Crochet Hats Tutorial: 5 Essential Tips for Success
Getting Started with Crochet Hats: The Basics
As we head into 2025, crocheting hats continues to be a versatile and rewarding craft for crafters of all skill levels!
Looking for a simple crochet hats tutorial? Here’s what you need to know:
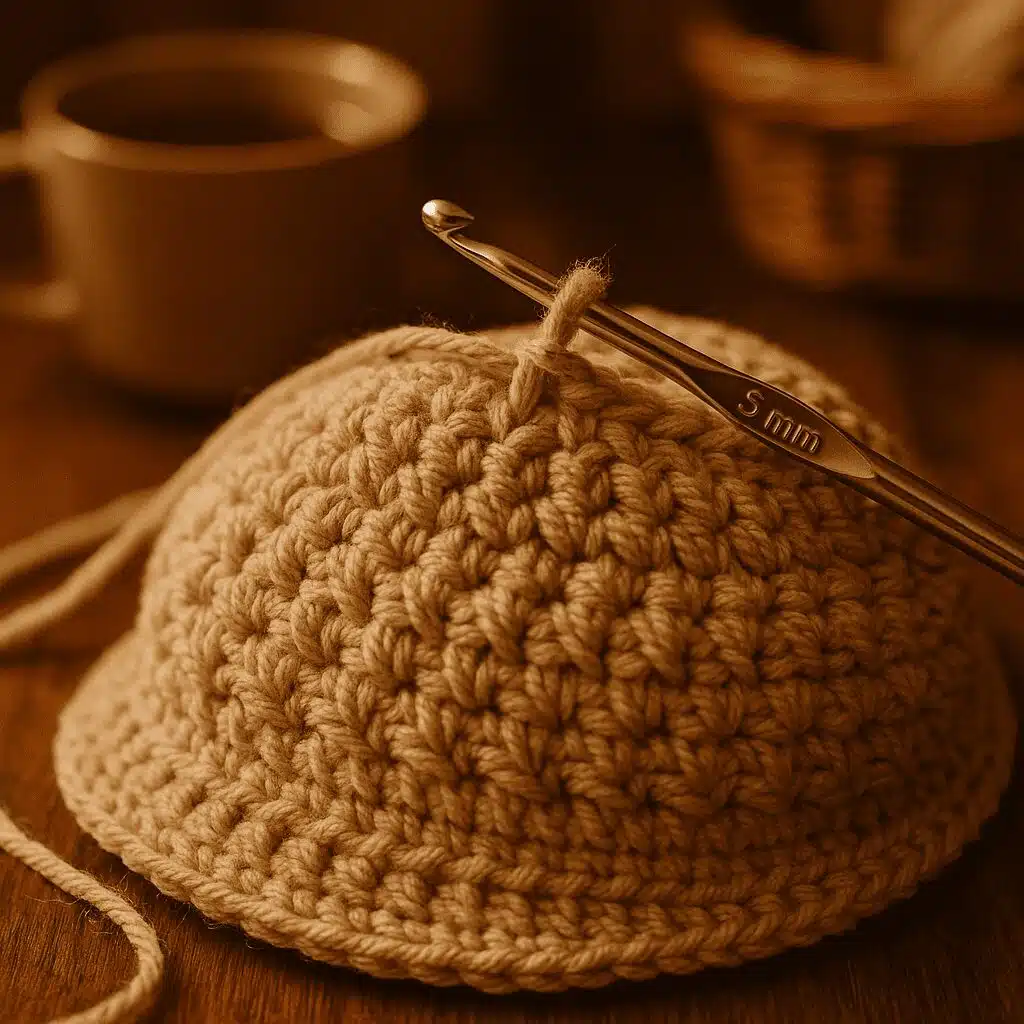
- Materials needed: Medium weight (#4) yarn and a 5mm (H) crochet hook for beginners
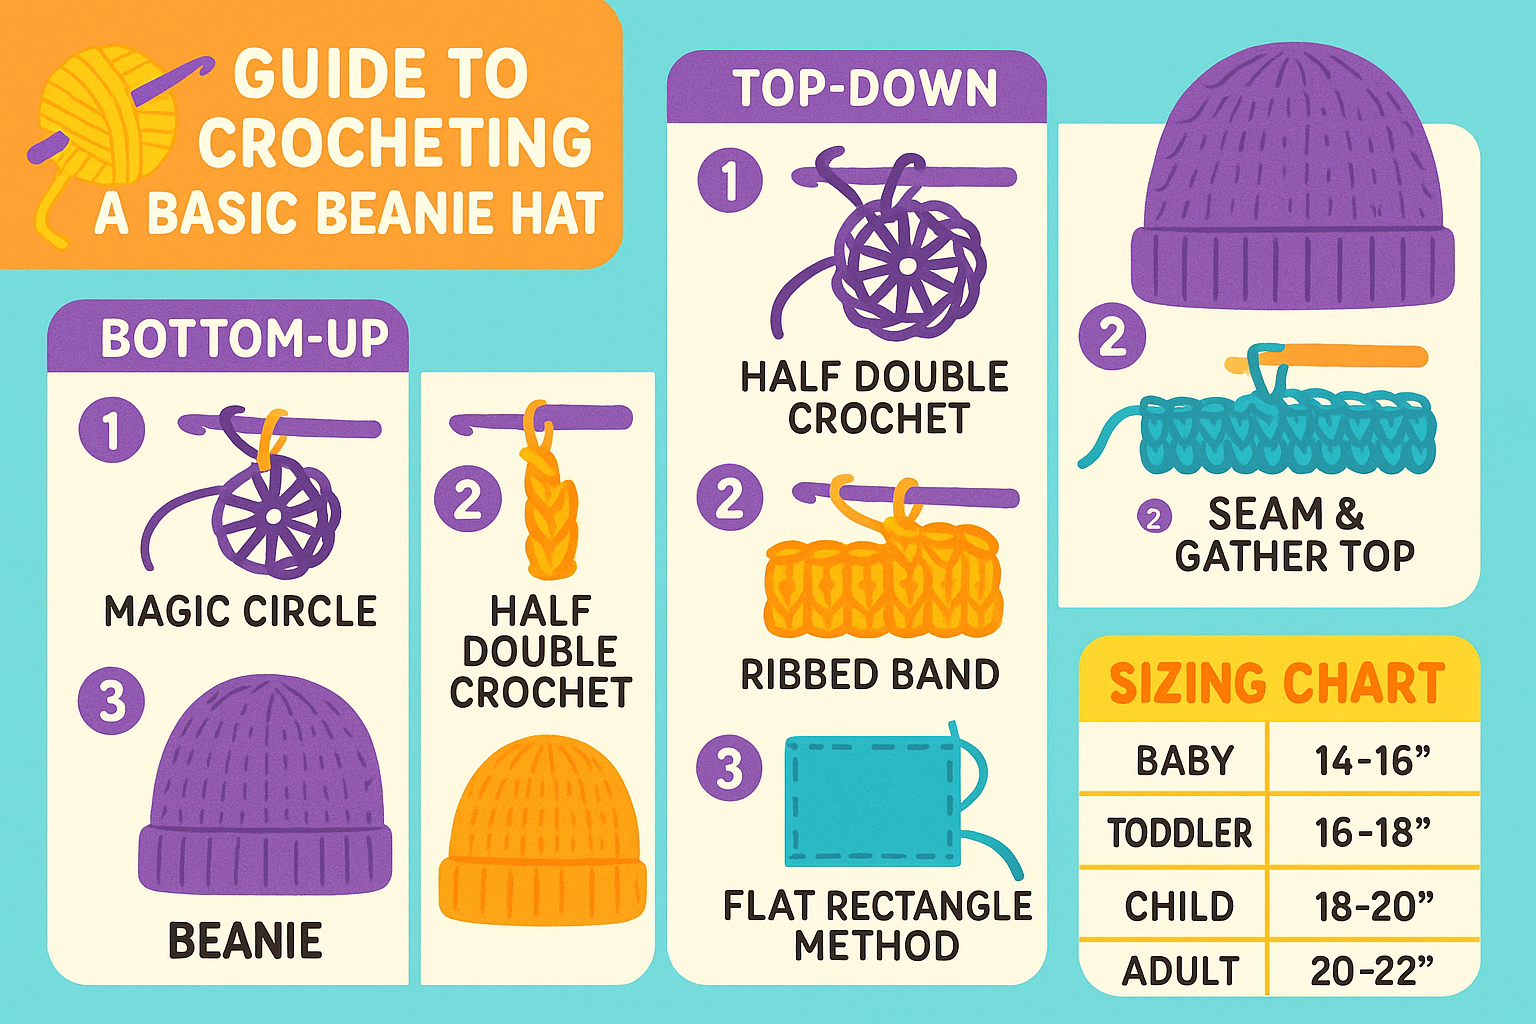
- Basic techniques: Magic circle to start, half double crochet for the main body
- Construction methods: Top-down (starting with a circle), bottom-up (starting with a band), or flat (seamed rectangle)
- Time requirement: 1-2 hours for a basic adult beanie
A crochet hats tutorial is the perfect starting point for beginners looking to create practical, wearable items. Hats are quick projects that use minimal yarn while teaching essential techniques like working in the round and creating textures. Whether you’re looking to make a simple beanie, a textured cap, or a stylish bucket hat, learning the fundamentals will set you up for success.
One of the best things about crocheting hats is their versatility. As shared in many tutorials, you can create warm winter beanies with bulky yarn or lightweight summer caps with cotton – all using the same basic techniques. The Ribbed Wonder Easy Crochet Hat pattern, which has been shared over 90,900 times on Pinterest, demonstrates how even beginners can create professional-looking hats with minimal experience.
“I’ve been crocheting for decades. And I SERIOUSLY did NOT grasp this concept until recently,” says Cheryl Bennett about the simple rectangle method for creating ribbed hats – proving that sometimes the simplest techniques can be the most effective.
I’m Sonji Huerta, a newcomer to crochet who recently found the joy of creating handmade items with yarn and a hook, and I’m eager to share my experiences with crochet hats tutorial projects as I learn alongside you.
Common crochet hats tutorial vocab:
– beginner crochet beanie tutorial
– chunky beanie crochet tutorial
Essential Materials and Techniques for Crochet Hats
Materials and Tools Needed
When I first started crocheting hats, I quickly learned that having the right supplies makes all the difference between frustration and fun! Before diving into your crochet hats tutorial, let’s make sure you’ve got everything you need for a smooth crafting experience.
Your most important supply is, of course, yarn! If you’re just starting out, I’d recommend grabbing some medium weight (#4) yarn – it’s the Goldilocks of yarn, not too thick or thin, perfect for learning. If you’re looking to make a super cozy winter hat, chunky (#5) or super bulky (#6) yarn will work up quickly and keep ears toasty warm. For summer hats or if wool makes you itch, cotton yarn is your best friend.
As for hooks, your choice will directly affect how tight your stitches are and how your finished hat fits. For most beginners, a size H/5.00mm hook works beautifully with medium weight yarn. If you’re using chunky yarn, size up to a J/6.00mm. And for those super bulky yarns, grab a K/6.50mm or larger.
Don’t worry about investing in expensive tools right away! A basic hook and affordable yarn will get you started just fine. As you fall deeper in love with crochet (and trust me, you will!), you might want to check out our guide on Best Yarn and Hook for Beginner Crochet or learn more about Crochet Hook Sizes: A Beginner’s Handbook.
A few other helpful items to have on hand: stitch markers (or even a safety pin in a pinch) to mark the beginning of rounds, a yarn needle for weaving in ends, scissors, and a tape measure. If you want to add that cute pom pom on top, a pom pom maker is handy but not essential – you can make them with just your fingers and some cardboard!
Choosing the Right Yarn and Hook Size
Selecting the perfect yarn and hook combo is like finding the right dance partners – they need to work well together for your crochet hats tutorial success. Let me walk you through your options!
#4 Worsted/Medium Weight yarn is my go-to recommendation for beginners. It’s versatile, widely available, and creates hats with a nice balance of warmth and drape. If you’re looking to finish your hat in one evening, #5 Bulky Weight works up much faster and creates wonderfully warm hats with beautiful stitch definition. The popular Ribbed Wonder Easy Crochet Hat pattern uses just 4.25 oz of bulky yarn – that’s efficient! For super quick projects that will keep you extra toasty, #6 Super Bulky yarn is amazing, though the finished hat will be thicker.

When it comes to fiber types, each has its personality. Acrylic is budget-friendly, comes in every color imaginable, and you can just toss it in the washing machine – perfect for beginners or charity projects. Cotton is breathable and ideal for summer hats or people with wool allergies, though it doesn’t have as much stretch. Wool provides wonderful warmth and natural elasticity, but might be scratchy for some – look for “superwash” wool if you want easier care. Blends give you the best of multiple worlds, like wool/acrylic blends that offer warmth but are still machine washable.
For matching your yarn to hook size, here’s a simple guide: #4 yarn pairs well with 4.5mm-5.5mm hooks, #5 yarn likes 5.5mm-8mm hooks, and #6 yarn works best with 8mm-12mm hooks. Always check your yarn label for recommended hook sizes, but don’t be afraid to experiment! Going up a hook size creates looser, drapier fabric, while sizing down makes a denser, warmer hat.
The Crochet Bucket Hat pattern only requires 80 grams of medium weight yarn, showing that even with regular yarn, you can create stylish, structural pieces that look professional.
Essential Crochet Techniques
Now for the fun part – the techniques that will bring your crochet hats tutorial to life! Mastering these fundamental methods will open up a world of hat-making possibilities.
Let’s talk about ribbing first – that stretchy, textured edge that hugs your head just right. The simplest way to create ribbing is by working in the Back Loop Only (BLO) of each stitch. This creates that lovely ridged texture you see in the viral Ribbed Wonder Easy Crochet Hat. Once you’re more comfortable, you might want to try Front Post/Back Post stitches for more pronounced ribbing.
Most hats are worked in the round, and you have two main approaches. With joined rounds, you complete each round with a slip stitch and chain to start the next one. This creates a visible “seam” but helps keep your stitch count accurate. Continuous spiral rounds flow without joining, creating a seamless look, but you’ll definitely need a stitch marker to track where each round begins.
The magic circle technique is a game-changer for starting top-down hats. It creates a tight center with no hole, which is perfect for keeping cold air out! You simply create a loop with your yarn, crochet the specified number of stitches into it, then pull the tail to close the circle completely. It’s a bit tricky at first but so worth mastering.
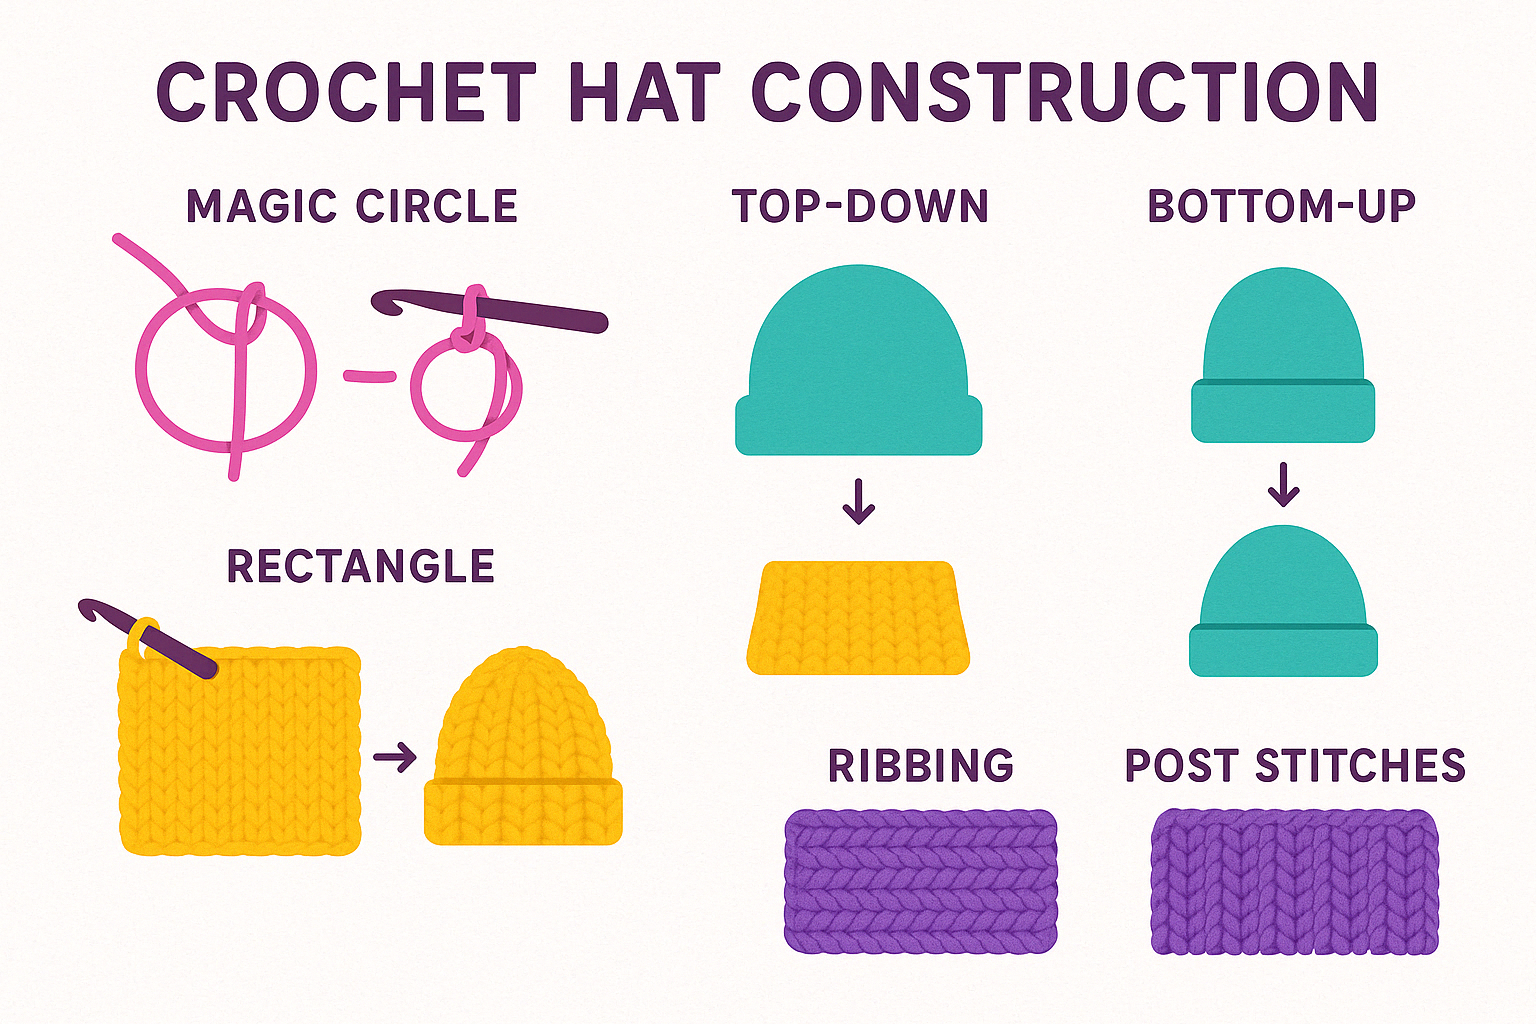
If working in the round intimidates you, the rectangle method is a wonderful alternative. You simply crochet a rectangle (often with ribbing), fold it in half, seam the sides, and then gather or seam the top. Voilà – a hat with minimal fuss!
When it comes to overall construction, you have three main approaches:
– Top-down: Start at the crown with a magic circle, increase until reaching the desired circumference, then work even for the sides.
– Bottom-up: Begin with a band that fits around the head, join to work in the round upward, then decrease to close the top.
– Flat method: Create a rectangle and seam it into a hat shape.
I love what Cheryl Bennett shared: “I’ve been crocheting for decades. And I SERIOUSLY did NOT grasp this concept until recently.” Her honest admission about finally understanding how to work in the back loop for ribbing reminds us that we’re all learning, no matter how long we’ve been crocheting!
Crochet Hats Tutorial: Step-by-Step Guide
Now that we’ve covered the basics, let’s put it all together with a simple crochet hats tutorial that combines these elements. This basic beanie uses the top-down method with a magic circle start – perfect for beginners who want to learn the fundamentals.
We’ll start with a magic circle, which might feel a bit like performing a magic trick the first time! Form a loop with your yarn, chain 2 (this counts as your first half double crochet), and work 9 more hdc into the magic circle for a total of 10 stitches. Pull the tail to close the circle completely, and place a stitch marker in that last stitch.
Next come the increase rounds, which create the flat crown of your hat. In round 2, you’ll work 2 hdc in each stitch around (giving you 20 stitches). For round 3, alternate 1 hdc in the first stitch and 2 hdc in the next stitch all the way around (30 stitches). Continue this pattern of increasing for rounds 4-6, working more stitches between increases each time, until you have about 60 stitches.
Once your crown is the right size (about 7-8 inches across for an adult), you’ll work even rounds for height – simply work 1 hdc in each stitch around for rounds 7-20, or until your hat reaches your desired length. Remember to move your stitch marker up at the end of each round!
If you want to add a ribbed brim (which looks so professional!), switch to working in back loops only for the last 1-2 inches. This creates that stretchy, comfortable edge that hugs your head.
To finish, slip stitch to the first stitch of the round, cut your yarn leaving a tail, pull through the loop, and weave in those ends. Congratulations – you’ve just made a hat!
This basic pattern is incredibly versatile – you can adjust the number of increase rounds for different sizes, change your stitch pattern, or add colorwork. For more detailed instructions, check out our Beginner Crochet Beanie Tutorial.
Your first hat might not be perfect (mine certainly wasn’t!), but each project improves your skills. Before you know it, you’ll be whipping up hats for everyone you know!
Adjusting Your Crochet Hat for the Perfect Fit
Have you ever spent hours on a crochet hats tutorial only to find the finished hat doesn’t quite fit right? I’ve been there too! Getting the perfect fit is one of those skills that makes all the difference between a hat that sits in the drawer and one that becomes a favorite. Let’s talk about how to nail that perfect fit every time.
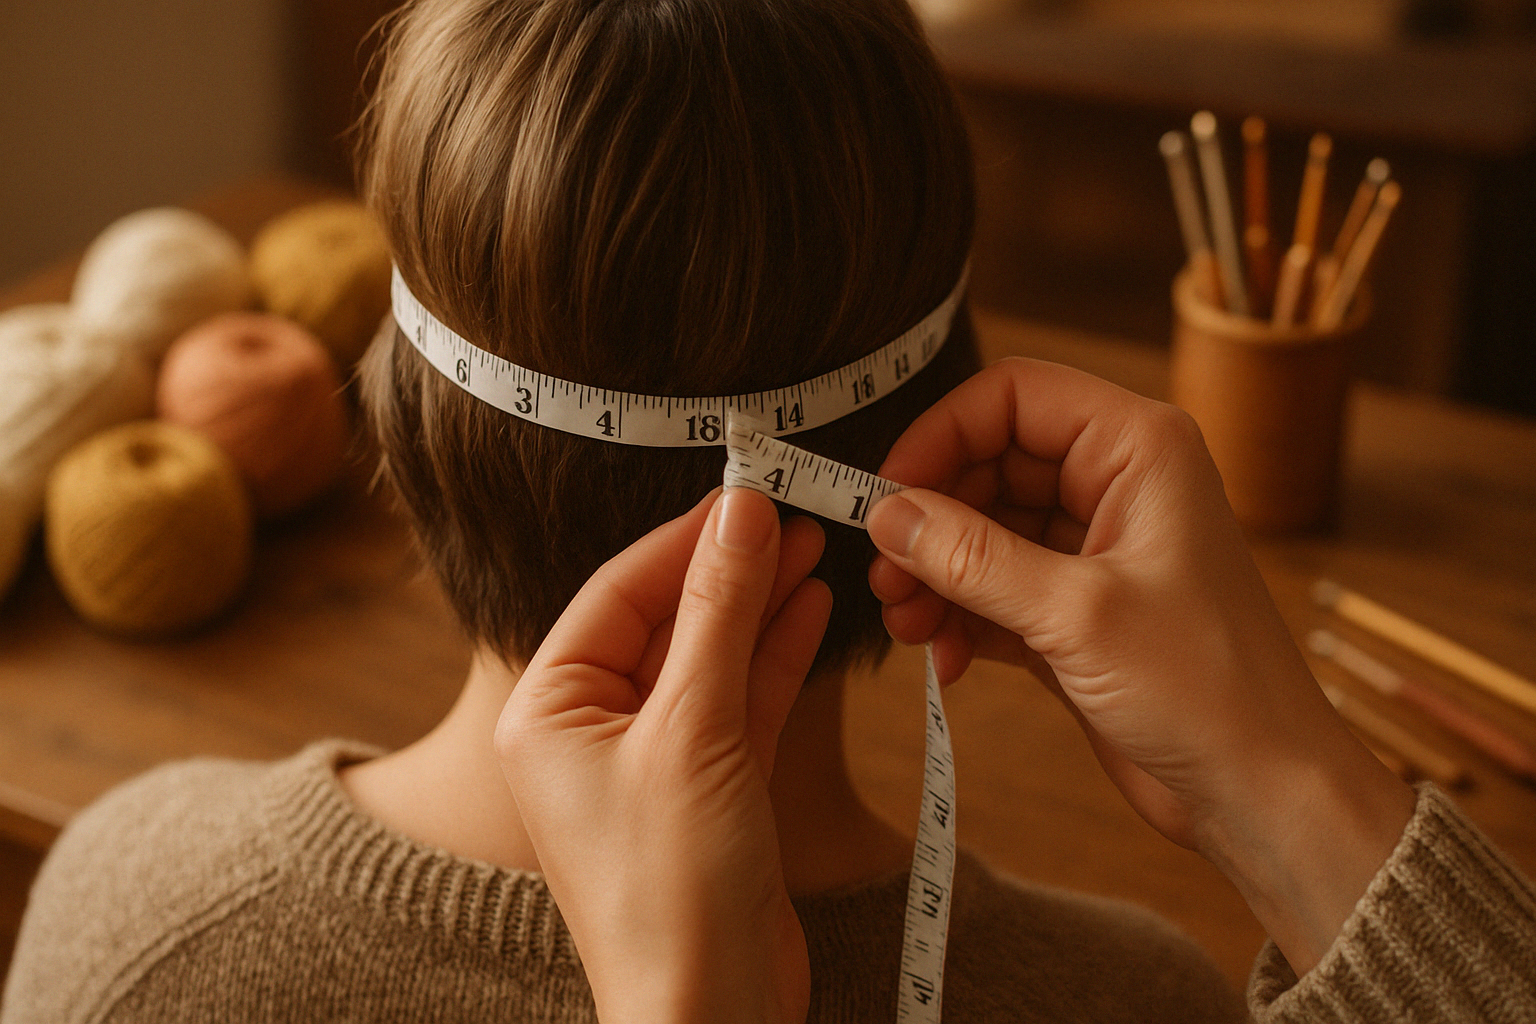
Measuring for the Perfect Fit
Before you even pick up your hook, grab a measuring tape. The most important measurement for any hat is the head circumference. Simply wrap your measuring tape around the head, just above the ears and eyebrows.
For adults, this typically measures between 21-23 inches. Children’s heads usually fall in the 18-20 inch range, while toddlers are around 16-18 inches. If you’re making a baby hat, aim for 14-16 inches.
Don’t forget about height! Measure from the crown of the head down to where you want the hat to end. Most adult hats are about 8-10 inches tall. Want a trendy slouchy style? Add an extra 1-2 inches to your height measurement.
Understanding and Calculating Gauge
I used to skip gauge swatches (who has the time, right?), but trust me – those few minutes can save you hours of frustration! Gauge is simply how many stitches and rows fit in one inch of your crocheted fabric.
To make a gauge swatch, use your chosen yarn and hook to crochet a 4×4 inch square. Count the stitches across and rows down, then compare with what your pattern requires.
If you have more stitches per inch than the pattern calls for, your hat will end up too small – try going up a hook size. Fewer stitches per inch means your hat will be too big, so try a smaller hook. It’s like Goldilocks – you’re looking for just right!
Adapting Patterns for Different Sizes
The beauty of understanding hat construction is that you can easily modify patterns to fit anyone.
For top-down hats (the ones that start with a magic circle), it’s all about controlling those increase rounds. Each increase round typically adds 10-12 stitches to your circumference. Need a smaller hat? Do fewer increase rounds. Need it larger? Add more increases before working even.
If you’re making a bottom-up hat (starting with the brim), adjust your starting chain length. For the popular Ribbed Wonder Easy Crochet Hat, you’d chain 37 for an adult size (21-23″ head), 32 for a child (18-20″ head), or 28 for a toddler (16-18″ head).
Working with the rectangle method? Simply adjust the rectangle’s width (which determines hat height) and length (slightly less than the head circumference).
When it comes to stitch count adjustments, here’s a handy rule of thumb: for every inch of circumference, add approximately 3-4 half double crochet stitches. For height, add about 6-7 rows of hdc per inch.
Yarn has natural stretch, especially when worked in stitches like half double crochet or in ribbing. It’s usually better for a hat to be slightly snug rather than too loose – a too-large hat will constantly slip down over the eyes, while a slightly tight hat will gently stretch to fit just right.
With these adjustments in your crafting toolkit, you’ll be able to customize any crochet hats tutorial to fit perfectly. Whether you’re making hats for family members with different head sizes or adapting your favorite pattern for a charity project, getting the fit right makes all the difference in creating wearable, comfortable hats that people will actually use!
Common Mistakes in Crocheting Hats and How to Fix Them
Let’s be honest – even with the best crochet hats tutorial in hand, we all make mistakes! I’ve certainly had my share of wonky hats that looked nothing like the pattern photos. The good news? Every crochet mishap has a solution, and learning to fix these issues will make you a better crafter.
One crafter confessed about her first attempt: “My first hat turned out so bad because I used a hook that was too big. lol.” This common mistake reminds us that something as simple as hook size can completely transform your finished project.
Let’s look at the most common hat-making blunders and how to solve them:
| Mistake | Cause | Solution |
|---|---|---|
| Hat is too small | Tight tension, incorrect gauge, not enough increases | Make a gauge swatch before starting, use a larger hook, add more increase rounds |
| Hat is too large | Loose tension, incorrect gauge, too many increases | Make a gauge swatch, use a smaller hook, reduce number of increase rounds |
| Hole at the top of the hat | Magic circle not pulled tight enough | Pull the tail firmly to close the circle completely, weave in the end securely |
| Hat is cone-shaped | Not enough increases | Follow the pattern’s increase schedule carefully, check your stitch count at the end of each round |
| Hat is wavy or ruffled | Too many increases | Reduce the number of increases, make sure you’re not accidentally adding stitches |
| Uneven stitches | Inconsistent tension | Practice maintaining even tension, consider using a different hold on your yarn |
| Lost track of rounds | Not using a stitch marker | Always use a stitch marker to mark the beginning of each round |
| Seam is visible in joined rounds | The joining creates a visible “step” | Consider working in continuous spiral instead of joined rounds |
| Brim is too tight | Not enough give in the ribbing | Work ribbing more loosely, add more stitches to the brim, use a larger hook for the brim only |
| Hat stretches out with wear | Wrong yarn choice | Choose yarn with better recovery (wool blends work well), add elastic thread to the brim |
The sizing issues are probably the most heartbreaking – spending hours on a hat only to find it’s way too small or comically large. That’s why I always recommend making a gauge swatch before diving in. Yes, I know it feels like wasted time when you’re eager to start your project, but those 15 minutes can save you hours of frustration later!
Tension troubles are another common culprit. If you’re a beginner, you might crochet much tighter when you’re concentrating hard on a new stitch pattern. As you relax and get into the flow, your stitches might loosen up. This inconsistency can make your hat look uneven. The fix? Practice, practice, practice – and be mindful of how tightly you’re holding your yarn.
If you’ve finded your magic circle has a hole at the top of your hat, don’t panic! Before weaving in that end, thread it onto a yarn needle and use it to cinch the circle even tighter. Then secure it with a few extra stitches before weaving in the end.
The cone-shaped hat dilemma happens when you haven’t increased enough stitches to create a flat circle for the crown. Your crochet hats tutorial should specify exactly how many increases to make in each round. If you’re still ending up with a pointy hat, you might need to add an extra increase round for your head size.
On the flip side, wavy or ruffled hats happen when you’ve increased too much. The extra stitches have nowhere to go but to create waves and ruffles. Sometimes this is a design feature, but if it’s not what you intended, you’ll need to reduce your increases.
Lost track of rounds? We’ve all been there! A stitch marker is your best friend when crocheting in the round. I like to use a safety pin or even a small piece of contrasting yarn if I don’t have a proper stitch marker handy.
The good news is that many mistakes can be fixed without starting over:
For minor stitch count errors, you can often adjust in the next round by adding or skipping a stitch. Nobody will notice one small correction, I promise!
If you’ve made a hat that’s too short, simply add extra rounds at the bottom, or create a folded brim for extra warmth. Too long? Fold the brim up for a stylish double-thickness edge.
For wobbly, uneven stitches, blocking can be your secret weapon. Wet the finished hat, shape it on a balloon or bowl that’s the right size for your head, and let it dry completely. You’ll be amazed at how much neater it looks!
Every mistake is just a learning opportunity. The more hats you crochet, the fewer mistakes you’ll make – and the better you’ll get at spotting and fixing them when they do happen. Happy crocheting!
Personalizing and Finishing Your Crochet Hat
Adding Personal Touches
Once you’ve mastered the basics from your crochet hats tutorial, it’s time for the fun part – making your hat uniquely yours! After all, that’s the beauty of handmade items, right?
When I first started crocheting hats, I stuck to the basics. But soon I finded that adding a simple pom pom completely transformed my plain beanie into something special! Pom poms are surprisingly easy to make – just wrap yarn around a piece of cardboard (or use a pom pom maker if you want to get fancy), tie it in the middle, cut the loops, and fluff. Attach it securely with a yarn needle using the same yarn as your hat. Here’s a handy tip: consider making your pom pom removable by attaching it with a button so you can take it off when washing your hat.
Color is another wonderful way to personalize your work. You might try simple stripes by changing colors at the beginning of rounds, or go bold with color blocks where entire sections showcase different colors. If you’re feeling adventurous, try carrying multiple colors to create patterns or use gradient yarns for a beautiful ombre effect that does the color transitioning for you.
Embellishments can take your hat from nice to wow! Buttons add both function and style – I’ve seen gorgeous hats with buttons lined along the brim or used as focal points. Crocheted appliqués like flowers, leaves, or even tiny animals can be sewn onto your finished hat. Some crafters even attach fabric patches for a mixed-media approach or sew on beads for a touch of sparkle.
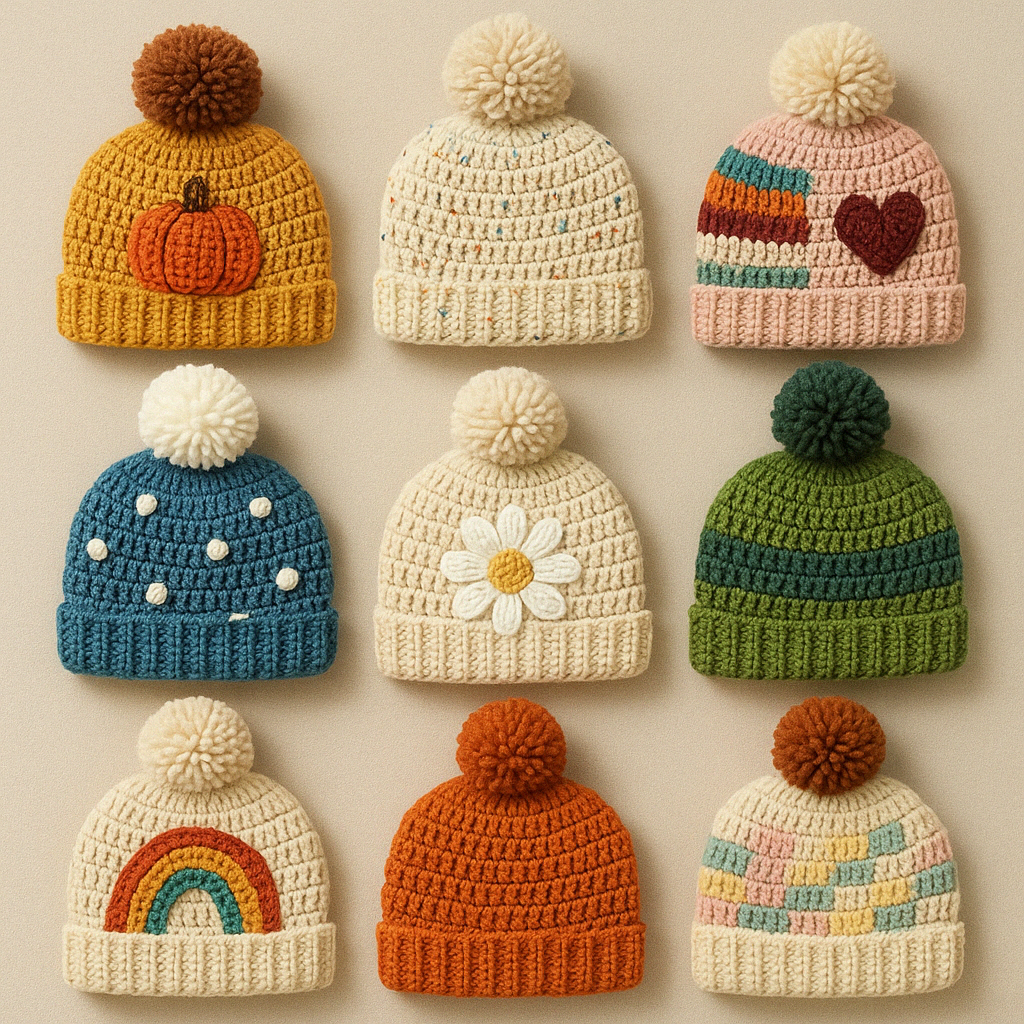
Don’t forget about stitch variations! Your hat doesn’t have to be all single or double crochet. Try incorporating textured stitches like bobbles or puff stitches for dimension, or experiment with lace patterns for warmer weather hats. Post stitches can create beautiful cable-like effects, and surface crochet lets you add designs on top of your completed work.
The popular Crochet Bucket Hat pattern (shared nearly 2,000 times on Pinterest!) is a perfect example of a simple base that invites personalization. One creative crafter even added a brown arrow to make her hat resemble Appa from a popular animated series! As one designer noted, “This crochet bucket hat is the perfect first crochet project!” not just because it’s easy to make, but because it’s such a wonderful canvas for your personal style.
Seaming and Finishing: A Crochet Hats Tutorial
The finishing touches on your crochet hats tutorial project can make all the difference between “homemade” and “handcrafted.” Let’s talk about how to give your hat that professional polish!
If you’ve made a hat using the flat rectangle method (like the popular Ribbed Wonder Easy Crochet Hat), you’ll need to seam it together. The whip stitch is straightforward – just place the edges side by side, insert your needle under both loops of the first stitch on both pieces, pull yarn through, and repeat. It creates a visible seam that can actually become part of your design.
For a more invisible finish, try the mattress stitch. Place your edges side by side and work from bottom to top, weaving your needle under the bars between stitches. When done correctly and pulled tight, this seam practically disappears! This technique works beautifully on the Ribbed Wonder Hat.
Some crafters prefer the slip stitch seam, which creates a nice ridge that can serve as a decorative element. Simply hold the edges together, insert your hook through both layers, pull yarn through both layers and through the loop on your hook. It’s like crocheting the pieces together!
For the specific case of the Ribbed Wonder Hat, after crocheting your rectangle, you’ll join the starting row to the finishing row by slip stitching both sides together. Then you’ll cinch the top by working a running stitch to gather and close the opening.
Weaving in ends is nobody’s favorite part, but doing it well makes your hat look much more professional. Thread each tail onto a yarn needle and weave through the wrong side of your work, changing directions at least once (this helps prevent the end from working its way out). For extra security, especially with slippery yarns, weave through the same area twice before trimming the excess close to your work.
Blocking can lift your hat from good to great by evening out stitches and improving the overall shape. For wet blocking, soak your hat in water, gently squeeze out the excess, and shape it on a form to dry. If you’re in a hurry, try steam blocking by using a steamer or holding an iron near (but not touching!) your hat to apply steam, then shape it.
For extra comfort or warmth, consider adding a lining. Cut fabric slightly smaller than your hat, fold under and hem the bottom edge, then hand-sew it to the inside of your hat with small stitches. This is especially nice for winter hats or if the person wearing it has sensitive skin.
Want more detailed instructions on these finishing techniques? Our Beginner Crochet Beanie Tutorial breaks it all down step by step.
The care you put into finishing your hat shows in the final product. These little details might take a few extra minutes, but they’ll make your creation something you’re truly proud to wear or gift!
Popular Crochet Hat Patterns and Seasonal Adaptations
Now that you’ve mastered the basics of a crochet hats tutorial, let’s explore some beloved patterns that crocheters of all skill levels can enjoy. From quick weekend projects to more intricate designs, there’s a hat pattern perfect for every season and occasion!
Beginner-Friendly Patterns
The world of crochet hats offers plenty of accessible options for newcomers. The Basic Beanie is the quintessential starter project—simple, straightforward, and satisfying. Whether worked top-down or bottom-up, this classic style typically takes just 1-2 hours to complete and works beautifully with virtually any yarn weight. It’s the perfect confidence builder for beginners!
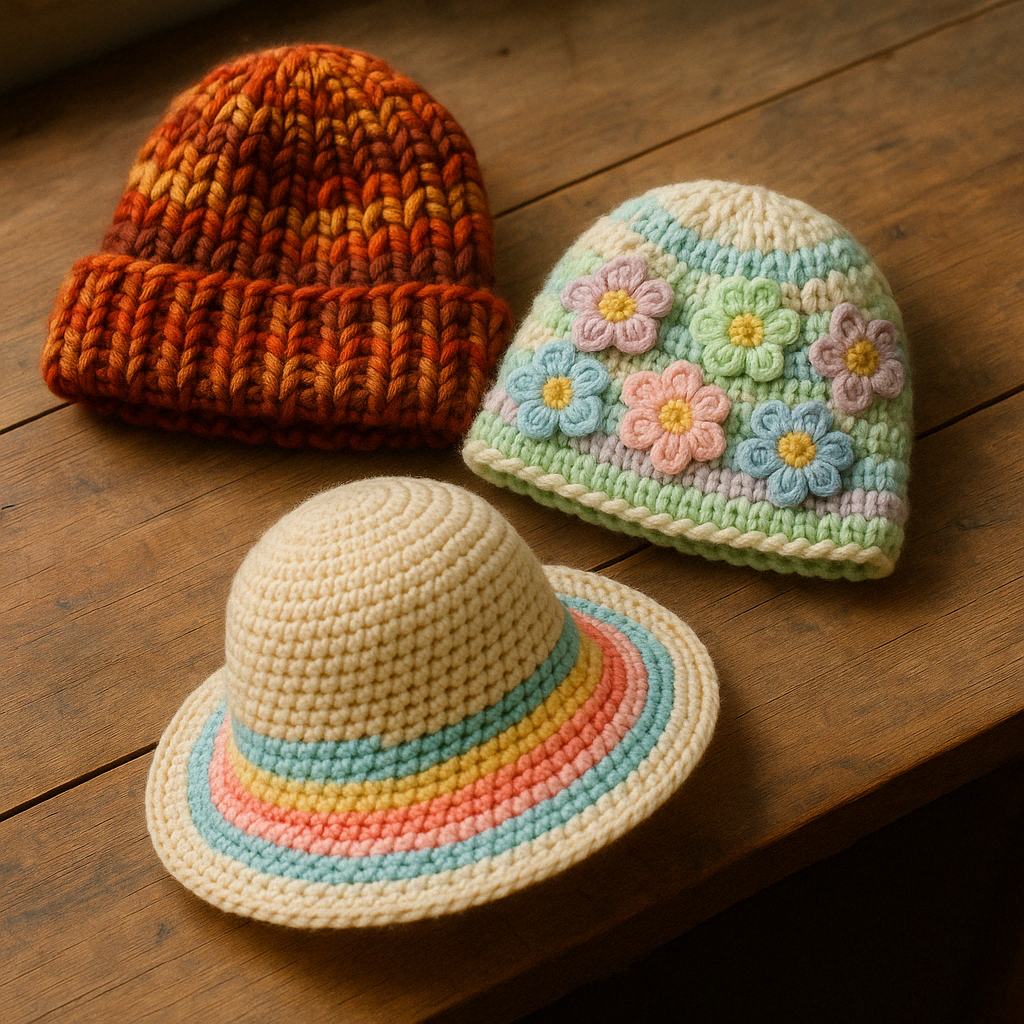
If you’re looking for something with a bit more texture, the Ribbed Wonder Easy Crochet Hat might be your new best friend. This pattern has taken Pinterest by storm with over 90,900 shares—and for good reason! Using a rectangle worked in back loop half double crochet, this clever design creates beautiful ribbing that fits adult heads 21-23 inches around. You’ll only need about 4.25 oz of #5 Bulky weight yarn, making it economical as well as stylish.
For those embracing current trends, the Simple Bucket Hat offers surprising simplicity with maximum style points. Requiring just 80 grams of #4 medium weight yarn, this pattern works from the top down with straightforward increases. The best part? You can customize the brim width to suit your style or sun protection needs.
Intermediate Patterns
Ready to level up? Textured Beanies incorporate simple yet striking stitch patterns like moss stitch or basket weave, adding visual interest without overwhelming complexity. These patterns help you practice stitch variations while creating something uniquely beautiful.
Slouchy Hats offer a relaxed, casual vibe perfect for everyday wear. Similar to beanies but with extra length for that fashionable drape, they’re ideal for bad hair days or just adding a touch of effortless style to your outfit.
The Crochet Slouchy Peak Cap combines the best of both worlds—a unique stitch pattern creates wonderful texture, while the rounded top design with a visor adds practical sun protection with a dash of vintage charm.
Advanced Patterns
For experienced crocheters seeking a challenge, Cabled Hats use post stitches to create stunning cable-like textures that mimic knitting. These impressive designs often become conversation starters and showcase your developing skills.
Color Work Hats incorporate multiple yarns in patterns or pictures, allowing for endless creativity. From simple stripes to complex fair isle designs, these projects help you master color changes and carrying yarn.
Specialized Shapes take hat-making to artistic levels. Whether adding animal ears, character designs, or complex structural elements, these advanced patterns transform a simple hat into wearable art.
Seasonal Adaptations
Your crochet skills can keep heads comfortable year-round with some thoughtful adjustments. For Winter Hats, accept chunky (#5) or super bulky (#6) yarns for maximum warmth. Consider adding a fleece lining for extra insulation in bitter weather, and don’t forget double-thick brims to protect sensitive ears from icy winds. Our Chunky Beanie Crochet Tutorial offers the perfect starting point for creating these cozy cold-weather essentials.
When spring and fall arrive with their changeable temperatures, medium weight (#4) yarn provides just the right amount of warmth. Spring/Fall Hats benefit from slightly looser stitches for breathability, and slouchy styles give you the flexibility to adjust as needed throughout the day. The popular Ribbed Wonder Easy Crochet Hat transitions beautifully through these in-between seasons.
Summer Hats call for different considerations entirely. Cotton or bamboo yarns offer much-needed breathability, while lighter weight (#2 or #3) yarns prevent overheating. Incorporating mesh or lace stitches creates natural airflow, and wider brims provide essential sun protection. Bucket hat styles are particularly perfect for beach days, offering 360-degree shade while showcasing your crochet skills.
“For me, there is no greater blessing than to make nice items for those who can never repay the kindness,” shares one crocheter who makes hats for charity. This beautiful sentiment reminds us that hat-making extends beyond personal enjoyment—it can warm both heads and hearts in our communities.
If you’re feeling inspired to crochet for charity, keep these thoughtful considerations in mind: opt for washable yarns like acrylic or superwash wool for durability and easy care; choose solid colors that show textured stitches beautifully; minimize embellishments that might complicate laundering; and focus on creating warm, comfortable pieces that will stand up to regular wear.
Whether you’re crafting for yourself, loved ones, or strangers in need, the versatility of crochet hats makes them a rewarding project in any season. With just a few adjustments to yarn weight, stitch pattern, and construction, your hook can create everything from cozy winter warmers to breezy summer shade-makers!
Frequently Asked Questions about Crocheting Hats
How do I choose the right crochet hook size for my hat?
When working on your crochet hats tutorial project, selecting the right hook can make all the difference between a perfect fit and a disappointing result.
Start by checking what the pattern recommends – this is usually your best first step since designers have tested their patterns with specific hook sizes. But remember, we all crochet differently! If you tend to create tight, firm stitches, you might need to size up your hook to match the pattern’s gauge. Conversely, if your stitches are naturally looser, try dropping down a hook size.
The yarn you’re using plays a crucial role too. For standard medium weight (#4) yarn, hooks in the 5mm-5.5mm range (H/8-I/9) typically work well. Chunky bulky weight (#5) yarns usually pair nicely with 6mm-6.5mm (J/10-K/10.5) hooks, while super bulky (#6) yarns need larger 8mm-9mm (L/11-M/13) hooks to handle their thickness.
Making a gauge swatch might seem like an extra step, but it’s truly the most reliable way to ensure your hat will fit as intended. Just crochet a small square, count your stitches per inch, and adjust your hook size until you match what the pattern calls for.
I still chuckle when I think about one crocheter who shared: “My first hat turned out so bad because I used a hook that was too big. lol.” We’ve all been there! Sometimes that small metal tool makes the biggest difference in your finished project.
Can I substitute a different yarn than the one recommended in the pattern?
Absolutely you can substitute yarns in your crochet hats tutorial project – it’s one of the joys of crochet! But a little knowledge goes a long way toward making successful swaps.
The most important factor is matching the weight category. If your pattern calls for a medium weight (#4) yarn, try to stick with another #4 for your substitution. This helps maintain the overall structure and size of the finished hat.
Different fibers create different effects, though. Wool provides warmth and natural stretch that’s perfect for winter hats. Acrylic offers washability and bright colors at budget-friendly prices. Cotton creates cool, structured hats but doesn’t have the same give as animal fibers. Blends can give you the best of multiple worlds – like the softness of alpaca with the durability of nylon.
Your gauge might change with a different yarn, even within the same weight category. That’s why making a quick gauge swatch with your substitute yarn is so important – it tells you if you need to adjust your hook size to get the right dimensions.
Consider the popular Ribbed Wonder Easy Crochet Hat pattern, which uses 4.25 oz of #5 Bulky weight yarn. If you wanted to use a #4 weight yarn instead, you’d likely need more stitches and rows to reach the same size hat. The fabric would also be a bit less bulky and potentially less warm, which might be perfect for a fall hat rather than a winter one.
Why doesn’t my hat fit correctly?
It’s frustrating when you follow a crochet hats tutorial carefully but end up with a hat that just doesn’t fit right. Let’s troubleshoot some common issues together.
If your hat turned out too small, your tension might be tighter than what the pattern designer used. Our hands all work differently! Try using a larger hook next time, or if you’re working top-down, add more increase rounds before working even. For rectangle-method hats like the Ribbed Wonder, simply make your starting chain longer.
Conversely, if your hat is swimming on your head, your tension is probably looser than the pattern’s gauge. Switching to a smaller hook often solves this issue. For top-down hats, try fewer increase rounds, and for rectangle hats, start with a shorter chain.
Height issues are equally common. A too-short hat might need additional rounds before finishing—don’t be afraid to deviate from the pattern if needed! For rectangle-method hats, making your rectangle wider creates a taller hat. If your hat ended up too tall, you can either frog (undo) back to your desired height or simply create a folded brim for a cozy double-thick edge.
That pointy, cone-shaped result usually means you didn’t include enough increase rounds. The hat needs to widen quickly enough to accommodate the curve of your head. And that pesky hole at the top? Simply pull your magic circle tail more firmly closed and weave it in securely.
Always measure before you start! The Ribbed Wonder Easy Crochet Hat pattern fits heads 21″–23″ around, but your recipient might need adjustments. I’ve learned the hard way that a few minutes spent measuring saves hours of frustration later.
Even experienced crocheters sometimes need to adjust and adapt. Each project teaches us something new about this wonderful craft!
Conclusion
Congratulations! You’ve made it through our complete crochet hats tutorial journey. From selecting the perfect yarn to adding those final personal touches, you now have all the knowledge needed to create beautiful, wearable hats that’ll impress friends and family alike.
Remember when we talked about that first magic circle? It might have seemed tricky at first, but like any new skill, crocheting hats gets easier with practice. Your first hat might not be perfect (mine certainly wasn’t!), but each project teaches you something valuable and builds your confidence.
The beauty of hat making lies in its versatility. Once you’ve mastered the basic techniques we’ve covered, you can adapt them endlessly. Want a warmer winter beanie? Grab some chunky yarn and a larger hook. Need a breathable summer hat? Switch to cotton and incorporate some lacy stitches. The possibilities are truly endless.
I love what one of our community members shared: “There is no greater blessing than to make nice items for those who can never repay the kindness.” This captures the heart of what makes crocheting so special. Whether you’re making hats for loved ones, donating them to charity, or creating them for yourself, each stitch represents care and creativity.
Don’t be afraid to experiment beyond the patterns we’ve discussed. Try combining different stitches, playing with color work, or adding unique embellishments. Some of the most beautiful designs come from happy accidents and bold experimentation. And if something goes wrong? Well, that’s what frogging is for (that’s crochet-speak for solveing your work to start again).
At Crochet Craze, we believe everyone can learn to crochet, no matter your age or previous crafting experience. We hope this crochet hats tutorial has sparked your enthusiasm and given you the confidence to pick up those hooks and start creating. There’s something incredibly satisfying about wearing a hat you made with your own two hands!
For more inspiration and guidance, check out our Crochet Patterns Tutorial Video and browse our collection of patterns. We’d love to see what you create – many beginners find that sharing their projects, even the imperfect ones, helps them connect with a supportive community of fellow crafters.
Happy crocheting, friends! May your yarn never tangle and your tension stay just right. We can’t wait to see the amazing hats you’ll create.