
crochet for beginners granny square step by step: 7 Powerful Tips for Success 2025
Why Granny Squares Are the Perfect Starting Point for Beginners
Have you ever picked up a crochet hook and felt completely lost? Don’t worry – we’ve all been there! That’s why I’m so excited to share why the humble granny square is truly the perfect first project for anyone diving into the wonderful world of crochet.
Crochet for beginners granny square step by step is more than just a tutorial – it’s your gateway to a creative journey that generations of crafters have traveled before you. Think of the granny square as the friendly neighbor of crochet patterns – approachable, forgiving, and always happy to see you!
The beauty of starting with granny squares lies in their simplicity. You’ll only need to master three basic stitches: chain, slip stitch, and double crochet. Rather than feeling overwhelmed by complex patterns with dozens of different techniques, you can focus on getting comfortable with your hook and yarn through these foundational movements.
What I love most about teaching beginners with granny squares is watching that moment of clarity when the pattern clicks. Unlike other crochet projects where it’s easy to lose your place, granny squares have clear visual markers – those chain spaces practically shout “put your hook here next!” This built-in guidance system helps new crocheters build confidence with every round.
Portability is another huge advantage. Your granny square practice can happen anywhere – waiting rooms, coffee shops, or cozied up on your couch. Just tuck a hook and small yarn ball in your bag, and you’ve got a crafting session ready to go whenever inspiration strikes!
For the budget-conscious crafter (and who isn’t these days?), granny squares are incredibly economical. Each square only requires about 20-30g of yarn, allowing you to experiment with colors and techniques without breaking the bank. Those partial skeins and leftover yarn from other projects? They’ve finally found their purpose!
Once you’ve mastered the basic technique, the creative possibilities expand exponentially. Join your squares to create blankets, bags, scarves, or even fashionable garments. Have you seen those trendy granny square bucket hats and vests taking over social media? Those started with the exact same simple squares you’ll be making!
I’m Sonji Huerta, a fellow crocheter who distinctly remembers the joy of completing my first wobbly granny square. Now I’m passionate about helping others find the satisfaction of this craft through crochet for beginners granny square step by step techniques. Together, we’ll tackle common challenges like maintaining consistent tension and creating squares that are actually square (harder than it sounds, trust me!).
Ready to expand your crochet knowledge? These resources will help deepen your skills:
– crochet crafts for beginners
– crochet yarn for beginners
– christmas crochet projects for beginners
What Is a Granny Square & Why It’s Perfect for New Crocheters
Have you ever wondered why so many crocheters start with granny squares? This beloved motif has been warming hearts and homes for generations. Grandmothers traditionally created these squares using leftover yarn scraps—a thrifty approach that turned odds and ends into beautiful heirlooms. That’s actually how they got their charming name!
The classic granny square design features clusters of double crochet stitches (usually three worked together) with chain spaces between them, creating that distinctive lacy pattern that grows outward like a blooming flower. It’s no wonder these little squares have captured the imagination of crafters worldwide—crochet for beginners granny square step by step tutorials regularly reach over 2 million views on YouTube, with single guides often being shared more than 12,000 times online!
“Be warned, however… My grandmother taught me, and she taught herself, and some of the methods may not be textbook, but they do work,” one of our community members shared. I love this reminder that crochet is as much about personal connection as it is about technique. Your granny squares might develop their own unique character—and that’s perfectly wonderful!
The Anatomy of a Classic Granny
Think of your granny square as having five key parts working together in harmony:
Your journey begins with the center ring—your square’s foundation—created either with chain stitches or a magic circle (don’t worry, we’ll cover both methods!). From there, you’ll work 3-DC clusters, those groups of three double crochet stitches that give granny squares their distinctive texture.
Between your clusters, you’ll create chain spaces—little breathing room that gives your square its lacy appearance. The corner chains (usually 2-3 chains) are especially important, as they help maintain that perfect square shape we’re aiming for. As you work rounds outward from the center, your square grows larger while maintaining the same beautiful pattern.
Benefits for Absolute Beginners
If you’re just getting started with crochet, granny squares offer so many wonderful advantages that make them the perfect first project.
Fast progress is perhaps the most immediately satisfying aspect—a basic 4-round square takes only 6-7 minutes once you get the hang of it. Nothing beats that feeling of completion when you’ve finished your very first square!
The visible spaces in granny squares are like built-in road maps for your hook. Unlike some crochet patterns where finding the next stitch feels like a treasure hunt, these clear spaces make it obvious where to go next.
You’ll only need to master minimal stitches to create beautiful squares—just chain, slip stitch, and double crochet. This simplicity helps build your confidence without overwhelming you with too many techniques at once.
Each square uses just 20-30g of yarn, making them a low cost way to practice and experiment. As one crafter in our community noted, “Granny squares are my favorite thing to make when I have bits of yarn leftover”—they’re perfect for using up those small balls of yarn that seem too tiny for other projects.
The portable project aspect shouldn’t be underestimated either. You can tuck a hook, small ball of yarn, and in-progress square into your bag and work on it anywhere—waiting rooms, commutes, or while catching up on your favorite show.
Perhaps most importantly, granny squares are a wonderful confidence builder. The repetitive nature helps build muscle memory, and completing each small square gives you that boost of accomplishment that keeps you coming back for more. Before you know it, you’ll have a collection of squares ready to join into something spectacular!
So grab your hook and let’s dive into this timeless technique together—your crochet journey is about to get wonderfully square!
Gathering Your Crochet Toolkit
Before diving into your first granny square, let’s make sure you have all the essential tools ready:
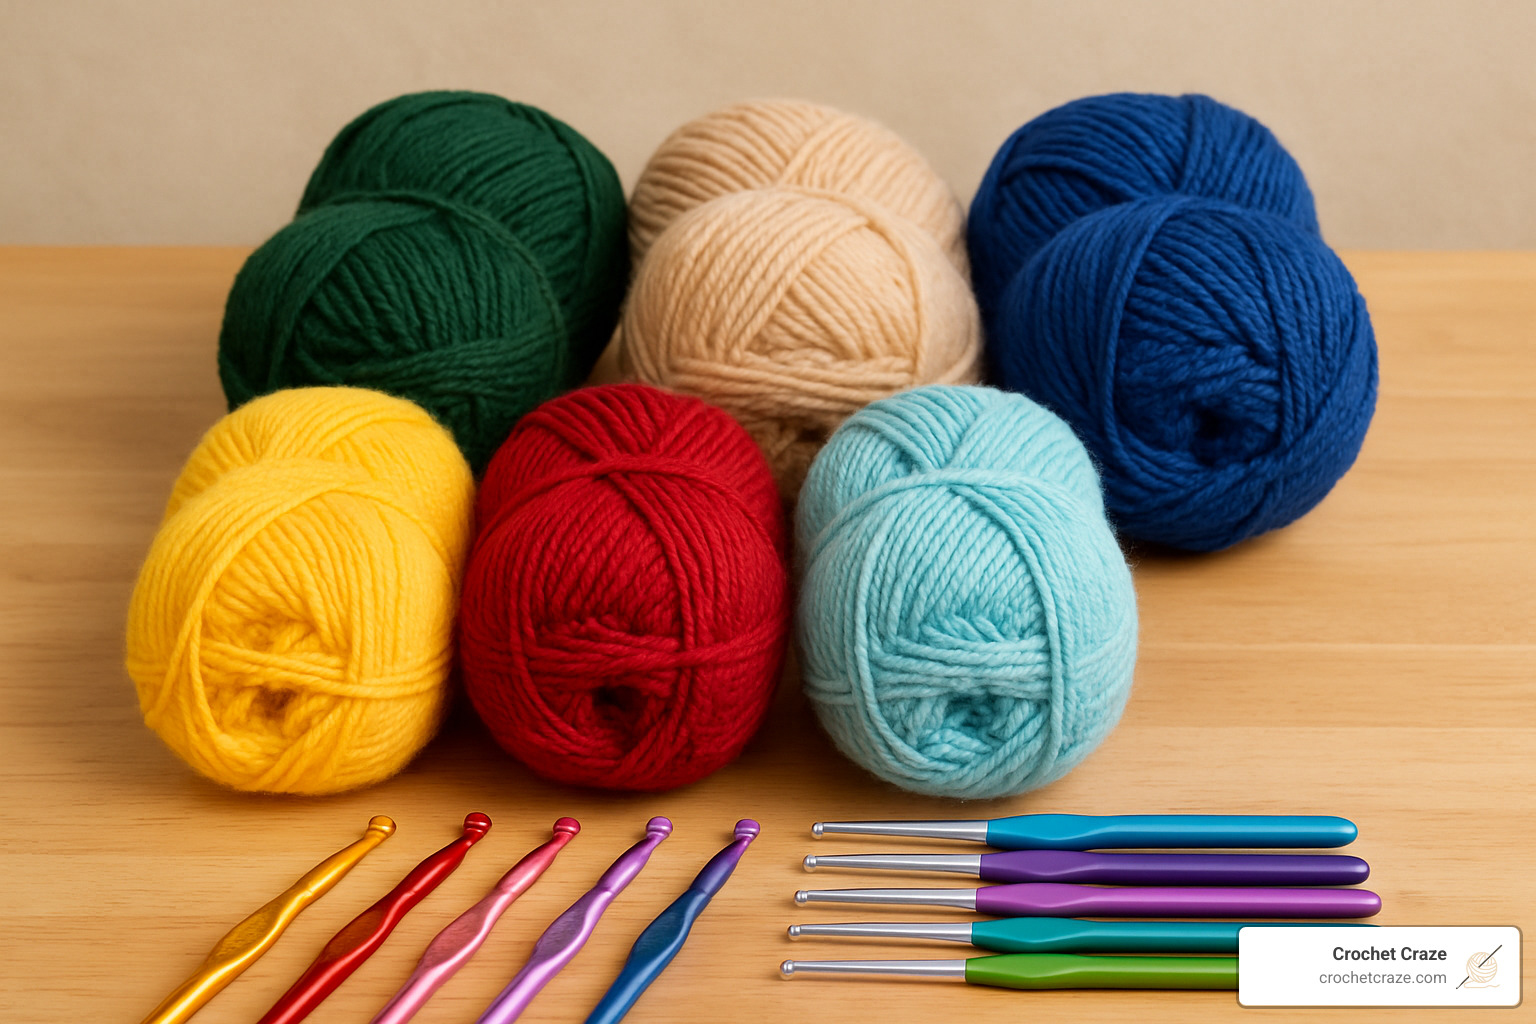
I remember the excitement of gathering my first crochet supplies – that moment when possibility sits in your hands as yarn and hook. The good news? You don’t need much to get started with crochet for beginners granny square step by step. Just a few affordable basics will set you on your creative journey.
The heart of your toolkit is obviously your yarn and hook. For beginners, I strongly recommend medium weight yarn (that’s DK or worsted weight) paired with a 4-5mm hook. This combination gives you enough bulk to easily see your stitches while still creating a nicely draping fabric. A small pair of scissors and a mix needle (that’s a yarn needle with a blunt tip and large eye) will round out your absolute essentials.
Don’t worry about breaking the bank – many crafters start with basic acrylic yarn from craft stores. It’s budget-friendly, comes in countless colors, and is quite forgiving for beginners still working on tension control.
Choosing Yarn & Hook Pairings
The relationship between your yarn and hook is like a dance partnership – they need to work well together! When you’re just starting out, medium weight yarns truly are your best friend. They’re widely available, easy to handle, and work up at a satisfying pace.
When selecting yarn, take a moment to look at the label. You’ll find a wealth of information there, including the recommended hook size for that particular yarn. This takes the guesswork out of pairing. For most worsted weight yarns, a 5.0mm (US H/8) hook creates a lovely fabric with good drape.
“I find this method the easiest and most straightforward,” shares one instructor who recommends starting with standard supermarket DK yarn for practice squares before investing in specialty fibers.
The beauty of granny squares is their flexibility – as one experienced crafter notes, “gauge is not really that crucial for most granny square projects.” This gives you freedom to experiment with different hook sizes until you find what feels comfortable in your hands.
Fiber content matters too. Acrylic yarns are perfect for beginners – they’re washable, durable, and come in every color imaginable. Cotton yarns offer fantastic stitch definition, making it easier to see your work. Both are excellent choices as you begin your crochet for beginners granny square step by step journey.
For a deeper dive into selecting the perfect yarn for your projects, our guide on crochet yarn for beginners has everything you need to know.
Extra Helpers for Success
While you can absolutely create beautiful granny squares with just yarn and a hook, a few additional tools can make your crochet experience even more enjoyable.
Stitch markers are tiny lifesavers that help you keep track of important points in your work – particularly the beginning of rounds in granny squares. They come in various styles, from locking plastic markers to simple safety pins or even scraps of contrasting yarn.
A dedicated pair of portable scissors can be a game-changer. “My MOST FAVORITE tool is these portable scissors that always make it through security and fit perfectly in my hook case,” shares one avid crocheter who takes her projects everywhere.
Consider treating yourself to a yarn bowl if you find your balls of yarn constantly rolling away during projects. These beautiful bowls hold your yarn steady while allowing it to feed smoothly as you work.
Many crocheters also keep a pattern notebook to track modifications, color combinations, and ideas for future projects. It’s amazing how quickly your creativity will blossom once you master the basic granny square technique!
Tension is something that develops with practice. Don’t worry if your first few squares look a bit wobbly – we all start somewhere! The joy of crochet is in the journey as much as the finished objects.
For everything you need to know about hook sizes and how they affect your projects, our crochet hook sizes handbook is an invaluable resource.
Basic Stitches & Terminology You Should Know
Let’s get cozy with the handful of stitches you’ll need to create your first crochet for beginners granny square step by step. The beauty of granny squares is that you only need to master a few basic techniques to create something beautiful!
Think of crochet terminology as learning a new, friendly language. Here’s your translation guide between US and UK terms (which often causes confusion for beginners):
| US Term | UK Term | Abbreviation (US) | Description |
|---|---|---|---|
| Chain | Chain | ch | Creates foundation and height |
| Slip Stitch | Slip Stitch | sl st | Joins rounds, moves position |
| Double Crochet | Treble Crochet | dc | Main stitch for granny clusters |
| Granny Cluster | Granny Cluster | 3 dc | Three double crochets in same space |
When you’re reading patterns online, always check whether they’re using US or UK terminology. The most important difference for your granny square journey is that what Americans call a double crochet (dc), the British call a treble crochet (tr). I still remember my confusion when I first encountered this difference – my square looked nothing like the picture until I realized I was using the wrong stitch height!
Beyond the stitches themselves, you’ll want to understand a few key concepts:
Working in the round means your crochet moves in a circular pattern rather than back-and-forth rows. Your granny square starts from the center and grows outward like a spiral.
Turning your work after completing each round can help keep your edges straight. Some crocheters skip this step, but I find it creates a more polished look.
Stitch height matters in granny squares. When patterns say “chain 3 counts as first double crochet,” they’re giving you a shortcut that maintains the correct height.
Joining connects the end of your round back to the beginning with a slip stitch, creating a closed circle before starting the next round.
Practising the Core Stitches
Before jumping into a complete square, I recommend spending a few minutes practicing each stitch on its own. This builds muscle memory and confidence:
The chain stitch (ch) forms the backbone of your crochet work. It creates both your starting foundation and the spaces between stitch clusters. Practice making chains of different lengths, focusing on keeping your tension consistent.
The slip stitch (sl st) is your connector stitch. It doesn’t add height but helps you join rounds and move your hook to new positions. It’s the smallest, most discreet stitch in your arsenal.
The double crochet (dc) is the star of your granny square. This taller stitch creates the distinctive clusters that give granny squares their lacy, textured appearance.
Remember what one of my first crochet teachers told me: “There is no right or wrong way to hold your yarn.” Find a grip that feels comfortable for your hands rather than forcing yourself into a particular technique. Your stitches might look a bit wobbly at first, but they’ll even out with practice.
If you’re struggling with any particular stitch, try practicing tension drills – make a chain of about 20 stitches, then work a row of the stitch you’re having trouble with. Do this a few times, and you’ll be amazed at how quickly your fingers learn the rhythm.
For a complete visual guide to these and other essential crochet stitches, visit our Crochet Stitch Guide where we break down each movement step by step.
Crochet for Beginners Granny Square Step by Step
Now for the exciting part—creating your first granny square! I’m going to walk you through this step-by-step, breaking it down into manageable chunks that even total beginners can follow with confidence.

Crochet for Beginners Granny Square Step by Step: Starting the Square
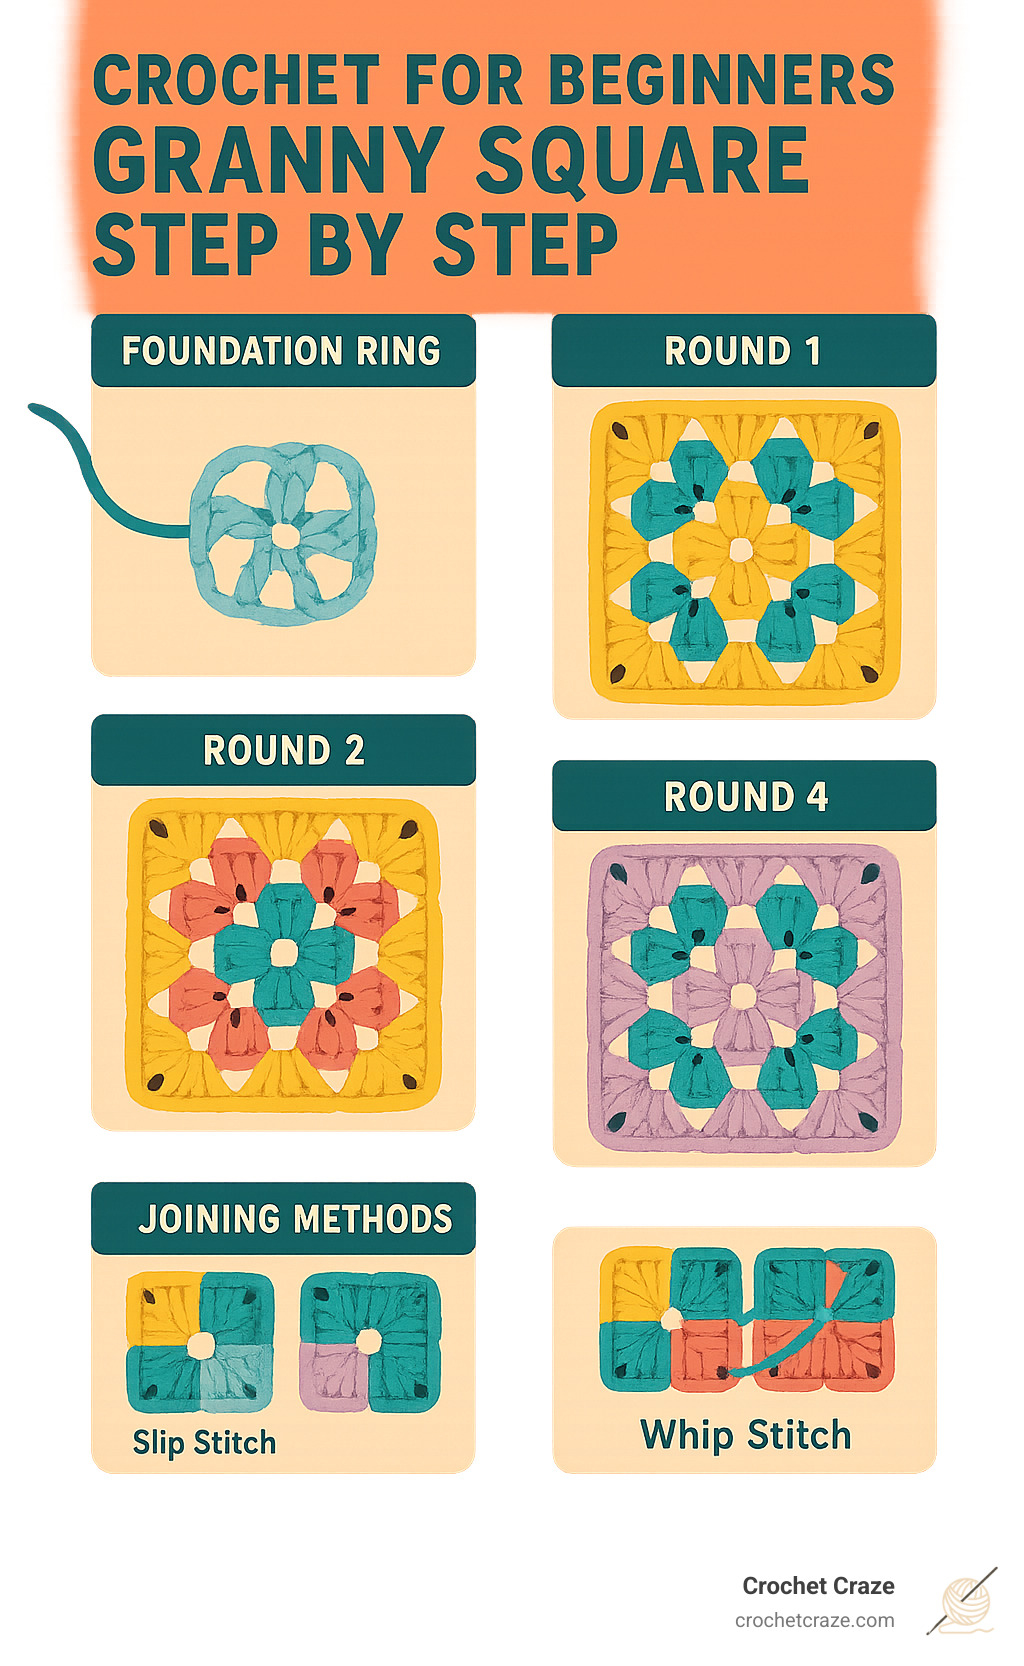
Let’s begin with Round 1—the foundation of your square. This is where the magic happens! Start by making a slip knot on your hook, leaving about a 6-inch tail (trust me, you’ll thank yourself later when it’s time to weave in those ends).
Chain 4 and connect them into a ring by making a slip stitch into your very first chain. This little ring is the heart of your granny square. If you’re feeling adventurous, you could try a magic circle instead—it creates a tighter center that won’t gap over time.
Now chain 3 (this counts as your first double crochet—a little trick that saves time). Work 2 more double crochets into your center ring. Congratulations! You’ve just made your first cluster of 3 dc.
Chain 2 to create your first corner space—these corners are what give the granny square its distinctive shape. Then work another cluster of 3 double crochets into the ring, followed by another chain-2 corner.
Keep repeating this pattern (3 dc, chain 2) two more times until you’ve gone all the way around. You should end up with 4 clusters separated by 4 chain-2 corner spaces. Join with a slip stitch to the top of your beginning chain-3, and voilà—Round 1 complete!
Crochet for Beginners Granny Square Step by Step: Rounds 2–4 & Beyond
For Round 2, we’re going to build on what we’ve created. Start by chaining 3 (this counts as your first dc again), then work 2 more dc in the same corner space to complete your first cluster. Chain 2 for your corner, then work another 3 dc cluster in that same corner space.
Here’s where things get interesting—chain 1 (not 2 this time!) as you move along the side. This shorter chain creates the side spaces that distinguish corners from sides. When you reach the next corner space, work a complete corner: 3 dc, chain 2, 3 dc all in the same space.
Continue around, working (3 dc, ch 1) along sides and (3 dc, ch 2, 3 dc) in corners. Join with a slip stitch to the top of your beginning chain-3 when you complete the round.
Now for a crucial tip that many beginners miss—turn your work! As one instructor wisely notes, “Does it really make that much of a difference you ask? I much prefer a straight and neat square.” This simple flip prevents the common problem of twisted edges that can make your square look more like a wonky spiral.
For Round 3 and beyond, you’re basically following the same growth formula:
– Begin with chain 3
– Complete each corner with (3 dc, ch 2, 3 dc)
– Work sides with 3 dc in each chain-1 space, with ch 1 between clusters
– Join rounds with a slip stitch and turn your work
With each round, your square grows larger but follows the same basic pattern—it’s this repetitive nature that makes the crochet for beginners granny square step by step process so perfect for building confidence!
Changing Colours the Clean Way
Adding different colors to your granny square is where the fun really begins! It’s also a fantastic way to use up those small balls of leftover yarn we all seem to collect.
To change colors cleanly, complete your round and join with a slip stitch. Cut your current yarn (leaving a 6-inch tail for weaving in later) and pull the tail through the last loop on your hook to secure it. Then simply attach your new yarn with a slip knot in any corner space, chain 3, and continue the pattern in your beautiful new color!
One crafter shares this practical tip: “I believe that it is technically correct to alternate the number in your chains for your corners at 3 and 4 but I can’t ever keep track of that so I just do 3 to save myself the stress!” Sometimes simplifying the rules makes the craft more enjoyable—and your squares will still look fantastic.
Finishing Off & Weaving Ends
The final touch to your granny square creation is properly securing those loose ends. After joining your final round, cut your yarn with a generous 6-8 inch tail and pull it through the last loop to bind off.
Thread this tail onto a mix needle (those blunt-tipped ones with large eyes made specifically for yarn). Weave the end through the back of several stitches in one direction, then change direction for extra security. Once you’re confident it won’t solve, trim any excess yarn close to your work.
As one instructor comfortingly advises, “There is no magic formula for this step, just sew it in discretely.” The goal is simply to secure the ends so they won’t show or come loose when your project is used.
For a truly professional finish, consider blocking your squares by lightly spraying them with water and pinning them to shape until dry. This step is especially helpful if your squares seem a bit wavy or uneven—blocking can work wonders to flatten and perfect your creation.
Troubleshooting & Common Mistakes
Even the most experienced crocheters occasionally run into issues with granny squares. Here are some common problems and their solutions:
If your square is twisting, remember to turn your work at the end of each round. For uneven sides, double-check your stitch counts and try to maintain consistent tension throughout.
A loose, gappy center can be fixed by using a magic circle instead of a chain ring, or by pulling your tail tighter when weaving in ends. If your corners look rounded rather than sharp, make sure you’re chaining 2 at each corner to create enough space.
And if your square seems to be increasing in size unintentionally, verify you’re working clusters into the chain spaces, not into the stitches themselves. “The chain of 3 stitches is used as a substitute for a double crochet at the beginning of each shell,” which helps maintain the correct stitch count throughout your square.
With these tips in your hook case, you’ll be creating perfect granny squares in no time! And once you’ve mastered this foundation, you’ll be amazed at how many beautiful projects you can create with this versatile technique.
Joining Squares & Creative Project Ideas
Once you’ve mastered making individual granny squares, a whole world of creative possibilities opens up! Let’s explore how to combine your squares into something truly special.

I remember the first time I joined my squares together—what a satisfying feeling to see my individual creations transform into something larger! There are several joining methods, each with its own look and feel. The slip stitch join creates a nice ridge on one side while staying flat on the other, making it perfect for beginners. As one crafter told me, “Using the slip stitch method is easiest when you’re just starting out.”
If you’re looking for a nearly invisible seam, the flat zipper join works beautifully. For those who want to make the seams part of their design, the single crochet join creates a defined edge that can become a decorative element. My personal favorite is the continuous join-as-you-go technique, which lets you attach squares as you complete them—perfect for those of us who get impatient to see the final project taking shape!
The traditional whip stitch remains popular for its simplicity—just sew squares together with a simple overhand stitch using your yarn needle. This method gives you great control over tension and alignment.
According to the latest research on modular crochet techniques from expert crocheters on YouTube, the joining method you choose can significantly impact both the appearance and durability of your finished project. It’s worth experimenting with different methods on scrap squares before committing to your masterpiece.
Turning Squares into Finished Masterpieces
What can you make with your growing collection of crochet for beginners granny square step by step creations? The possibilities are truly endless!
Blankets and afghans remain the classic granny square project—there’s something deeply comforting about wrapping yourself in a handmade blanket during chilly evenings. Fashion-forward crocheters are turning squares into trendy cardigans and vests that are currently making waves on social media platforms. The granny square bucket hat has become particularly popular, with thousands of makers sharing their colorful creations online.
“Crochet granny squares are ideal for beginners because they are super easy to crochet and take very little time per piece,” notes one designer who explains that a standard 4-round square takes only about 6-7 minutes to complete. This quick gratification makes them perfect for practical items like coasters, which can use up small yarn scraps while providing immediate satisfaction.
Before joining your squares for larger projects, I highly recommend laying them out first to create balanced color patterns. This simple step can transform a random collection of squares into a cohesive design. My neighbor Sarah spent an entire afternoon arranging her squares on her living room floor, taking photos of different layouts before deciding on the perfect arrangement for her first blanket.
Blocking your squares before joining is another game-changer. By lightly spraying each square with water and pinning it to shape until dry, you’ll ensure all your squares are uniform in size. This extra step makes joining much easier and gives your finished project a professional appearance.
Don’t forget about borders! Adding a unifying border around your entire project after joining pulls everything together beautifully. A simple single crochet border in a complementary color can frame your work perfectly, while more elaborate borders add extra flair.
For more inspiration on turning your granny squares into wearable items, our Beginner Crochet Beanie Tutorial provides excellent guidance on creating your first hat. Once you’ve mastered the basics, you might want to explore our collection of more patterns and next-level projects to keep growing your skills.
Frequently Asked Questions about Beginner Granny Squares
Why are my corners rounding instead of squaring?
One of the most common frustrations for new crocheters is ending up with rounded corners instead of crisp, sharp angles. Don’t worry—this happens to almost everyone at first! The most likely culprit is that you’re not making enough chains in your corner spaces.
The magic number for corners is usually 2 chains, though some patterns might call for 3 to create more pronounced points. If your corners still look rounded even with the right number of chains, double-check that you’re working the complete corner sequence of (3 dc, ch 2, 3 dc) in each corner space.
“Make sure you chain two in the corner spaces—fewer chains will definitely produce a rounder shape,” shares Maria, who teaches beginners’ workshops. “It’s such a simple fix but makes all the difference in how professional your squares look!”
How do I keep my square from twisting?
There’s nothing more disappointing than finishing a beautiful granny square only to find it’s twisted like a pinwheel! The simplest solution is also the most effective: turn your work after completing each round.
This turning technique counteracts the natural tendency of crochet stitches to bias slightly in one direction. By alternating the direction you work, you’ll create more balanced tension around the square.
“I resisted turning my work for years,” admits longtime crocheter Jamie. “When I finally tried it, the difference was night and day—my squares stayed flat and square without any extra effort!”
If you’ve already completed a twisted square and don’t want to start over, blocking can be your saving grace. Just pin the square to shape on a foam board, lightly spritz with water, and let it dry completely. For stubborn cases, steam blocking works wonders.
What’s the fastest way to join dozens of squares?
When you’re staring at a pile of 50+ squares for your blanket project, the thought of sewing them all together can be overwhelming. That’s where the continuous join-as-you-go method becomes your best friend.
With this technique, you join squares while creating the final round of each new square, eliminating separate seaming time. Not only is it faster, but many crafters find it creates flatter, more professional-looking seams.
“This join-as-you-go method saved my sanity when making my daughter’s baby blanket while eight months pregnant,” shares Tanya. “What would have taken me weeks of tedious sewing only took a few evenings, and the finished blanket looks so polished.”
If you’re more of a visual learner, search for tutorial videos that demonstrate this technique step by step. The small learning curve is well worth the time investment, especially for larger projects like blankets or cardigans where you might be joining dozens of squares.
For more inspiration on what to do with your finished squares, check out our Beginner Crochet Beanie Tutorial where we show how to adapt the granny square technique for wearables.
Conclusion
Mastering the crochet for beginners granny square step by step technique truly opens the door to a world of creative possibilities. What begins as a simple square can evolve into complex, multi-colored designs that showcase your growing skills and personal style.
Throughout this guide, we’ve walked together through everything you need to know—from gathering basic materials and learning essential stitches to troubleshooting those pesky common issues and exploring different joining techniques. Like any worthwhile craft, crochet improves with practice and patience. Your first square might look a bit wonky (mine certainly did!), but each one you make will be better than the last.
“Lots of us start out in crochet by learning how to crochet a granny square – I certainly did!” shares one long-time crocheter, a gentle reminder that even the most skilled crafters once struggled with their chain tension and corner counts.
I’ve found that the skills you develop making granny squares—consistent tension, reading patterns, and finishing techniques—transfer beautifully to other crochet projects. The confidence you build completing these small, manageable squares provides the perfect foundation for tackling more ambitious creations.
What I love most about granny squares is how they connect us—both to crafting traditions passed down through generations and to the vibrant community of crocheters sharing their work today. At Crochet Craze, we believe granny squares aren’t just beginner projects but a foundation for creative expression that can bring joy throughout your crafting journey.
We’d absolutely love to see your first granny square creations! Share your projects with us—whether perfectly executed or charmingly imperfect—and connect with our community of crafters at all skill levels. There’s nothing more inspiring than seeing how different people interpret this classic motif.
Ready to take your newfound skills to the next level? Explore our collection of patterns and next-level projects for inspiration on where to take your crochet journey next. From cozy blankets to stylish accessories, your granny square education has prepared you for countless creative trips.
Happy crocheting, friends!