
Crochet Granny Square Video: 7 Powerful Steps for Easy Success 2025
Why Crochet Granny Square Video Tutorials Are Every Beginner’s Best Friend
Crochet granny square video tutorials have become the go-to learning method for millions of crafters worldwide. Here’s what you need to know:
Top Benefits of Video Learning:
– Visual guidance – See exactly how to hold your hook and yarn
– Pause and replay – Learn at your own pace without stress
– Real-time demonstrations – Watch tension and stitch formation up close
– Most popular tutorials – Bella Coco’s basic granny square has over 7 million views
What You’ll Learn:
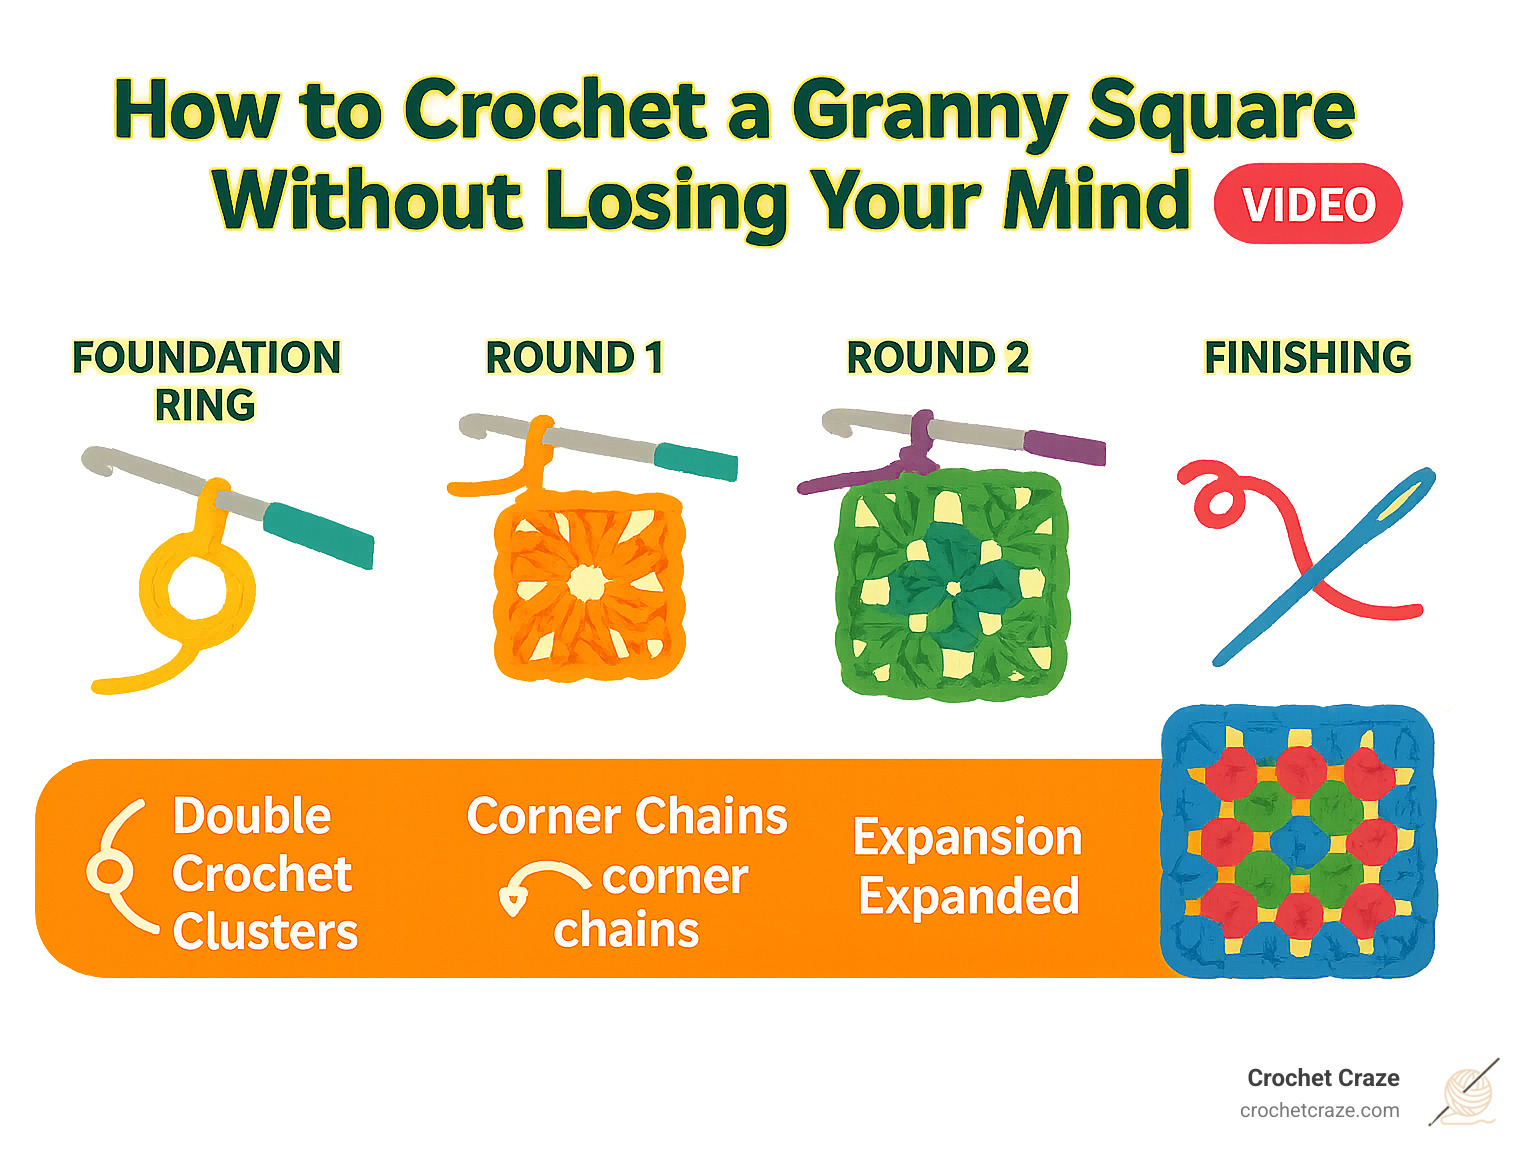
1. Foundation ring or magic circle start
2. Three basic stitches: chain, slip stitch, double crochet
3. Round-by-round construction with corner chains
4. Color changes and finishing techniques
Video tutorials break down the repetitive nature of granny squares, making them perfect for building confidence. You’ll master just three stitches that repeat in a clear pattern, with each round building naturally on the last.
I’m Sonja Huerta, and as a fellow beginner who found the calming joy of crochet, I know how intimidating those first stitches can feel. Crochet granny square video tutorials were my lifeline when I started, giving me the visual confidence to create my first successful projects.
Crochet granny square video further reading:
– crochet patterns for beginners video
– crochet patterns tutorial video
– crochet video tutorials
Granny Square 101: Definition & Why It’s Everywhere
Think of granny squares as the comfort food of the crochet world – they’re familiar, satisfying, and endlessly customizable. These beloved traditional motifs have been warming hearts and homes for generations.
The numbers don’t lie: crochet granny square video tutorials consistently dominate searches. The Crochet Crowd’s granny square tutorial has racked up over 2 million views, while Pinterest users have shared popular tutorials over 15,700 times.
Granny squares are surprisingly simple – built from just four basic clusters of double crochet stitches, arranged in rounds that grow outward from a center ring. This straightforward construction creates endless possibilities, from cozy afghans to trendy cardigans.
What Is a Granny Square?
A granny square is a crocheted motif worked in rounds from the center outward. You start with a tiny center ring, then build outward in concentric circles, with a clever twist that keeps everything perfectly square.
Each round consists of clusters of three double crochet stitches separated by chain spaces. The magic happens in the corners – special chain-2 spaces create those distinct corners while chain-1 spaces along the sides keep everything straight and square.
This creates the classic “granny” look with those signature visible holes between clusters. Those aren’t mistakes – they’re features! These spaces give granny squares their distinctive texture and beautiful drape.
Why Crocheters Love Them
Granny squares are the ultimate “quick win” project. As one happy crafter shared, “One thing I love about making granny squares is that you can start and finish one in a single sitting.” That instant gratification builds confidence and provides stress relief.
They’re also incredible stash-busters. Granny squares turn yarn collecting into a creative superpower, letting you explore wild color combinations and use up every precious yard.
The portability factor can’t be overstated. Hospital patients find them perfect for staying active during long stays. Commuters love having a square to work on during train rides, and they’re perfect for meditative stitching while watching TV.
Best of all, granny squares offer endless combinations. Change colors every round for a rainbow effect, stick to one color for simplicity, or create stunning ombre effects. Each square becomes a tiny canvas for your creativity.
Gear Up: Tools, Yarn & Stitches You’ll Need
One of the best things about learning granny squares is that you don’t need to raid your savings account. You probably already have some of what you need lying around.
The magic happens with just a handful of basic tools. You’ll need a crochet hook (4mm to 5.5mm works perfectly), some yarn in worsted or DK weight, scissors, and a yarn needle for tidying up loose ends.
As for stitches, you only need to master four basic moves: slip knot, chain stitches, double crochet, and slip stitches to join rounds. That’s it!
When you’re ready to dive deeper, our Crochet Stitch Guide breaks everything down with clear explanations. And if hook sizes confuse you, the Craft Yarn Council’s standards page will set you straight.
Picking the Right Hook & Yarn
Hook size makes a bigger difference than most beginners realize. Grab a 4.5mm hook with worsted weight yarn, and you’ll end up with squares measuring about 5 inches after five rounds. Want something more drapey? Go bigger. Prefer tighter squares? Size down.
Yarn choice is where the fun begins. Worsted weight (size 4) and DK weight (size 3) are winners for beginners. They’re thick enough to see your stitches clearly, forgiving when your tension isn’t perfect, and comfortable to work with.
Cotton yarn gives you crisp stitch definition perfect for dishcloths or summer blankets. Wool blends offer cozy warmth and are incredibly forgiving if your stitches aren’t exactly even.
Mastering the Core Stitches
The double crochet stitch is your new best friend. You’ll yarn over, insert your hook, yarn over and pull through (three loops on hook), yarn over and pull through two loops, then yarn over and pull through the final two loops.
Heads up: US double crochet equals UK treble crochet. If you’re following a UK pattern, keep this in mind or your squares might look quite different.
Chain stitches create those distinctive spaces between clusters and give you height at the start of each round. When a pattern says “chain 3,” that usually counts as your first double crochet.
Tension control comes with practice, so don’t stress if your first squares look wonky. Some stitches might be tight, others loose – that’s completely normal.
Watch & Stitch: Crochet Granny Square Video Step-By-Step
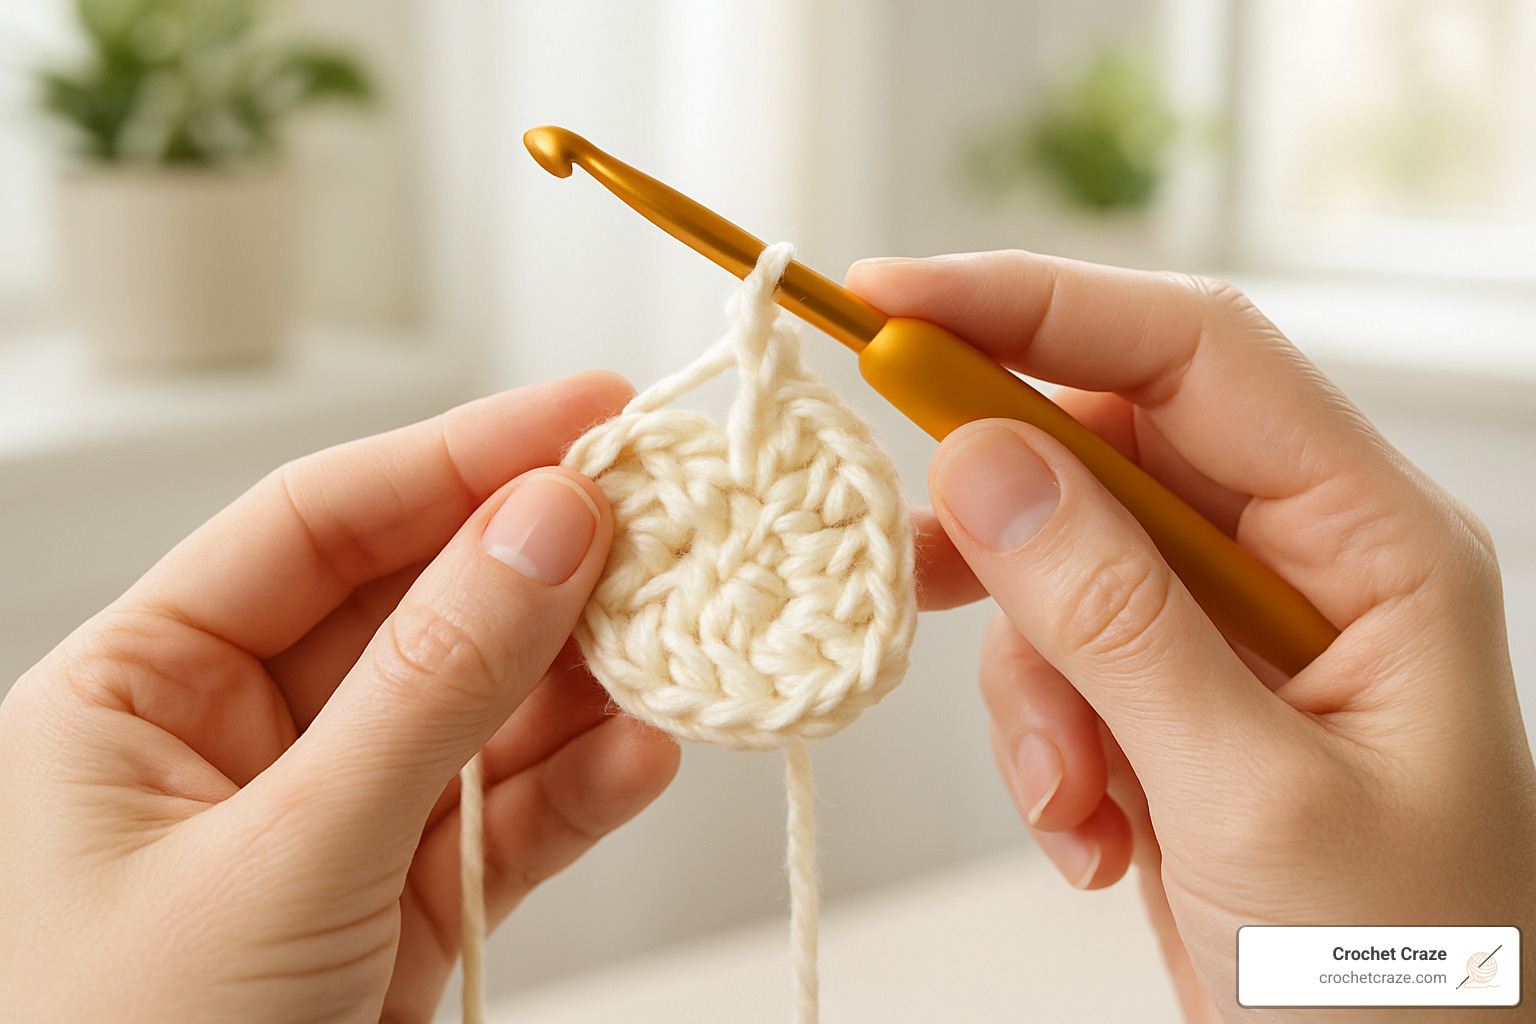
Now comes the fun part – actually making your first granny square! This is where crochet granny square video tutorials really shine. There’s something magical about watching those first stitches come together, seeing exactly how the yarn should move and how your hands should hold the hook.
I remember my first attempt at following a written pattern – it felt like trying to assemble furniture with instructions written in ancient hieroglyphics. But when I switched to video tutorials, everything clicked. You can pause when you need to catch up, replay tricky parts, and actually see what “proper tension” looks like.
The beauty of granny squares lies in their predictable rhythm. Once you complete that first round, you’ll start to feel the pattern in your hands. Each round builds naturally on the previous one, creating a satisfying spiral of growth that somehow magically stays square.
For complete step-by-step guidance with detailed photos, check out our Crochet for Beginners: Granny Square Step by Step tutorial that complements any video you’re following.
Round-by-Round Walkthrough (Crochet Granny Square Video)
Your foundation can start two ways, and both work beautifully. The traditional chain-4 method is often easier for beginners because it’s more forgiving. Simply chain 4 and slip stitch to the first chain to create your starting ring.
Round 1 sets the stage for everything that follows. Chain 3 (this counts as your first double crochet – remember that!), then work 2 more double crochets into your center ring. Now comes your first corner: chain 2. Repeat this pattern three more times around the ring – 3 double crochets, chain 2 – until you have four corner groups. Slip stitch to the top of your beginning chain-3 to close the round.
Round 2 is where the square shape really starts to emerge. Slip stitch over to your first corner space, then chain 3 again. Work 2 more double crochets in that same corner space, chain 2, then 3 more double crochets in the same spot. This creates your corner cluster. Chain 1, move to the next corner space, and repeat the (3 dc, chain 2, 3 dc) pattern. Continue around, adding chain-1 spaces between corners.
Round 3 and beyond follow the same logical pattern. Work 3-double-crochet clusters in each chain-1 space along the sides, and continue the (3 dc, chain 2, 3 dc) corner treatment in each corner space. Each round adds one more cluster per side, keeping your square perfectly proportioned.
The turning chain hack that many video tutorials teach is brilliant: always chain 3 at the start of each round, and always count it as your first double crochet. This keeps your stitch count consistent and prevents that annoying lean that can develop in squares.
Magic Circle Start (Crochet Granny Square Video)
The magic circle method creates a more professional-looking center with no visible hole. It’s like the difference between a store-bought cookie and a homemade one – both taste good, but one just looks more polished.
To create your magic circle, make a loop with your yarn, leaving about a 6-inch tail. Insert your hook through the loop and work your first round into the loop itself, not through individual chains. The genius part comes at the end – you can pull that tail to tighten the center completely, eliminating any gap.
This technique does require a bit more practice than the chain-4 method. The key is keeping that adjustable tail accessible throughout your first round. Don’t accidentally crochet over it, or you’ll lose the ability to tighten your center.
Many crocheters find that once they master the magic circle, they never go back to the chain-4 method. The secure, hole-free center it creates is especially beautiful when you’re making squares that will be joined into larger projects like blankets or shawls.
Level Up: Colors, Fixes & Pro Tips

Now that you’ve got the basic granny square down, let’s talk about the fun stuff – and how to fix those moments when everything goes sideways!
Color changes are where granny squares transform from simple practice pieces into stunning works of art. You might change colors every round for that classic rainbow effect, or stick with two alternating colors for a bold checkerboard look.
Here’s the truth about common mistakes: they happen to absolutely everyone. Your first squares might look “loose and wonky,” and that’s perfectly normal. Don’t be hard on yourself when things don’t look magazine-perfect right away.
Some techniques can be tricky to grasp from written instructions alone. The false treble (US double crochet) used to confuse countless beginners until this helpful video demonstration made it crystal clear.
For more troubleshooting help, our Crochet Video Tutorials collection covers common granny square challenges with demonstrations that make fixing mistakes less frustrating.
Clean Color Changes
The secret to professional-looking color changes lies in the standing stitch method. Instead of cutting your yarn after every round, you complete the final stitch using your new color. This creates an almost invisible join that eliminates bulk.
Another reliable technique is the invisible join method. Complete your round, cut the yarn, then join your new color with a slip stitch where you’ll start the next round.
The key is consistency. Pick one method that feels comfortable and stick with it throughout your project.
Avoiding Common Mistakes
Twisting squares usually happen when your tension varies too much or when you forget to turn your work. Some patterns recommend turning your square after each round to prevent warping.
Skipped corners are easier to fix once you learn to “read” your work. Look for those chain-2 spaces from the previous round – they’re your corner landmarks.
Uneven tension improves naturally with practice, but you can speed up the process by finding a comfortable way to hold your yarn and sticking with it.
Keep Squares Square
The biggest secret to perfect squares? Counting stitches and blocking properly. Each side should have the same number of clusters in every round.
Blocking is like magic for imperfect squares. Pin your finished square to a blocking mat while damp, then let it dry in the correct shape. This can make even questionable squares look amazing.
Tension control becomes second nature over time, but while learning, slightly loose is better than too tight. You can always block a loose square into shape.
Beyond One Square: Joining, Projects & Fun Variations

Here’s where the real magic happens – changing your collection of squares into something spectacular. Once you’ve got a handful of squares, you’ll start dreaming about all the amazing projects they could become.
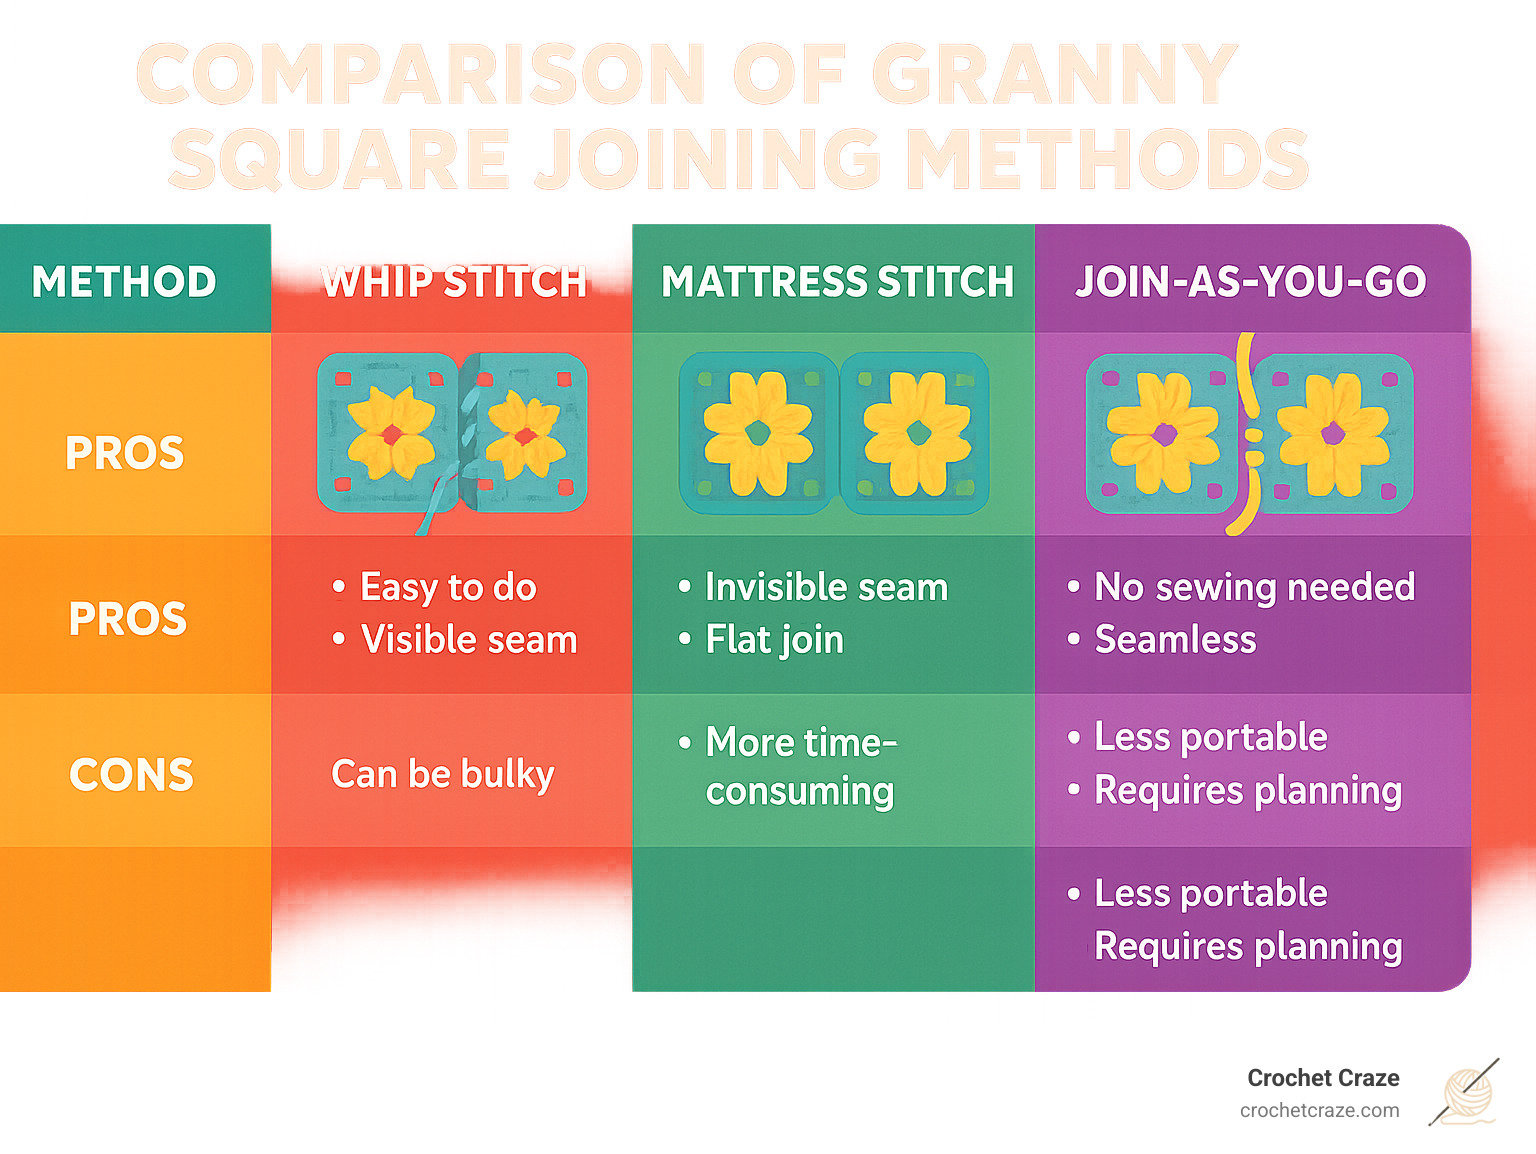
Whip stitch joining creates visible seams that become a design feature. Join-as-you-go techniques eliminate assembly by connecting squares during their final rounds. For a seamless look, the mattress stitch creates invisible joins that make squares appear to flow together naturally.
Granny squares aren’t just for afghans anymore. Cardigans and sweater vests made from squares have become incredibly trendy. Tote bags and purses showcase individual squares beautifully. Pillow covers let you experiment with color combinations, and scarves and shawls – like our Shawl Made from Granny Squares – create stunning wearable art.
How to Join Multiple Squares
The slip stitch seam method is perfect for beginners who want visible structure. Place squares wrong sides together, then slip stitch through both layers, catching matching stitches. This creates raised seams that add texture.
Mattress stitch joining requires a yarn needle but creates invisible seams. Work from the right side, catching only the back loops of corresponding stitches. Maintain consistent tension so seams don’t pucker.
Join-as-you-go methods are brilliant for large projects. During the final round of each new square, slip stitch into completed squares at specific points. This eliminates hours of assembly work later.
Granny Square Variations to Try
The solid granny square fills in chain spaces with extra double crochets, creating denser fabric perfect for winter projects. The sunburst square starts with a different center motif that radiates outward like sunshine.
Victorian lattice squares incorporate decorative chain loops for an neat, lacy appearance. The spiral granny square creates a mesmerizing swirl effect by changing colors strategically.
Try bobble heart squares with raised stitches in heart patterns, or mitered squares that work from corner to corner instead of center outward.
US vs UK Terms Cheat-Sheet
Terminology differences between US and UK patterns can be confusing! In US terms, you’ll work double crochets for clusters, but UK patterns call these treble crochets. US single crochets become UK double crochets.
Most online tutorials use US terminology, but many printed books follow UK conventions. When in doubt, check the pattern notes.
For complete conversions, this handy PDF from Annie’s is invaluable. Print it out and keep it in your project bag!
Frequently Asked Questions about Crochet Granny Square Video
Let’s tackle the questions that pop up most often when you’re learning granny squares. These are the same concerns I hear from beginners all the time, and trust me – you’re not alone in wondering about these things!
How many chains start the center?
The chain-4 method is your most reliable starting point as a beginner. It’s sturdy, easy to see, and works with virtually every granny square pattern you’ll encounter. Some patterns call for chain-6 or chain-8 if they want a larger center opening, but these are less common.
The magic circle is the trendy alternative that eliminates chains altogether. While it creates a beautifully tight center with no visible hole, it can be tricky for absolute beginners. My advice? Master the chain-4 method first, then experiment with magic circles once you’re comfortable with the basic construction.
If you’re following a crochet granny square video tutorial and feeling confused about which method to use, stick with whatever the instructor demonstrates. Consistency is more important than perfection when you’re learning.
Why does my square curl or warp?
Oh, the dreaded wonky square! This is probably the most common frustration I hear about. Curling upward usually means your tension is too tight – you’re gripping that yarn like it’s trying to escape. Try relaxing your hold or switching to a larger hook size.
Ruffling or waving edges typically indicate the opposite problem – your tension might be too loose, creating extra fabric that has nowhere to go but up. A smaller hook or more consistent yarn control can help here.
Sometimes the issue isn’t tension at all. Skipping the turning process between rounds can cause warping in some patterns. Check if your pattern mentions turning your work – it’s a small step that makes a big difference.
When all else fails, blocking is your secret weapon. Pin your finished square to the correct measurements while it’s damp, and let it dry completely. You’ll be amazed how much this professional finishing technique can rescue even the most stubborn squares.
Best way to weave in ends securely?
Nobody wants their beautiful granny square blanket falling apart after the first wash! The key is creating a zigzag path with your yarn needle that locks the tail in place.
Thread your yarn needle with the tail, then weave through several stitches in one direction – I usually go through about 4-5 stitches. Then reverse direction and weave back through different stitches, creating that secure zigzag pattern.
Here’s a pro tip: split the yarn fibers as you weave by pushing your needle through the actual yarn strands, not just around them. This creates extra friction that prevents the ends from pulling loose over time.
Never just trim ends short without weaving them in properly. Those little tails will work their way out eventually, and you’ll end up with holes in your finished project. Trust me – spending the extra few minutes weaving in ends properly is worth it for the peace of mind!
Conclusion
Congratulations! You’ve just completed your crochet granny square video journey from complete beginner to confident square-maker. That first slip knot probably felt awkward, but look at you now – ready to tackle rounds, corners, and color changes like a pro.
Your first square might be a little lopsided, and that’s absolutely perfect. Every experienced crocheter has wonky first attempts that they secretly treasure. Those imperfect squares tell the story of your learning journey.
The beauty of granny squares is that they grow with you. Today you’ve mastered the basic traditional square, but tomorrow you might try a sunburst variation or experiment with bold color combinations. Next month, you could be joining squares into your first blanket.
Your next steps are entirely up to you. Maybe you’ll make a dozen squares in different colors for a rainbow baby blanket. Perhaps you’ll stick with one color family for an neat throw. Or dive into our Crochet Patterns for Beginners (Video) collection to explore projects that build on these foundational skills.
Every stitch is progress. Some days your tension will be perfect, other days it might be all over the place. That’s not failure – that’s learning. The muscle memory you’re building now will serve you through countless future projects.
At Crochet Craze, we believe that crafting should bring joy, not stress. You’ve joined a community of makers who understand the satisfaction of creating something beautiful with just yarn and a hook.
Your granny square journey starts with that first foundation ring, but it certainly doesn’t end with your first finished square. Each new project teaches you something different, and before you know it, you’ll be helping other beginners steer their first crochet granny square video tutorial.
Now go make something wonderful – your yarn stash is waiting, and your next masterpiece is just a slip knot away!