
Crochet Flowers for Beginners: 5 Easy Stunning Ideas 2025
Why Crochet Flowers Are Perfect for New Crafters
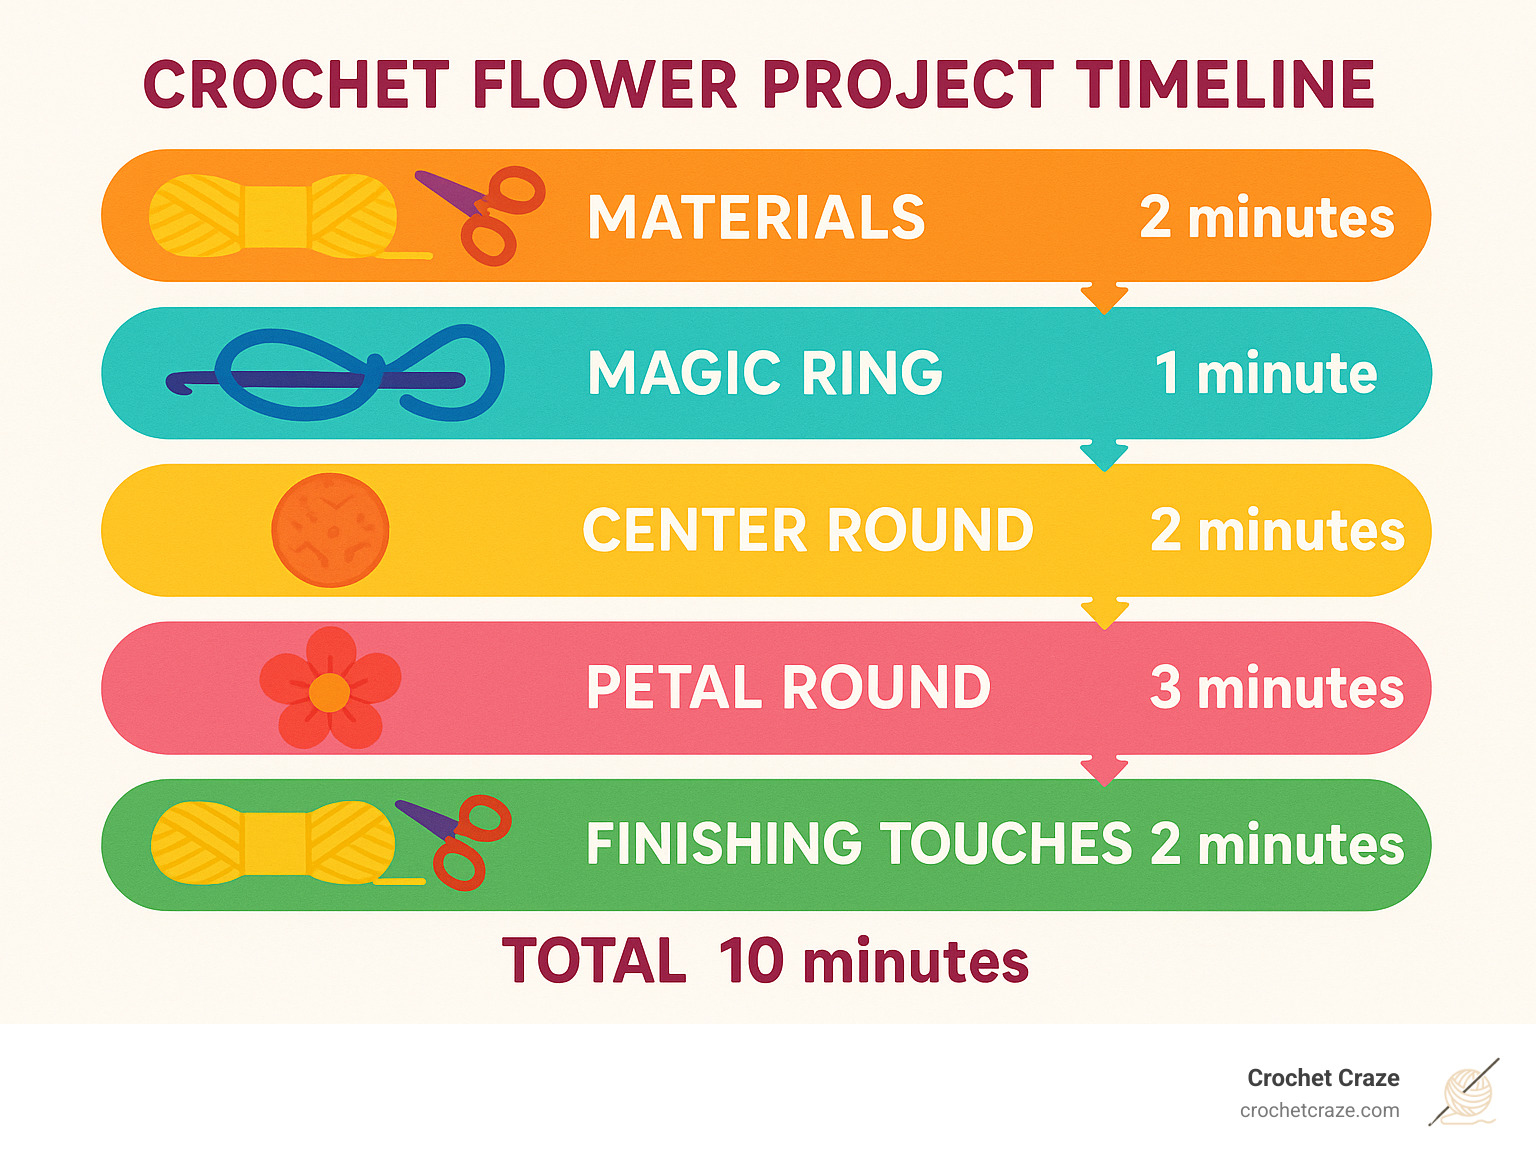
Crochet flowers for beginners offer the perfect introduction to this beloved craft. These charming projects take just 5-10 minutes to complete and use basic stitches you can master quickly.
Quick Start Guide for Beginner Crochet Flowers:
- Time needed: 5-10 minutes per flower
- Essential stitches: Chain, single crochet, double crochet, slip stitch
- Materials: Small amounts of yarn, one crochet hook, scissors
- Best first project: Simple 5-petal flower using magic ring
- Yarn to use: Any weight works – cotton or acrylic recommended
- Hook size: Match to your yarn weight (typically 3.5-5.5mm)
Crocheted flowers are incredibly popular among beginners because they provide instant gratification. You can complete one while watching TV and use up those precious yarn scraps sitting in your craft box. These tiny treasures work perfectly as embellishments for hats, bags, or home decor.
The beauty of flower motifs lies in their forgiving nature. Even if your stitches aren’t perfectly even, the organic shape of petals hides small imperfections beautifully.
I’m Sonja Huerta, and as someone who recently finded the joy of crochet, I understand the excitement and nervousness that comes with learning new techniques. Crochet flowers for beginners became my confidence-building stepping stones, teaching me essential skills while creating something beautiful in minutes.
Basic crochet flowers for beginners vocab:
– best crochet hook to start with
– best yarn and hook for beginner crochet
Why Crochet Flowers? Quick Wins for Beginners
There’s something truly magical about changing a simple ball of yarn into a delicate flower in just minutes. Crochet flowers for beginners have become incredibly popular because they offer everything new crafters crave: quick results, beautiful outcomes, and that wonderful “I made this!” feeling.
The Joy of Instant Gratification
When you’re just starting your crochet journey, waiting weeks to finish a blanket can feel overwhelming. That’s where these tiny treasures shine! A simple crochet flower takes just 5 to 10 minutes from start to finish, giving you that satisfying sense of completion almost immediately.
These quick wins keep beginners motivated. You’ll find yourself thinking “just one more flower” as you build your skills without even realizing it. Before you know it, you’ve mastered the basic stitches and created a whole bouquet of practice pieces.
Turn Scraps into Treasures
Here’s where crochet flowers become brilliant for your yarn budget. Each small flower needs less than 2 meters of yarn for the center and about 7 meters for the petals. Those tiny leftover bits from other projects? Perfect flower material! A single ball of sport weight yarn can create 20 or more flowers, making this an incredibly cost-effective way to practice.
This stash-busting approach feels so satisfying. Instead of letting those beautiful yarn scraps collect dust, you’re creating something useful and pretty.
Endless Possibilities for Your Creations
Crocheted flowers are so pretty! The versatility of these little beauties is honestly amazing. They transform ordinary items into something special with just a few stitches.
Your flowers can become hair accessories and brooches for a personal touch, gift embellishments that make presents extra thoughtful, or home decor accents that brighten any room. They work wonderfully as appliqués for blankets and scarves, and make absolutely perfect quick Mother’s Day gifts when you need something heartfelt in a hurry.
Crafting with a Clear Conscience
Using cotton thread scraps to create these simple flowers feels good for the planet too. This zero-waste approach appeals to environmentally conscious crafters who hate throwing away perfectly good yarn pieces.
The popularity of crochet flowers for beginners continues to grow across all skill levels. Video tutorials often receive hundreds of thousands of views, creating a supportive community that makes learning feel less intimidating and more fun.
Ready to explore more quick projects? Our Easy Fun Crochet Projects collection shows how these simple flowers can improve your entire crafting journey.
Essential Tools & Materials
The wonderful thing about crochet flowers for beginners is how simple the supply list really is. You probably already have most of what you need! Over 80% of beginner crochet flower patterns use only basic stitches and simple tools.
Your essential toolkit is surprisingly minimal. You’ll need a crochet hook sized to match your yarn, sharp scissors for cutting yarn cleanly, and a yarn needle for weaving in ends. Stitch markers help track rounds, and a measuring tape comes in handy for consistent flower sizes.
Choosing Your Yarn Wisely
Cotton yarn is my personal favorite because it’s durable, has a lovely matte finish, and being 100% natural makes it perfect for flowers that will get lots of handling. Acrylic yarn wins hearts among beginners because it’s budget-friendly, completely machine washable, and wonderfully forgiving if your tension isn’t quite perfect yet.
For delicate small flowers, fingering weight yarn creates those beautiful, refined results that look almost store-bought. DK (double knitting) yarn is incredibly versatile for small motifs and pairs beautifully with a 4mm hook. If you’re working with worsted weight yarn and a 3.5mm hook, you’ll get approximately 1.25″ flower motifs that are perfect for most embellishment projects.
| Yarn Weight | Hook Size (US) | Hook Size (mm) | Flower Size |
|---|---|---|---|
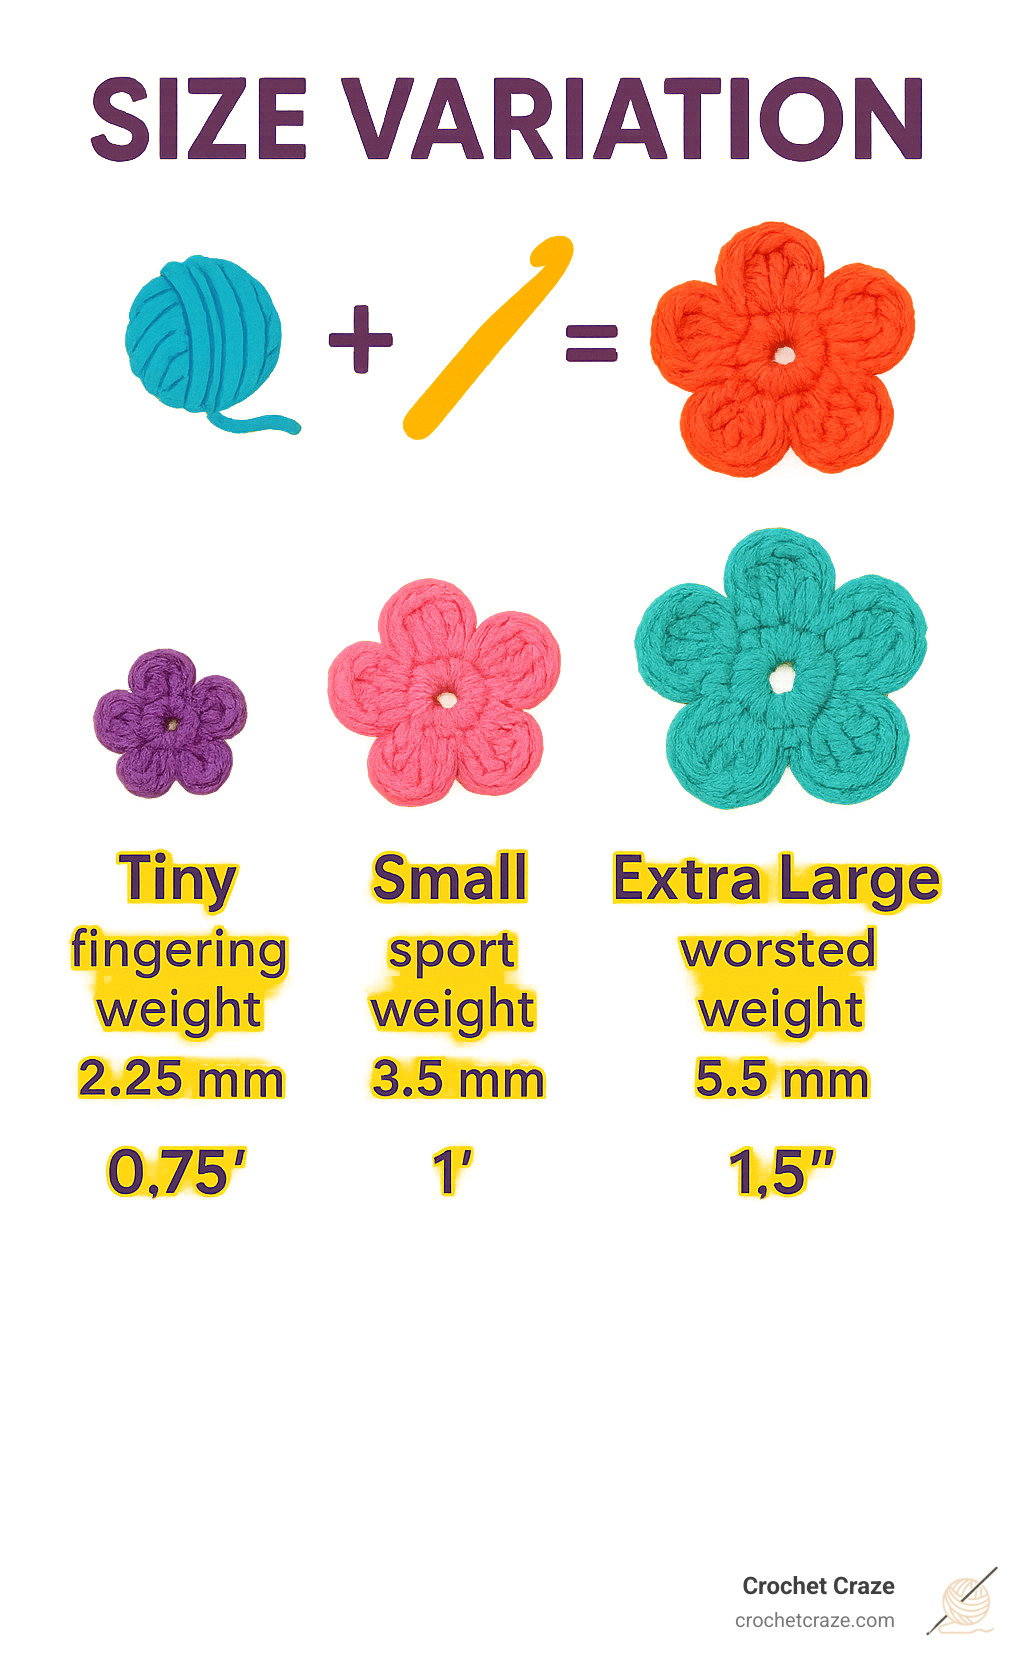
| Fingering (1) | B/1-E/4 | 2.25-3.5 | Tiny (0.75″) |
| Sport (2) | E/4-G/6 | 3.5-4.25 | Small (1″) |
| DK (3) | G/6-I/9 | 4-5.5 | Medium (1.25″) |
| Worsted (4) | I/9-K/10.5 | 5.5-6.5 | Large (1.5″) |
| Bulky (5) | K/10.5-M/13 | 6.5-9 | Extra Large (2″) |
For comprehensive guidance on selecting the right materials, visit our Best Yarn and Hook for Beginner Crochet guide.
Budget-Friendly Starter Kit
Start with what you have rather than rushing out to buy everything new. Some of the most charming crochet flowers come from leftover yarn from other projects or cotton thread scraps that were destined for the trash bin.
Check out those small skeins from discount bins at craft stores – they’re perfect for flower projects since you need so little yarn per bloom. Yarn swaps with friends are another fantastic way to build your stash without spending money.
Smart Sizing Tips
Unlike sweaters or blankets, flowers don’t require precise gauge, but understanding your tension helps create consistent, professional-looking results. If you’re naturally a tight crocheter, try using a slightly larger hook than recommended. Loose crocheters often get better results with smaller hooks.
Here’s how to check if your tension is just right: your stitches should be even but not so tight that you struggle to insert your hook for the next round. Your petals should lay flat without curling up at the edges, and the center should close completely when you’re using a magic ring.
Foundation Skills & Stitches
Learning crochet flowers for beginners becomes much easier once you master the basic building blocks. The wonderful thing about flower patterns is that they typically use just five fundamental stitches that work together like a beautiful dance.
Think of these stitches as your crochet vocabulary. The chain stitch creates your foundation, like drawing a line with your hook. Slip stitches help you join rounds and move around your work without adding height. Single crochet creates tight, sturdy fabric that’s perfect for flower centers.
When you’re ready to add some height to your petals, half double crochet gives you that perfect medium stitch. Double crochet creates the tallest, most dramatic petals that really make your flowers pop with dimension.
A Quick Note About Crochet Language
We use US crochet terms throughout this guide, which can be confusing if you’re following patterns from other countries. In UK patterns, what we call single crochet is called double crochet, and our double crochet becomes their treble crochet. It’s like learning two dialects of the same language!
The key techniques you’ll also need include creating a magic ring for tight centers, fastening off to secure your work, and weaving in ends for a professional finish. Don’t worry about memorizing everything at once – these skills develop naturally as you practice.
For detailed step-by-step instructions on each stitch, our Crochet Stitch Guide breaks everything down with clear photos and tips.
Mastering the Magic Ring
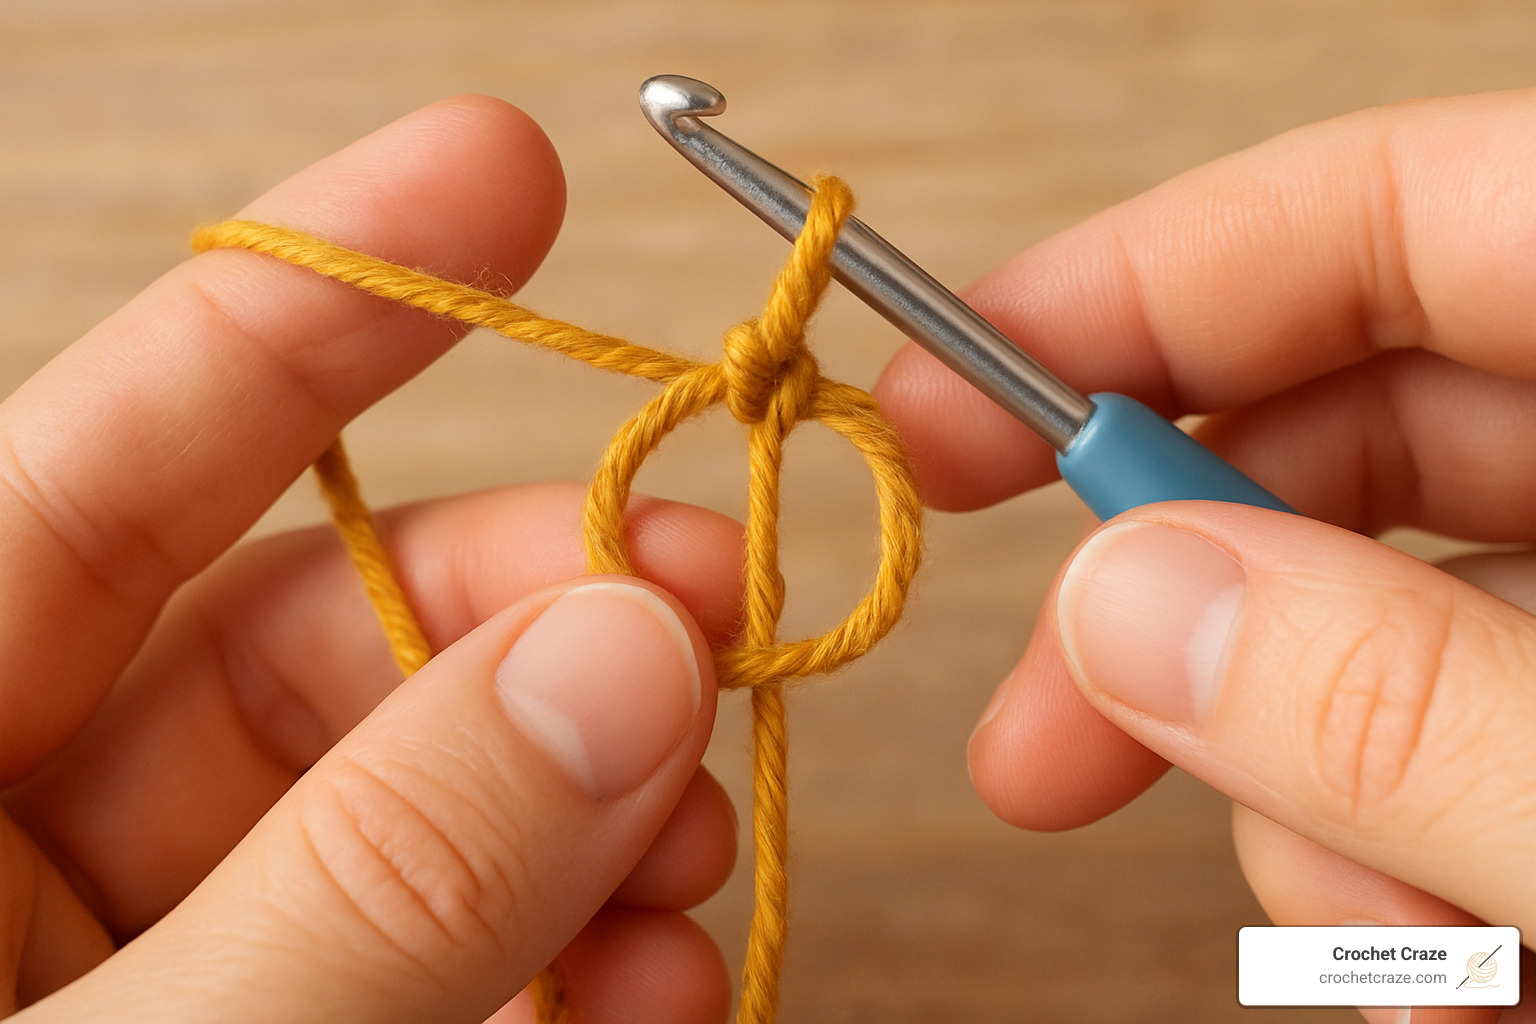
The magic ring is your secret weapon for creating flowers with beautifully tight centers. Without this technique, you’d have a little hole in the middle of your flower that looks unfinished.
Start by making a loop with your yarn, leaving about a 6-inch tail hanging. Insert your hook through the loop and pull up a working loop, then chain one to secure everything. Now you can work your first round of stitches directly into this adjustable ring.
The magic happens when you pull that tail tight after completing your first round. The center closes up completely, creating that professional no-hole finish that makes your flowers look store-bought.
Here’s a helpful tip: resist the urge to pull the tail too tight while you’re still working. Keep it loose until you finish the round, then give it a gentle tug to close the center perfectly.
Practice Before You Bloom
Before jumping into your first flower, spend a few minutes getting comfortable with your materials. Create a small sample swatch using your chosen yarn and hook to get a feel for the tension.
Your hands need time to develop the right rhythm and tension for consistent stitches. Some people crochet tightly, others work more loosely – there’s no wrong way, but knowing your style helps you choose the right hook size.
Practice making a magic ring a few times until it feels natural. Try chaining and working a few single crochets and double crochets. This warm-up time isn’t wasted – it’s an investment in making your first flower absolutely beautiful.
Step-by-Step Tutorial: 5-Petal Crochet Flowers for Beginners
Here comes the moment you’ve been waiting for – creating your very first crochet flowers for beginners! This simple pattern uses just two rounds and basic stitches you’ve already learned. Most beginners complete their first flower in about 5-10 minutes, which makes it perfect for building confidence.
We’ve chosen a 5-petal design because it looks naturally beautiful and forgiving. Even if your stitches aren’t perfectly even, the organic shape of flower petals hides any small wobbles beautifully.
What you’ll need: A small amount of yarn in any weight, the matching hook size, scissors, and a yarn needle for finishing. The beauty of this project is that you probably already have everything sitting in your craft supplies!
Your finished flower will typically measure 1-2 inches across, depending on your yarn weight. Cotton yarn creates crisp, defined petals while acrylic gives a softer, more relaxed look.
For extra support as you work through this tutorial, our How to Do a Basic Crochet Stitch guide covers any techniques you might need to review. You can also follow along with this helpful Simple Crochet Flower – Pattern and Tutorial for additional visual guidance.
Round 1—Center of crochet flowers for beginners
The magic ring technique creates that perfect, tight center that makes your flower look professionally made. Don’t worry if it feels awkward at first – most beginners need a few tries to get comfortable with this technique.
Start by creating your magic ring, leaving about a 6-inch tail for weaving in later. Chain 1 to secure your ring – this chain doesn’t count as a stitch, it just anchors everything in place.
Now comes the fun part! Work 5 single crochet stitches directly into the magic ring. Keep your stitches snug but not too tight. You want to be able to pull your yarn tail easily in the next step.
Join your round with a slip stitch into the first single crochet you made. This creates a perfect circle of 5 stitches around your center.
Here’s the magic moment: gently pull that yarn tail to close the ring completely. Watch as your loose center transforms into a tight, professional-looking flower center with no hole visible. It’s honestly one of the most satisfying moments in crochet!
Round 2—Petals of crochet flowers for beginners
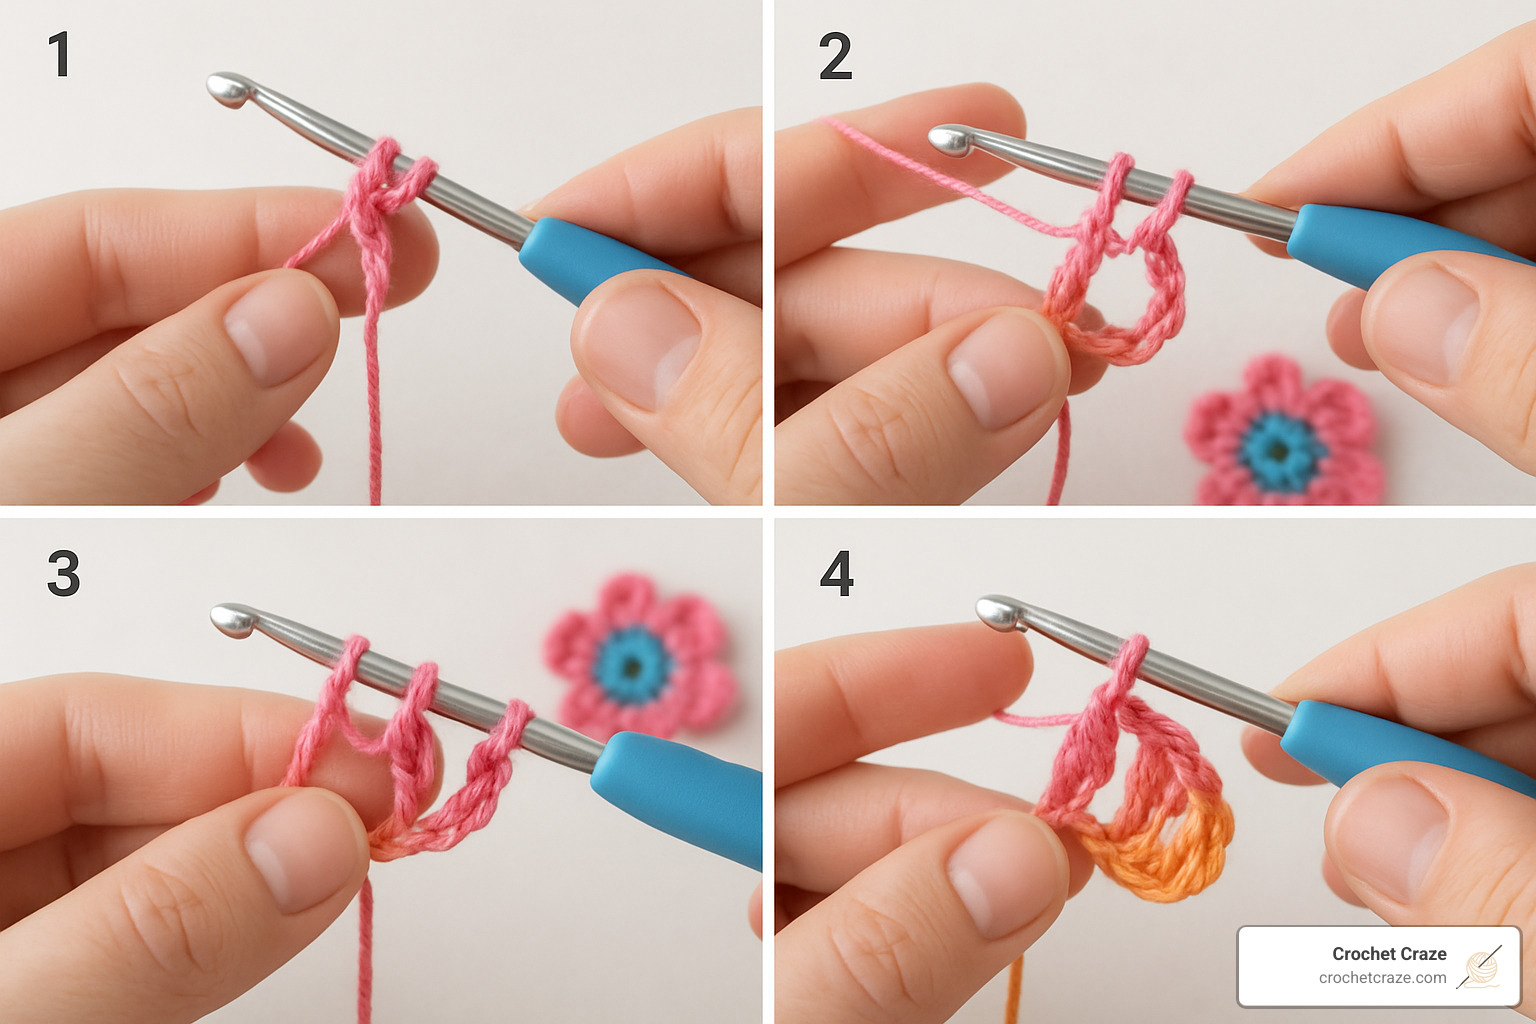
This round transforms your simple center into a blooming flower. Each petal uses the same sequence, so once you get the rhythm, you’ll zip through all five petals quickly.
Start your first petal by chaining 2. This creates the foundation for your petal shape. Work 2 double crochet stitches into the same stitch where you just joined your previous round. These taller stitches give your petals their lovely curved shape.
Chain 2 again to complete the petal, then slip stitch into the next single crochet from Round 1. You’ve just created your first petal! It should look like a little loop with some height in the middle.
Repeat this same sequence four more times around your flower center. The pattern becomes: chain 2, work 2 double crochet, chain 2, slip stitch into next stitch. By the time you reach your fifth petal, your hands will know exactly what to do.
Finish by slip stitching into the base of your very first chain-2 to complete the circle. Cut your yarn leaving about a 6-inch tail, and pull it through your last loop to fasten off securely.
Finishing & Shaping
Your flower is technically complete, but these finishing touches make all the difference between a beginner project and something that looks professionally made.
Weaving in your ends keeps everything secure and tidy. Thread your yarn needle with one of your tails and weave it through several stitches on the back of your flower. Change directions at least once to lock it in place, then trim the excess. Repeat with your other tail.
Shaping your petals brings your flower to life. Gently pinch and tug each petal to give it dimension and character. Some petals might naturally curl slightly – this actually adds to the organic, realistic look we’re after.
Steam blocking is completely optional but worth trying if you want perfectly flat, crisp petals. Hold your flower over steam from a kettle for a few seconds, then gently pin it to shape on a towel while it dries. This technique works especially well with cotton yarn.
The most important thing to remember? Your first flower doesn’t need to be perfect. Each crochet flowers for beginners project teaches you something new, and before you know it, you’ll be creating beautiful blooms without even thinking about the steps.
Customize & Use Your Blossoms
Now comes the really fun part! Once you’ve created your first basic crochet flowers for beginners, you’ll find how easy it is to make each one unique.
Playing with Petal Numbers
The beauty of these simple flowers lies in how easily you can change their personality. Want a sweet, delicate look? Try making 4 petals by working only 4 single crochets in Round 1. For a fuller, more dramatic flower, work 6 or even 8 single crochets in your center round. The 8-petal version creates a lovely daisy-like appearance.
Size Makes All the Difference
Your yarn choice completely transforms the final result. Fingering weight yarn with a 2.25mm hook creates tiny, delicate blooms perfect for baby items or jewelry. Sport weight yarn with a 3.5mm hook gives you small, versatile flowers that work beautifully on headbands. DK weight yarn with a 4mm hook produces medium flowers – my personal favorite for most projects. Worsted weight yarn with a 5.5mm hook creates bold, statement flowers that really pop on bags and hats.
Creating Dimensional Magic
Layering different sized flowers creates stunning dimensional effects. Start with a large flower as your base in a solid color, add a medium flower in a contrasting color for the middle layer, then top it with a small flower or decorative button. The classic combination of white petals with a yellow center never goes out of style.
Smart Attachment Techniques
Sewing with matching thread gives the most professional look – just use small stitches around the center where they won’t show. Safety pins work perfectly for removable brooches. For permanent attachments, fabric glue works well on fabric items, while hot glue is your friend for quick craft projects.

Endless Project Possibilities
These little flowers are incredibly versatile embellishments. They transform plain beanies, headbands, and bags into something special. They make gorgeous greeting cards, especially for Mother’s Day when you want something handmade and heartfelt. Turn them into hair accessories and jewelry for unique pieces no one else will have. They also work beautifully as home decor accents on pillows and curtains, or as reusable gift bows that recipients will actually want to keep.
Keeping Your Flowers Fresh
Dust them gently with a soft brush or use compressed air for intricate areas. If they’re attached to washable items, use a gentle cycle and air dry to prevent damage. Store them flat in a box or drawer to prevent crushing. Avoid direct sunlight to prevent colors from fading over time.
For even more creative inspiration, check out our Crochet Patterns for Beginners Step by Step collection to see how flowers can improve all sorts of projects.
Frequently Asked Questions about Crochet Flowers for Beginners
Why does my flower center stay loose?
Don’t worry – this happens to almost everyone when learning crochet flowers for beginners! The loose center is usually a magic ring issue, and it’s totally fixable.
The most common mistake is pulling the yarn tail too hard or at the wrong time. Instead of yanking it tight immediately, pull the tail gradually while you’re still working your first few stitches. Think of it like slowly closing a drawstring bag rather than jerking it shut.
Make sure you’re using the long tail from your slip knot – that’s what actually cinches the center closed. The working yarn won’t do the job! Also, timing really matters here. Don’t pull tight until you’ve completed all your single crochets in the center ring.
Sometimes the problem is that you’re accidentally working into just the loop instead of the actual ring. Check your technique by making sure your hook goes through the center ring itself each time.
If your center still won’t cooperate, try making your initial loop smaller or using slightly tighter tension. With a little practice, you’ll get that perfect tight center every time!
Can I crochet a flower without using the magic ring?
Absolutely! While the magic ring creates the cleanest center, plenty of beautiful flowers start with a simple chain ring instead.
Here’s how to do it: Chain 4, then slip stitch into the first chain to form a small ring. Work your single crochets into the center of this ring, then continue with the petal round exactly as written in the pattern.
This method does leave a tiny hole in the center, but many crocheters actually prefer this look! Some vintage patterns specifically call for this open-center style, and it can give your flowers a more delicate, lacy appearance.
The chain ring method is also more forgiving for beginners who find the magic ring tricky. You can always go back and learn the magic ring technique once you’re comfortable with the basic flower pattern.
What’s the best way to attach flowers to hats or bags?
The attachment method depends on whether you want your flowers to be permanent residents or occasional visitors to your projects!
For permanent attachment, use a yarn needle with matching thread and sew around the center with small, hidden stitches. Make sure to secure everything with several knots on the wrong side where they won’t show.
If you want removable flowers, attach a small safety pin to the back or sew on a proper pin-back finding from the craft store. This way, you can move your flowers between different accessories or remove them for washing.
Here are some pro tips that will save you headaches later: Always test your attachment method on a fabric swatch first, especially if you’re using adhesive. Consider whether the item will need washing and choose your attachment method accordingly.
Place flowers strategically away from stress points like shoulder straps or areas that get lots of handling. For thin fabrics, use a small piece of interfacing behind the attachment point for extra support. Your flowers will stay put much better this way!
Conclusion & Next Steps
Look at you! You’ve just mastered the art of creating beautiful crochet flowers for beginners using nothing more than basic stitches and a little bit of yarn magic. These delightful 5-10 minute projects aren’t just pretty decorations – they’re your stepping stones to crochet confidence.
Think about everything you’ve accomplished in this short journey. You’ve conquered the magic ring technique, which honestly intimidates many beginners at first. You’ve learned to work chain stitches, single crochet, double crochet, and slip stitches with purpose and precision. Working in rounds probably felt awkward initially, but now you’re shaping those petals like a pro. And let’s not forget those finishing techniques that transform a simple collection of stitches into something truly special.
Show Off Your Blooms!
Your first crochet flower deserves to be celebrated! We’d absolutely love to see what you’ve created. Share your crochet flowers for beginners on social media and tag us @CrochetCraze. There’s something magical about seeing other beginners’ work – it reminds us that every expert started exactly where you are right now.
Your success story might be exactly what another nervous beginner needs to see to take that first brave step with their hook and yarn.
Ready for Your Next Trip?
Now that you’ve got these basic flowers under your belt, a whole world of possibilities has opened up. You might want to experiment with multi-colored flower patterns that really make those petals pop. Larger, more complex flower designs will challenge your new skills while still feeling achievable.
Some crafters get hooked on joining flowers into motifs or blankets – imagine a whole garden of your handmade blooms! Others love adding leaves and stems to create realistic bouquets that never need watering.
At Crochet Craze, we’re genuinely excited to be part of your crafting journey. We believe in building skills step by step, making sure each new technique feels like a natural progression rather than an overwhelming leap.
When you’re ready to tackle your next challenge, our Crochet Patterns for Beginners (Video) collection offers that visual guidance that makes all the difference when learning something new.
Every crochet expert you admire started with their very first flower. You’re already well on your way to creating those beautiful, handmade treasures that will bring joy to you and your loved ones for years to come. Happy crocheting!