Shawl made from granny squares: 10 Powerful Positive Tips 2025
Find the Timeless Appeal of Granny Square Shawls
A shawl made from granny squares is a versatile crochet project that combines individual squares into a beautiful, wearable accessory. If you’re looking to create one, here’s what you need to know:
- Basic Requirements: Worsted weight yarn (approximately 950 yards total), size H/8 (5.0mm) crochet hook, yarn needle, scissors
- Skill Level: Beginner to intermediate
- Time Investment: 1-2 weeks for an average crocheter
- Standard Size: 36 squares (each 5.5″ square) typically creates a shawl measuring 16.5″ wide by 66″ long
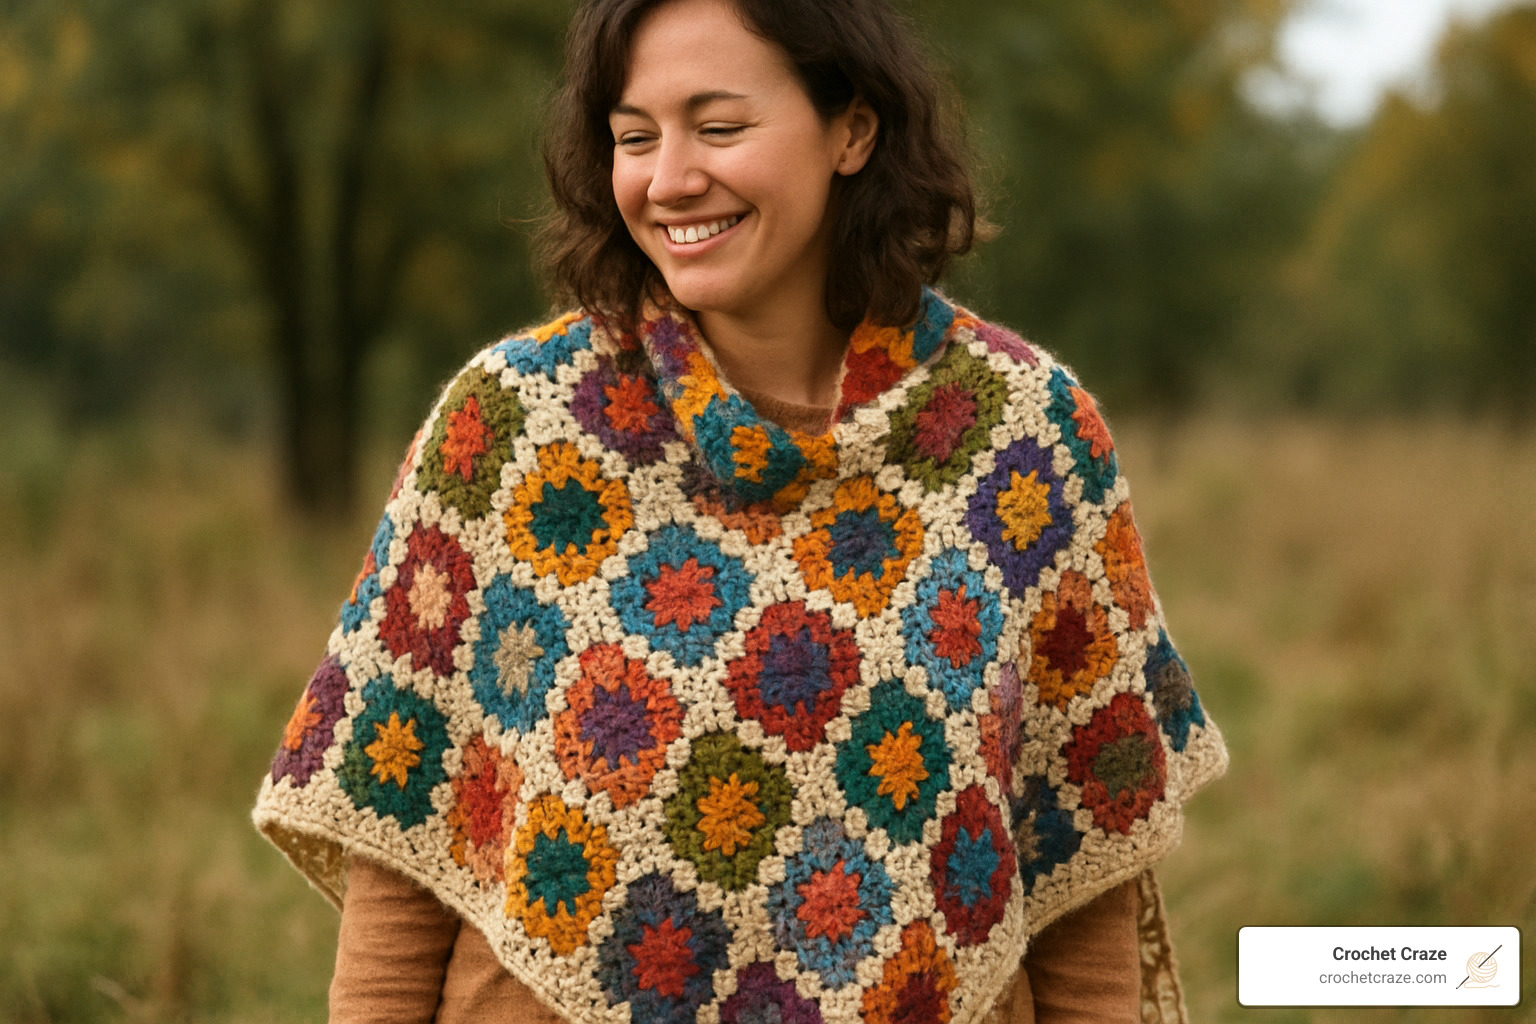
There’s something deeply satisfying about creating a shawl made from granny squares. Each colorful square feels like a mini-accomplishment, and together they form something both practical and beautiful. Granny squares have been a cornerstone of crochet for generations, and changing them into a wearable shawl brings this classic technique into modern fashion.
Unlike traditional shawls worked in rows, a shawl made from granny squares offers endless customization opportunities. You can arrange squares in different layouts, play with color combinations, and incorporate various joining methods to create a piece that’s uniquely yours. This modular approach makes it perfect for using up scrap yarn from your stash!
I’m Sonji Huerta, a crochet enthusiast who recently finded the joy of creating shawls made from granny squares. I’m excited to share what I’ve learned about this versatile crochet technique that combines traditional methods with modern styling possibilities.
Shawl made from granny squares helpful reading:
– crochet pineapple scarf
– crochet scarf patterns
– easy crochet scarf chunky yarn
What Is a Shawl Made From Granny Squares?
A shawl made from granny squares is like a patchwork of crochet love – it’s a beautiful accessory created by joining those iconic little squares we all recognize from grandma’s blankets. Each square features clusters of double crochet stitches with chain spaces between them, creating that classic lattice-like appearance.
Think of it as building blocks for grown-ups! Unlike traditional shawls where you work row after row, these modular creations offer a refreshing “one bite at a time” approach. You can tuck a single square project in your purse, work on it during lunch breaks, and experience that little burst of accomplishment each time you finish one.
What makes a shawl made from granny squares truly special is its versatility. The classic rectangular version typically features about 36 squares arranged in a 12×3 layout, creating a cozy wrap measuring around 16.5″ wide by 66″ long – perfect for draping over your shoulders on chilly evenings. But that’s just the beginning! These shawls can take rectangular, triangular, or even asymmetrical forms depending on your creative vision.
These pieces often become family treasures. There’s something magical about creating a garment where each square might tell a story – perhaps that blue one came from your first sweater project, while the purple was leftover from a baby blanket for your niece. They’re wearable memories, wrapped in warmth.
History & Popularity
The humble granny square has been warming hearts (and bodies) since at least the 1800s, but it really had its moment in the spotlight during the groovy 1970s. This was when handcrafted items became powerful symbols of individuality and self-expression – and the shawl made from granny squares emerged as both practical accessory and artistic statement.
Today, these colorful creations are experiencing a delightful comeback. This renaissance isn’t just about aesthetics – it’s deeply connected to our growing awareness of sustainability and zero-waste crafting. What better way to use up those lonely yarn remnants than incorporating them into a stunning wearable mosaic?
The revival also speaks to our collective yearning for slow fashion in a world. When you craft a shawl made from granny squares, you’re participating in a tradition that values patience, creativity, and resourcefulness. The Original Half Granny Square Shawl pattern on Ravelry boasts over 1,000 completed projects and maintains an impressive 4.5/5 rating – clear evidence that this style continues to captivate crocheters of all skill levels.
Materials, Tools & Skills Checklist
Ready to start your shawl made from granny squares? Let’s gather everything you’ll need!
For a standard 36-square shawl, you’ll want about 500 yards of your main color yarn and roughly 450 yards of contrast colors (you can divide this among 9 different colors at about 50 yards each for a scrappy look). Most crocheters choose DK (#3), worsted (#4), or aran (#4) weight yarn, depending on how drapey or substantial you want your finished shawl to feel.
Your essential tools include a size H/8 (5.0mm) crochet hook for worsted weight yarn, scissors for snipping yarn, a yarn needle for weaving in ends, and some stitch markers to keep track of your corners. A measuring tape helps check your gauge, and for blocking your finished shawl, you’ll want blocking mats, pins, and a spray bottle.
As for skills, if you can make a chain, slip stitch, and double crochet, you’re already well on your way! You’ll also need to be comfortable working in rounds, starting with either a magic ring or chain ring, changing colors, and using basic joining methods.
New to crochet hooks? Our Crochet Hook Sizes: A Beginner’s Handbook breaks everything down in simple terms.

Best Yarn & Hook Pairings
The yarn you choose will completely transform the look and feel of your shawl made from granny squares!
Wool yarn creates a wonderfully warm shawl with natural elasticity that blocks beautifully. If you live somewhere warmer, cotton gives you crisp stitch definition and breathability. On a budget or need something machine-washable? Acrylic yarns come in every color and won’t break the bank.
For something truly special, consider an alpaca blend like Touch of Alpaca Yarn, which drapes like a dream while keeping you cozy. Wool/acrylic blends offer the perfect middle ground between warmth and easy care.
The weight of your yarn matters too! DK weight (#3) creates a lighter, more delicate shawl with beautiful drape. Most crocheters reach for worsted weight (#4) as it balances drape and warmth. For extra coziness, aran weight (#4) produces a more substantial wrap.
Pair your yarn with the right hook size:
– DK weight: 4.0mm (G) to 4.5mm (7) hook
– Worsted weight: 5.0mm (H/8) to 5.5mm (I/9) hook
– Aran weight: 5.5mm (I/9) to 6.0mm (J/10) hook
If wool makes you itch, try cotton/bamboo blends, premium hypoallergenic acrylics, or plant-based fibers like linen or hemp.
One last tip: when substituting yarns, always check your gauge! A standard granny square in worsted weight yarn with a 5.0mm hook should measure approximately 5.5″ square.
Step-by-Step: Crochet Your First Square
Ready to begin your shawl made from granny squares journey? Let’s start with creating that first perfect square!
Round 1:
Start with a magic ring (or chain 4 and join with a slip stitch). Chain 3 (counts as your first double crochet), then work 2 more double crochets into your ring. Chain 2 to create your first corner space. Now repeat the pattern: 3 double crochets, chain 2, three more times around the ring. Join with a slip stitch to the top of your beginning chain-3.
Round 2:
Join your new color in any corner chain-2 space. Chain 3, then work 2 more double crochets, chain 2, and 3 more double crochets all in that same corner space. Chain 1, then move to the next corner and repeat: 3 double crochets, chain 2, 3 double crochets, chain 1. Continue around, and join with a slip stitch when you reach the beginning.
Round 3:
Join your next color in any corner space, chain 3, and work the corner pattern (2 more double crochets, chain 2, 3 more double crochets). Chain 1, then work 3 double crochets in the chain-1 space from the previous round, chain 1 again. Repeat this pattern around the square, making sure to work those 3-double-crochet clusters in each corner and side space. Join with a slip stitch when you finish.
Your first granny square is complete!
Tips for Square Success:
– Keep your tension consistent throughout
– The beginning chain-3 counts as a double crochet
– Always keep the right side facing you when working in the round
– Weave in ends after each round rather than saving them all for the end
– Aim for squares measuring about 5.5″ across when using worsted weight yarn
For a more detailed walkthrough with photos, check out our Crochet for Beginners: Granny Square Step by Step guide.
How Many Squares Make a Shawl Made From Granny Squares?
“How many squares do I need?” is probably the most common question about a shawl made from granny squares. The answer depends on what shape and size you’re dreaming of!
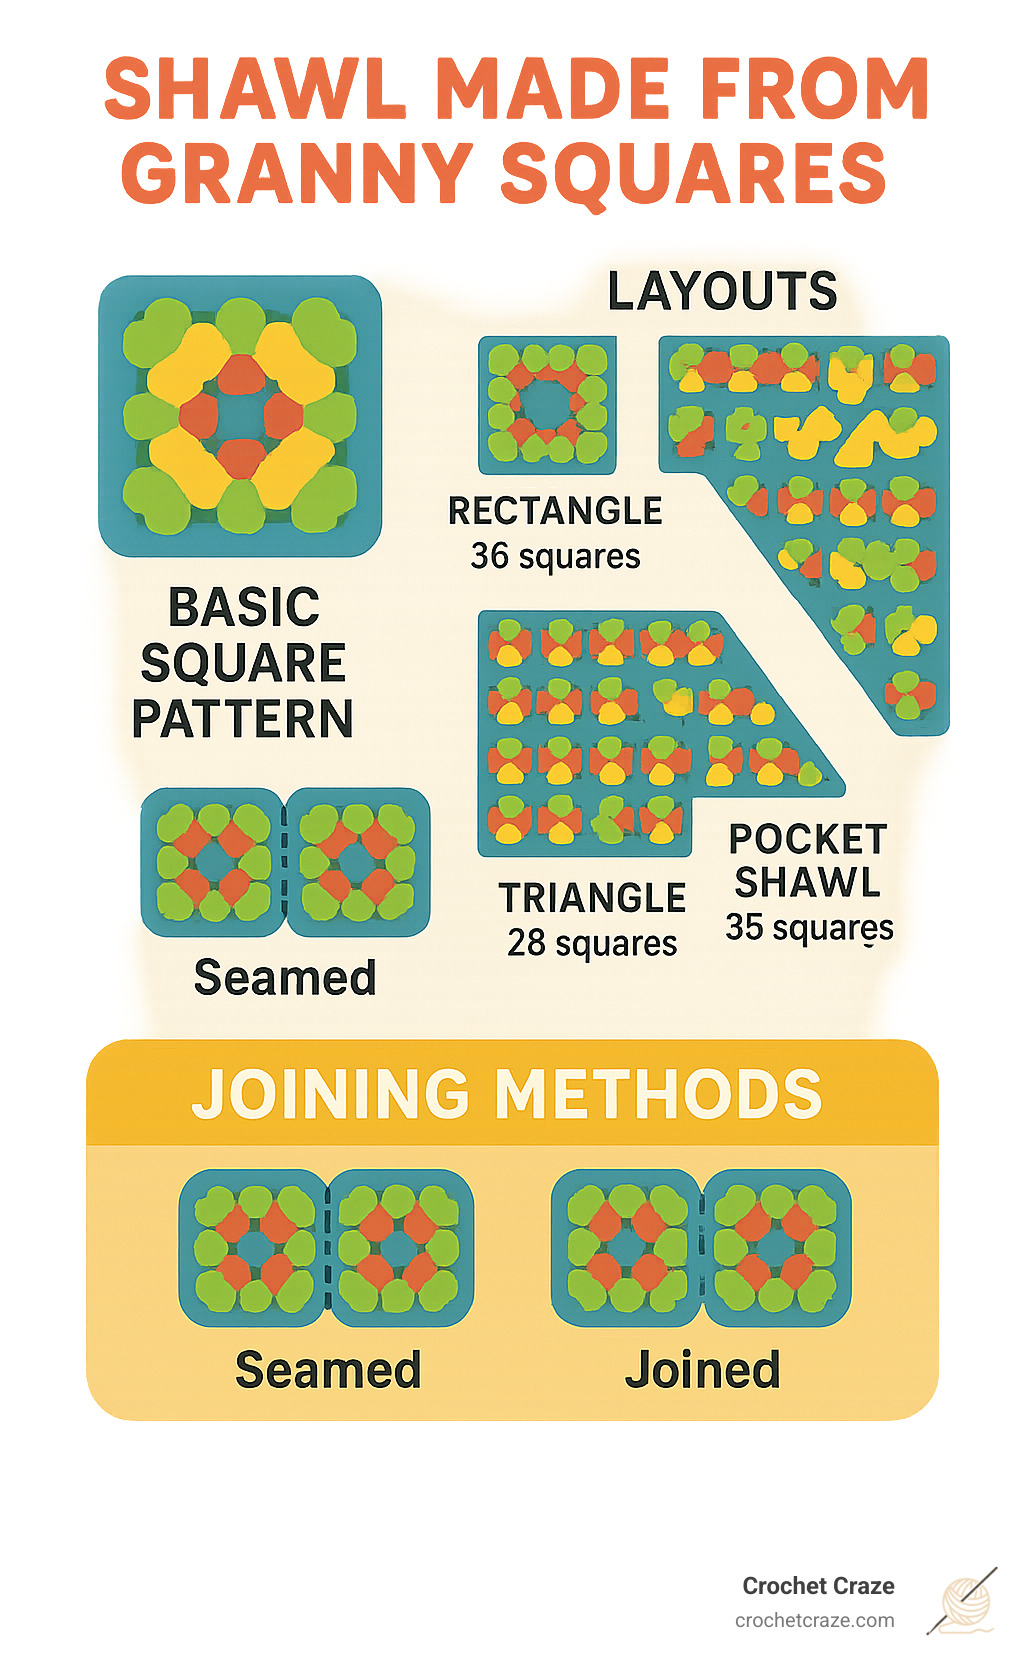
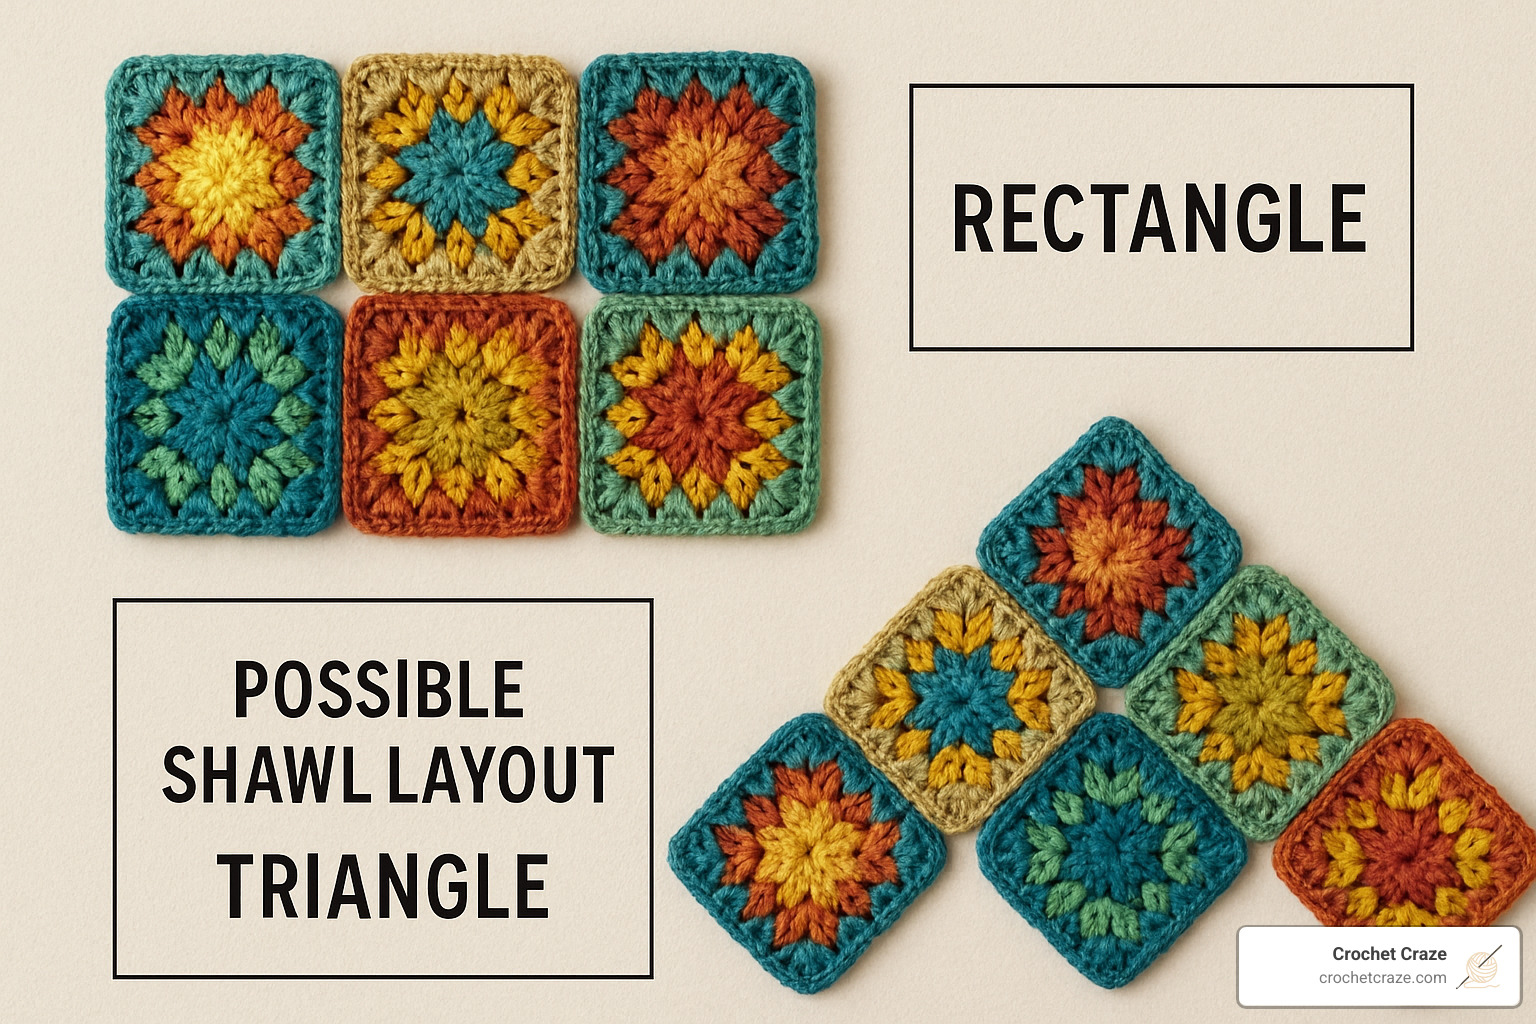
For a classic rectangular shawl, you’ll need about 36 squares arranged in 12 rows of 3 squares each. This creates a lovely wrap approximately 16.5″ wide by 66″ long.
If you prefer something wider, consider making 55 squares arranged in 11 rows of 5 squares, measuring about 27.5″ × 60.5″.
The trendy Hip Granny Pocket Shawl requires 55 full squares plus 11 half squares, with 2 additional squares for pockets (each about 8″ × 8″).
For triangular shawls, the Half Granny Triangle works in rows that expand as you go. The Tulip Square Collection creates a stunning triangle using 36 squares and 9 triangular pieces, resulting in a shawl about 60″ wide by 30″ high.
Here’s a quick reference for popular layouts:
| Shawl Style | Square Count | Finished Dimensions | Approx. Yardage |
|---|---|---|---|
| Classic Rectangle | 36 squares | 16.5″ × 66″ | 950 yards |
| Tulip Square Triangle | 36 squares + 9 triangles | 60″ × 30″ | 770 yards |
| Hip Granny Pocket | 55 squares + 11 half squares + 2 pocket squares | 11″ × 61″ | 624 yards |
| Original Half Granny | Worked in rows | Customizable | 770 yards |
| Ferris Wheel Granny | 55 squares + 11 half squares | 61″ × 30″ | 800 yards |
Joining Tips for a Shawl Made From Granny Squares
The joining method you choose affects both appearance and durability of your shawl made from granny squares.
My personal favorite is the Join-As-You-Go Method. Complete all squares through Round 4, then for the joining round, work the first square completely. For subsequent squares, replace some chain stitches with slip stitches into the adjacent square. This creates a flat, nearly invisible join.
The Slip Stitch Seam creates a lovely raised texture. Place squares right sides together, insert your hook through both loops of both squares, and pull your yarn through both layers and through the loop on your hook.
For a truly seamless look, try the Invisible Whipstitch. Thread a yarn needle with matching yarn, place squares with wrong sides together, and whipstitch through the back loops only.
The Flat Slip Stitch Join offers a decorative element while keeping everything secure. With squares right sides up and edges touching, insert your hook from front to back through both squares, then pull yarn through both layers and through the loop on your hook.
When joining, use yarn that either matches or intentionally contrasts with your squares. Keep your tension loose enough to prevent puckering. For rectangular shawls, join squares into rows first, then join the rows together.
For a visual demonstration, check out Watch the video Here:Tips:Granny Square ShawlInstructions:Assembly.
Customize & Finish Like a Pro
Making your shawl made from granny squares truly unique is where the real joy begins! After mastering the basics, it’s time to add those special touches that transform your project from lovely to stunning.
Size adjustments are perhaps the simplest way to customize. Need something longer? Add another row or two of squares. Want a wider piece? Add an extra column on each side. You can even play with the square size itself—using bulkier yarn with a larger hook creates bigger squares (and a faster project!), while finer yarn produces delicate, lacy squares.
Color is where your personality can really shine. Try an ombré effect, where colors gradually transition from light to dark. If you’re working from your yarn stash, accept the scrappy look by using random leftover yarns. For something more polished, stick to a planned palette of 3-5 complementary colors, or try a monochromatic approach using different shades of the same color.
Borders can completely transform your shawl! A simple edge of single crochet creates a clean finish, while a shell border adds feminine flair. Picot edges add delicate detail, and a scalloped border offers vintage charm. For more texture, try a bobble border.
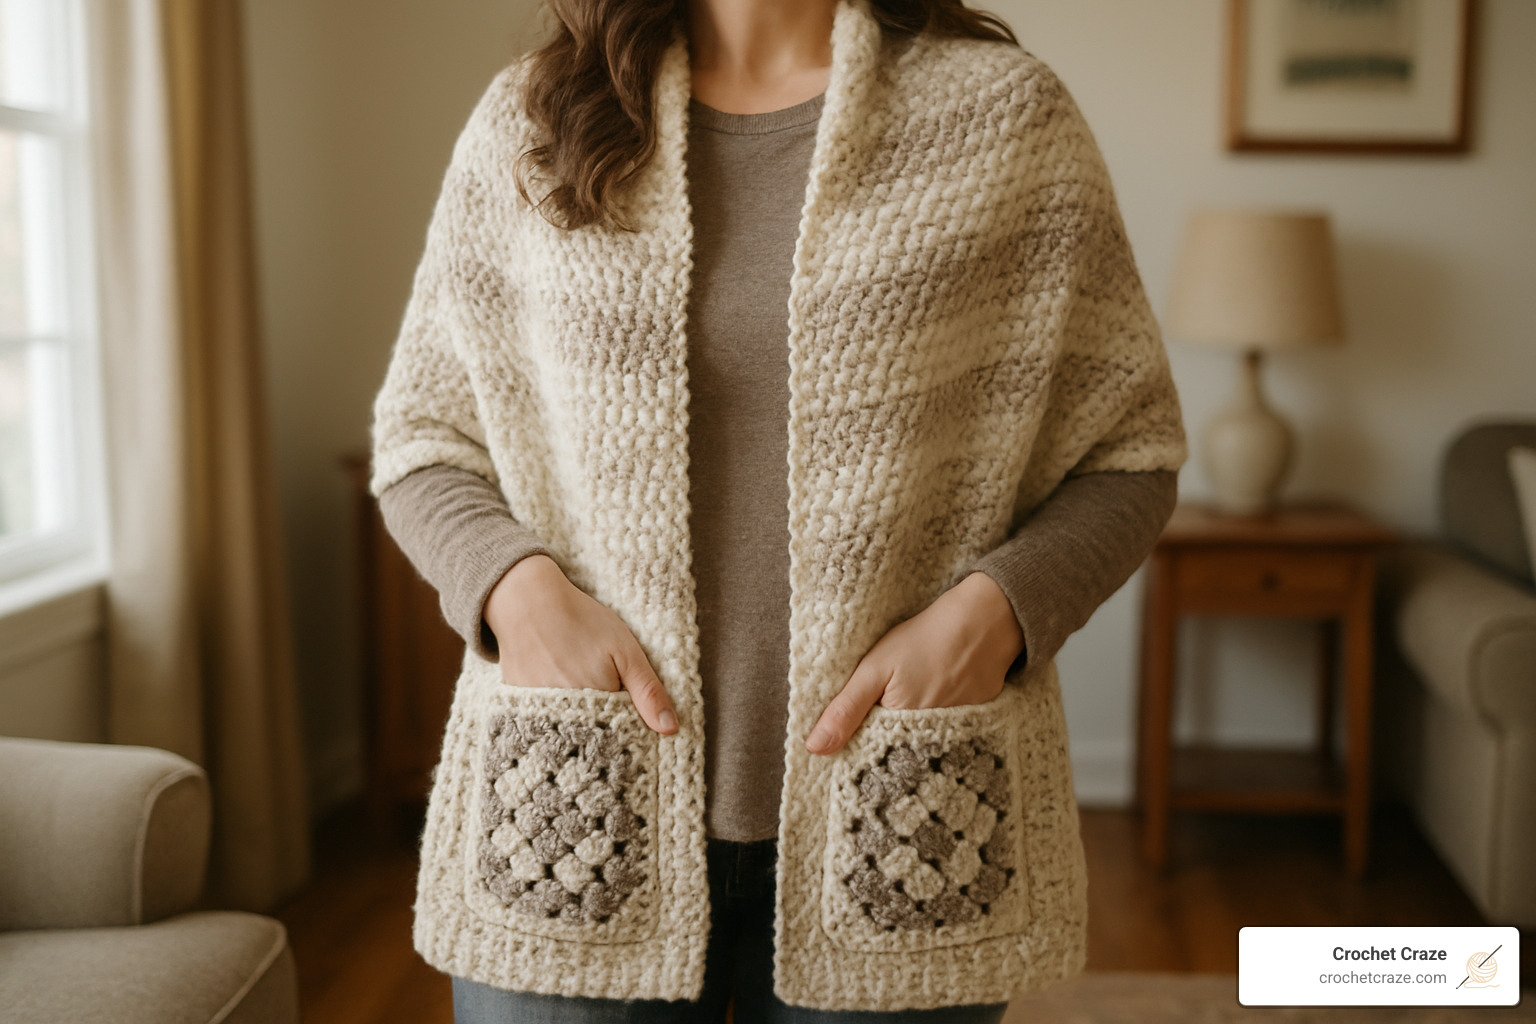
Embellishments take your shawl to the next level. Fringe adds movement and a bohemian touch—just cut 10-12″ strands, fold them in half, and knot them along the bottom edge. Tassels at the corners create a polished finish, while pom-poms add playful whimsy. For a practical touch, consider adding pockets—functional granny square pockets not only look adorable but also keep your hands warm!
For even more creative inspiration, check out our Creative Crochet Projects collection.
Blocking & Care
Your beautiful shawl made from granny squares deserves proper care to keep it looking gorgeous for years to come.
Wet blocking works wonders for natural fibers like wool and cotton. Soak your finished shawl in lukewarm water with mild soap, gently squeeze out excess water, lay it flat on blocking mats or clean towels, pin it to your desired dimensions, and let it dry completely.
If you’ve used acrylic yarn or blends, steam blocking is your friend. Lay your shawl flat, hold a steam iron about 1-2 inches above the surface (never touching the yarn!), and let the steam penetrate the fibers. Pin if necessary and let cool completely.
For quick fixes, try spray blocking. Lay your shawl flat, mist it with water until damp, gently shape it with your hands, and let it dry.
Caring for your shawl depends on the fiber:
– Wool: Hand wash in cool water, lay flat to dry
– Cotton: Gentle machine cycle, lay flat to dry
– Acrylic: Machine wash and dry on low heat
– Alpaca blends: Gentle hand washing in cool water
– Wool/acrylic blends: Hand wash or gentle machine cycle
When storing your creation, fold rather than hang it to prevent stretching. Keep it in a breathable container like a cotton bag or pillowcase.
Modern Variations
The classic shawl made from granny squares has inspired some truly creative modern interpretations!
The Pocket Shawl has become an absolute sensation. This clever design combines the cozy wrap of a traditional shawl with the practicality of pockets. Typically rectangular (about 11″ × 61″), it features two 8″ × 8″ granny square pockets that add both function and visual interest. Many crocheters add fringe for a bohemian touch.
The Half-Granny Triangle design is worked top-down in rows rather than rounds. It creates a dramatic point at the back that drapes beautifully with no seaming or joining required! You can easily customize it to any size, making it perfect for everything from a small neck scarf to a generous wrap.
For those who love floral motifs, the Tulip Square Shawl offers a gorgeous alternative to classic granny squares. This design combines 36 decorative tulip-motif squares with 9 triangles for shaping, featuring special stitch patterns including puff stitches that create wonderful texture.
The Ferris Wheel Granny Square Shawl puts a modern spin on the traditional layout with 55 full squares and 11 half squares. Many crafters add tassel embellishments for extra flair.
Troubleshooting & Pro Tips
Even experienced crocheters run into snags when working on a shawl made from granny squares. Here are solutions to common problems:
If your squares are coming out in different sizes, check your gauge frequently and block your squares before joining. Make a cardboard template of your target square size (usually 5.5″ for worsted weight) and use it to measure each square as you complete it.
For curling corners that won’t lie flat, double-check that you’re making proper corner spaces (chain-2) and maintaining correct stitch counts in each round. A light steam block can work wonders for stubborn corners.
If your joins are too visible, try switching to an invisible whipstitch or flat slip stitch join. A pro trick is to join with a slightly thinner yarn or crochet thread in a matching color for a nearly seamless look.
For smooth color transitions, complete the last yarn over of your final stitch with the new color. Weave in ends as you go to avoid dealing with dozens of loose ends at the finish line.
To keep track of right and wrong sides, place a removable stitch marker on the right side of your first square as a visual reminder. This ensures all squares face the same direction when joined.
Be realistic about timing – a typical shawl made from granny squares takes 1-2 weeks for an average crocheter. Setting a goal of 3-5 squares per day keeps the project moving without becoming overwhelming.
If you run out of a specific color halfway through, try to buy extra of colors you love from the start. When using scrap yarn, group similar weights together for consistent squares.
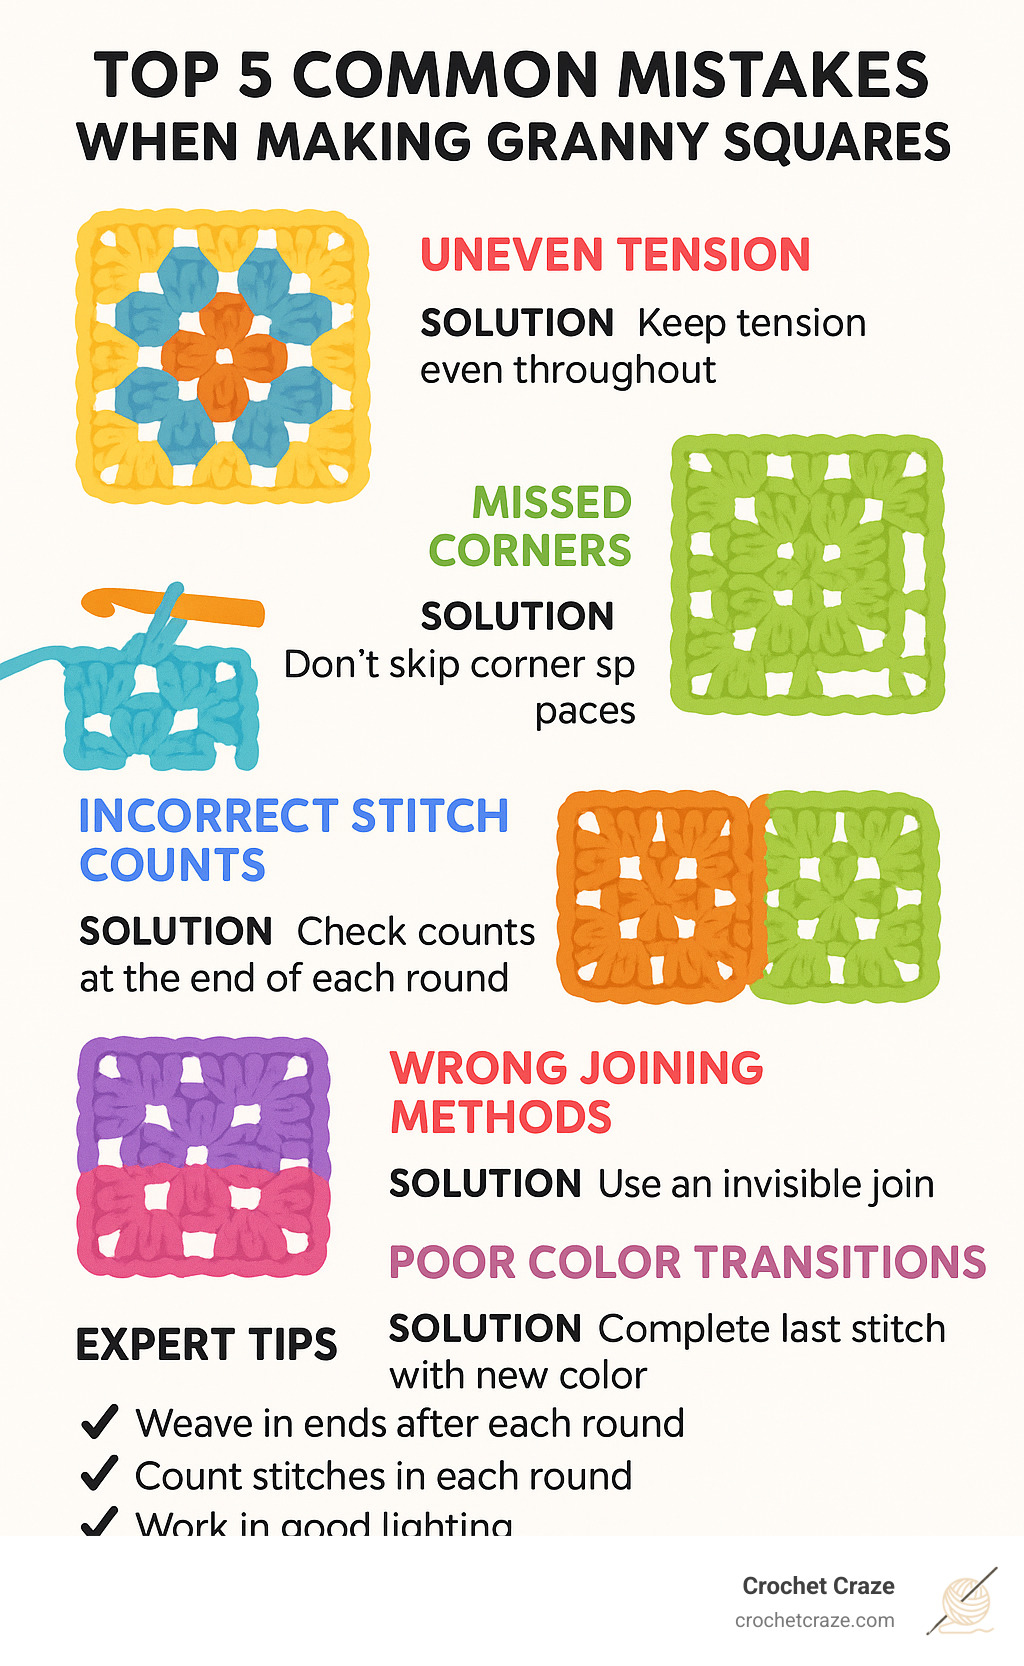
Final pro tips:
– Weave in ends after each round
– Count your stitches in each round
– Use a consistent hook grip for even tension
– Work in good lighting
– Take regular breaks to prevent hand fatigue
– Store work-in-progress squares in a project bag
Creating a shawl made from granny squares is as much about enjoying the journey as reaching the destination. Each completed square is a little victory to celebrate!
Frequently Asked Questions About Granny-Square Shawls
What skill level do I need?
One of the beautiful things about a shawl made from granny squares is how accessible it is for crocheters at different skill levels.
If you’re just starting out, don’t be intimidated! The basic granny square is actually one of the most beginner-friendly motifs in crochet. You only need to know chains, double crochets, and slip stitches to create your first square. What makes this project especially beginner-friendly is that you work in small, manageable sections rather than maintaining tension across a large piece all at once.
For those with some crochet experience, a shawl made from granny squares offers opportunities to refine your skills through joining techniques and adding beautiful borders. Many intermediate crocheters find this project satisfying because each square feels like a little accomplishment.
Even advanced crocheters find creative challenges in planning complex color schemes, designing custom modifications, or mastering intricate joining methods.
I recommend that complete beginners start by mastering just the basic granny square before committing to a full shawl. Once you can create consistent squares with even tension, you’ll be ready to tackle the complete project.
Can I use leftover yarn?
Absolutely yes! Using up yarn leftovers is practically a time-honored tradition with a shawl made from granny squares. Many crocheters specifically choose this project as their favorite “stash-buster.”
The “scrappy” look—with its joyful mix of colors and textures—has a charm all its own. To make your scrap yarn work beautifully together:
Sort your leftovers by weight first (keeping DK with DK, worsted with worsted) to ensure your squares come out consistent in size. Even the most random collection of colors can look intentional if you include one unifying color throughout—perhaps as the final round of each square or as your joining yarn.
Before starting, estimate how many squares you’ll need and make sure you have enough yarn to complete the project. You can always combine partial skeins to complete squares if needed—maybe using one color for the first two rounds and another for the final round.
How do I choose the best joining method?
Choosing how to connect your squares is one of the most important decisions for your shawl made from granny squares. The right joining method affects both appearance and function.
When considering appearance, think about whether you want your seams to be a design feature or to disappear. A flat join like an invisible whipstitch creates a nearly seamless look, while a raised join using slip stitches creates a decorative ridge that frames each square. For something special, decorative joins with picots or shell stitches add beautiful texture.
The function of your shawl matters too. If you’re creating something that needs to withstand frequent wear, consider a stronger connection like a single crochet join. For a shawl that drapes beautifully, a more flexible join like a simple whipstitch might be preferable. Some joins, like the flat slip stitch, look good on both sides—perfect if your shawl will be seen from all angles.
Your own comfort level with different techniques should also guide your choice. If you’re newer to crochet, a simple slip stitch join or basic whipstitch is perfectly lovely and straightforward. As your confidence grows, you might want to try the join-as-you-go method, which eliminates the need for a separate joining step altogether.
There’s no single “best” joining method—just the one that creates the look and feel you want for your unique creation!
Conclusion
There’s something truly magical about finishing a shawl made from granny squares. As you drape your completed creation across your shoulders for the first time, you can’t help but feel a sense of accomplishment—one square at a time, you’ve created something both beautiful and functional.
This project represents the perfect balance between tradition and personal expression. Each color choice, each joining method, each border stitch reflects a bit of your unique creative voice. Whether you’ve opted for a classic rectangular design, a dramatic triangle, or a practical pocket shawl, your granny square shawl tells your story.
What I love most about making a shawl made from granny squares is how perfectly it fits into our busy modern lives. Those small pockets of time—waiting for appointments, during lunch breaks, or while watching your favorite show—become productive moments where one more square comes to life. Before you know it, you have a collection ready to join into something magnificent.
The eco-friendly aspect shouldn’t be overlooked either. In a world of fast fashion, there’s something deeply satisfying about changing leftover yarn into a wearable piece of art. Each colorful square represents not just creativity, but mindful consumption—a small step toward more sustainable crafting.
For beginners, this project builds confidence with each completed square. For experienced crocheters, it offers endless opportunities to experiment with color, texture, and technique. No matter where you are on your crochet journey, a shawl made from granny squares helps you grow as a maker.
Here at Crochet Craze, we believe handmade items carry something special—the time, attention, and care of their creator. When you wear your shawl or gift it to someone special, that energy travels with it, bringing warmth in more ways than one.
Ready to explore more creative possibilities? Visit our collection of More info about creative crafts and continue your making journey with us.
Happy crocheting, friends—may your hooks be swift, your yarn never tangle, and your granny square shawl bring you joy for years to come!