Discover how simple it is to make mini amigurumi. They fit in your hand, sit on your desk, or hide in a pocket. These tiny toys are made with basic crochet and just a few supplies. They show that you don’t need a lot of time or money to create something special.
Starting with mini amigurumi is great if you’re new to crocheting. You don’t need to be an expert. A simple guide will teach you the basics. Plus, they’re quick to make, which is perfect for busy people and beginners.
For inspiration, check out Instagram. It’s full of maker’s work, color ideas, and pattern tips. You can also find detailed tutorials at amigurumi tutorials. Soon, you’ll be making mini amigurumi that brighten up your day.
Key Takeaways
- Mini amigurumi are tiny crochet toys about 1–3 inches tall, ideal for quick projects.
- You don’t need advanced skills—basic stitches and a short amigurumi tutorial are enough.
- Small amigurumi projects use minimal yarn and supplies, making them affordable and portable.
- Instagram is a great source of inspiration for colors, trends, and maker tips.
- These minis make delightful gifts, desk companions, and instant mood boosters.
Why You’ll Love Making Mini Amigurumi
Mini amigurumi are great for a quick, fun craft that looks good. They are small, so you can finish them fast. You can make something cute in just one evening or during a break.
Instant gratification and small-project satisfaction
Working on small projects boosts your confidence. Mini amigurumi give you a sense of accomplishment like a big toy but quicker. This is perfect for improving your skills and staying excited about crafting.
Perfect gifts and desk companions for your home or office
Mini amigurumi are great as desk toys, keychains, or bag charms. They make wonderful gifts for birthdays, teachers, and coworkers. You can make each one special with little effort.
Affordable crafting that uses minimal yarn and supplies
Mini projects are cheap because they use scraps and little stuffing. This lets you try different designs and colors without spending a lot. If you’re new to mini amigurumi, the low cost and risk are big pluses.
| Benefit | What You Get | Best Use |
|---|---|---|
| Fast completion | One-evening projects that boost morale | Quick crochet projects for breaks and travel |
| Low cost | Uses leftover yarn and tiny amounts of stuffing | Affordable crafting and testing new ideas |
| Gift-ready | Adorable tiny forms that fit into packages | Tiny handmade gifts for many occasions |
| Creative practice | Safe space to try new techniques | Skill-building before tackling larger amigurumi |
| Social friendly | Easy to share photos and tag makers on Instagram | Join trends and find inspiration for seasonal minis |
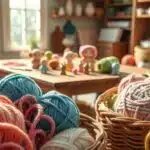
Essential Materials and Tools for Mini Amigurumi
You’ll need a small kit that fits in your bag and matches your patience. Making smart choices helps you work on tiny projects faster and neater. Here are the main things you’ll need before starting to crochet minis.
Yarn types and recommended weights for tiny projects
For mini projects, use fingering, sport, or DK weight yarns. Cotton yarns like Lion Brand Jeans are great for clear stitches. Acrylic yarns, such as Red Heart Super Saver, are affordable and come in many colors.
Premium brands like Scheepjes offer a luxurious finish. Use small skeins or scraps to avoid wasting yarn. Testing with a swatch helps find the best yarn for mini amigurumi, ensuring stuffing won’t show through the stitches.
Hook sizes, stuffing, safety eyes, and simple notions
Choose hooks that are smaller than what the yarn label suggests. Hook sizes usually range from 2.0 mm to 3.5 mm. Using smaller hooks helps keep stuffing hidden and shapes sharp.
Polyester fiberfill is the best stuffing. For weighted or textured minis, try puffy pellets or small amounts of wool roving. Use 6–8 mm safety eyes for slightly larger minis or embroider faces with embroidery floss on very small pieces.
Your toolkit should include a tapestry needle, stitch markers, small scissors, and a sewing needle. These tools help you finish your work neatly and quickly. For gifts to young children, avoid small safety eyes. Instead, use embroidered features or securely sewn felt for safety.
Where to source supplies online and locally
Major craft stores like Michael’s and Joann have hooks, yarn, stuffing, and safety eyes. Online stores like LoveCrafts, KnitPicks, and Amazon let you buy small quantities and compare brands easily.
Instagram is a great place to find limited-dye runs, indie dyers, and tiny kits. Follow makers and yarn shops for restock alerts and direct shop links. This is a fun way to discover specialty mini amigurumi materials and kits made for miniature projects.
Basic Crochet Stitches and Techniques You’ll Use
You’ll learn a few key moves to bring tiny amigurumi to life. Start with steady rounds and smooth transitions. Keep track of stitch counts and use a marker for shaping heads, bodies, and limbs.
Magic ring, single crochet, increase and decrease
The magic ring tutorial is essential for tight, neat starts. Pull the loop tight, then work single crochet rounds into it. Close the loop for a perfect center.
Single crochet is great for most of your fabric. Add increases to widen and decreases to curve. Keep rounds in a spiral unless a pattern says to join them, and track counts for shape consistency.
Invisible join, color changes, and simple shaping tricks
For a seamless finish, use an invisible join at round ends. It removes the ridge from a visible slip stitch join, making small toys look polished.
For color changes, carry yarn inside or cut and weave ends, depending on size. Plan shifts to minimize loose ends in tiny projects. Place increases and decreases to sculpt features; stitch markers help hit the same spots every time.
Quick finishing: weaving in ends and basic embroidery for faces
Weave in ends with a tapestry needle and bury tails inside the toy. For faces, use embroidery floss for mouths and cheeks when safety eyes are not suitable.
Watch short Instagram reels for visual help on the magic ring tutorial and invisible join amigurumi. They offer quick demonstrations that make these techniques click faster than reading alone.
| Technique | When to Use | Quick Tip |
|---|---|---|
| Magic ring | Starting circles for heads and bodies | Pull tight to close hole; count first round carefully |
| Single crochet | Main fabric for mini amigurumi | Work evenly in spiral rounds to avoid visible seams |
| Increase / Decrease | Shaping curves, necks, and limbs | Space decreases evenly for smooth shaping |
| Invisible join | Neat round endings and color transitions | Use mattress stitch-style pull for an invisible seam |
| Color change | Striping or accents on tiny pieces | Carry yarn when feasible; hide ends inside stuffing |
| Finishing embroidery | Eyes, mouths, and small details | Use short stitches and secure knots inside toy |
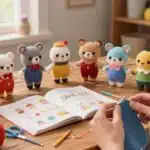
Step-by-Step Mini Amigurumi Pattern for Beginners
Start with a simple sphere to learn increases, even rounds, and decreases. This is the fastest way to master a mini amigurumi pattern while keeping frustration low and smiles high.

Choosing a simple shape
Pick a round body or tiny animal head when you begin. A hemisphere or full sphere uses the magic ring, steady increases, even rounds for height, then mirrored decreases to close. That path trains you on key moves without complicated shaping.
Stitch counts and following the pattern
Use this basic stitch count structure as a starting point:
- R1: 6 sc in MR (6)
- R2: inc in each (12)
- R3: (sc, inc) x6 (18)
- R4: (2 sc, inc) x6 (24)
- Work even rounds to build height, then mirror decreases to close.
To avoid getting lost, decode common abbreviations like MR, sc, inc, dec, and sl st first. Mark the start of each round with a stitch marker. Carry a row counter or a scrap of paper to track rounds. If you want a visual walkthrough, check a beginner tutorial such as the one at amigurumi for beginners.
Troubleshooting common beginner mistakes
If your tension is loose, try a smaller hook or tighten your hold. For visible stuffing, switch to a smaller hook or add more stitches per round. Miscounts cause odd shapes; stop at the end of each round to tally stitches. Lumpy stuffing happens when you add too much at once—stuff in small amounts and shape as you go.
Practice on scrap yarn to test hook and yarn combos until the size matches your plan. Use stitch markers, recount often, and watch short Instagram reels for live troubleshooting when a written mini crochet pattern feels unclear.
| Issue | Likely Cause | Quick Fix |
|---|---|---|
| Too floppy | Loose tension or large hook | Drop one hook size, tighten stitches, or use a firmer yarn |
| Stuffing shows | Holes between stitches | Add rounds, switch to smaller hook, or increase stitch density |
| Odd shaping | Miscounted rounds or missed increases | Recount each round, place a marker at round start |
| Lumpy interior | Too much stuffing at once | Stuff gradually with small fiber amounts and smooth as you fill |
| Confused by pattern language | Unknown abbreviations or shorthand | Learn abbreviations, follow a beginner amigurumi pattern glossary, and practice reading how to read amigurumi pattern lines |
Once you finish a few spheres, you can adapt counts to make heads, bodies, or tiny props. Working through one tiny crochet pattern at a time builds confidence faster than jumping between complex shapes.
Design Variations and Cute Customizations
Give your minis personality with tiny details that speak louder than size. You can customize mini amigurumi by changing scale, color, or one standout accessory. A small tweak makes each piece feel handcrafted and unique.
Adding accessories
Make scarves, hats, and tiny props with simple chains, slip stitches, and short rows. A mini cupcake or a leaf prop makes your friend feel like a scene from a story. Use secure stitches when making amigurumi accessories meant for kids.
Mixing colors and textures
Pair smooth cotton with fuzzy eyelash or boucle yarn for contrast. Variegated yarns give gradient effects without fiddly color changes. Try oversized hats or tiny glasses to play with scale and create playful proportions.
Embellishments and finishing touches
Embroider cheeks, mouths, and freckles using embroidery floss for soft expression. Attach felt shapes by hand-sewing or with fabric glue for a neat finish. Small beads work well as buttons or accents, but mind safety if the toy goes to a child.
Quick styling tips
- Stitch a maker’s initial or add a tiny tag label for a branded touch when you sell or gift.
- Use mini crochet embellishments such as little bows or pom-poms to lift a simple design.
- Browse Instagram for seasonal tiny amigurumi ideas like Halloween pumpkins or holiday Santas to keep your line fresh.
Speed Crocheting Tips to Make Lots of Minis Fast
You want to make lots of minis quickly without getting tired. Start with a simple plan. Choose one shape, get your materials ready, and set a small goal. This keeps you focused and helps you make progress fast.
Efficient assembly-line workflow
Work in stages to speed up. First, crochet all the heads. Then, move on to bodies, limbs, and accessories. This saves time and keeps you from counting rounds too often.
Batch stuffing and finishing
Stuff many pieces at once, then sew and embroider later. Grouping tasks helps you work faster. Use a small funnel or chopstick to stuff tiny spaces quickly.
Time-saving shortcuts without sacrificing cuteness
Use pre-cut felt for eyes and simple templates for accessories. This saves time. For non-child items, fabric glue can be quicker than sewing. Watch short videos on Instagram for quick technique tips.
Organizing patterns and supplies for repeatable results
Label zip bags with project names and include pre-measured yarn, hooks, and notions. Keep digital folders of your favorite patterns. This makes making many amigurumi easier.
Practical time management and micro-goals
Set a timer and aim to finish three minis in an hour. Short, focused sprints keep you going. Track what works so you can do it again.
If you want quick patterns, check this free pattern roundup. Use these designs to practice speed crocheting. This will help you make many amigurumi reliably.
Sharing and Selling Your Mini Amigurumi Creations
Want to make your tiny stitches bring joy and sales? Treat each mini as a tiny product. Use natural light and a simple backdrop. Add props like pencils or coins to show size.
Post images and short videos to show off your work. Use a consistent color scheme and simple settings. Tag yarn brands like Lion Brand to build trust.
When selling, calculate costs carefully. Include material, labor, packaging, and fees. Use a spreadsheet to track expenses. Set a minimum price to avoid undercharging.
Packaging should be as charming as the toy. Use small boxes or clear bags with tissue and a tag. Include a card with care tips and your contact info.
Plan for small-batch production. Make a plan for stuffing, sewing, and tagging. Keep track of best-sellers for craft fairs or online sales. Use Etsy, local fairs, and Instagram Shops for sales.
To market on Instagram, use hashtags like #miniAmigurumi and #handmade. Post regularly and engage with followers. Collaborate and run giveaways to attract more customers.
At craft shows, display items at eye level. Offer discounts for buying more. Bring business cards or a QR code sign for follow-ups.
When pricing, consider hourly value. Have a clear policy on custom orders. Explain your pricing in the listing, including materials and time.
Mini Amigurumi Care and Gift Presentation

You’ve made a tiny friend. Treat it like one. Quick care tips will keep colors bright and seams strong. Add a short care card with washing instructions when you gift, so recipients know how to wash crochet toys without damaging delicate details.
Cleaning and maintenance for small crochet toys
Spot clean small stains with a mild detergent and a soft cloth. For a deeper refresh, hand wash gently in cool water and reshape before you air dry flat. Avoid machine cycles if the mini has glued eyes, painted details, or felt pieces.
Check seams and attachments every few months. Re-stitch loose joins and secure beads or safety eyes promptly to extend life. Store minis away from direct sunlight to slow fading and brittleness.
Creative gift wrapping ideas and personalized tags
Presentation boosts charm. Place your mini in an organza bag, tuck it into a tiny kraft box, or display it in a mason-jar scene with tissue in the recipient’s favorite hues. When you gift wrap minis, include a personalized tag with your name, fiber content, and a short care note.
For an extra touch, create a “birth certificate” or a brief story card about the character. Use saved Instagram posts for inspiration and to discover creative packaging trends from makers like Hooked By Kati; you can adapt several ideas from this personalization guide.
Safety considerations for gifts intended for children
When your mini is a child’s companion, prioritize child-safe amigurumi practices. For kids under three, skip beads and plastic safety eyes. Embroider faces and double-stitch all seams so nothing detaches during play.
Label items with age recommendations and washing guidance. If you plan to sell to parents, follow toy-safety guidance and standards; resources like Crochet Craze offer practical safety reminders you can reference when drafting labels.
| Care Task | Method | When to Use | Notes |
|---|---|---|---|
| Spot cleaning | Mild detergent, soft cloth | Small stains or smudges | Quick, preserves shape and details |
| Hand wash | Cool water, gentle agitation, air dry flat | Periodic deep cleaning | Best for plain yarns without glued parts |
| Storage | Box or drawer away from sun | Long-term keeping | Prevents fading and dust buildup |
| Repair | Re-stitch seams, secure loose attachments | When threads or beads loosen | Use matching yarn and a sharp needle |
| Gift prep | Organza bag, tiny box, care tag | Before gift-giving | Include care for mini amigurumi and washing tips |
| Child safety | Embroider features, avoid small parts | For children under three | Creates truly child-safe amigurumi for worry-free play |
Inspiration: Trending Mini Amigurumi Ideas from Makers
Looking for quick and cute projects? Check out Instagram and craft markets for animals, kawaii food, tiny plants, and fandom minis. These trending minis are loved for their simplicity, portability, and gift-giving charm.
Start with a theme like cats, bunnies, mini donuts, sushi, tiny plants, or character minis. Each theme helps guide your project and makes choosing colors and props easier. Remember, these ideas are just starting points, not strict rules.
When adapting patterns, try new yarn colors, adjust sizes, or swap accessories. Always give credit to the original creator and follow pattern licenses. For step-by-step guides, visit Little Crochet Farm for inspiration and video tutorials.
Keep an inspiration board to track your favorites. Save posts, pin colors, and note interesting details. Tag images with quick notes for easy reference later.
Here’s a quick checklist to turn inspiration into action:
- Start with a trending mini, then tweak one feature.
- Try new yarn colors or weights for texture.
- Combine parts from two patterns for a unique mini.
- Always credit the original maker when sharing your work.
| Theme | Quick Hook | Easy Customizations |
|---|---|---|
| Animals (cats, bunnies) | Sweet faces, small ears, poseable limbs | Change eye style, add scarves, vary ear shape |
| Kawaii food (donuts, sushi) | Bright colors, tiny props, keychain-ready | Switch frosting colors, add sprinkles, use felt toppings |
| Plants (potted cacti) | Chunky stitches, miniature pots, low stuffing | Mix yarn textures, embroider spines, repaint pots |
| Fandom minis | Recognizable accents, small accessories | Use signature colors, safe fan art tweaks, add badges |
Conclusion
Mini amigurumi are quick, affordable, and fun. They spark creativity and make great gifts or items to sell. Each tiny piece teaches you about shaping, color, and personality.
Ready to start? You’ll need small yarn, a hook, and stuffing. Learn the magic ring and single crochet. Then, follow a simple pattern to make your first mini.
Instagram is full of tutorials, ideas, and feedback. Save posts, follow makers, and use hashtags. It’s a great way to find inspiration and suppliers.
Start your mini collection today. Grab your hook and make something adorable. Begin small, keep it fun, and stitch often.
FAQ
What exactly is a mini amigurumi?
Mini amigurumi are small crochet plushies, about 1–3 inches tall. They use basic techniques and tiny materials. Perfect for pocket toys, keychains, or desk friends.
Do I need advanced crochet skills to make minis?
No, you don’t need advanced skills. Beginners can start with simple shapes. This makes projects quick and easy to learn.
What yarn weights and types work best for minis?
Fingering, sport, and DK weights are best. Cotton gives crisp stitches, while acrylic offers color and affordability. Use yarn scraps to save money.
Which hook size should I use?
Use 2.0–3.5 mm hooks. A smaller hook than suggested ensures tight stitches. Test a swatch to get the right fabric.
What stuffing and notions do I need?
Polyester fiberfill is standard. For extra weight, try puffy pellets or wool roving. You’ll also need a tapestry needle, stitch markers, and small scissors.
Are safety eyes okay for gifts to kids?
For kids under three, avoid small safety eyes. Use embroidery floss or felt for eyes. Always check local toy-safety rules.
Where can I buy supplies for mini amigurumi?
Michaels and Joann have what you need. Online, try LoveCrafts, KnitPicks, and Amazon. Instagram is great for indie dyers and small shops.
Which core stitches and techniques should I learn first?
Learn the magic ring, single crochet, increases, and decreases. Practice continuous rounds and invisible joins. Simple finishing touches are key.
How do I follow a typical mini amigurumi pattern?
Read abbreviations and track rounds and stitches. Use stitch markers for round starts. A common pattern starts with 6 sc in MR, then increases and decreases.
What if my tension is loose or stuffing shows?
Switch to a smaller hook or tighten your stitches. Add rounds or use a smaller hook if stuffing shows. Use small, even amounts of stuffing.
How can I speed up making many minis?
Make all parts in batches. Batch stuffing and finishing saves time. Use pre-cut felt and templates for accessories.
Any shortcuts that won’t ruin quality?
Use pre-cut felt and glue for non-child items. Reuse templates and batch tasks. Keep a system of pre-measured yarn and notions.
How do I add character with accessories and textures?
Add tiny scarves, hats, and props for personality. Mix smooth cotton with fuzzy accents. Use variegated yarns and embroider details.
How do I photograph minis for Instagram or a shop?
Use natural light and a neutral background. Include scale props and make carousels or reels. Keep a consistent color palette.
How should I price and package minis for sale?
Calculate material cost, labor, and packaging. Set a minimum price and consider sets or keychains. Use small boxes or bags with a personalized tag.
What cleaning and maintenance do minis need?
Spot clean with mild detergent. For deeper cleaning, hand wash and air dry flat. Avoid machine washing with glued elements.
Where do I find inspiration and tutorials?
Instagram is the best place. Search hashtags like #miniAmigurumi and #tinycrochet. Follow makers and yarn shops for ideas.
Can I adapt patterns I find online or on social media?
Yes, change colors and add accessories. Respect original pattern licenses. Credit the creator and don’t redistribute paid patterns.
Any safety or legal tips for selling minis?
Avoid detachable small parts for young children. Follow local toy-safety rules. Include care instructions and contact info on platforms like Etsy or Instagram Shops.
What are some trending mini amigurumi themes?
Animals, kawaii food, plants, and fandom-inspired minis are popular. Seasonal minis like Halloween pumpkins also do well.
How do I get started right now?
Gather yarn, a hook, fiberfill, a tapestry needle, and a stitch marker. Practice the magic ring and single crochet. Follow a simple pattern and check Instagram reels for help.