
Crochet stitch tutorials: 10 Powerful Easy Patterns 2025
Why Crochet Stitch Tutorials Are Your Gateway to Creative Freedom
Crochet stitch tutorials are step-by-step guides that teach you how to create different stitches using a hook and yarn. Whether you’re a complete beginner or looking to expand your skills, these tutorials break down each stitch into simple, manageable steps.
Essential crochet stitches every beginner should learn:
- Chain stitch (ch) – Foundation for all crochet projects
- Single crochet (sc) – Basic solid stitch, great for dishcloths
- Half double crochet (hdc) – Medium height, perfect for scarves
- Double crochet (dc) – Tall and fast, ideal for blankets
- Slip stitch (sl st) – Joining and finishing stitch
Learning to crochet is surprisingly easy and rewarding. Research shows that each basic stitch can be mastered in about 30 minutes with focused practice. The single crochet stitch is typically the first real stitch beginners learn after the chain, and it creates a dense, sturdy fabric perfect for washcloths and bags.
Crochet offers measurable health benefits too – it can lower blood pressure, reduce stress, and help prevent cognitive decline. Plus, unlike knitting, you can’t drop stitches in crochet, making it more forgiving for beginners.
Why start with tutorials? They provide visual guidance, clear instructions, and often include troubleshooting tips for common mistakes. Many tutorials also suggest practice projects like washcloths or simple scarves to help you apply your new skills immediately.
I’m Sonja Huerta, and as a newcomer to crochet myself, I understand the excitement and challenges of learning these fundamental techniques. My journey with crochet stitch tutorials has taught me that patience and regular practice are key to building confidence with your hook and yarn.
Crochet stitch tutorials vocab explained:
– Creative crochet projects
– Crochet project kits
– Crochet project planner
Crochet Stitch Tutorials 101: Tools, Terminology & First Loops
Ready to transform yarn into something beautiful? Let’s start your crochet stitch tutorials journey with the essentials that’ll set you up for success.
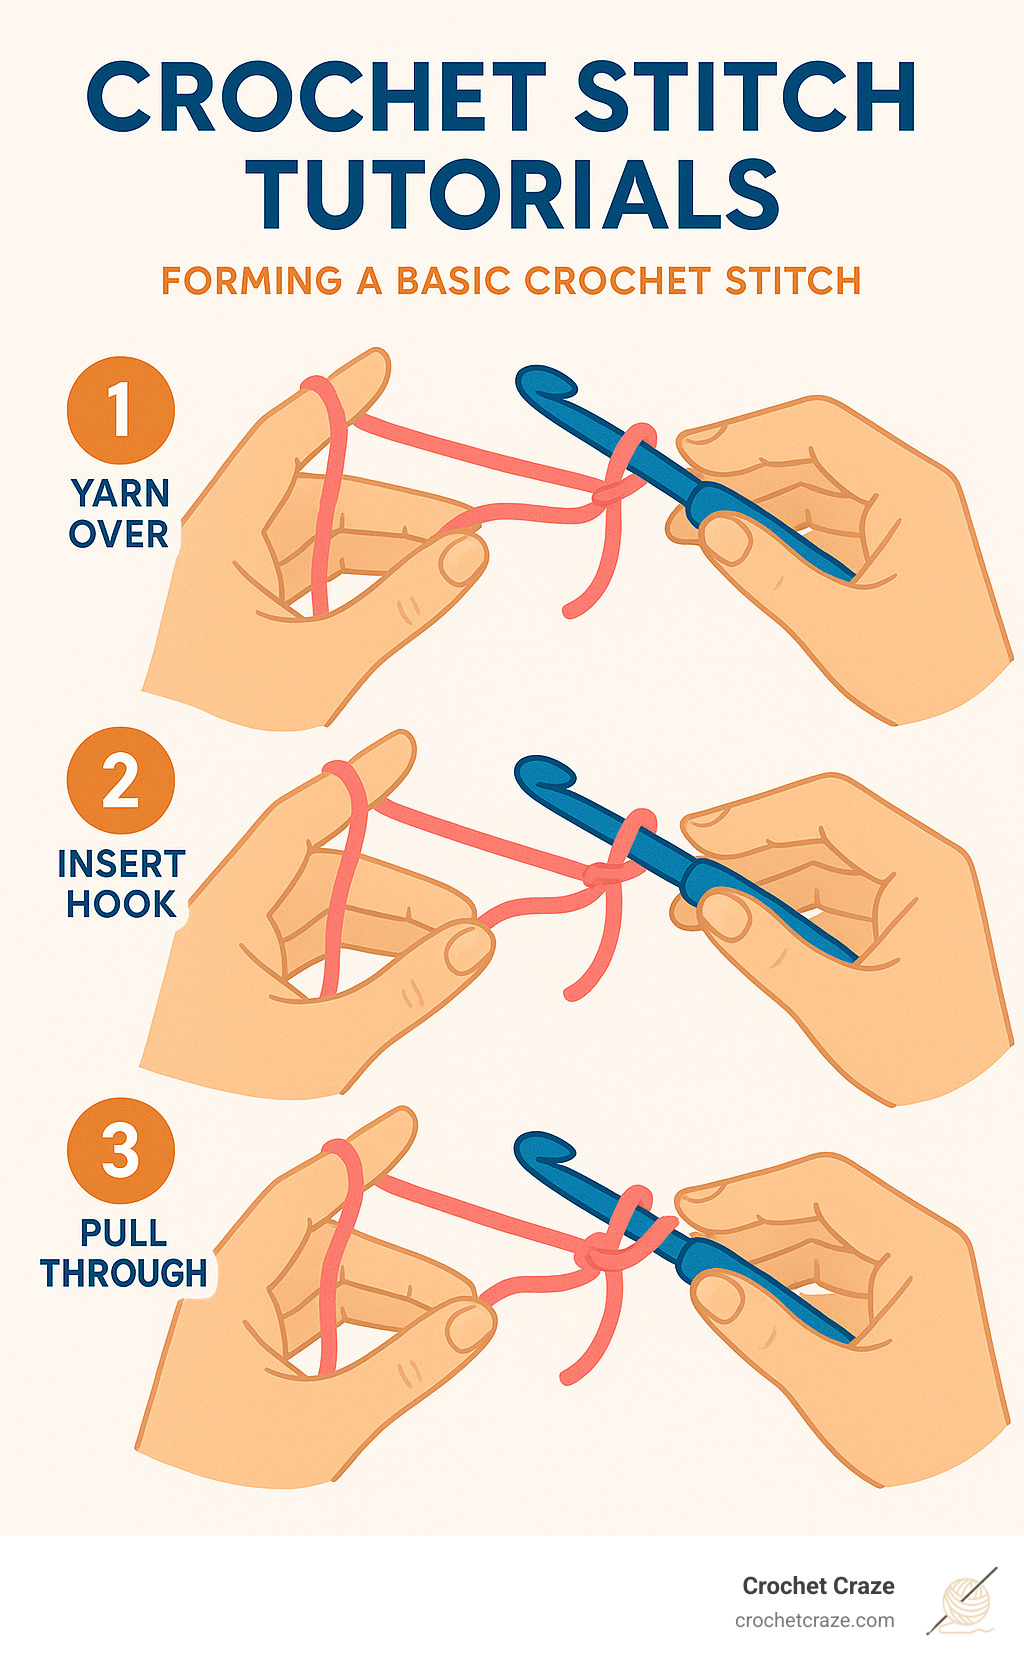
Your first step is creating a slip knot – make a simple loop about 6 inches from your yarn end, then pull the working yarn through to create a sliding knot. Pop that onto your hook, and you’re ready to begin!
Next comes the chain stitch – the foundation of nearly every crochet project. Simply yarn over (wrap yarn around your hook from back to front), catch the yarn with your hook, and pull it through the loop. Keep repeating this motion, and you’ll see a lovely chain forming. The loop sitting on your hook never counts as a chain stitch.
For yarn weights and hook sizes, beginners should start with medium-weight yarn (size 4) paired with a 5.5mm hook. This combination gives you clear, easy-to-see stitches that are forgiving when you’re still finding your rhythm.
Crochet abbreviations are time-savers once you get the hang of them: ch for chain, sc for single crochet, hdc for half double crochet, dc for double crochet, sl st for slip stitch, and yo for yarn over.
Tension control is where many beginners struggle. Your stitches should feel snug but not strangled – they need to slide smoothly along your hook. Try moving your thumb and index finger close to your hook after each stitch.
Want to dive deeper into the basics? Our How to Do a Basic Crochet Stitch tutorial walks you through each step with clear visuals. And don’t forget to grab our handy Basic Crochet Stitches Printable.
Crochet Stitch Tutorials for Getting Started
How you hold your hook makes a big difference. There are two popular grips: the knife hold (imagine you’re cutting dinner) and the pencil hold (like you’re writing a letter). Try both and see which feels more natural.
When creating your foundation chain, counting becomes your best friend. Most patterns tell you exactly how many chains you need. For practice, try making 11 chains – that gives you 10 working chains plus one extra for turning.
Turning chains help you climb to the next row. Chain 1 for single crochet rows, chain 2 for half double crochet, and chain 3 for double crochet.
Must-Have Beginner Toolkit
Beyond your hook and yarn, a few simple tools will make your crochet life easier. Sharp scissors are essential for clean cuts. A mix needle becomes your best friend when weaving in loose ends. Stitch markers help you keep track of important spots in your work. A gauge ruler ensures your finished projects turn out the right size.
Good lighting and a comfortable chair help prevent hand and wrist strain. Developing good ergonomic habits early keeps you crocheting happily for years to come.
Master the Foundational Stitches: SC, HDC, DC & TR
Here’s where crochet stitch tutorials get really exciting! These four foundational stitches are like learning the alphabet – once you master them, you can create almost anything your heart desires.
Let’s start with single crochet, the workhorse of the crochet world. Insert your hook into the stitch, yarn over, and pull up a loop. Now you have two loops dancing on your hook. Yarn over again and pull through both loops in one smooth motion. Done! Single crochet creates the most solid, dense fabric – perfect when you want something sturdy like a shopping bag or cozy dishcloth.
Half double crochet is where things start getting taller and more interesting. Begin with a yarn over, then insert your hook and pull up a loop. You’ll have three loops on your hook now. Here’s the magic: yarn over and pull through all three loops at once. This stitch gives you lovely coverage while working up faster than single crochet.
Now for double crochet – this is often where beginners fall in love with the rhythm of crochet. Start with a yarn over, insert your hook, yarn over and pull up a loop. You’ll work off these loops two at a time: yarn over, pull through two loops, yarn over again, pull through the last two loops. Double crochet works up beautifully fast and creates an airy, flexible fabric that’s perfect for blankets and scarves. For step-by-step visuals, find the tutorial here!
Treble crochet (sometimes called triple crochet) is the tallest of our basic stitches. Start with two yarn overs – yes, two! Insert your hook, yarn over, and pull up a loop. Now you’ll work off the loops two at a time, just like double crochet, but you’ll do it three times total. This stitch creates gorgeous drape and works up lightning fast.
Each stitch has its own personality and purpose. Single crochet is your reliable friend for structure, half double crochet balances speed with coverage, double crochet gives you versatility and flow, and treble crochet brings drama and quick progress to large projects.
| Stitch | Height | Speed | Fabric Density | Best Uses |
|---|---|---|---|---|
| Single Crochet | Shortest | Slowest | Very Dense | Dishcloths, bags, amigurumi |
| Half Double | Medium-short | Medium | Dense | Scarves, hats, washcloths |
| Double Crochet | Tall | Fast | Medium | Blankets, shawls, garments |
| Treble Crochet | Tallest | Fastest | Open | Large blankets, decorative work |
Crochet Stitch Tutorials: Building Blocks in Action
The best way to master these stitches? Practice swatches! I know, I know – swatches aren’t the most glamorous part of crochet, but they’re pure gold for building muscle memory. Create a small square using each stitch type, and you’ll be amazed how quickly your hands learn the rhythm.
Try making a simple washcloth with single crochet – it’s incredibly satisfying to complete something useful while you practice. The beauty of washcloths is that slight imperfections just add character, and you’ll use them every day as a reminder of your progress.
When you’re working in rows, counting those little “V” shapes at the top of each stitch becomes second nature. These V’s are like breadcrumbs showing you exactly where to place your hook for the next row. Trust me, learning to read these visual cues will save you countless headaches later.
Checking gauge might seem like extra work, but it’s your secret weapon for projects that actually fit. Create a test swatch with your chosen yarn and hook, then measure it against the pattern requirements. If your stitches are too loose, try a smaller hook. Too tight? Go up a hook size. It’s that simple!
Slip & Skip – Tiny Helpers With Big Impact
Don’t overlook the humble slip stitch – this little helper might be the shortest stitch in your toolkit, but it packs a punch. Simply insert your hook, yarn over, and pull through both the stitch and the loop on your hook in one quick motion. Slip stitches are perfect for joining rounds invisibly and creating smooth, professional-looking edges.
Understanding the skip-chain spacing is crucial for straight edges. Generally, you’ll skip the chain closest to your hook and work into the second chain from the hook. This accounts for your turning chain and keeps everything lined up perfectly. For deeper insights into slip stitch techniques, check out Sarah Maker’s slip stitch tutorial – she breaks it down beautifully.
These foundational skills might seem simple, but they’re the building blocks for every amazing project you’ll ever create. Master these, and you’re ready for the fun stuff ahead!
Easy Patterns & Textured Fun for Beginners
Ready to take your crochet stitch tutorials to the next level? Once you’ve got those basic stitches down, the real fun begins with texture patterns.
The granny square is like the Swiss Army knife of crochet patterns. This beloved classic uses simple double crochet stitches worked in rounds. Want a baby blanket? Make 20 squares. Dreaming of a king-size bedspread? You’ll need about 200 squares. The beauty lies in their versatility – perfect for using up yarn scraps.
The moss stitch creates gorgeous textured fabric that looks more complicated than it is. You’ll alternate single crochet and chain stitches: single crochet, chain one, skip the next stitch, and repeat. This creates an open, breathable fabric perfect for summer tops.
Waffle stitch is where texture really shines. The pattern uses front post and back post double crochet stitches to create distinctive raised squares. This stitch is fantastic for dishcloths because the texture helps with scrubbing.
The spider stitch creates beautiful open lacework using only single crochet and chain stitches. Puff stitches add delightful clouds of texture by working several incomplete double crochets into the same spot, then finishing them together.
Don’t overlook the lemon peel stitch and grit stitch – both create subtle textures that work particularly well with variegated yarns.
For step-by-step guidance, check out our comprehensive Crochet Patterns for Beginners Step by Step collection.
Crochet Stitch Tutorials for Quick Success
Row-by-row visuals are your best friend when learning textured stitches. Many patterns create reversible textures, meaning both sides look beautiful – perfect for scarves and blankets.
Understanding the difference between open and dense fabrics helps you choose the right stitch for each project. Open patterns work beautifully for market bags, while dense stitches create sturdy fabrics for structured items.
Color play opens up endless possibilities. Try working stripes using different stitch patterns, or experiment with how variegated yarns interact with various textures.
Turning Swatches Into Projects
Those practice squares don’t have to live in a drawer forever! Transform your 4×4 inch swatches into useful coasters. Larger practice pieces make excellent dishcloths.
Sampler scarves are brilliant for practicing multiple stitches in one project. Work several rows of each new stitch, creating a scarf that showcases your growing skills. Consider making blanket stripes using different textured stitches – each stripe becomes practice for a new technique.
Troubleshooting & Advancing: Combining Stitches, Fixing Mistakes, Creative Swatching
Let’s be honest – every crocheter has been there. You’re happily working along when suddenly you notice something’s gone wrong. Maybe your edges are wavy, your tension is all over the place, or you’ve somehow gained mysterious extra stitches. Don’t panic! These moments are actually valuable learning opportunities.
Frogging (rip it, rip it!) becomes every crocheter’s friend eventually. When you need to undo your work, take it slow and keep that yarn nice and taut to prevent those frustrating tangles. I’ve learned that frogging with patience saves more time than rushing through it.
Tension rescue is probably the most common challenge beginners face. If your stitches feel like they’re strangling your hook, try going up a hook size or consciously relaxing your death grip on the yarn. Too loose and floppy? Drop down a hook size or practice keeping steady pressure. Even tension matters more than perfect tension – consistency is your goal.
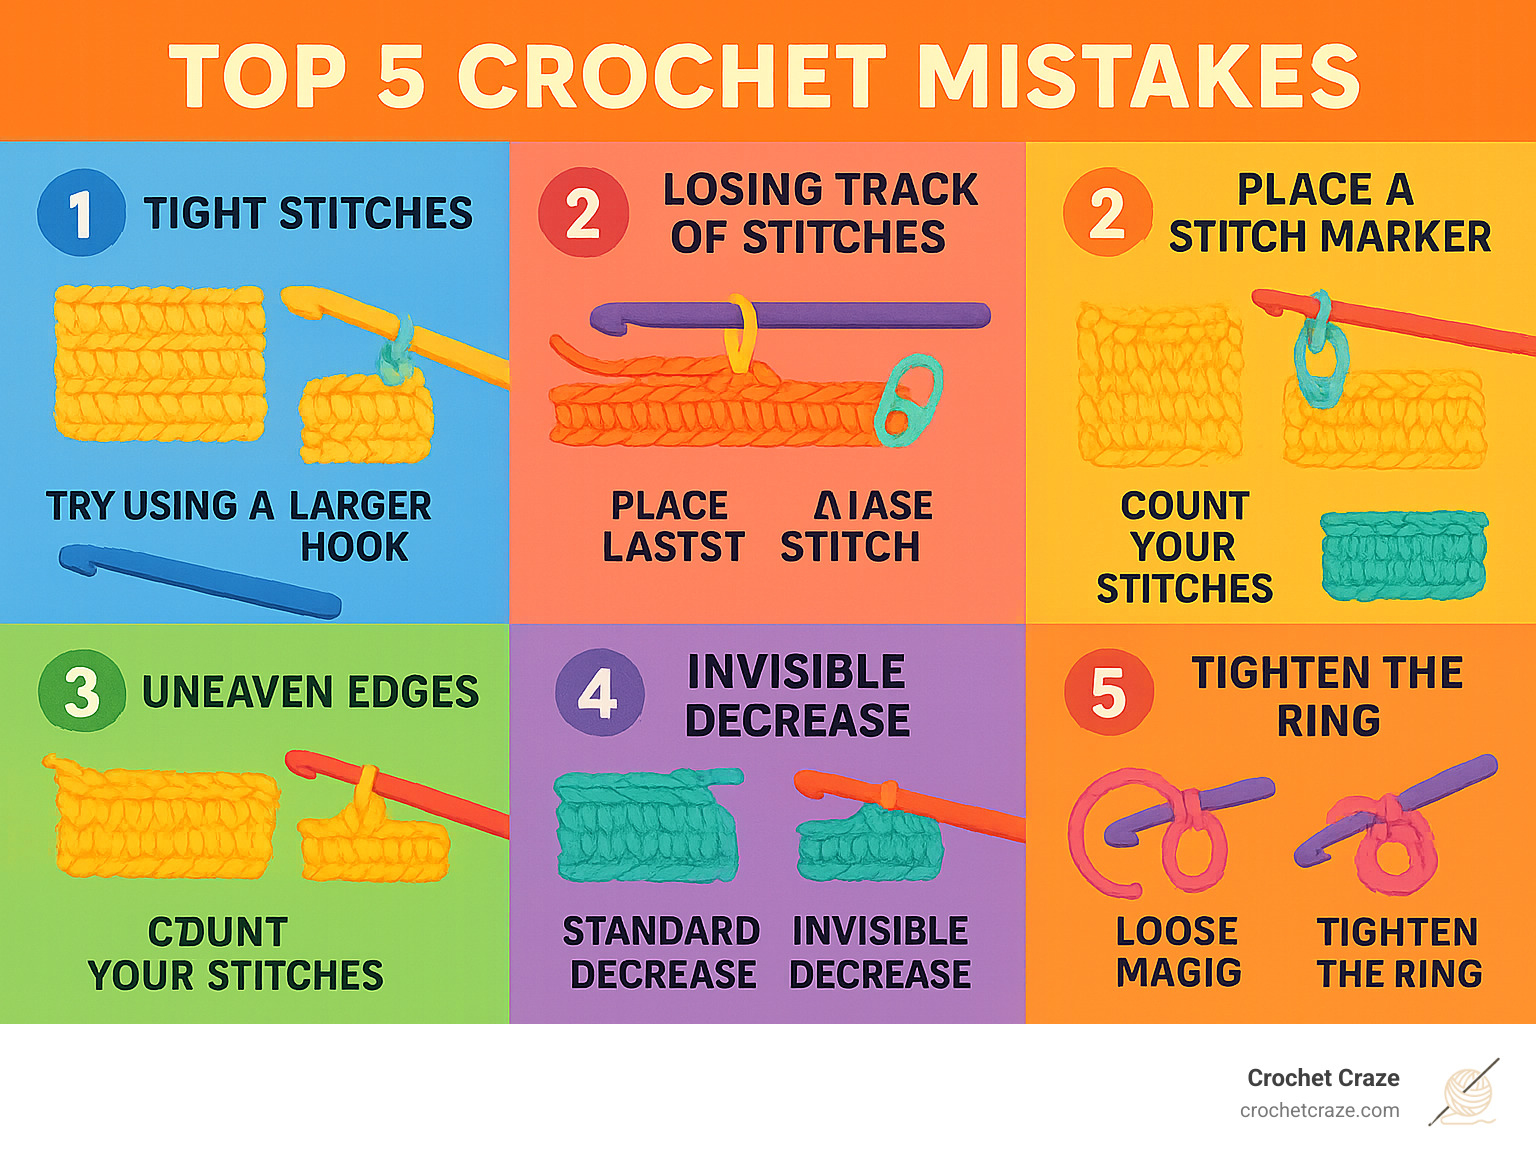
Those uneven edges that make your work look wonky usually come from inconsistent turning chains or losing track of your stitch count. Get in the habit of counting stitches at the end of each row. If one edge waves while the other pulls tight, you’re probably not treating your turning chains the same way throughout your project.
The invisible decrease technique is a game-changer once you start making shaped pieces or amigurumi. Instead of the standard decrease that can leave little holes, this method keeps your fabric looking smooth and professional while reducing your stitch count.
Magic circle mastery opens up a whole world of round projects like hats, bags, and cute amigurumi creatures. This adjustable ring technique creates a tight center that can be pulled completely closed, eliminating that little hole you get with traditional chain rings.
Combining stitches in creative ways transforms basic techniques into stunning designs. Understanding stitch multiples – how many stitches each pattern repeat needs – helps you adapt patterns to different sizes or successfully merge different stitch patterns in one project. It’s like having a secret code that open ups endless possibilities.
Blocking basics can completely transform your finished pieces from “clearly homemade” to “wow, did you really make that?” Even simple steam blocking helps even out stitches and makes pieces lay beautifully flat. Natural fibers respond especially well to wet blocking for more dramatic improvements.
Caring for finished pieces ensures all your hard work lasts for years. Most acrylic yarns handle machine washing like champs, but natural fibers often need gentler treatment. Always check those yarn labels – they’re like care instruction manuals for your projects.
Here’s something wonderful: scientific research shows that crafting activities like crochet provide real stress relief and mental health benefits. The repetitive motions and focused attention required for crochet stitch tutorials can actually lower cortisol levels and promote relaxation. It’s basically meditation that produces beautiful, useful items!
For detailed help with specific problems, our comprehensive guide Mastering Your Crochet: A Guide to Fixing Common Mistakes walks you through solutions step by step.
Creative swatch uses mean your practice squares never go to waste. Transform them into coasters, combine them for patchwork throws, or even frame particularly gorgeous ones as small art pieces. Some crafters keep swatch journals, documenting their learning journey with notes about yarn choices, hook sizes, and lessons learned along the way. These little squares become a beautiful record of your growing skills.
Frequently Asked Questions about Crochet Stitch Tutorials
Learning crochet through crochet stitch tutorials brings up plenty of questions, and that’s completely normal! Here are the most common concerns I hear from fellow beginners, along with practical answers that’ll get you back to stitching with confidence.
What are the first five stitches every beginner should master?
Your crochet journey starts with the slip knot – think of it as your handshake with every new project. From there, the chain stitch becomes your foundation, literally building the base for everything that follows.
The single crochet deserves your focused attention next. This workhorse stitch creates that lovely dense fabric perfect for dishcloths and sturdy bags. It might work up slowly, but the solid results are so satisfying.
Half double crochet strikes the perfect balance between speed and coverage. Once you master this medium-height stitch, you’ll find yourself reaching for it constantly for scarves, hats, and cozy blankets where you want good stitch definition without the slow pace of single crochet.
Double crochet is where the magic really happens – it’s about twice the height of single crochet and works up much faster. This stitch opens the door to granny squares, afghans, and so many classic patterns. Plus, it’s incredibly satisfying to see your projects grow quickly.
Finally, don’t overlook the humble slip stitch. This tiny helper might be the shortest stitch in crochet, but it’s essential for joining rounds, creating smooth edges, and moving across your work without adding height. Research shows each of these basic stitches can be learned in about 30 minutes with focused practice – pretty encouraging, right?
How do I read crochet stitch abbreviations and symbols correctly?
Those mysterious letter combinations in patterns aren’t trying to confuse you – they’re actually your friends! Crochet stitch tutorials often include abbreviation guides, and once you learn the basics, reading patterns becomes second nature.
The most common abbreviations you’ll see are ch (chain), sc (single crochet), hdc (half double crochet), dc (double crochet), and sl st (slip stitch). These show up in virtually every pattern, so memorizing them pays off quickly.
Pattern repeats use asterisks (*), parentheses, or brackets to show which steps you’ll repeat. When you see “sc, ch 1, skip 1 st repeat across,” you’re simply doing that sequence of stitches all the way across your row. It’s like following a dance step – once you get the rhythm, it flows naturally.
Here’s something that trips up many beginners: US and UK terms are completely different. A US double crochet equals a UK treble crochet, which can make your project turn out completely wrong if you mix them up. Always check which system your pattern uses – it’s usually mentioned right at the beginning.
Numbers in patterns serve different purposes – they might indicate stitch counts, hook sizes, or how many times to repeat something. Taking a few minutes to read the pattern introduction saves hours of frustration later.
Why are my edges wavy even though I follow the pattern?
Wavy edges are the bane of many beginners, but the good news is they’re totally fixable! The most common culprit is inconsistent stitch counts. Count your stitches at the end of each row – it might feel tedious, but catching mistakes early saves so much time.
Turning chain confusion causes more wavy edges than almost anything else. Sometimes you work into the turning chain from the previous row, sometimes you don’t – and mixing this up throws off your entire edge. The pattern should specify, but when in doubt, look at how the previous rows were handled.
Your tension consistency throughout each row makes a huge difference too. Many of us start rows with tight stitches when we’re focused, then relax as we get into the rhythm. This creates edges that just won’t lay flat, no matter how much you want them to.
Wrong turning chain heights also wreak havoc on edges. Single crochet needs chain 1, half double crochet needs chain 2, and double crochet needs chain 3. Using chain 2 when you need chain 3 might seem like a small mistake, but it throws off your entire row height and creates those frustrating ripples.
The beautiful thing about crochet is that these issues become less common as you practice. Your hands develop muscle memory, your eyes get better at spotting problems early, and those smooth, even edges become your new normal.
Conclusion
Your journey with crochet stitch tutorials has just begun, and what an exciting trip it will be! At Crochet Craze, we’ve watched countless beginners transform from nervous first-time hookers into confident creators, and we know you have that same potential.
The magic of crochet isn’t just in those gorgeous finished pieces you’ll create – though those are wonderful too. It’s in the quiet moments when your hands find their rhythm, when that tricky stitch finally clicks, and when you realize you’ve been crocheting for an hour without even thinking about it. That’s when you know you’ve found something special.
Practice daily, even if it’s just fifteen minutes while your coffee brews or during your favorite TV show. Those small, consistent sessions build muscle memory much faster than cramming in long weekend sessions. Your fingers will thank you for the gentle, regular practice.
Start small, but dream big – that’s our motto here at Crochet Craze. Yes, begin with simple washcloths and basic scarves, but don’t let anyone tell you that elaborate blankets or intricate amigurumi are beyond your reach. Every expert crocheter started exactly where you are right now, fumbling with their first slip knot.
The crochet community is one of the most welcoming crafting communities you’ll ever encounter. Share your progress with fellow hookers online or in local groups. We celebrate wonky first squares and perfectly straight edges with equal enthusiasm. Your first completed project deserves just as much excitement as your fiftieth.
Join our community here at Crochet Craze, where beginners are welcomed with open arms and experienced crocheters love sharing their wisdom. We’re all here to support each other through dropped stitches, tangled yarn, and those moments when a pattern just doesn’t make sense.
Every stitch you master opens new doors to creative possibilities. That single crochet you’re practicing today will become the foundation for countless future projects. The double crochet that feels awkward now will soon flow from your hook like second nature.
For deeper exploration of specific techniques and comprehensive step-by-step guidance, our Crochet Stitch Guide offers expanded tutorials and introduces more advanced techniques when you’re ready to tackle them.
Happy stitching! Every mistake is just a learning opportunity wearing a disguise, and every expert was once exactly where you are now. Your hook and yarn are waiting patiently for your next creative session – let’s make something beautiful together.