
crochet patterns for beginners step by step: 5 Essential Easy Wins 2025
Starting Your Crochet Journey: The Basics
Looking for crochet patterns for beginners step by step? Here’s a quick guide to get you started:
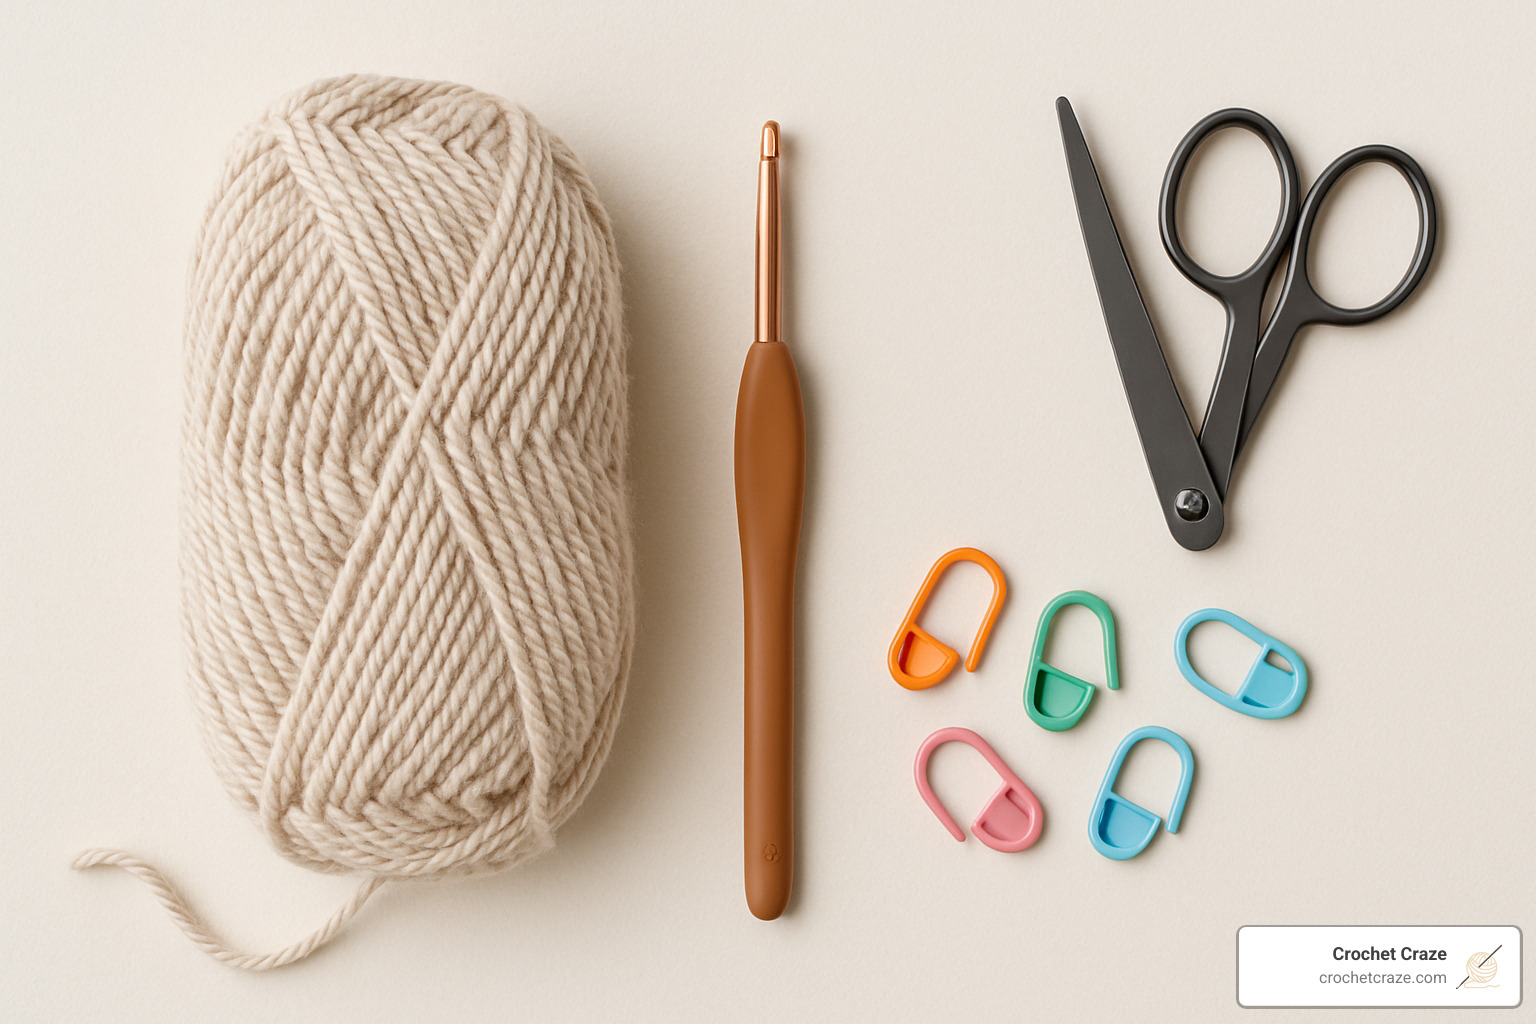
- Choose the right supplies:
- Medium (worsted) weight yarn in a light color
- Size H-8 (5mm) crochet hook
-
Scissors and yarn needle
-
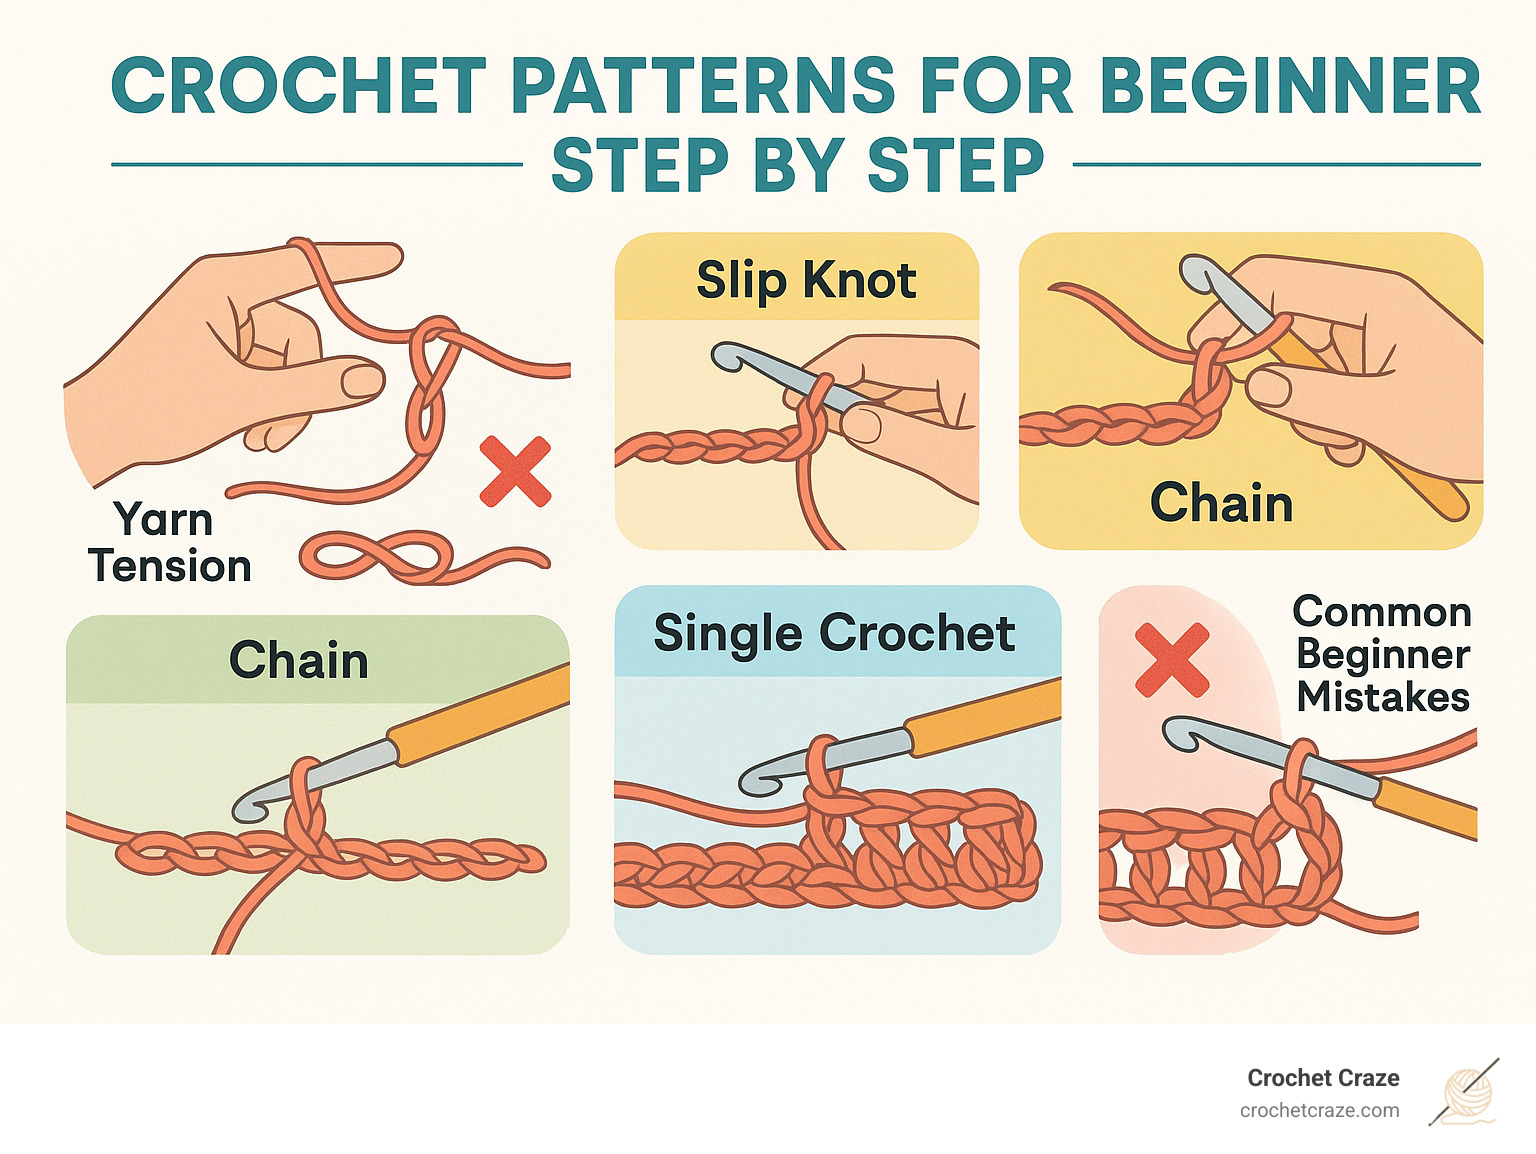
Learn these essential stitches first:
- Slip knot
- Chain stitch (ch)
- Single crochet (sc)
- Double crochet (dc)
-
Half double crochet (hdc)
-
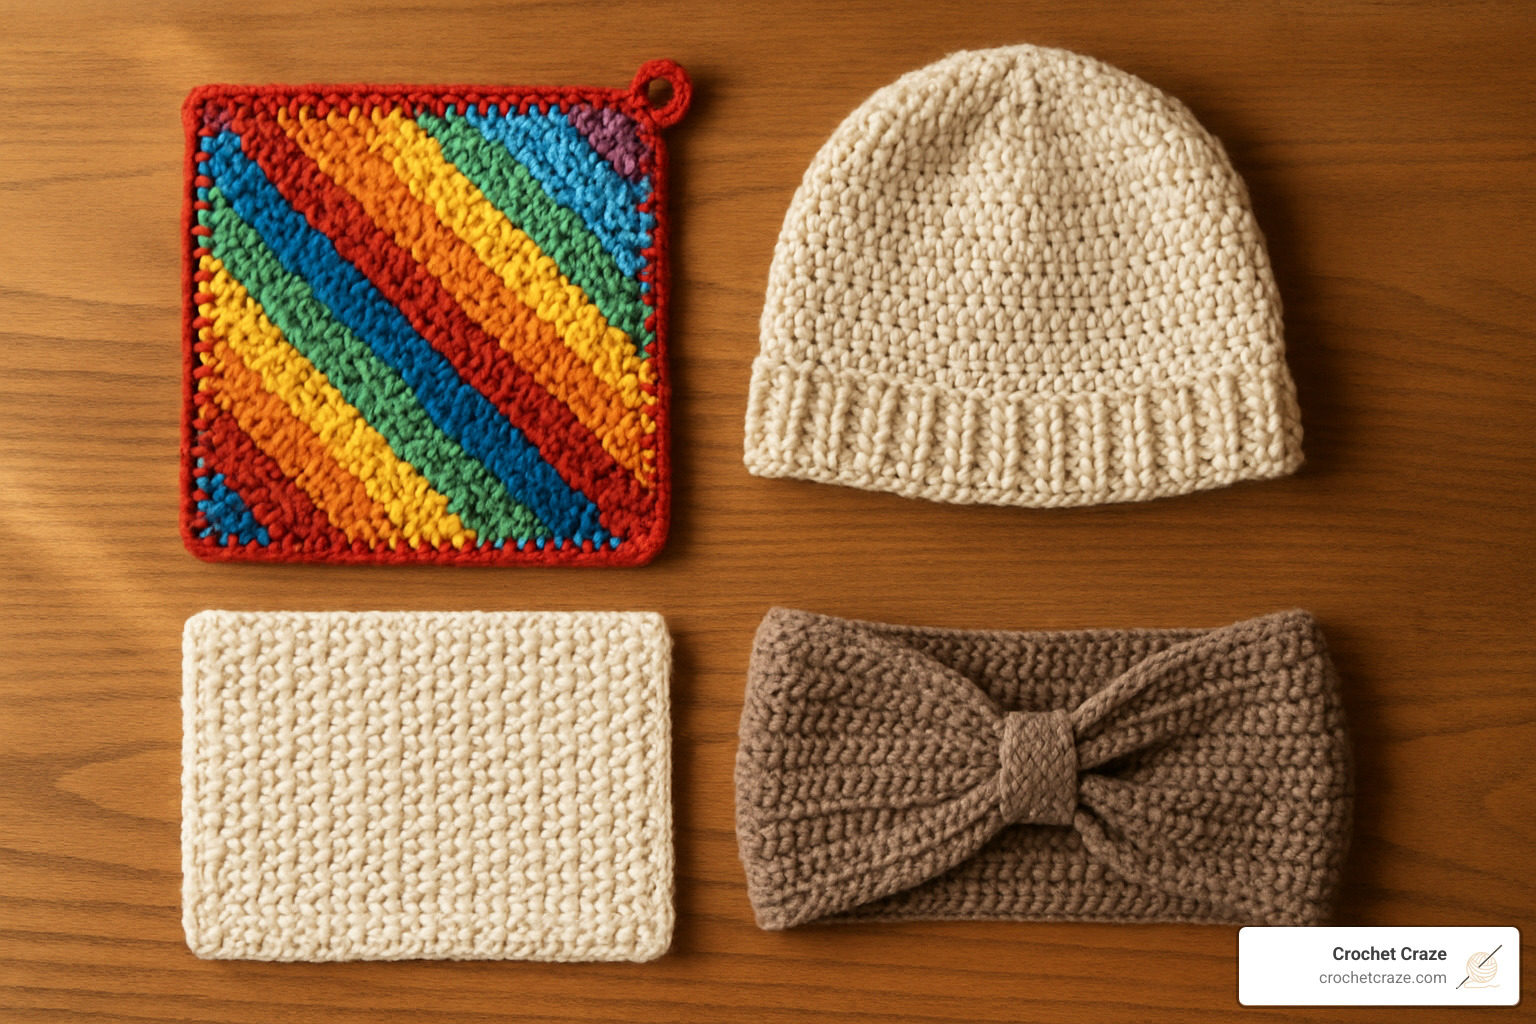
Beginner-friendly projects to try:
- Dishcloth or potholder
- Simple scarf
- Headband
- Mug rug
- Basic blanket
Crochet is a wonderfully rewarding craft that only requires a hook and some yarn to get started. Unlike knitting which uses two needles, crochet creates fabric using a single hook to pull loops through other loops. The beauty of learning crochet patterns for beginners step by step is that you can create something useful and beautiful even as you’re still mastering the basics.
Many beginners feel overwhelmed when looking at crochet patterns, but don’t worry! Breaking down the process into simple steps makes it approachable for anyone. With a little practice and patience, you’ll be creating beautiful handmade items in no time.
The most important thing to remember is that everyone starts somewhere. Your first projects don’t need to be perfect – they’re opportunities to practice and improve your skills. As you work through beginner patterns, you’ll naturally develop muscle memory and better tension control.
I’m Sonji Huerta, a fellow beginner who recently finded the joy of creating handmade items with yarn and a hook, and I’m excited to share what I’ve learned about crochet patterns for beginners step by step as I steer this creative journey.
Essential crochet patterns for beginners step by step terms:
– crochet yarn for beginners
– crochet crafts for beginners
– christmas crochet projects for beginners
What Is Crochet and How It Differs From Knitting
Ever wondered about the magic behind those cozy blankets and cute hats? Crochet (pronounced “crow-shay”) comes from the French word “croche,” meaning hook. It’s a beautiful craft where you create fabric by interlocking loops of yarn with a single hook. People have been crocheting for centuries, turning simple yarn into everything from delicate lace doilies to chunky, warm blankets.
When I first started crocheting, I was amazed at how different it felt from knitting, despite both crafts creating gorgeous yarn projects. The main difference? While knitting juggles multiple active stitches on two needles, crochet works with just one hook and typically one active loop at a time. This fundamental difference creates entirely different textures and makes each craft unique in its own way.
| Feature | Crochet | Knitting |
|---|---|---|
| Tools | One hook | Two or more needles |
| Active stitches | Usually one | Multiple |
| Fabric texture | Often thicker, more textured | Usually more elastic, drapey |
| Ease for beginners | Simple to learn basic stitches | Can be more complex to master |
| Fixing mistakes | Easier to fix (just pull out) | Can be challenging to recover |
| Speed | Often faster for most projects | Can be slower for similar items |
| Yarn usage | Typically uses 1/3 more yarn | More economical with yarn |
“Crochet patterns may look scary—almost like a foreign language—because of their abbreviations and terms,” notes Jean Leinhauser, a crochet expert. I remember feeling the same way! But don’t worry – once you understand the basics, that “foreign language” starts making perfect sense.
Understanding crochet patterns for beginners step by step
When you first look at a crochet pattern for beginners step by step, you’ll notice it’s filled with abbreviations, numbers, and symbols. This might seem overwhelming, but it’s actually a clever shorthand that tells your hands exactly what to do.
For example, “Ch 15, sc in 2nd ch from hook and in each rem ch = 14 sc” simply means: “Make a chain of 15 stitches, then work a single crochet in the second chain from your hook and in each remaining chain, giving you a total of 14 single crochet stitches.” Once you learn the basic terms, patterns become like recipes that guide you through creating something wonderful.
What makes crochet particularly beginner-friendly is how forgiving it can be. You work with just one stitch at a time, making it easier to control. Made a mistake? No problem! You can simply pull out your work to that point and try again. Many beginners also find they complete projects faster with crochet than knitting, which gives that lovely feeling of accomplishment sooner.
One of my favorite things about crochet is the versatility. You can create flat items like scarves and blankets, but it’s also perfect for three-dimensional projects like stuffed animals or hats. The fabric tends to be sturdier and less stretchy than knitting, making it ideal for items that need to hold their shape.
A fellow beginner once told me, “I tried knitting first but kept dropping stitches. With crochet, I felt more in control right away, and seeing my first dishcloth take shape was so satisfying!” I couldn’t agree more – there’s something magical about watching your very first crochet patterns for beginners step by step transform from a ball of yarn into something useful and beautiful.
Gathering Your Tools and Materials
Before diving into your first crochet patterns for beginners step by step, you’ll need to gather the right supplies. Having proper tools makes learning much easier and more enjoyable.
Choosing the right yarn & hook
The yarn you choose can make or break your first crochet experience. When I started crocheting, I grabbed whatever yarn was on sale – big mistake! Save yourself the frustration and reach for medium weight yarn (also called worsted or #4). This thickness hits the sweet spot – not so thin that you can’t see what you’re doing, but not so bulky that your stitches look clumsy.
Color matters more than you might think! I learned the hard way that dark yarn makes it nearly impossible to see your stitches when you’re just starting out. One of our Crochet Craze community members put it perfectly: “Black yarn is VERY difficult to learn with. I made that mistake and couldn’t see what I was doing!” Stick with light or bright colors until your fingers develop some muscle memory.
As for fiber content, acrylic yarn is your beginner best friend. While cotton makes lovely kitchen items, acrylic has a bit of stretch that forgives small tension issues. It’s also budget-friendly, which means you won’t feel guilty if your first project ends up a bit… experimental!
Hook selection is equally important. Most beginners find success with a Size H-8 (5mm) or Size I-9 (5.5mm) hook, which pairs perfectly with medium weight yarn. Aluminum hooks offer a smooth surface that lets yarn glide without catching.
If your hands start to cramp after crocheting for a while (which happens to the best of us!), consider hooks with ergonomic grips. My favorite beginner tip came from a long-time crocheter: “If you’re finding your chains too tight to work into, try using a hook one size larger just for your foundation chain, then switch to your project hook for the rest of the work.” Game-changer!
Optional helpers that make life easier
While you technically only need yarn and a hook to start crocheting, a few extra tools can save you hours of frustration. Stitch markers are little plastic rings that help you track the beginning of rounds or mark important points in your pattern. One crafty member of our community shared, “I found stitch markers to be a game-changer. Placing one at the beginning and end of each row helped me maintain straight edges, which was my biggest challenge as a beginner.” In a pinch, safety pins or small pieces of contrasting yarn work too!
A flexible measuring tape becomes your best friend when checking if your project is the right size. There’s nothing more disappointing than creating a hat that’s too small for any human head!
When you finish a project, you’ll need a yarn needle (with a large eye and blunt tip) to weave in those loose ends. Dedicated craft scissors keep your yarn ends neat without the fraying that can happen with dull kitchen shears.
If you’re working on a pattern with many rows, a row counter can be a sanity-saver. I’ve lost count mid-project more times than I care to admit, and there’s nothing more frustrating than trying to figure out if you’re on row 23 or 24!
For more detailed guidance on selecting the perfect materials for your first projects, check out our comprehensive guide on Best Yarn and Hook for Beginner Crochet.
Mastering Basic Stitches & Techniques
Now that you have your supplies ready, let’s dive into the heart of crochet – those fundamental stitches that will become your best friends as you explore crochet patterns for beginners step by step.
Holding the hook & yarn correctly
There’s no single “right way” to hold your hook – it’s all about what feels comfortable in your hands. Most crocheters use one of these two grips:
The knife grip feels natural for many beginners – just hold your hook like you would a dinner knife, with your thumb and index finger resting on the flat thumb rest. This position often gives beginners more control and stability.
The pencil grip is exactly what it sounds like – holding your hook similar to how you’d hold a pencil. Some find this grip allows for more delicate, precise movements, especially for detailed work.
“I always tell my students to experiment with both grips,” says Jean from our Crochet Craze community. “Your hands will naturally find what works best for you. There’s no crochet police checking your technique!”
For yarn tension – which is crucial for consistent stitches – try this beginner-friendly method: Guide the yarn over your pinky finger, wrap it once around, then bring it across the back of your hand and over your index finger. This creates a natural tension system that feeds yarn smoothly as you work.
Remember to keep everything relaxed! White knuckles lead to achy hands and uneven stitches. Your grip should be firm enough for control but loose enough that your hands stay comfortable.
Step-by-step basic stitches
Every beautiful crochet creation starts with these building blocks:
The slip knot is where it all begins – this adjustable loop is your starting point. Make a loop with your yarn, pull a second loop through it, then place that loop on your hook and gently tighten. Think of it as the handshake that introduces your hook to your yarn!
The chain stitch (ch) forms the foundation of most projects. Wrap the yarn over your hook (yarn over), then pull it through the loop already on your hook. Each chain looks like a tiny “V” when viewed from the front. One beginner told me, “I practiced making chains while watching TV until my fingers just knew what to do without me thinking about it.”
The single crochet (sc) is your first “real” stitch. Insert your hook into the specified stitch, yarn over and pull up a loop (giving you two loops on your hook), then yarn over again and pull through both loops. This creates a tight, sturdy fabric perfect for dishcloths and amigurumi.
The half double crochet (hdc) adds a bit more height. Yarn over before inserting your hook, pull up a loop (three loops on hook), then yarn over and pull through all three loops at once. It’s a versatile middle-ground stitch that works up quickly.
The double crochet (dc) creates even taller stitches. Yarn over before inserting your hook, pull up a loop (three loops on hook), yarn over and pull through the first two loops, then yarn over again and pull through the remaining two loops. This airy stitch is perfect for blankets and garments.
Don’t forget your turning chains when you reach the end of a row! These create height so your next row starts at the right level. Chain 1 for single crochet, chain 2 for half double, and chain 3 for double crochet before turning your work.
For visual learners, our detailed guide on How to Do a Basic Crochet Stitch shows each movement with helpful photographs.
Troubleshooting crochet patterns for beginners step by step
Even when following crochet patterns for beginners step by step, little hiccups happen to everyone! Here’s how to solve the most common issues:
Those uneven edges that plague nearly every beginner have simple fixes. Make sure you’re working into the correct first stitch of each row (it’s easy to miss!), and try placing bright stitch markers at the beginning and end of each row. Counting your stitches regularly helps catch problems before they grow.
“When I started, my rectangles looked more like trapezoids,” laughs Sarah, a Crochet Craze regular. “Using stitch markers was my saving grace – suddenly my edges were straight!”
Tension troubles show up as stitches that are either too tight (making your fabric stiff) or too loose (creating gaps). If your work feels too tight, consciously relax your grip on both yarn and hook. Sometimes switching to a slightly larger hook size helps too. For stitches that are too loose, try wrapping the yarn around your pinky one extra time for more resistance.
Missed stitches happen to everyone. Look for the “V” shape at the top of each stitch – that’s where your hook needs to go. In darker yarns, running your finger along the top edge can help you feel each stitch. For longer rows, place stitch markers every 10 stitches so you can quickly spot if your count is off.
Perfect practice makes perfect. Start with small, quick-win projects that let you focus on mastering one technique at a time. As one of our community members wisely shared, “I made six dishcloths before attempting anything else. By the sixth one, my stitches were so much more even, and I felt ready for bigger challenges!”
Crochet Patterns for Beginners Step by Step
Now that you’ve mastered the basic stitches, let’s explore some simple crochet patterns for beginners step by step that will help you practice your skills while creating useful items.
I’ve carefully selected these projects because they build confidence while creating items you’ll actually use. Each one teaches you something new without overwhelming you. Think of them as friendly stepping stones on your crochet journey—each one gets you a little closer to mastering this wonderful craft.
Square One: Magic Square Potholder
The Magic Square potholder is my go-to recommendation for absolute beginners. It uses only chain stitches and single crochet, creating a useful kitchen item you can finish in just a few hours.
“When I first learned to crochet as a kid, this Magic Square potholder was one of my first projects,” shared Maria from our Crochet Craze team. “It’s so satisfying to create something functional with such simple stitches.”
The basic pattern is beautifully straightforward: Chain 31, then single crochet in the second chain from hook and in each chain across to create 30 single crochets. After that, you’ll chain 1, turn your work, and single crochet in each stitch across. Repeat until your piece becomes square (about 30 rows), then fasten off and weave in those ends.
What I love about this project is how it teaches you tension control—those straight edges won’t lie! For color variations and more detailed instructions, check out the Magic Square Crochet Potholder pattern.
Beginner Half Double Crochet Hat
Ready to try something you can wear? This simple hat works up quickly and introduces you to the half double crochet stitch, working in rows, and joining with a seam to create a three-dimensional item.
What makes this pattern particularly beginner-friendly is that you’re simply creating a rectangle and then assembling it into a hat—no increasing or decreasing required! You’ll create a rectangle using half double crochet, sew the short ends together to form a tube, gather one end to close the top, and add an optional pompom if you’re feeling fancy.
Jenny, who taught a beginner’s crochet class at her local community center, told me, “My students were amazed they could create a wearable hat in just one evening. The look on their faces when they put on their finished hats was priceless!”
For the complete pattern with measurements for different sizes, visit Beginner Half Double Crochet Hat.
Harvest Throw: Chain & Single Crochet Blanket
Blankets might seem ambitious, but they’re essentially just big rectangles! This simple throw is perfect for practicing consistent tension across many rows.
The beauty of blanket-making lies in its repetitive nature—chain 75 (or your desired width), single crochet in the second chain from hook and across, chain 1 and turn, then single crochet in each stitch across. Repeat until you reach your desired length. For a bit of visual interest, try changing colors every 13 rows to create stripes.
“I started a baby blanket when I was only two weeks into learning crochet,” shared Taylor from our community. “The repetitive motion was almost meditative, and seeing the blanket grow row by row gave me such a sense of accomplishment.”
Here’s a helpful tip I wish someone had told me earlier: Use stitch markers or safety pins to keep track of your chain counts, especially when working with longer chains. Place a marker every 25 chains to easily track your foundation row.
For more inspiration and patterns, our Crochet Baby Blanket Patterns page has plenty of beginner-friendly options.
Quick-Win Kitchen Dishcloth
When you need a confidence boost, dishcloths are your best friend. They work up quickly (usually in under an hour), are small enough to complete in one sitting, and make practical household items you’ll use daily.
This pattern introduces double crochet, which creates a slightly looser, more flexible fabric than single crochet. The basic pattern is simple: Chain 31, double crochet in the 4th chain from hook and in each chain across. Then chain 3 (which counts as your first double crochet), turn, and double crochet in each stitch across. Repeat until square (approximately 15 rows), then fasten off and weave in ends.
For kitchen dishcloths, I strongly recommend using 100% cotton yarn. It’s more absorbent and stands up better to repeated washing than acrylic alternatives.
“I keep a dishcloth project in my purse for unexpected waiting rooms or long car rides,” shared Rachel, a Crochet Craze reader. “They’re small enough to take anywhere, and I always feel productive even if I only complete a few rows.”
For the complete pattern with lovely textural variations, check out the Nantucket Easy Double Crochet Dishcloth Pattern.
Mini Projects to Build Confidence
Once you’ve mastered the basics, these quick projects will expand your skills without overwhelming you:
Mug Rug: These small coasters use simple stitches but introduce you to creating a border. “How cute is the idea of a rug for your mug?” as Sam, one of our community members, put it. These work up in about 30 minutes and make thoughtful handmade gifts.
Simple Headband: A beginner-friendly headband introduces working in the round with a simple join. They’re perfect for cold weather and using up scrap yarn. Plus, there’s something deeply satisfying about wearing something you made yourself.
Mini Pouch: A small rectangular pouch that’s folded and seamed introduces you to creating a three-dimensional object from a flat piece. These are great for storing small items like earbuds or jewelry.
I’ve found that selecting patterns that feature simple shaping and focus on a single stitch helps build confidence without frustration. These mini projects let you practice different techniques without the time commitment of larger items.
For more quick-win project ideas that will keep your motivation high, visit our Crochet Crafts for Beginners page. Every stitch you make is improving your skills—even if they aren’t perfect!
Finishing Techniques & Common Pitfalls
Knowing how to properly finish your project is just as important as knowing how to start it. Think of it as putting the final polish on your handmade creation – these last steps can truly lift your work from “homemade” to “handcrafted.”

Fasten Off
When you reach that satisfying moment of completing your project, you’ll need to secure your work properly. Cut your yarn, leaving about a 6-inch tail – this gives you plenty to work with later. Then, simply yarn over and pull the cut end completely through the loop on your hook. Give it a gentle tug to create a secure knot, and voilà – your work is fastened off!
“I always do a little happy dance when I fasten off a project,” shares one of our Crochet Craze community members. “It’s like putting the period at the end of a sentence – so satisfying!”
Weaving in Ends
Those dangling yarn tails might seem like a nuisance, but properly hiding them is the secret to a professional-looking finish. Thread your tail onto a yarn needle (those big-eyed blunt ones are perfect for this job), and weave through the back of several stitches. The key is changing direction at least once – I like to call this the “zigzag method” – which helps prevent the end from working itself loose over time.
“Use the ‘rule of 3’ method for securing yarn ends,” recommends our Crochet Craze instructor Jenny. “Weave back and forth in three different directions to ensure the end won’t come loose with use or washing.” Once you’ve secured those ends, trim any excess yarn close to your work, and no one will ever know they were there!
Blocking Basics
If you’ve ever wondered why your finished project doesn’t quite look like the pattern photo, blocking might be the missing step. This technique helps even out your stitches and gives your creation that polished, store-bought appearance.
For most projects, wet blocking works wonderfully: simply submerge your finished piece in water (adding a drop of wool wash for natural fibers), gently squeeze out excess moisture, and shape to the correct dimensions. For acrylic yarns, steam blocking is often more effective – hold a steamer or iron (on steam setting) slightly above your work without touching it. Pin your project in place if needed, and allow it to dry completely.
“I was amazed at the difference blocking made to my first shawl,” shares a community member. “It transformed from a rumpled triangle into something truly neat!”
Avoiding the 5 most common beginner mistakes
As you work through crochet patterns for beginners step by step, watch out for these common pitfalls:
Tension too tight is perhaps the most common struggle for beginners. Your hands naturally want to grip everything firmly when learning something new, but try to stay relaxed. If your work is curling or you’re fighting to insert your hook into stitches, your tension is likely too tight. Try holding your hook and yarn more loosely, or even go up a hook size until your hands learn the right feel.
Skipped turning chain can lead to uneven, slanting edges. Remember to chain the appropriate number at the end of each row before turning: 1 for single crochet, 2 for half double crochet, and 3 for double crochet. I like to think of the turning chain as an elevator that lifts you up to the height of the next row.
Inconsistent stitch height happens when you don’t fully complete each stitch before moving on. Take your time and make sure you’re pulling through all the loops required for each stitch type. Developing this consistency takes practice, but your edges will thank you!
Wrong hook size can dramatically affect your project. “Match hook size to yarn weight using the yarn label,” recommends our research team. Using a hook that’s too small creates stiff fabric, while one that’s too large can make your work look holey and loose.
Not checking gauge is a mistake that can lead to garments that don’t fit or blankets that aren’t the right size. For projects where dimensions matter, work a small gauge swatch first (usually a 4×4 inch square) to ensure your stitches match the pattern’s recommendations. Yes, it takes a few extra minutes, but it can save hours of frustration later!
“Mistakes are okay – they are a part of the learning process and help you improve,” notes our crochet instructor Maria. “I still make mistakes after 20 years of crocheting, I just get better at fixing them!” Don’t be discouraged if your early projects aren’t perfect – each one is a step toward mastery.
If you’re ready to expand your stitch repertoire beyond the basics, our comprehensive Crochet Stitch Guide will introduce you to dozens of beautiful textures and patterns to try in your next project.
Frequently Asked Questions About Beginner Crochet
How do I read abbreviations in a pattern?
When you first look at crochet patterns for beginners step by step, the alphabet soup of letters might seem like a secret code. Don’t worry – these abbreviations are simply shorthand that makes patterns more concise and easier to follow once you know what they mean.
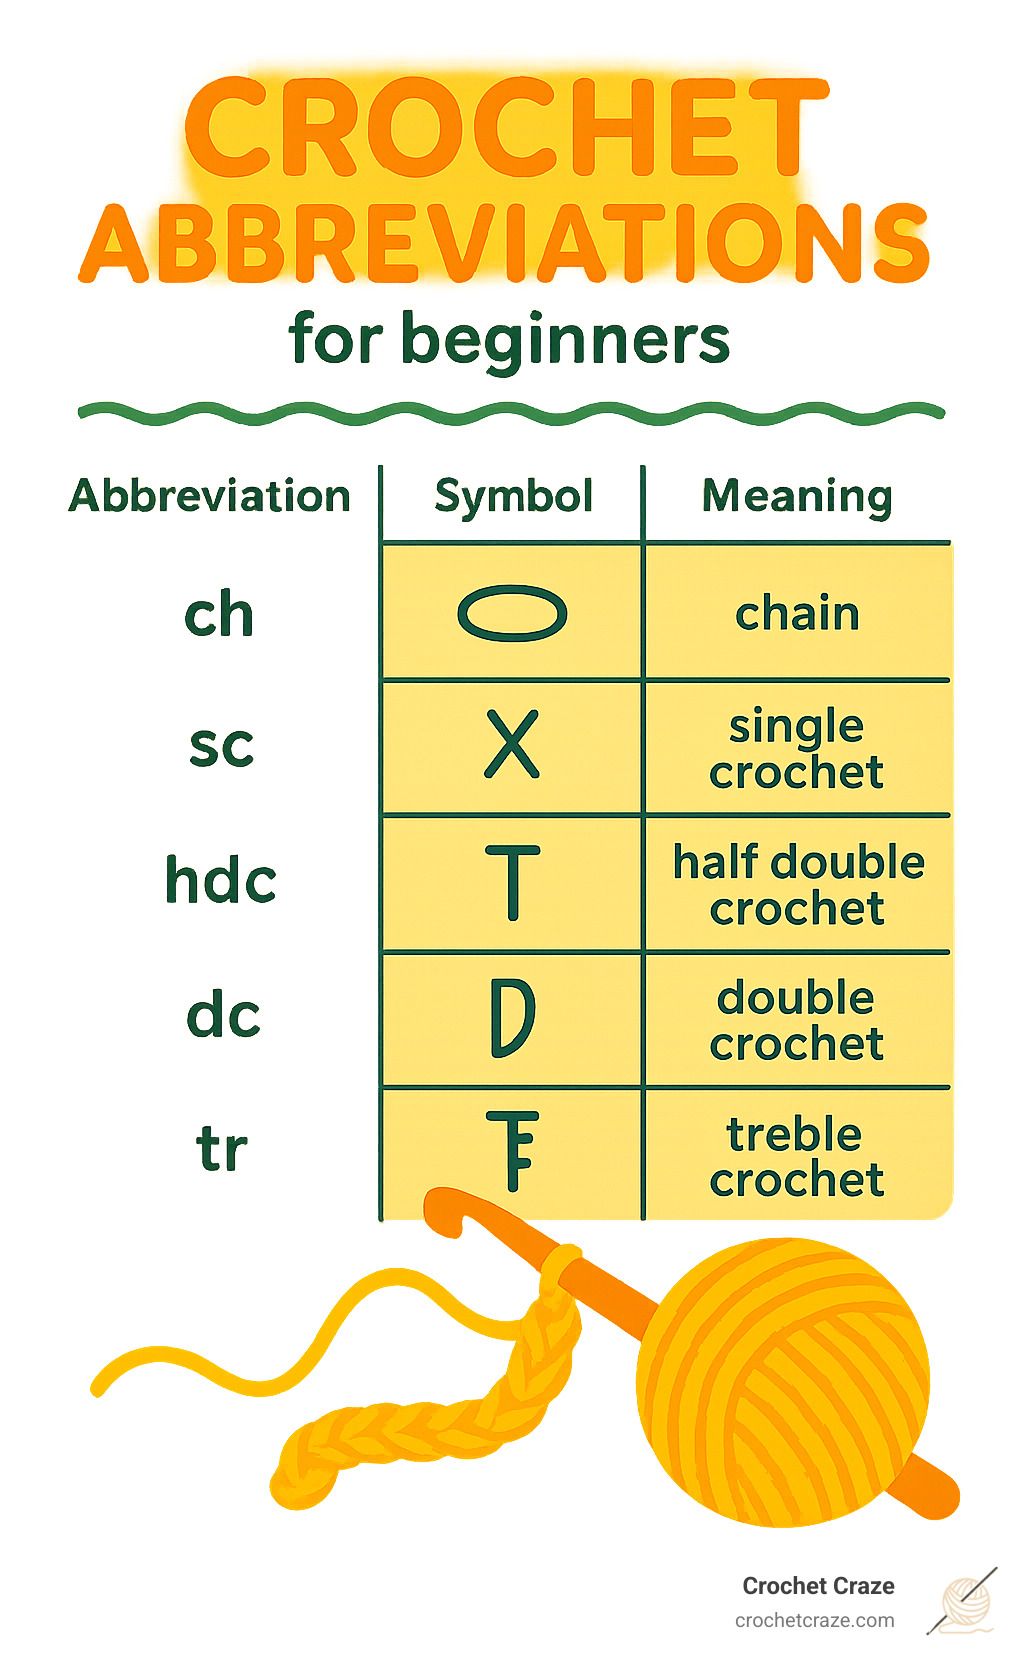
The most common abbreviations you’ll encounter include:
- ch = chain
- sc = single crochet
- hdc = half double crochet
- dc = double crochet
- st(s) = stitch(es)
- sl st = slip stitch
- rep = repeat
- sk = skip
- yo = yarn over
“I keep a little cheat sheet with abbreviations tucked in my project bag,” shares Maria, one of our Crochet Craze community members. “Even after years of crocheting, I sometimes need a quick reminder when working with a new pattern designer.”
Numbers in patterns typically indicate repetition – “ch 15” simply means create 15 chain stitches in a row. Special symbols like asterisks and brackets are pattern shorthand for repeated sections. For instance, when you see “* sc, dc, sc; repeat from * 3 times,” the pattern is asking you to work that sequence of stitches a total of 4 times (the original plus 3 repeats).
Why does my project curl or ripple unexpectedly?
Nothing’s more frustrating than working on a supposedly flat project only to watch it curl up like a potato chip or ripple like a pond! This common beginner issue usually stems from a few fixable problems.
Inconsistent tension is often the culprit. When some rows are worked tighter than others, your project can’t help but curl. With practice, your hands will develop muscle memory for maintaining even tension throughout your work.
Incorrect stitch counts can also cause trouble. “I used to wonder why my scarves kept getting wider,” laughs Jenny from our community. “Turns out I was accidentally adding stitches at the end of rows!” Try counting your stitches at the end of each row until this becomes second nature.
Missing the first or last stitch in a row is surprisingly easy to do, especially when turning your work. Those bright-colored stitch markers aren’t just for decoration – they’re lifesavers for marking the beginning and end of rows.
Your turning chain matters too! Remember the simple rule: chain 1 for single crochet, chain 2 for half double crochet, and chain 3 for double crochet. Using the wrong height turning chain can cause your edges to pull in or flare out.
How can I keep my edges straight row after row?
Creating beautifully straight edges is one of those skills that separates beginner work from more experienced crocheters. The good news is that with a few simple techniques, you can achieve professional-looking edges even as a beginner.
Count your stitches religiously at first. It might seem tedious, but this habit ensures you’re not accidentally adding or dropping stitches that would cause your work to widen or narrow.
Use stitch markers strategically. “Placing a marker in the first and last stitch of each row was a game-changer for me,” shares Thomas, who recently completed his first blanket. “I never miss an edge stitch anymore.”
Be consistent with turning chains. Some patterns count the turning chain as a stitch, while others don’t. Whichever approach your pattern uses, stick with it consistently throughout your project.
Develop a turning routine. It might sound silly, but how you physically turn your work matters. Try to turn your work the same way each time, keeping your hook in place during the turn.
Watch your edge tension. Many of us unconsciously pull too tightly on the first stitch after turning or make the last stitch of the row too loose. With awareness, you can adjust this habit.
“I used to have the wavy edge problem constantly,” admits Caroline, who teaches beginner crochet classes. “What finally fixed it was being extra mindful about my first and last stitches in each row. I make a conscious effort to match their tension to the rest of my work.”
Even experienced crocheters occasionally struggle with these issues. Each project teaches you something new, and those early “learning experience” projects will soon give way to beautifully executed creations you’ll be proud to display or gift to others.
Conclusion
Learning to crochet is a journey that begins with simple stitches and gradually builds to more complex projects. By focusing on crochet patterns for beginners step by step, you’ve laid a solid foundation for a lifetime of creative possibilities.
Every expert crocheter once started exactly where you are now. As one of our community members shared, “Crocheting is more than just a craft. It’s also a great stress reliever, an excellent way to pass time at home—and, it’s super addictive!”
The skills you’ve learned in this guide—from basic stitches to reading patterns and troubleshooting common issues—will serve you well as you continue to explore the wonderful world of crochet. Each project you complete builds confidence and helps develop your unique crocheting style. Those uneven edges and dropped stitches will soon become a distant memory as your hands develop the muscle memory that makes crocheting feel like second nature.
We at Crochet Craze encourage you to practice regularly, even if it’s just 15 minutes a day. Consistency is truly the key to improvement! Don’t be afraid to join our supportive community where you can share your projects (even the imperfect ones!), ask questions, and connect with fellow crochet enthusiasts who understand the joy of creating something beautiful with your own two hands.
As you grow more comfortable with the basics, try incorporating new stitches gradually. There’s no rush—this craft has been around for centuries and will wait patiently for you to master each technique at your own pace. Remember to be gentle with yourself along the way. Learning any craft takes time, and those “mistakes” you make are actually valuable learning opportunities that shape your development.
The joy of crochet isn’t just in the finished product,” as one of our longtime members puts it, “it’s in the meditative process of creating something stitch by stitch.” Many of us have found that crochet becomes a form of mindfulness practice, a way to slow down and be present in our world.
When you’re ready for your next crochet trip, explore our extensive collection of Crochet Patterns. From seasonal decorations that bring holiday cheer to wearable accessories that showcase your skills, there’s always something new to find and create.
The Crochet Craze community is here to support you every step of the way. We love nothing more than seeing beginners transform into confident crafters who pass along their knowledge to others. That’s how this beautiful tradition continues to thrive, one stitch at a time.
Happy crocheting from all of us at Crochet Craze! We can’t wait to see what you create.