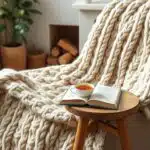
You want a cozy hat, made fast, that actually fits. This quick beanie pattern shows you how to knit or crochet a one-hour beanie. You can use bulky yarn or multiple worsted strands held together.
The aim is speed without losing a neat finish. You’ll use techniques like back loop only brims and rectangle-then-seam construction. Simple cinch closures are also used.
The methods here work whether you prefer a fast crochet hat or a quick knit hat. You can make a super bulky beanie or a bulky yarn beanie in minutes. You’ll get clear steps, realistic sizing, and brand-tested suggestions from Lion Brand Hometown to Bernat Softee.
Expect small, focused instructions you can follow in one sitting. The guide pulls together practical tips from HDC knit-like textures to dc2tog decreases and whip-stitch finishing. If you’ve got a timer, large needles or a 9–12 mm hook, and a ball of chunky yarn, you’re already halfway to a polished, wearable hat.
Key Takeaways
- Use super bulky or held-together worsted yarn to hit the one-hour beanie mark.
- Choose rectangle-then-seam or simple cast-on methods for fastest results.
- Back loop only (BLO) gives a crisp brim fast.
- Keep tools ready: large hook/needles, tapestry needle, and scissors.
- Brands like Lion Brand Hometown and Bernat Softee work well for bulky yarn beanie builds.
Why a Quick Beanie Pattern Is Perfect for Last-Minute Gifts
You want a useful present that looks handcrafted without eating your weekend. A one-hour gift idea delivers that. Use super bulky yarn and large hooks or needles, and you can finish a polished hat in a single sitting. This speed gives quick gratification and high perceived value.
Pick a beginner-friendly beanie pattern that uses simple shapes and basic stitches. Single crochet, half double crochet, or a short knitted rectangle with knit/purl and k2tog will get you to a tidy finish fast. These straightforward moves make this a great last-minute gift crochet option for new makers and a satisfying fast knitting project for seasoned crafters.
Benefits of a one-hour project
You complete a wearable gift after a cup of coffee. Time to make multiple hats for family or charity comes free. Quick projects reduce stress before holidays or birthdays. They also serve as practice pieces when you try a new yarn or stitch.
Who this pattern is ideal for
If you’re new to yarn work, a rectangle or single-seam design helps you build confidence. Experienced makers can crank out several in an afternoon for swap tables or fundraiser bundles. Both skill levels get a presentable finish using simple finishing steps like a slip stitch close and woven-in ends.
Occasions to whip one up: gifts, fundraisers, swaps
These hats shine at teacher gifts, donation drives, craft swaps, and emergency cold-weather needs. They work for birthday surprises and quick holiday presents. When you need bulk items for a fundraiser, a fast knitting project or last-minute gift crochet pattern makes scaling simple.
Want a tested quick pattern and photos to follow? Try this compact guide for speed-focused hats on Winding Road Crochet, where adult beanies are shown to finish in about 45–60 minutes once you get the rhythm.
| Why Choose It | Time | Skill | Best Use |
|---|---|---|---|
| Super bulky yarn + big hook/needle | 30–60 minutes | Beginner to advanced | Holiday gifts, swaps, donations |
| Rectangle or single-seam construction | 45–60 minutes | Beginner-friendly beanie | Teacher gifts, emergency hats |
| Simple decrease and cinch finish | 5–10 minutes to close | All levels | Fast last-minute gift crochet |
| Fast knitting project with chunky needles | 30–60 minutes | Intermediate to expert | Multiple makes for fundraisers |
Materials and Tools for Fast Knitting or Crochet Beanies
You want a beanie that looks great and fits well in just one hour. Choose yarn and tools that help you work fast. Super bulky yarn and chunky options make your project quicker.
If you’re short on yarn, try holding three worsted strands together. This trick gives you a similar look without needing special yarn.
Recommended yarn types
Super bulky yarn (category 6) is perfect for speed and warmth. Bulky (category 5) offers structure while staying quick. Holding three worsted strands together is a good emergency option.
Suggested brands used successfully
Lion Brand Hometown yarn has a relaxed drape that avoids a helmet look. Lion Brand Wool‑Ease Thick & Quick is great for quick hats, but some colors can feel stiff. Bernat Softee Chunky is another top pick for super bulky yarn.
For pattern ideas and notes on gauge, check out this ribbed wonder easy crochet hat and a chunky beanie tutorial.
Hook and needle sizes that speed up projects
Use a jumbo crochet hook in the 9–12 mm range for quick rows and bold texture. A 9 mm hook works well for the body, while a 6.5 mm can tame the brim. Bulky knitting needles in the US 13–17 range (9–12 mm) or matching circulars help you finish in one hour with fewer rounds.
Extras: pom-poms, needles, and finishing tools
Keep a tapestry or yarn needle handy for clean weaves and cinches. A pom-pom maker or faux‑fur pom adds a quick polish. Secure it with a sewing needle and thread or weave the yarn tails through the crown.
Scissors and a stitch marker are essential for a compact kit that prevents last-minute scrambles.
| Item | Why it helps you finish fast | Example |
|---|---|---|
| Super bulky yarn | Builds height with few stitches; one-skein adult hats common | Lion Brand Hometown, Bernat Softee Chunky |
| Bulky yarn | Balances structure and speed for less helmet-like drape | Lion Brand Wool‑Ease Thick & Quick |
| Held-together worsted (3 strands) | Emergency substitute that mimics super bulky thickness | Three worsted strands held together |
| Jumbo crochet hook | Large loops = faster rows; useful for textured stitches | 9–12 mm hooks |
| Bulky knitting needles | Quick rounds on circulars or fast flat rectangles | US 13–17 / 9–12 mm |
| Tapestry needle & sewing needle | Neat seaming, secure pom-poms, tidy weaves | Yarn needle and basic sewing needle |
| Pom-pom options | Fast finishing touch; faux fur or yarn available | Faux-fur pom, yarn pom, pom maker |
| Smaller hook/needle for brim | Create a firmer edge quickly to avoid sloppy joins | 6.5 mm or one size down |
Basic Stitches and Techniques You Need to Finish in Under an Hour
You want a beanie done fast and tidy. Learn a handful of moves and you’ll shave minutes off the work. Below are the core crochet and knitting skills that power most one-hour patterns and keep the finish neat.
Essential crochet stitches
Start with chain (ch) and slip stitch (sl st) for joins and edging. Single crochet (sc) and half double crochet (hdc) give a dense, fast fabric. Double crochet (dc) builds height quickly if you’re racing the clock. Learn the dc2tog decrease so you can close the crown in two quick rounds; a clear dc2tog tutorial will save you fumbling at the finish.
Essential knitting stitches for quick beanies
For knit beanies, the basics are knit and purl. A few rows of ribbing then a stockinette body gets you there fast. Use k2tog as your staple decrease when you work in the round or when you plan to seam flat. Those quick knitting decreases cut the crown time without fuss.
Working in back loop only (BLO) for crisp brims
When you want a tidy, elastic edge, work the brim in back loop only. BLO creates a rib-like fold that mimics a knitted cuff and helps the brim fold neatly. Many rectangle methods ask you to use BLO on every brim row to get a polished look with minimal effort.
Seaming methods and quick finish techniques
Choose fast joins: slip stitch seams for crochet, whip stitch along the short side of a rectangle, and a running or cinch stitch at the crown. Pull the running stitch tight, secure with a knot and a small cross stitch for strength. Weave in ends with a tapestry needle and trim—done.
Practice these moves once and they become second nature. With a little repetition you’ll hit the one-hour mark more often than not.
quick beanie pattern: Crochet Rectangle Method for Speed
Looking for a fast way to make a warm hat? The crochet rectangle method is quick and easy. It involves making a flat panel, then seaming the sides and cinching the top. This method is great for when you need a beanie fast.

Why it saves time
Working with flat panels saves time on joins and tool changes. You crochet in long rows, turn, and repeat. Seaming is done only once. Use big hooks and HDC or DC to build height quickly. Try the one-hour method with bulky yarn for a fast result.
Foundation chain counts to start
Start with these chain counts for different sizes: Child 21, Teen 23, Adult Woman 23, Adult Man 25. Add 2–6 chains for more slouch. For precise stitches, aim for 20–24 HDC stitches across for a typical panel.
Row pattern example that reads like knitting
ROW 1: HDC into 2nd ch from hook across. ROW 2: ch 1, HDC in back loop only across; repeat until length matches target. Swap DC rows (ch 3 counts as first dc) for a chunkier feel. The HDC back loop beanie effect makes a crisp, rib-like brim when you fold the lower edge.
Fast decrease and closing techniques
Fold the rectangle and whip-stitch the short seam with a tapestry needle. For the crown, run a whip or running stitch around the top edge, pull tight to cinch, and knot. If you prefer a crochet closure, work two decrease rounds with dc2tog, then cinch and weave ends. Pick up two strands when whip-stitching the top for a sturdy finish.
| Size | Foundation Chain | Approx. Finished Rectangle | Rows (HDC) | Notes |
|---|---|---|---|---|
| Child | 21 | 10″ × 15.5″ | 21–23 | Use smaller hook for snug brim; add 2 ch for slouch |
| Teen | 23 | 11″ × 16″ | 22–24 | Good test-fit at 20 rows; adjust for head height |
| Adult Woman | 23 | 11″ × 18″ | 24–26 | HDC back loop beanie brim folds neatly; try one-hour crochet rectangle method with bulky yarn |
| Adult Man | 25 | 12″ × 20″ | 25–28 | Allow extra rows for deeper crown or slouch |
Quick Knitted Beanie Method Using Chunky Needles
Want to make a warm hat quickly? Choose from two fast methods: short-row shaping for little seam or a flat rectangle for quick stitching. Short-rows save time on finishing, while a knit rectangle beanie is simple and reliable.
Super bulky yarn and large needles make for fast knitting. A chunky needle beanie has big stitches, meaning fewer rows and a quicker hat. An experienced knitter can make a one-hour hat for an adult woman in about 45 minutes. Beginners can finish and seam a knit rectangle beanie in an hour.
Do you prefer knitting in the round? Use circular needles or the magic-loop method for a seam-free crown. Or, use straight needles to cast on a rectangle, seam the sides, and cinch the top. Both methods make a cozy hat; choose what you like best.
Seaming affects both speed and look. Mattress stitch is nearly invisible but takes time. Whip stitch is faster and works well for quick hats. For flat tops, thread a yarn tail through the top stitches and pull tight to close. Weave in tails securely and tuck ends under the brim for a neat finish.
Need a quick guide while you knit? Check out the easy knit hat tutorial for tips on gauge and timing. Use it to keep track of your progress from brim to body, aiming for a one-hour hat.
- Short-row tip: Work wrapped turns every few inches for smooth shaping and minimal seaming.
- Rectangle tip: Cast on to match head circumference; seam with mattress or whip stitch; cinch top and weave in.
- Needle choice: Circulars for seamless finish, straights for speed and easy seaming.
Sizing Cheat Sheet to Finish the Beanie Fast
Ready to finish a beanie quickly? This guide helps you match head size to rectangle size. It also shows how to adjust rows for slouch and test-fit as you go. Below, you’ll find a simple beanie sizing chart and quick measurements for one-hour hat sizes.
Follow the rectangle dimensions for each head size. Wrap the panel around the head to check width. Then, adjust rows before seaming. Super bulky yarns hide small gauge shifts, so you can work fast.
For slouch or a snug fit, add 2–6 foundation chains. Remove 2–4 chains to tighten the crown or cut slouch. Repeat HDC rows until you reach Row 21 for child, Row 22 for teen, Row 24 for adult woman, and Row 26 for adult man. Then, work decreases as your pattern indicates.
Use a smaller hook or needle for the brim to draw the edge in. If the hat is too big, drop a few rows or shorten the foundation chain by 2–4. If it’s too small, add rows or a couple chains if your pattern allows.
Quick test-fit tips: drape the rectangle around the head while working. Try the panel on before final seam to confirm length. Measure gauge loosely. These tips help you stay within one-hour hat sizes and reduce rework.
| Target | Head Circumference | Rectangle Dimensions (W × L) | Row Count Guide (HDC) | Foundation Chain Adjust |
|---|---|---|---|---|
| Child | 18–20″ (45–48 cm) | 10″ × 15.5″ | Repeat to Row 21 | ±2–4 chains |
| Teen | 19–21″ (48–53 cm) | 11″ × 16″ | Repeat to Row 22 | ±2–4 chains |
| Adult Woman | 21–23″ (53–59 cm) | 11″ × 18″ | Repeat to Row 24 | ±2–6 chains |
| Adult Man | 22–24″ (56–61 cm) | 12″ × 20″ | Repeat to Row 26 | ±2–6 chains |
Yarn Substitutions and Speed Hacks
Need a hat fast? Smart yarn choices and shortcuts save time. This guide covers swaps, quick tips, and keeping your beanie soft and flattering.
Using three strands of worsted held together makes instant super bulky yarn. Hold them as one and check gauge with a 4–6 row swatch. You might need to adjust needle or hook size for the right weight.
Holding yarn strands together saves time without buying new yarn. Twist them every few inches to avoid splitting. For a less bulky brim, use one strand for a few rows, then switch back.
Some bulky yarns are stiff, making hats boxy. Choose yarn with good drape for beanies. This way, your hat will follow your head’s curves.
Look for brands like Lion Brand Hometown and Bernat Softee for soft yarn. Test a small sample on your wrist. If it’s stiff, choose a different yarn to avoid a helmet hat.
Color and texture choices hide small mistakes and speed work. Variegated or tweed yarns hide uneven tension. Bulky slubby yarns hide mistakes, letting you work faster.
Time-saving hacks that actually work:
- Use single-skein adult quantities to skip joins.
- Choose faux fur pom-poms for instant polish.
- Pick one size larger needle or hook to finish faster if you can accept a looser drape.
Keep a blunt tapestry needle and small scissors in your kit. They help with finishing, so you knit more and fuss less.
If your hat is too stiff, try a softer yarn or loosen your tension. Small changes in yarn and handling make a big difference.
Brim Options That Take Minutes
You want a neat edge that looks handmade, not hacked together. Choose a brim style that fits your time and skill. Options include a folded cuff, a quick rib, or single-crochet rows. All can be finished in minutes and look sharp.
Folded cuff is a fast favorite. Crochet a narrow rectangle, seam the ends, then fold and join to the hat body. This method lets you build structure without long ribbing. Work the seam slightly below the top edge so the join hides beneath the fold.
Want stretch with minimal fuss? Try a ribbed option. Knit 1×1 or 2×2 on bulky yarn for a ribbed brim quick enough to stay under your time limit. For crochet, work front- and back-loop ribs to mimic knit elasticity. Use tighter tension for a firmer cuff.
For the speediest path, simple single crochet brim rows give clean results. Crochet around the base and work a few firm rounds. This method reduces shaping and keeps the hat lightweight.
Holes at the join spoil the look. To prevent joining holes brim, insert your hook or needle into the lower loop instead of the very top loop when you attach the body. Some makers sl st under the BLO of the front side and catch the top loop of the back side for a tidy, hole-free seam.
Swap hook or needle sizes between brim and body for shape fast. Use a smaller tool for the cuff—try a 6.5 mm hook for the brim and a 9 mm for the body in the cited pattern—to create a firm edge that holds a fold and keeps the hat from flopping.
Need a quick demo while you work? Follow a short visual guide at this crochet hats tutorial for step-by-step images and timing tips that help you finish the brim without fuss.
- Folded brim: crisp cuff, quick rectangle seam.
- Ribbed brim quick: elastic, fast on chunky needles.
- Single-crochet rows: fastest, light, and tidy.
Adding a Pom-Pom or Finishing Touches Fast
Want a beanie that looks finished in minutes? Choose between a faux fur pom pom and a yarn pom-pom. A faux fur pom pom gives a store-bought look and is easy to attach. A yarn pom-pom is cheaper and quicker to make, but you’ll need a few minutes to trim and shape it.
For quick finishing, plan your pom pom attachment before sewing the crown. Turn the hat wrong side out and thread the pom-pom ties through the top. Pull tightly and tie a secure double knot inside. Then, weave the tails along the hat’s wrong side and trim close for durability. This way, you can attach pom pom toppers in under five minutes.
If your faux fur pom pom has a plastic stud, follow the manufacturer’s directions to lock it in place. For yarn pom-poms, use a sharp darning needle to run the ties up into the pom-pom center and then back down through the hat. Add a small cross stitch over the cinched crown for extra hold.
Want more flair than just a pom? Add a tiny sewn-on tag, a quick cuff stitch at the brim, or a simple embroidered accent. These details make the hat look handmade, not rushed. Match thread color and use tidy, even stitches for the best look.
For a step-by-step guide, check this DIY fur pom-poms and attachment walk-through on Whistle & Ivy: how to make a pom-pom and attach. You’ll find clear photos and small tricks that speed the process and improve security.
| Finish Option | Time | Look | Durability Tips |
|---|---|---|---|
| Faux fur pom pom (stud) | 1–3 minutes | Polished, retail-ready | Use manufacturer stud; press firmly; check fit |
| Yarn pom-pom (ties) | 5–10 minutes | Cozy, customizable | Tight double knot, weave tails, trim, add cross stitch |
| Small sewn-on tag | 2–4 minutes | Personalized, subtle | Sew with matching thread; bar tack ends |
| Cuff stitch or embroidered accent | 3–8 minutes | Handmade detail | Use contrasting thread sparingly; secure knots inside |
Troubleshooting Common Problems When You’re Racing the Clock
When making a beanie in under an hour, small mistakes seem big. This quick guide helps fix common issues fast. So, you can get back to your timer.

Fixing brim holes and uneven edges quickly
For gaps at the brim, sew the join a bit lower. Rethread your yarn and single crochet again. This time, hook a bit deeper to seal the holes quickly.
Uneven edges can be fixed with one round of single crochet or slip stitch. For bulky yarn, a quick steam or gentle stretch can fix rows without blocking for hours.
Adjusting gauge on the fly when size is off
Is the hat too big? Remove a few body rows or tighten the brim with a smaller hook. For a smaller hat, add rows or fold in extra fabric for the cuff.
For knitting, change needle size or add short rows to gain length. A quick math trick: measure the current circumference and compare. Then, remove or add rows in proportion to adjust gauge fast.
Handling yarn splits and bulky yarn stitches without slowing down
Use blunt-tipped hooks or needles for chunky yarn. They help avoid splits. Keep steady tension and use acrylic-wool blends or tightly plied yarn when time is tight.
If a split occurs, pull back to the last clean stitch and rework it. Avoiding splits saves time. With bulky yarn, a quick rework hides most errors.
Fast fixes for crown closure and final seaming
If the top won’t close, run an extra running stitch around the opening. Secure with whip-stitches. Cross-sew the final thread for extra strength. This trick keeps the crown neat and strong without a long redo.
For emergencies, keep a small kit: smaller hooks, a blunt yarn needle, and spare yarn. These items can turn most quick beanie fixes into five-minute wins.
Video and Photo Tutorial Checklist to Follow for a One-Hour Make
Get ready to crochet fast with a simple plan. This checklist will guide you through a one-hour beanie tutorial. It helps you stay on track from start to finish, avoiding mistakes.
First, clear your workspace and pick a short tutorial. If you prefer, use a printable pattern or PDF. For backup, check out quick single-skein patterns.
Step-by-step sequence to watch or reference while you work
- Prepare tools and yarn so everything is at hand.
- Work the brim using BLO rows or ribbing; use a slightly smaller hook or needle for a firm edge.
- Build the body with HDC or DC if you crochet, or stockinette if you knit.
- Perform decrease rounds with dc2tog or k2tog; short rows work for some knitters.
- Seam short sides when using the rectangle method and whip-stitch the crown closed.
- Attach the pom-pom, cinch the top, and weave in ends neatly.
What to prepare before you start (tools, yarn, space, timer)
Get ready with bulky yarn, hooks/needles, a tapestry needle, scissors, and a pom-pom. Have extra yarn for finishing touches. Set a timer to keep pace.
Time benchmarks for each section: brim, body, decreases, finishing
Use these time guides to stay on track. Adjust based on your speed and yarn choice.
| Section | Typical Time | Tips to Speed Up |
|---|---|---|
| Brim | 5–15 minutes | Use BLO or ribbing with a 6.5 mm hook/needle; keep tension relaxed |
| Body | 20–35 minutes | Work HDC/DC with 9–12 mm tools or hold two worsted strands together |
| Decrease/Closure | 5–10 minutes | Follow timed video cues and use quick cinch methods |
| Finishing & Pom | 5–10 minutes | Attach pom securely and weave ends with a tapestry needle |
Practice the sequence without a timer first. Watch tutorials at slower speeds or pause as needed. Keep this checklist handy. Soon, you’ll make an adult beanie in under an hour.
Conclusion
For a quick beanie, start with super bulky yarn or worsted held together. Use a rectangle or short-row method. Add a BLO brim and simple decreases. This makes your beanie fast to make, ready in about an hour.
Choose Lion Brand Hometown, Bernat Softee, or Wool-Ease Thick & Quick for a smooth drape. Or, hold three worsted strands together for quick bulk. Use a small hook for the brim and a big one for the body. This trick prevents holes and speeds up your work.
Start with the brim, then the body, decrease, seam, cinch, and add a pom if you want. Keep a cheat sheet and quick tips handy to avoid mistakes. Use whip stitch or running stitch for a neat finish.
With the right materials and a few quick tips, you can make a cozy beanie fast. Try it and see how a few smart choices can turn a quick project into something you’ll love wearing.
FAQ
How can I realistically finish a cozy beanie in under an hour?
Use super bulky or bulky yarn with large hooks/needles. Work a flat rectangle for the body. Seam the short sides and cinch the crown with a running or whip stitch.
Choose HDC or DC for crochet, or stockinette/short rows for knitting. Prepare tools and yarn beforehand. Follow a simple step sequence and pick a forgiving yarn.
Which yarns give the best balance of speed and a wearable drape?
Lion Brand Hometown offers good drape and softness. Lion Brand Wool-Ease Thick & Quick is classic but can be stiff. Bernat Softee Chunky is another solid choice.
Avoid stiff yarns like Hobbii Amigo Giga for a cozy look. If you’re out of super bulky, hold three worsted strands together. Test drape before committing.
What hook and needle sizes should I use to hit the one-hour mark?
Use 9 mm to 12 mm crochet hooks for speed. Some patterns use a 6.5 mm hook for the brim and 9 mm for the body. For knitting, use bulky needles or circulars (US 13–17 / 9–12 mm).
Keep a smaller hook/needle for the brim to create structure and reduce holes.
What is the fastest brim technique that yet looks neat?
A folded brim worked flat with BLO rows for crochet or a quick 1×1 or 2×2 rib in bulky knitting is fast and tidy. Use a slightly smaller hook/needle for the brim (e.g., 6.5 mm) to keep it firm.
When joining, insert the hook a bit lower into the stitch to avoid holes. An extra round of single crochet or slip stitch can smooth the join.
How do I make a rectangle-based crochet beanie step by step?
Chain to your target width (foundation chain examples: Child 21, Teen 23, Adult Woman 23, Adult Man 25). Row 1: HDC into 2nd ch from hook. Row 2: ch 1, BLO HDC across.
Repeat BLO HDC rows until desired height (about 21–26 rows depending on size). Seam short sides with whip stitch, then place running stitch around top edge and pull to cinch or use two decrease (dc2tog) rounds before cinch. Weave in ends and attach pom-pom if desired.
What knitting shortcut methods will shave time without sacrificing finish?
Use chunky needles and knit a flat rectangle to the head circumference, then seam short sides and gather the crown. Or, knit in the round on large circulars or use short rows for minimal shaping.
Fast decreases use k2tog in the crown rows; finish by threading a yarn tail through top stitches and pulling tight, then weave in ends securely.
How many stitches and rows should I plan for different sizes?
Use the sizing cheat sheet as a guide: finished head circumferences—Child ~18–20″ (45–48 cm), Teen ~19–21″ (48–53 cm), Adult Woman ~21–23″ (53–59 cm), Adult Man ~22–24″ (56–61 cm). Rectangle dimensions from example patterns: Child ~10″ x 15.5″, Teen ~11″ x 16″, Adult Woman ~11″ x 18″, Adult Man ~12″ x 20″. Add 2–6 chains for slouch, subtract 2–4 for a snug fit.
Can I use three worsted strands to speed up the hat?
Yes. Holding three worsted strands together mimics super bulky thickness and speeds progress. It may change drape slightly, so test one swatch or a few rows to confirm fit and look. Use large hooks/needles to match the combined diameter and be prepared to adjust stitch counts if needed.
How do I avoid a “helmet” look with super bulky yarn?
Pick yarns with good loft and drape—Lion Brand Hometown and select Bernat Softee shades are better choices. Use lighter, more airy fibers or slightly looser gauge for a softer silhouette. For a less boxy shape, add a few more body rows for slouch or choose colorways and textures that visually soften the brim and crown.
What are the fastest, most secure crown-closure methods?
The quickest is to seam short sides, then thread a yarn needle around the top edge, pull a running stitch tight, and secure with a knot and a small cross stitch for reinforcement. Crochet alternatives include two dc2tog decrease rounds before cinching. Always weave in tails on the wrong side for durability.
How long should each stage take so I can finish in an hour?
Time benchmarks: Brim 5–15 minutes; Body 20–35 minutes using HDC/DC with large hooks or knitting with bulky needles; Decrease/closure 5–10 minutes; Finishing and pom attachment 5–10 minutes. Experienced makers commonly finish an adult beanie in 45–50 minutes; beginners often complete one in about an hour.
Which finishing touches give a polished look quickly?
Faux fur pom-poms attach fast and look store-bought; use the pom’s stud or tie-on method and secure inside with a double knot. Add a simple sewn-on label or a cuff stitch for personality. A quick cross-stitch reinforcement at the cinched crown keeps the top tidy and secure.
What tools and extras should I have ready before starting?
Prep a skein of super bulky yarn (one will usually do for adult sizes), appropriate hooks/needles (6.5 mm for brim, 9–12 mm for body), a tapestry/yarn needle, scissors, a pom-pom (optional), and a stitch marker or timer. Having everything within arm’s reach saves minutes.
How do I fix holes or uneven edges without ripping everything out?
If holes appear at the brim join, resew the join slightly lower or work another single crochet round inserting the hook into a lower stitch loop. For uneven edges, a final round of slip stitch or single crochet smooths things. If the crown puckers oddly, add an extra running stitch and a cross-stitch reinforcement to tidy the closure.
What quick-fit techniques stop you from having to rip back?
Wrap the rectangle around the intended head while you work to check width. Try it on before seaming to confirm height and adjust rows on the fly. Use the smaller hook for the brim to tighten the edge without altering the whole panel. Super bulky yarns are forgiving—small tweaks usually fix fit without ripping.
Are beginner stitches sufficient to make a polished one-hour beanie?
Absolutely. Basic crochet stitches—chain, single crochet, HDC, DC, and dc2tog—plus BLO for a brim, are enough. For knitting, basic knit/purl and k2tog decreases do the job. Rectangle construction and simple seaming produce professional results with minimal shaping required.
Do video tutorials speed up learning and finishing in one hour?
Yes. Follow a step-by-step video or photo tutorial and pause between sections as needed. Many free tutorials demonstrate an adult beanie completed in 45–60 minutes. Keep the video handy for timing cues and refer to printable pattern notes when you want to work offline.
What are smart time-saving hacks for last-minute gift scenarios?
Use single-skein super bulky yarn or hold worsted strands together, pick a faux-fur pom-pom, and choose variegated or chunky textures that hide small mistakes. Work a rectangle method, use a smaller hook for the brim and a larger one for the body, and skip optional blocking. These choices maximize speed while keeping a polished look.
Where should I start if I’ve never seamed or closed a crown before?
Start with a simple whip stitch along the short sides and a running stitch around the top edge to cinch. Pull tight, make a secure knot, then reinforce with a cross-stitch. Watch a short video on whip stitch and running stitch technique; practice on scrap yarn for five minutes to gain confidence.
Which color and texture choices make errors less visible?
Variegated, tweed-speckled, or heathered yarns like some Wool-Ease variegated shades camouflage uneven tension. Chunky, fluffy textures hide stitch inconsistencies naturally. Dark, solid colors show less pilling and minor flaws; mid-tone variegated skeins are the most forgiving for quick makes.
How much yarn do I need for one adult beanie?
Most adult beanies in super bulky yarn use one skein. Check the specific yarn label and pattern—some variegated skeins or added pom-poms may require extra yardage. Keep a small extra ball on hand for secure cinching and weaving in ends.