
Easy knit hat tutorial: 5 Powerful Tips for Stunning Results 2025
From Novice to Knitter: Your Easy Winter Hat Tutorial
Easy knit hat tutorial steps at a glance:
- Gather supplies: Worsted/bulky yarn, 16″ circular needles (US 7-10), stitch markers
- Calculate size: Measure head circumference, multiply by stitches per inch
- Cast on: Use long-tail method, join without twisting
- Knit the brim: Work K1P1 or K2P2 ribbing for 1-3″
- Knit the body: Continue in stockinette stitch until reaching 7-8″ total length
- Shape the crown: Place markers and decrease evenly
- Finish: Thread yarn through remaining stitches, weave in ends
A knit hat is the perfect entry point into the wonderful world of knitting. Unlike scarves which can drag on for weeks, hats are quick to complete, use minimal yarn, and give you that satisfying feeling of creating something both beautiful and useful.
Hats are the ideal beginner project because they teach essential skills without overwhelming you. You’ll learn to cast on, work in the round, create ribbing, and shape a crown – all fundamental techniques you’ll use in countless future projects.
One of the best things about knitting hats is their versatility. As one experienced knitter noted, “I’ve been knitting hats for years and still prefer simple, beginner-friendly patterns. Some of the most basic knit patterns result in the most modern-looking hats.”
Looking to get started right away? The basic beanie pattern is incredibly forgiving. You need just one skein of yarn, making it both budget-friendly and perfect for using up leftover yarn from your stash.
I’m Sonji Huerta, a newcomer to yarn crafts who has found particular joy in creating simple knitted items like hats, and I’m excited to share this easy knit hat tutorial that has helped me build confidence in my knitting journey. Let me walk you through creating your first cozy winter hat, step by simple step.
Supplies, Yarn & Needles 101
Ready to cast on your first cozy hat? Let’s gather everything you’ll need! One of the joys of hat knitting is its simplicity – you won’t need to raid the craft store or break the bank.
Here’s what you’ll want to have on hand for your easy knit hat tutorial:
- Yarn: One skein (100g) of worsted (#4) or bulky (#5-6) weight yarn
- Needles: 16″ circular needles in size US 7-10 (4.5-6mm)
- Double-pointed needles (DPNs) or a longer circular for Magic Loop (same size as your main needles)
- Stitch markers: One to mark the beginning of your round, plus four more for crown decreases
- Measuring tape: To check your gauge and hat length as you go
- Mix needle: For weaving in those pesky ends
- Scissors
- Optional: Pom-pom maker or a pre-made fur pom for that perfect finishing touch
I remember my first hat – I was so nervous about knitting in the round, but it came together in just one weekend! As the knitting experts at Tin Can Knits point out, “A typical easy knit hat can be completed in as little as 12 hours of active knitting time.” Perfect for impatient beginners like I once was!
When choosing your yarn, think about both warmth and comfort. Your hat will sit directly against sensitive skin (including foreheads and ears), so scratchy yarn is a no-go. “Choose 100% wool or a soft wool blend to maximize coziness,” advised my knitting mentor, and it’s advice I still follow today.

Best Beginner Yarns & Needle Sizes
For your first hat trip, I recommend sticking with these beginner-friendly options:
Worsted Weight (#4) offers the perfect balance between speed and detail. Use US 7-8 (4.5-5mm) needles with yarns like Lion Brand Wool-Ease or Patons Classic Wool Worsted. You’ll get approximately 4-5 stitches per inch in stockinette, giving you a medium-weight hat that’s not too bulky but still plenty warm.
Bulky Weight (#5-6) is my go-to recommendation when you want that instant gratification! Pair with US 9-10 (5.5-6mm) needles and yarns like Lion Brand Wool-Ease Thick & Quick. With only 3-4 stitches per inch in stockinette, your hat will grow quickly before your eyes.
I always suggest superwash wool or wool/acrylic blends for beginners because they’re warm without being itchy, machine washable (no felting accidents!), budget-friendly, and available in a rainbow of colors. As my knitting group friend always says, “Using any worsted-weight yarn makes this a great stash-buster project.”
If you’re looking to expand your yarn collection, monthly yarn subscriptions like KnitCrate can provide inspiration and introduce you to fibers you might not try otherwise. Scientific research confirms wool’s superior warmth properties, making it ideal for winter wear – your ears will thank you!
Flat vs In-the-Round: Tool Showdown
There are two main approaches to knitting a hat: flat (back and forth on straight needles) or in the round (circular). Here’s how they compare:
| Feature | Flat Knitting | Circular Knitting |
|---|---|---|
| Tools | Straight needles | Circular needles or DPNs |
| Seaming | Requires seaming at the end | No seam needed |
| Stitch Pattern | Alternating knit and purl rows | Knit every round for stockinette |
| Difficulty | Simpler tools, but requires seaming | Learning curve for circular, but no seaming |
| Best for | Complete beginners | Slightly more advanced beginners |
| Final Look | Has a seam | Seamless finish |
For this easy knit hat tutorial, we’ll focus on circular knitting because it creates a seamless finish, is faster once you get the hang of it, and teaches valuable skills you’ll use in future projects. As my knitting teacher explained, “Knitting in the round is like walking up a spiral staircase—you’re always moving forward in the same direction.”
If circular needles look intimidating, don’t worry! I felt the same way at first. They function similarly to straight needles, just connected with a flexible cable. You might find it helpful to check out our guide to circular knitting needles or learn about the Magic Loop method if you’re curious about alternatives to DPNs.
Later in our tutorial, we’ll also cover connecting yarn in knitting if you want to add stripes or switch colors mid-project. But for now, let’s focus on gathering those supplies and getting ready to cast on!
Sizing & Cast-On Math Demystified
“How many stitches should I cast on for my hat?” This might be the most common question I hear from new knitters. Don’t worry – I’ll help explain this crucial first step!
The perfect hat size depends on three key factors:
Head circumference (who’s going to wear this cozy creation?), gauge (how many stitches per inch your particular yarn and needle combination creates), and negative ease (that bit of magic that makes hats hug your head just right).
Think of negative ease as the secret to a well-fitting hat. Your hat should actually measure 1-2 inches smaller than the actual head circumference so it stretches slightly when worn. This gives you that perfect snug fit without your hat sliding down over your eyes mid-winter walk!
Here’s the simple formula I use for all my hats:
Stitches to cast on = (Head circumference in inches - 1 or 2 inches for negative ease) × Stitches per inch
Let’s work through a real example together. Say you’re knitting for an adult with a 22″ head. You’ll want the finished hat to be about 20-21″ around. If your gauge swatch shows you’re getting 4 stitches per inch:
20.5" × 4 sts/inch = 82 stitches
Here’s a handy tip from my own knitting journey: round your stitch count to a multiple of 6 or 8 to make the crown decreases much easier later on. In our example:
82 stitches → round to 84 (multiple of 6) or 80 (multiple of 8)
“I learned the hard way that checking gauge before starting ensures the correct hat size,” my knitting mentor once told me. “A too-small hat is unwearable, and a too-large hat constantly falls over your eyes!” Those few minutes spent making a gauge swatch will save you hours of frustration later.
If you’re curious about other techniques like connecting yarn in knitting, our Crochet Craze resource library has detailed guides to help you along.
Quick Reference Size Chart
Not in the mood for math? I totally understand! Here’s my go-to reference chart based on the wonderful Basic Beanie pattern by Tin Can Knits. Their pattern “includes directions for four different yarn weights and seven sizes, making it suitable for newborns to adults”:
For Worsted Weight Yarn (4-5 sts/inch):
– Newborn (13″ head): 56-60 stitches
– Baby (16″ head): 68-72 stitches
– Toddler (18″ head): 76-80 stitches
– Child (19.5″ head): 84-88 stitches
– Adult Small (21″ head): 88-92 stitches
– Adult Medium (22″ head): 92-96 stitches
– Adult Large (23.5″ head): 100-104 stitches
These numbers are just guidelines. Your personal gauge and chosen stitch pattern will influence your final stitch count. The good news is that ribbing (which we’ll use for the brim) is wonderfully forgiving, giving you a bit of wiggle room with sizing.
Avoid the Twist!
Let me save you from one of my early knitting heartbreaks – the dreaded twisted join! There’s nothing worse than knitting several rounds only to find your work has a permanent twist in it.
When joining to knit in the round, make absolutely sure your cast-on stitches aren’t twisted around the needle. Here’s my foolproof method:
- Cast on your calculated number of stitches
- Lay the needle flat on a table with all stitches facing upward
- Double-check that the cast-on edge runs along the inside of the circular needle
- Triple-check that there are no twists or flips (seriously, this step is worth it!)
- Join the last stitch to the first by knitting into the first stitch
- Place a marker to indicate the beginning of the round
As my first knitting teacher emphatically told me, “Always triple-check that your cast-on round is not twisted. Once you’ve knit a round, a twist is permanent and you’ll need to start over.” Those extra few seconds of checking will save you from having to rip out your work and start again!
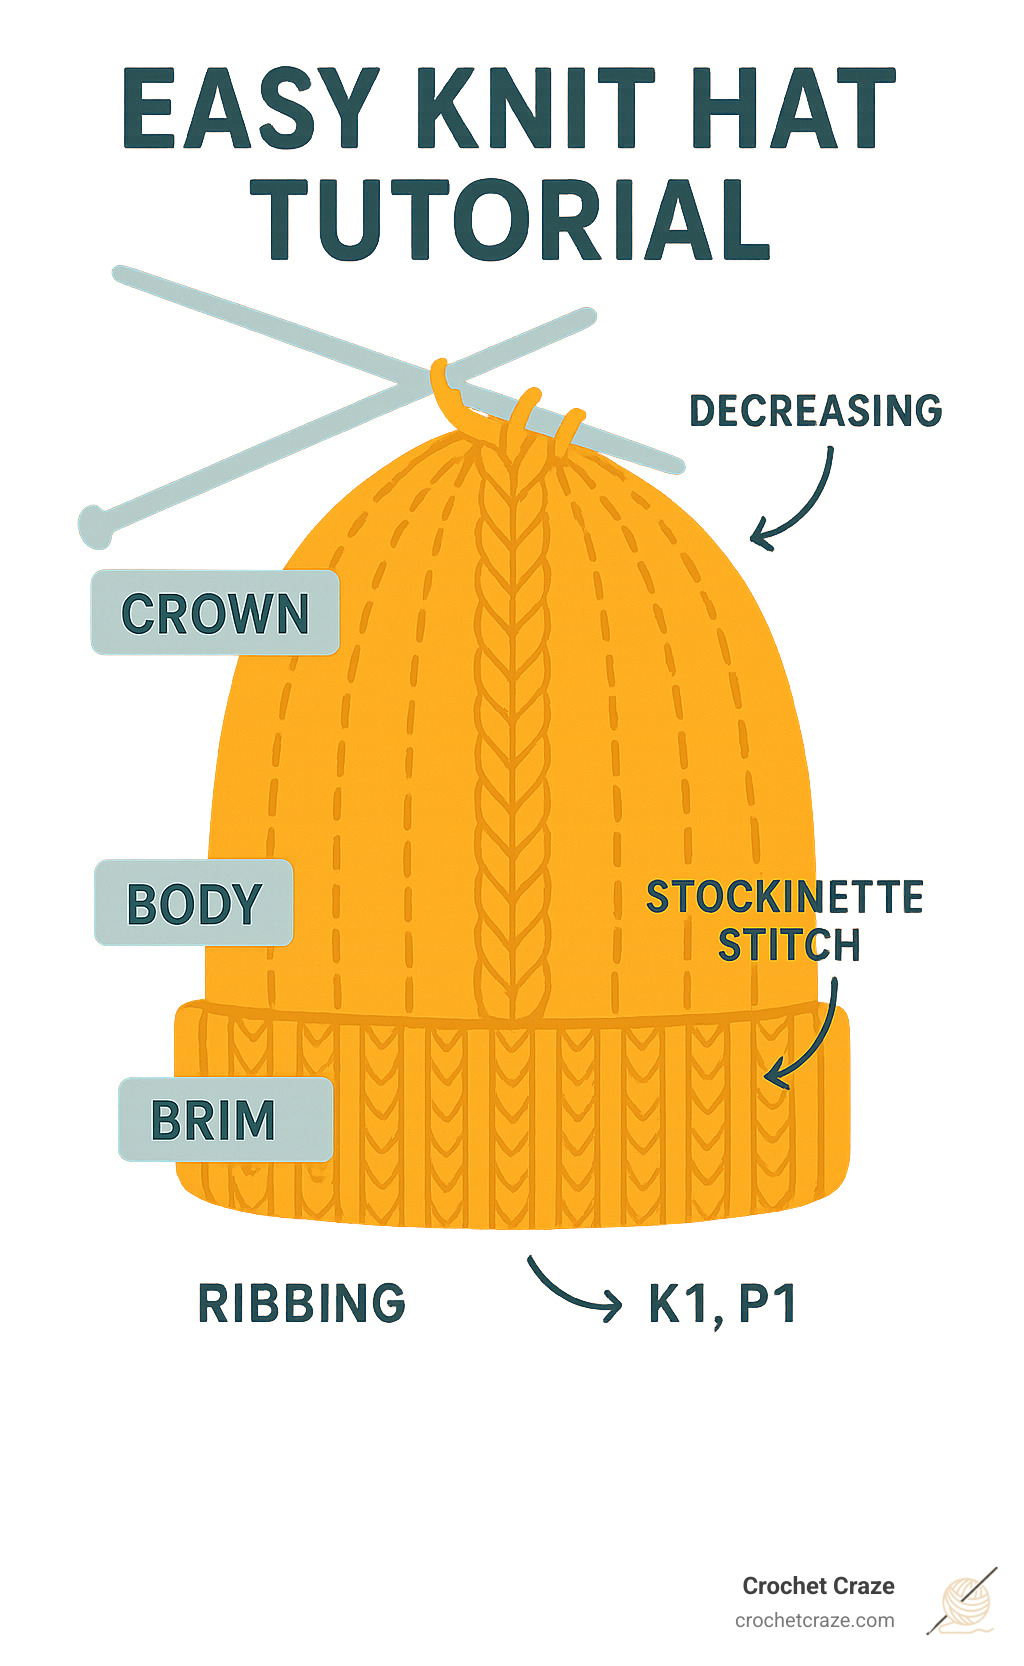
Easy Knit Hat Tutorial: Brim to Crown
Now that we’ve covered all the preparation, let’s roll up our sleeves and dive into the actual easy knit hat tutorial. I’m going to break this down into five manageable steps that will guide you from your first cast-on stitch to a finished hat you’ll be proud to wear or gift.
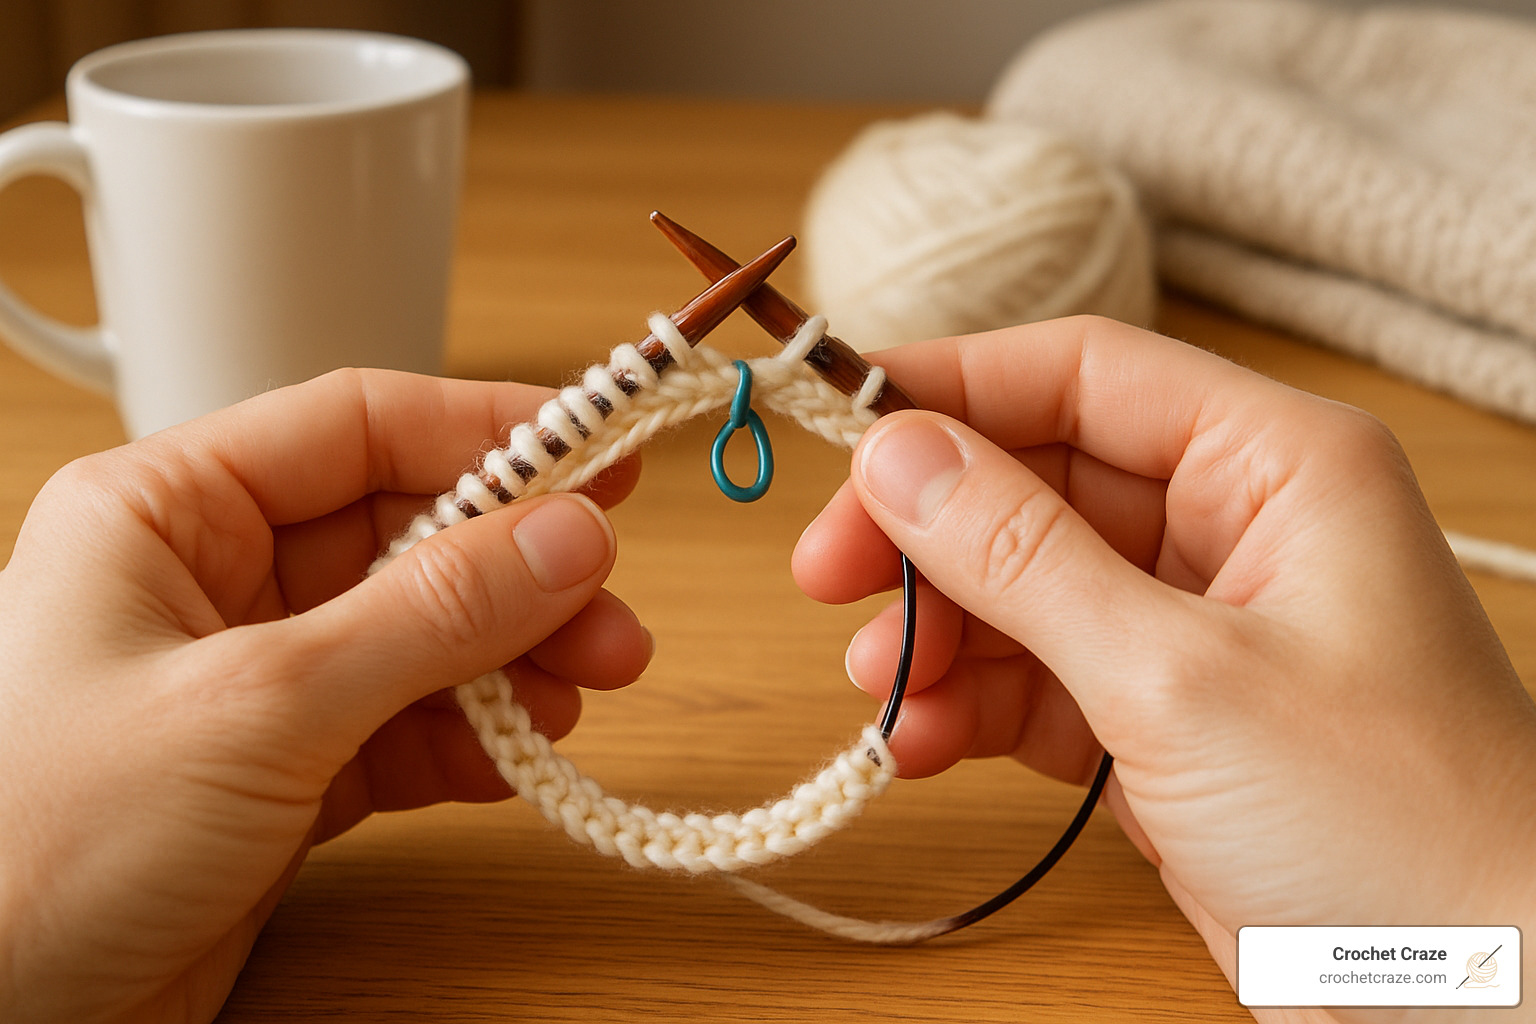
Step 1 – Cast On & Join for Easy Knit Hat Tutorial
Starting your hat is like laying the foundation for a house—it needs to be solid but flexible:
- Use the long-tail cast-on method for a stretchy edge that will comfortably fit over your head without feeling tight
- Cast on your calculated number of stitches onto your 16″ circular needle
- Take a moment to carefully check for twists as we discussed earlier
- Join in the round by knitting into that first stitch you cast on
- Slip a stitch marker onto your right needle to mark where each round begins
“I always tell my beginner students to keep their cast-on edge loose enough to stretch over the head,” says one of our knitting instructors. If you’re worried about tightness, you can simply go up a needle size just for the cast-on row and then switch back.
For our sample hat, we’ll use an adult medium size with 92 stitches in worsted weight yarn on US 8 (5mm) needles—a comfortable size that fits most adults.
Step 2 – Knit the Brim (Single or Folded)
The brim is your hat’s personality—it hugs the head and sets the tone for your whole project. You’ve got several ribbing options to choose from:
1×1 Ribbing creates a crisp, classic look that’s extremely stretchy but takes a bit longer to work. You’ll simply alternate K1, P1 for each round.
2×2 Ribbing is my personal favorite—it works up slightly faster while still providing excellent stretch. Just repeat K2, P2 around each round.
3×1 Ribbing offers an interesting texture with a bit less stretch, following a K3, P1 pattern.
Work your chosen ribbing pattern for about 1-3 inches. For a standard brim, 1-1.5 inches works well. But here’s a pro tip: “I always fold the brim for better fit and extra warmth,” one of our designers recommends. For a folded brim, work 2-3 inches of ribbing—it not only provides double the warmth but also gives your hat a more professional, finished look.
For our sample hat, we’ll create a cozy 2×2 ribbing for 2 inches (about 12-14 rounds).
Step 3 – Cruise Through the Body
After completing the brim, you get to the most relaxing part of hat knitting—the body. In circular knitting, stockinette stitch means simply knitting every stitch of every round. No purling required!
This is the perfect “Netflix and knit” section of your project. Just knit around and around until your hat reaches approximately 6-7 inches from the cast-on edge (or about 1-2 inches less than your desired total hat height).
Want a slouchy style instead of a beanie? Simply add an extra 1-2 inches of stockinette before beginning your decreases. Your hat, your rules!
“This is the part where you can just zone out and enjoy the rhythm of your needles,” as one of our knitters puts it. The body of the hat is simple, repetitive, and wonderfully meditative.
For our sample hat, we’ll work stockinette until it measures 6 inches from the cast-on edge—perfect for a standard beanie fit.
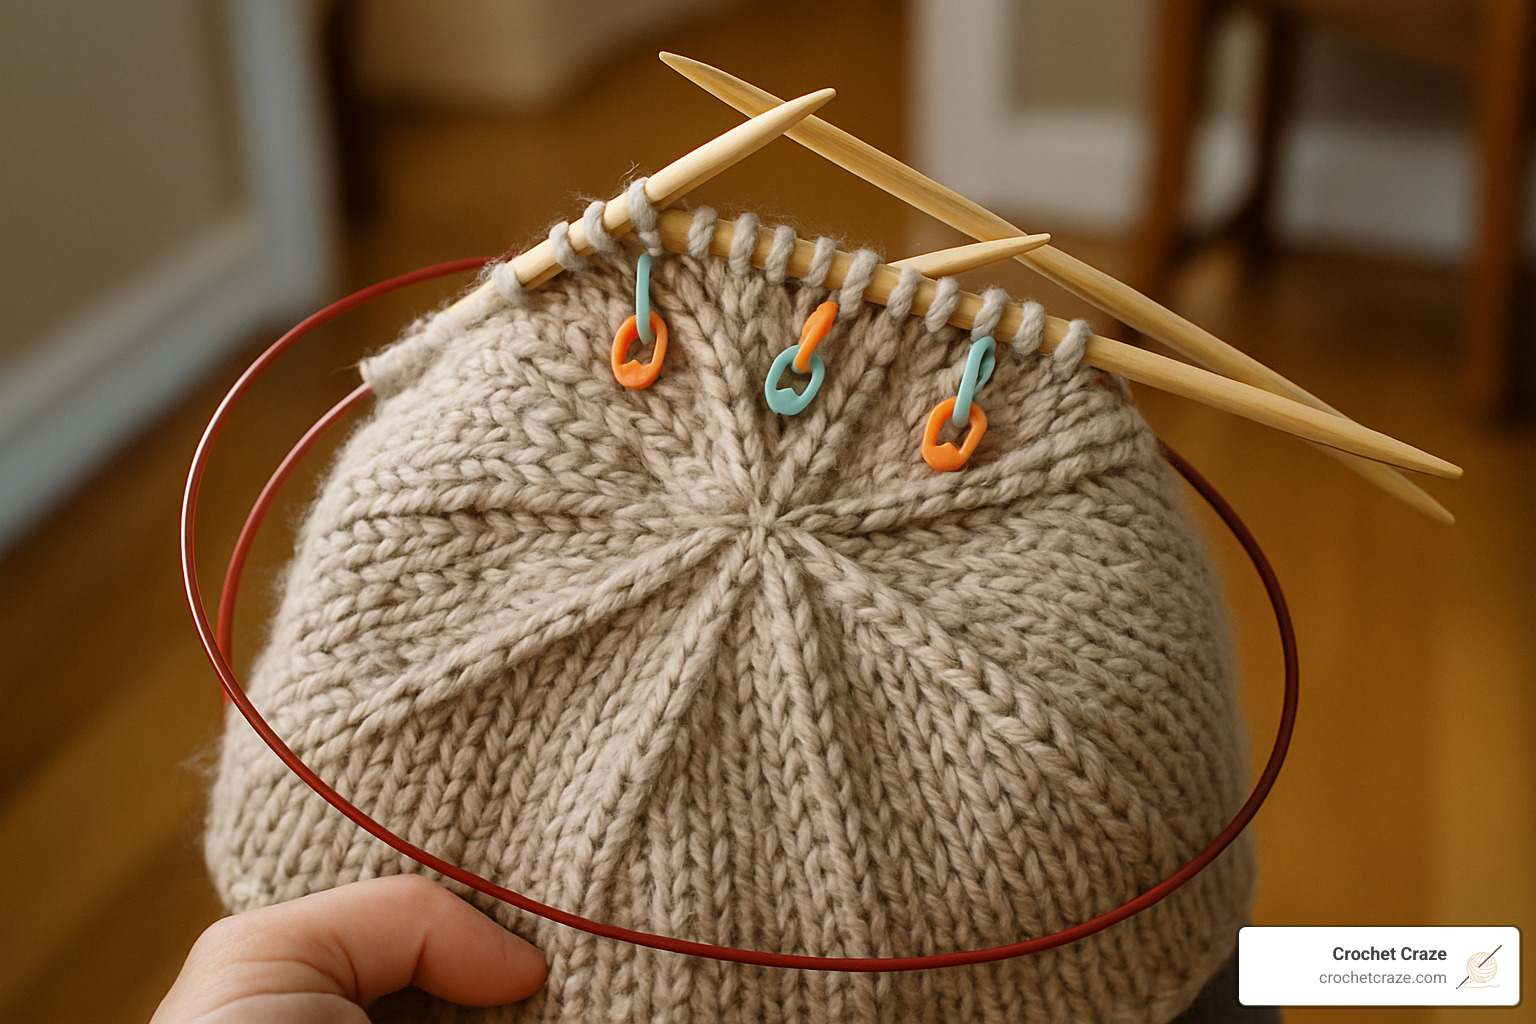
Step 4 – Crown Shaping in Easy Knit Hat Tutorial
Now comes the magical part where your flat circle transforms into a hat—the crown shaping! This is where strategic decreases create the dome that fits the top of your head.
Start by placing markers to divide your stitches into equal sections. For our 92-stitch sample, we’ll place 4 markers dividing into sections of 23 stitches each.
Then begin your decrease rounds:
– Decrease Round 1: Knit to 2 stitches before marker, K2tog, slip marker repeat to end of round
– Regular Round: Knit all stitches
Alternate these two rounds until you have about half your original stitches. You’ll notice the top of your hat starting to take shape!
As your hat gets smaller, you’ll reach a point where the stitches no longer stretch comfortably around your circular needle. This is when you’ll need to switch to double-pointed needles (DPNs) or the Magic Loop method. Don’t panic—this transition is easier than it looks!
As you have fewer stitches, you’ll want to increase the rate of decreases:
– Decrease Round 3: Knit to 2 stitches before marker, K2tog, slip marker repeat to end of round
– Decrease Round 4: K2tog, slip marker repeat to end of round
Continue until you have about 8-12 stitches remaining. “The crown decreases create a beautiful spiral effect at the top of your hat,” notes one of our pattern designers. It’s like watching the perfect ending to your knitting story unfold.
Step 5 – Bind Off, Cinch & Weave Ends
You’re in the home stretch! Now to finish off your hat with a professional touch:
Cut your yarn, leaving a generous 12-inch tail. Thread this tail through a mix needle, then slide the remaining stitches off your knitting needles and directly onto the yarn tail. This might feel scary the first time, but I promise those stitches aren’t going anywhere!
Pull the yarn tail tight to close the hole at the top of the hat—like drawing a drawstring bag closed. Secure with a few stitches on the inside of the hat, then weave in all ends on the wrong side of your work.
“I always tell beginners to weave in tails by following a column of knit stitches for the most invisible finish,” shares one of our knitting experts. Take your time with this step—neat finishing makes all the difference between a homemade and handmade look.
If you created a folded brim, now’s the time to fold it up and admire how it transforms your hat.
Congratulations! You’ve completed your first hat using our easy knit hat tutorial. Take a moment to admire what you’ve created—a beautiful, functional accessory made with your own two hands. There’s nothing quite like the satisfaction of wearing something you’ve made yourself or seeing someone’s face light up when you gift them a handmade hat.
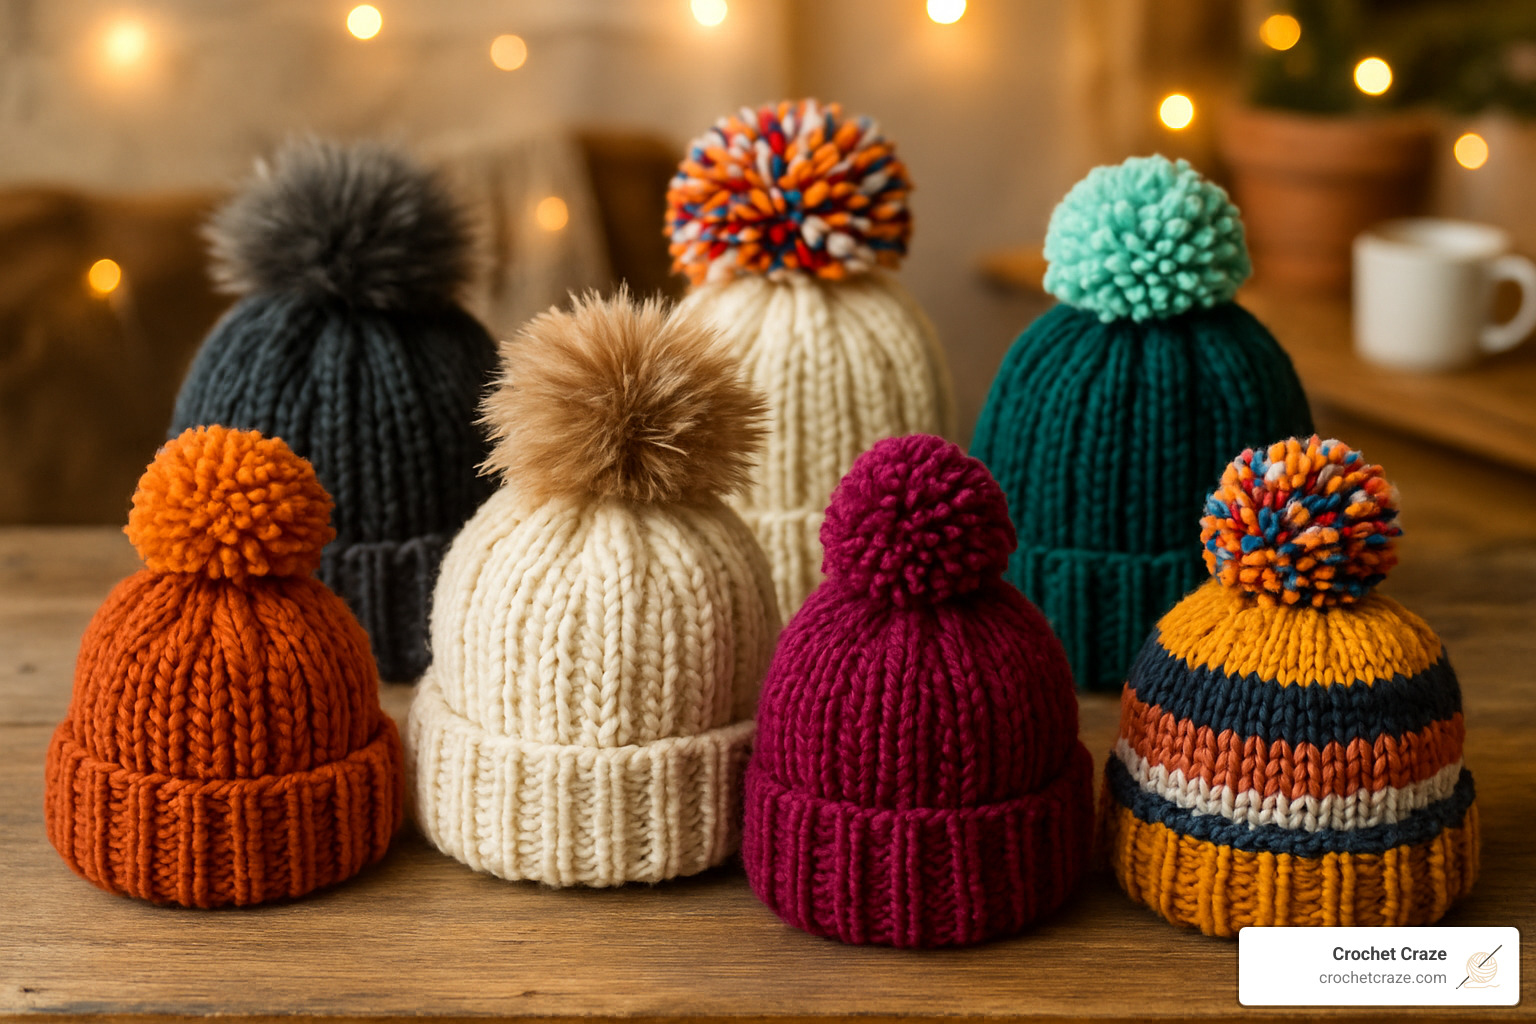
Finishing, Customization & Troubleshooting
You’ve knitted your hat from brim to crown—congratulations! Now comes the fun part where you can add your personal touch and address any little hiccups along the way.
Embellishments Made Easy
A simple beanie becomes uniquely yours with just a few easy additions. I still remember the first time I added a pom-pom to my plain gray hat—it instantly transformed from “just another beanie” to my favorite winter accessory!
Pom-Poms add instant personality to any hat. Store-bought faux fur poms give your hat that trendy, boutique-quality look with zero effort—just attach with a secure double knot that can be untied when it’s time to wash your creation. If you’re feeling crafty, make your own yarn pom using a pom-pom maker or simply wrap yarn around a fork or piece of cardboard.
Duplicate Stitch is like magic—it lets you “draw” on your finished hat with yarn! Using contrasting yarn and a mix needle, you can add hearts, stars, initials, or simple geometric patterns by following the path of your existing stitches. This technique is perfect for personalizing gifts without having to learn complicated colorwork.
Adding Stripes is another way to make your hat special. Change colors every few rounds for a playful look, or try just one contrast stripe at the brim. For two-row stripes, you can carry the unused yarn up the inside instead of cutting it each time. As one knitter shared with me, “Work extra rows in stockinette before decreases to create a slouchy version with even more room for colorful stripes!”
Buttons or Patches offer endless possibilities. Sew decorative wooden buttons onto the brim, or attach fabric patches for a personalized touch. One of my knitting friends adds vintage buttons from her grandmother’s collection to every hat she makes—a beautiful way to blend crafting with family history.
For yarn inspiration, check out Vidalana yarn for beautiful color options, or explore our pattern library for more creative ideas to make your hat truly one-of-a-kind.
Common Rookie Mistakes & Fixes
Even seasoned knitters make mistakes—I certainly still do! Here’s how to avoid or fix the most common issues that might pop up during your easy knit hat tutorial journey:
The dreaded Twisted Join happens to everyone at least once. Prevention is your best strategy: triple-check before joining your first round. Unfortunately, if you find this problem after knitting a few rounds, you’ll need to start over. I now make it a habit to lay my work flat after the first round and check again—this extra step has saved me hours of frustration!
A Tight Cast-On Edge can make your hat uncomfortable to wear. To prevent this, try casting on over two needles held together, then removing one before you start knitting. If you’ve already completed your hat and the edge is too tight, you can snip the cast-on edge, pick up the live stitches, and bind off using a stretchier method.
Uneven Ribbing is common for beginners. Pay extra attention to your tension, especially when switching between knits and purls. The good news is that blocking can work wonders to even out minor inconsistencies. One knitter told me, “Block your hat gently without overstretching to even out ribbing,” which has been great advice for all my projects.
Laddering (those annoying gaps between needles when knitting in the round) can be prevented by pulling tightly on the second stitch of each needle rather than the first. If you notice laddering after you’ve finished, use your yarn tail when weaving in ends to close those gaps.
Dropped Stitches happen to everyone. Prevention is best—use stitch markers and count your stitches frequently. If you do drop one, don’t panic! Use a crochet hook to pick it up and work it back to your needle one row at a time.
If your hat turns out the Wrong Size, don’t despair. Always check gauge before starting, but if it’s too late for that, consider repurposing it as a gift for someone with a different head size. My “too small” adult hat became my nephew’s favorite winter accessory!
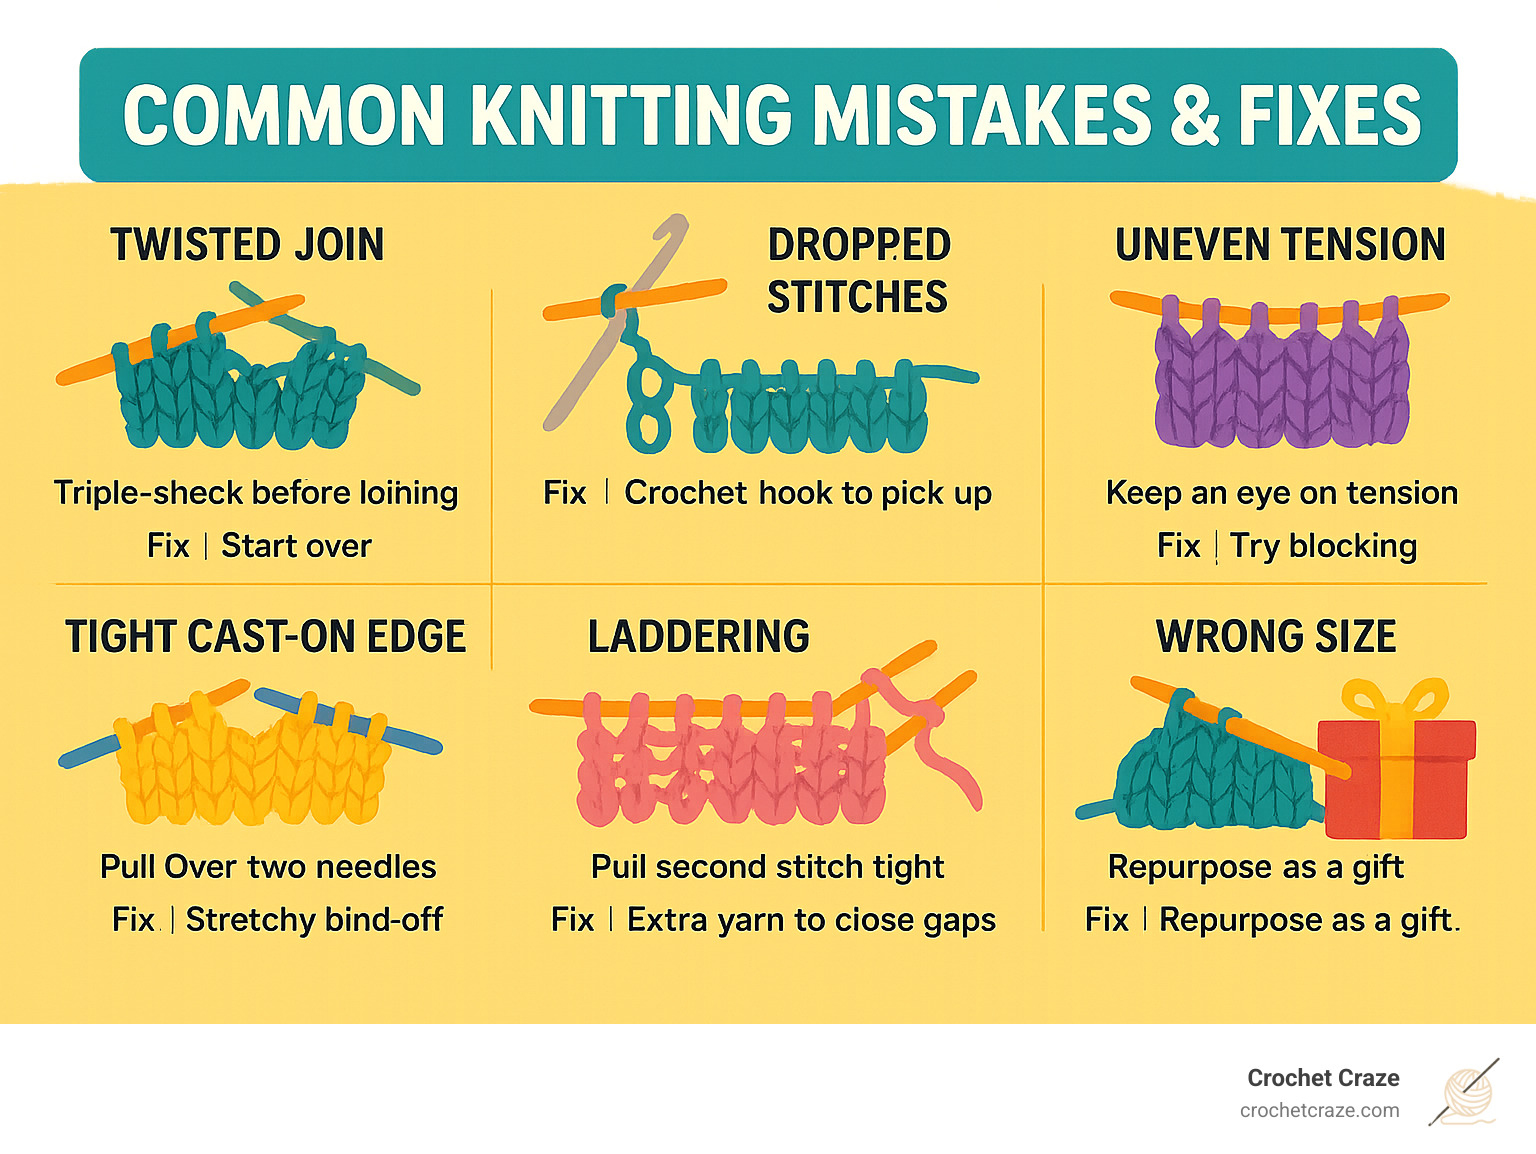
Blocking is a finishing technique that can solve many minor issues. Simply wet or steam your finished hat and allow it to dry in the correct shape, often over a bowl or balloon to maintain the rounded form. This gentle process helps even out stitches and gives your hat a more professional appearance.
Every “mistake” is just another opportunity to learn something new about knitting. The beauty of creating handmade items is that each one tells a story—including the story of how you solved problems along the way!
Frequently Asked Questions about Easy Knit Hat Tutorial
How many stitches do I cast on for my size?
This might be the most common question I hear from beginner hat knitters! The number of stitches depends on both your gauge (how tight or loose you knit) and the head size you’re aiming for.
Here’s the simple formula I use for all my hats:
Stitches to cast on = (Head circumference in inches - 1 or 2 inches) × Stitches per inch
The “minus 1 or 2 inches” part creates what knitters call “negative ease” – it ensures your hat will hug the head rather than slide around. For worsted weight yarn (which gives you about 4-5 stitches per inch), here are the numbers I recommend:
Adult small (21″ head): 88-92 stitches
Adult medium (22″ head): 92-96 stitches
Adult large (23.5″ head): 100-104 stitches
One little tip I’ve learned the hard way: round your stitch count to a multiple of 6 or 8. This makes the crown decreases much more straightforward and creates that lovely spiral effect at the top of your hat!
Should I knit my hat flat or in the round?
Both methods will give you a wearable hat, but I’m firmly in the “knit in the round” camp for one simple reason: no seaming!
Knitting in the round offers several advantages:
– You create a seamless finish (no awkward ridge running down the back of your head)
– You only need to knit (no purling) to create stockinette stitch
– There’s no sewing up at the end when you’re excited to wear your new creation
As my knitting buddy Jen always says, “A hat knit flat in stockinette or garter stitch with minimal shaping is perfectly fine for beginners. But once you try circular knitting, you may never go back!”
That said, if you’re just starting out or only have straight needles on hand, go ahead and knit flat. Your hat will still be warm and wonderful, and you’ll learn valuable seaming skills in the process.
When do I start decreasing for the crown?
Timing the crown decreases can feel like a bit of knitting magic, but it’s actually quite straightforward once you understand hat architecture. The answer depends on what style of hat you’re creating:
Standard beanie: Begin decreases when your hat measures about 6-7 inches from the cast-on edge. This creates that classic close-fitting cap.
Skull cap: If you prefer a more fitted look, start your decreases earlier – around the 5-5.5 inch mark.
Slouchy hat: For that trendy relaxed look, keep knitting until you reach 7-8 inches before starting decreases.
I’ve found that most adult hats need about 1.5-2 inches of decrease rounds to properly shape the crown. This means you should start decreasing when your hat is approximately 1.5-2 inches shorter than your desired final length.
One practical tip from my own easy knit hat tutorial experiments: if you’re making a folded brim hat, remember to measure with the brim folded up when deciding when to start your decreases. Nothing’s more disappointing than a hat that’s accidentally too short or too long!
Conclusion
Congratulations! You’ve now mastered the easy knit hat tutorial and have all the skills needed to create warm, stylish winter beanies for yourself and loved ones. There’s something truly magical about changing a simple ball of yarn into a cozy hat that will keep you warm all winter long.
The beauty of hat knitting is that it’s both approachable for beginners and satisfying for experienced crafters. Each hat you create becomes a little faster and more polished than the last. As one of my knitting friends always says, “The first hat is for learning, the second is for improving, and the third is for falling in love with the process.”
Your first attempt doesn’t need to be perfect! What matters is that you’re creating something useful with your own two hands. Many knitters find that hats become their go-to project for using up single skeins from their stash, creating quick gifts, or experimenting with new techniques.
One of the most wonderful aspects of knitting hats is how customizable they are. Change the yarn weight for a completely different look, try color blocking or stripes for visual interest, or play with different brim styles to suit your personal taste. A simple pom-pom can transform a basic beanie into a fashion statement!
We at Crochet Craze hope this tutorial has sparked joy in your crafting journey. There’s a special satisfaction in seeing someone’s face light up when you gift them a handmade hat, knowing that your time and care will keep them warm through the winter months.
Ready to expand your knitting repertoire? Our pattern library is filled with projects for every skill level. From simple scarves to cozy blankets, we have patterns that will help you continue building your skills one stitch at a time.
Now grab your favorite yarn, pick up those needles, and cast on your next hat. Winter is coming, and your perfect handmade beanie awaits!