Circular Knitting Needle: 7 Powerful Benefits in 2025
Everything You Need to Know About Circular Knitting Needles
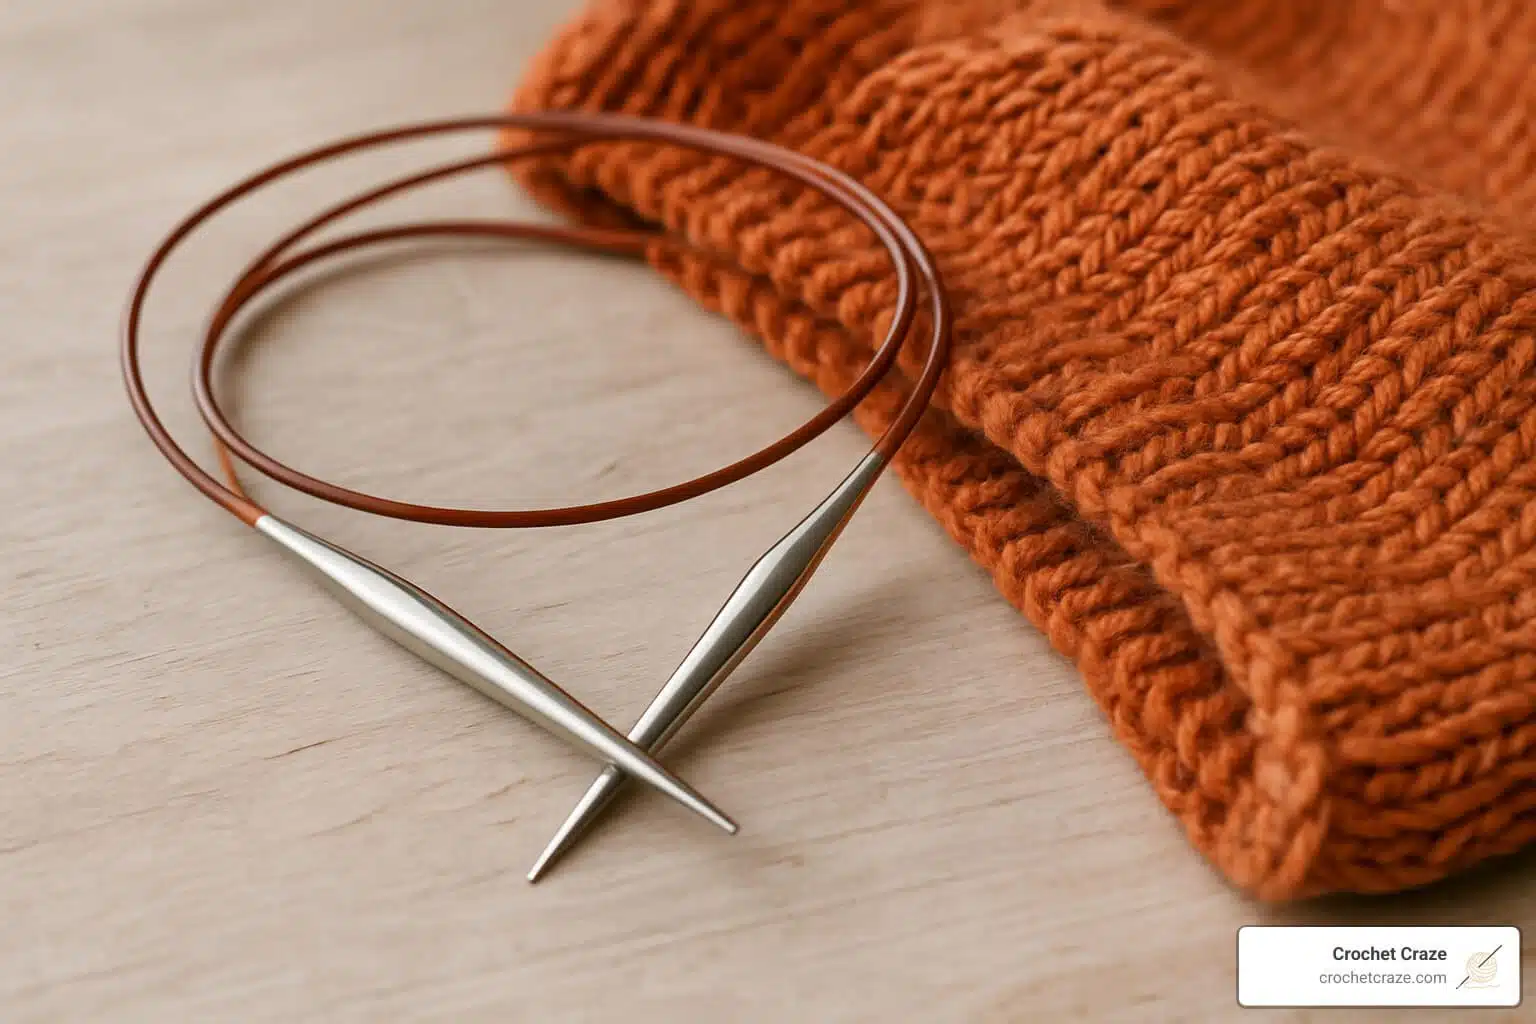
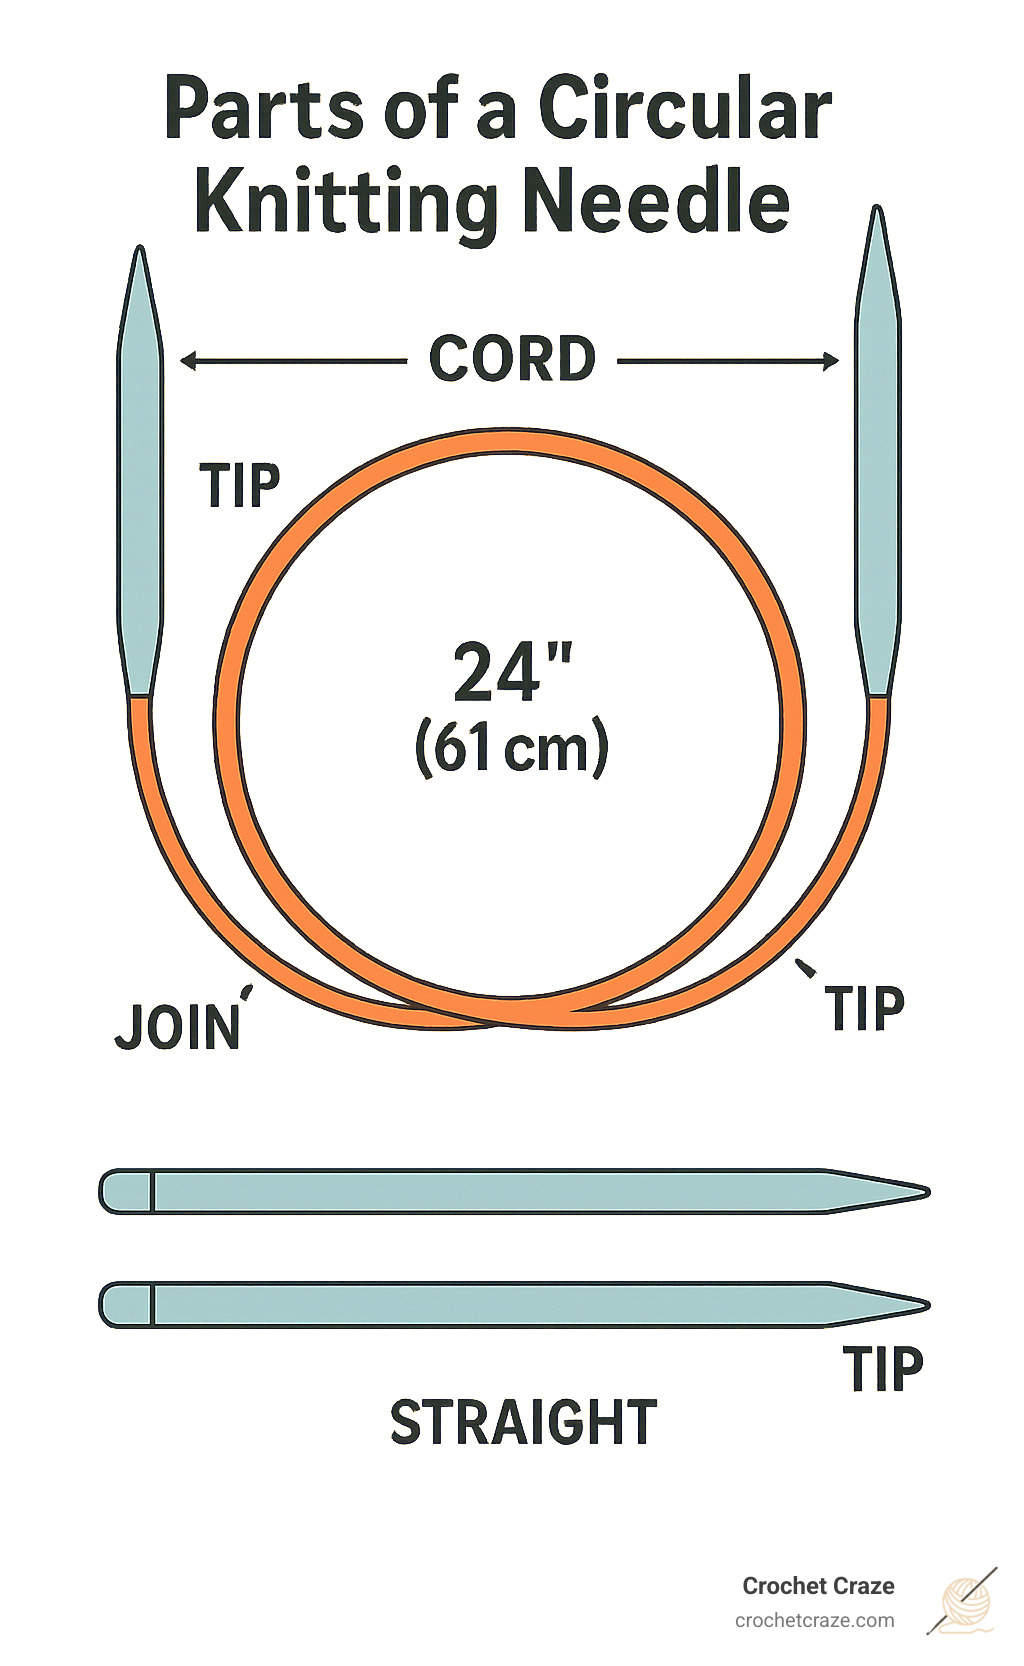
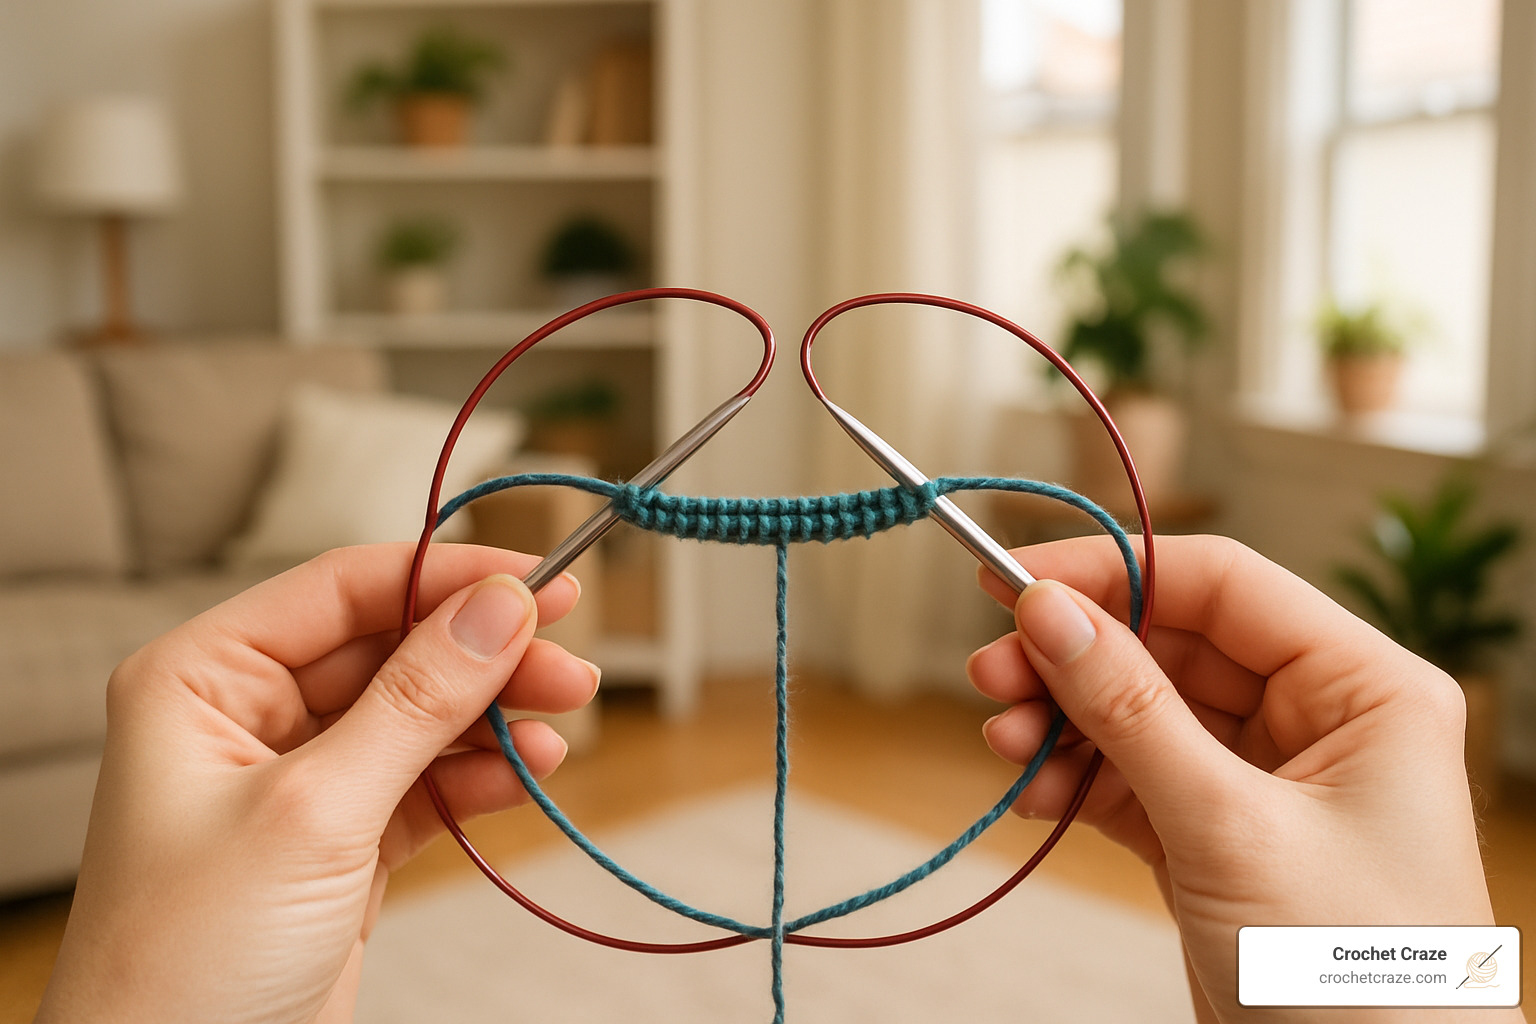
Circular knitting needles are two pointed tips connected by a flexible cord, used for both knitting in the round (creating seamless tubes) and knitting flat pieces. Here’s what makes them special:
- Structure: Two needle tips + flexible cord
- Lengths: Common sizes are 16″, 24″, 29″, 32″, 40″ (measured tip-to-tip)
- Best uses: Hats, sweaters, socks, blankets, scarves
- Advantages: Distributes weight better, holds more stitches, reduces wrist strain
Types of circular knitting needles:
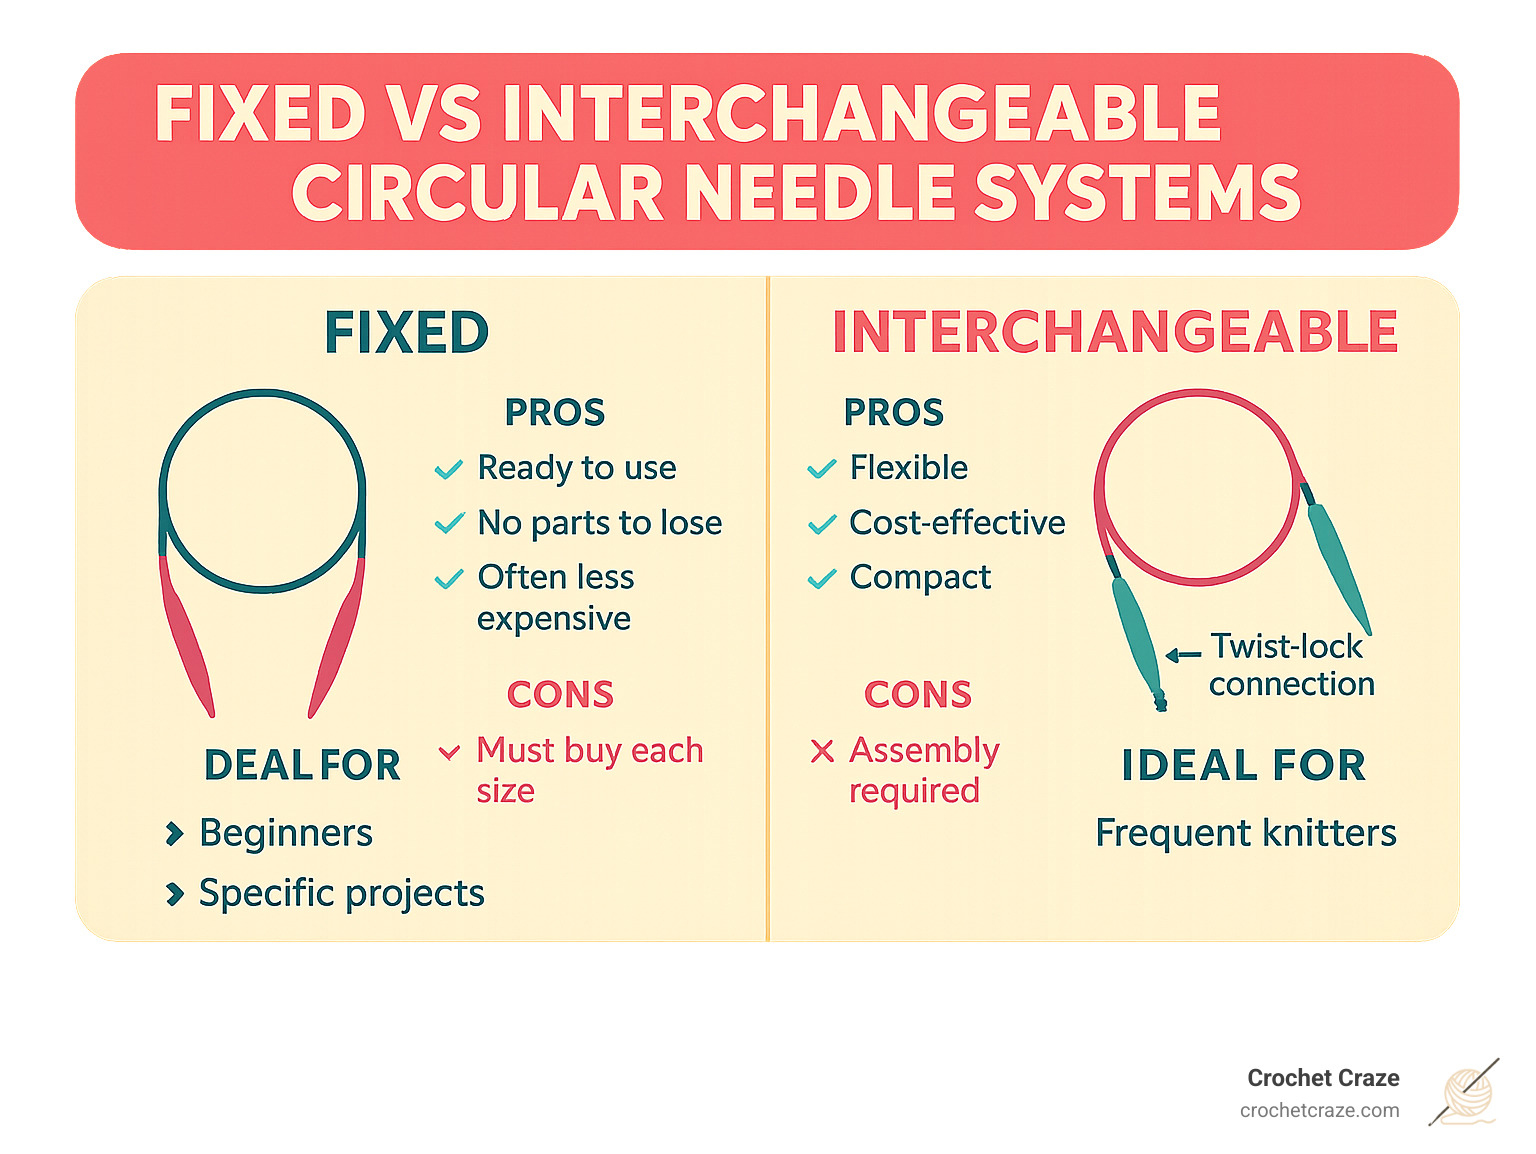
1. Fixed circulars – One-piece needles with permanent cord length
2. Interchangeable sets – Detachable tips that connect to various cord lengths
When I first finded circular knitting needles, I was amazed at how versatile they were compared to straight needles. Not only could I create seamless garments like hats and sweaters, but I found the weight distribution made knitting large projects like blankets much more comfortable on my wrists.
The beauty of circular knitting needles is their flexibility. You can use them for almost any project – whether you’re creating a seamless tube for a hat or simply working a flat scarf with lots of stitches. Many knitters (myself included) eventually switch to using circulars for almost everything because they’re so practical.
For beginners, I recommend starting with a fixed circular needle in the size your pattern calls for. As you grow more confident, an interchangeable set offers great versatility without filling your craft drawer with dozens of individual needles.
I’m Sonji Huerta, a craft enthusiast who has explored various needle types and found circular knitting needles to be the most versatile tools in my collection. I enjoy sharing simple explanations that help beginners steer the sometimes confusing world of knitting tools.
Circular Knitting Needle Basics: What, Why & Materials
When I first finded circular knitting needles, they completely transformed my knitting experience. These clever tools consist of two pointed tips connected by a flexible cord – a simple design that opens up so many possibilities! Unlike straight needles with their stoppers at one end, circulars allow your stitches to flow freely onto the cord, giving you room for hundreds of stitches rather than the limited number straight needles can handle.
The magic of circular knitting needles truly shines when creating seamless tubes. Imagine knitting a hat, sweater, or sleeve without any side seams to sew up later – just pure, continuous knitting. That said, I’ve found myself reaching for my circulars even when making flat projects like scarves and blankets because they’re just so comfortable to use.
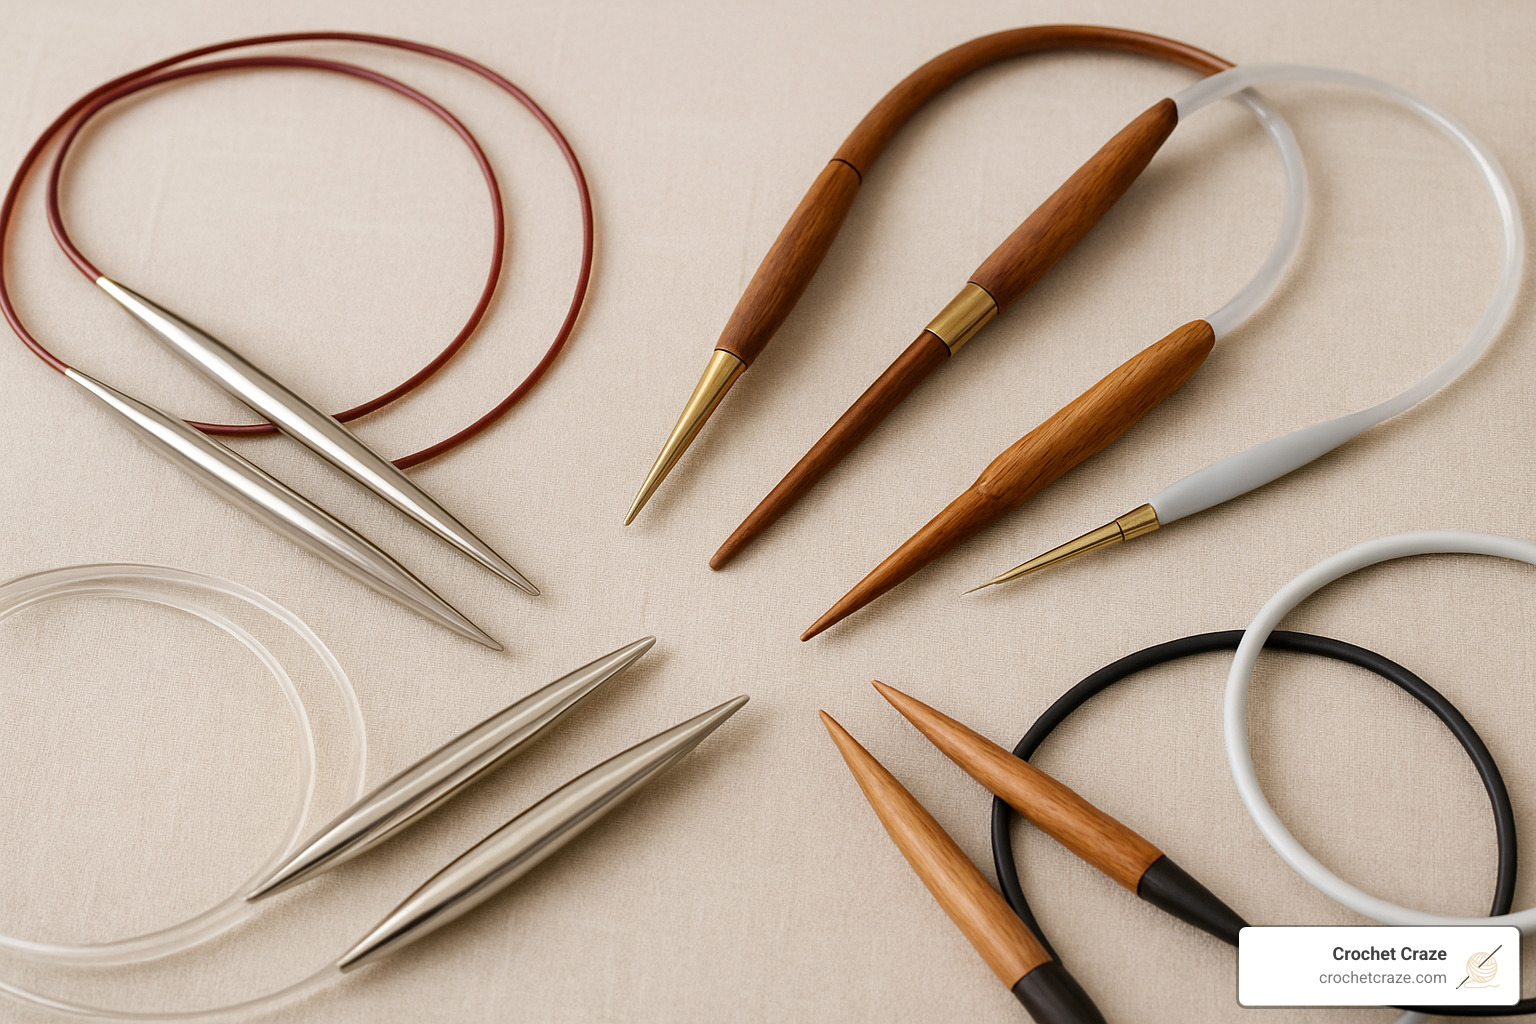
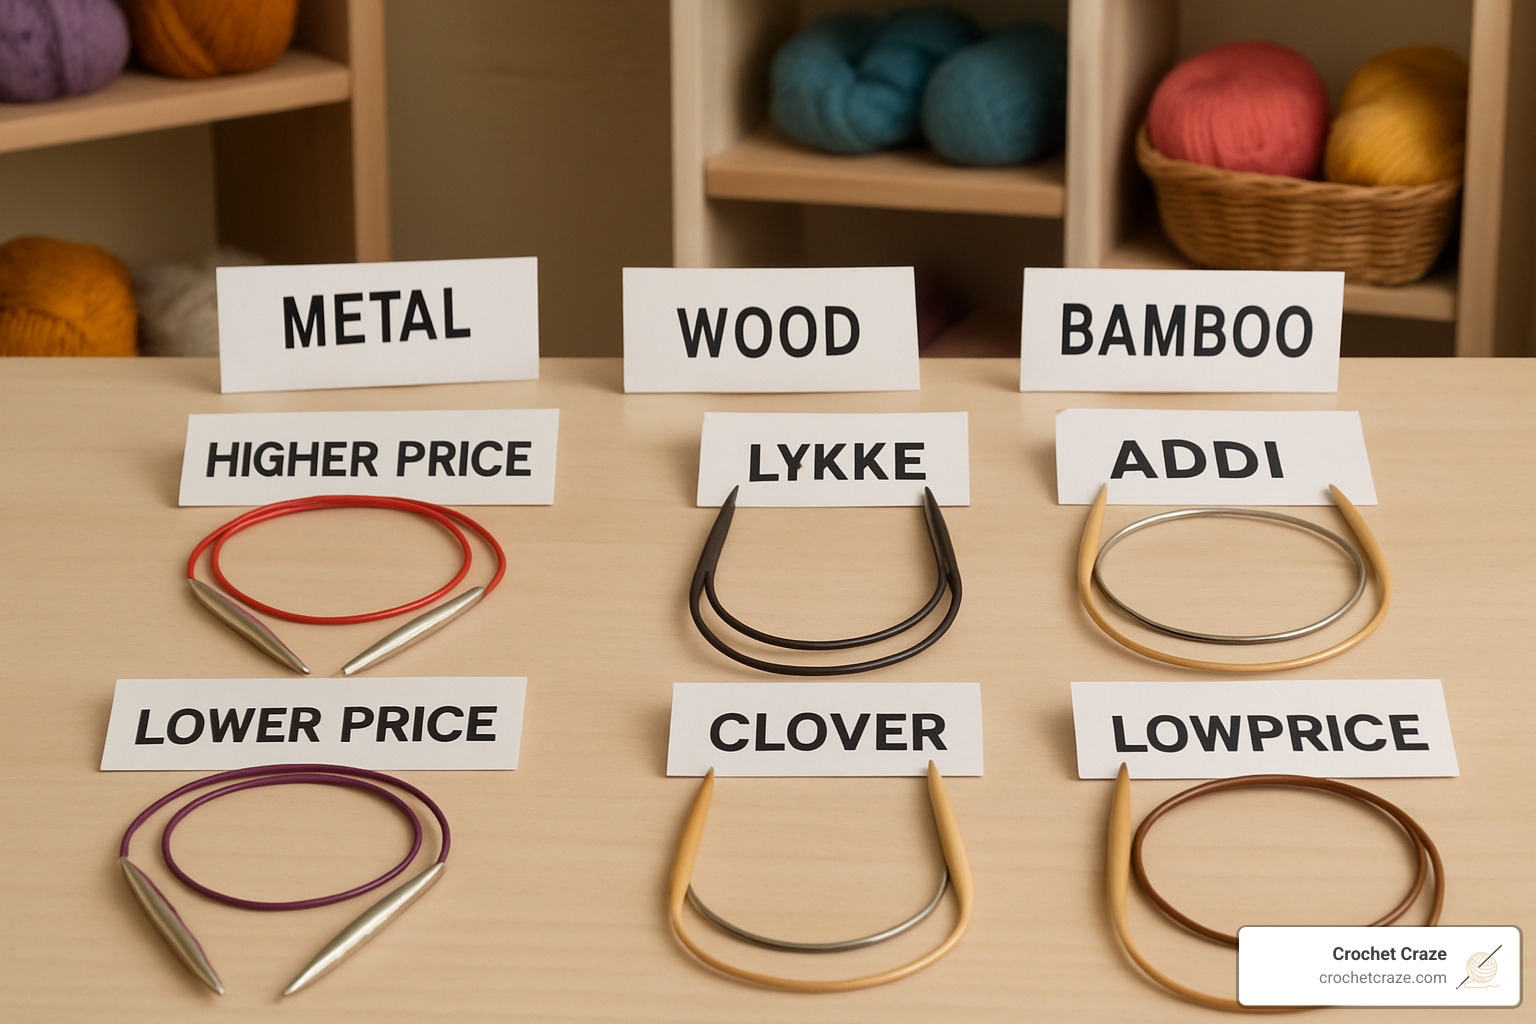
When shopping for your first circular knitting needle, you’ll notice they come in various materials, each with its own personality:
Bamboo needles have become my go-to recommendation for beginners. They offer a natural grip that prevents your stitches from sliding off unexpectedly – perfect when you’re working with slippery yarns like silk or bamboo blends. They’re warm to the touch and wonderfully lightweight.
Metal needles (often aluminum or stainless steel) are the speedsters of the knitting world. Their slick surface lets stitches glide effortlessly, making them ideal once you’ve built up confidence or when working with “sticky” yarns like mohair. The tips tend to be sharper too, which helps with intricate stitch patterns.
Plastic needles won’t break the bank and are surprisingly lightweight. I recommend these for larger sizes or for knitters with joint sensitivity who need the lightest possible option. They’re not as durable as other materials, but they’re certainly gentler on the budget!
Resin needles offer a lovely middle ground – the warmth of wood with improved durability. These have become increasingly popular in recent years, and I can see why – they’re comfortable for long knitting sessions while standing up to regular use.
Eco-friendly options are the newest additions to the market. From sustainably harvested birch wood to innovative materials like casein (made from milk protein), these needles let you craft with a clearer conscience.
One of my workshop students shared her experience: “After struggling with heavy afghans on straight needles for years, switching to circulars felt like finding a secret that experienced knitters had been keeping! My wrists felt better immediately, and I could knit for twice as long.”
How a Circular Knitting Needle Differs From Straights
The defining feature of a circular knitting needle is that flexible cord connecting the two tips. This seemingly simple design difference completely changes the knitting experience.
First, the cord stores most of your stitches, allowing you to tackle projects with hundreds of stitches that would be impossible on straights. My first circular project was a blanket with 225 stitches – something that would have been a cramped nightmare on straight needles!
Second, the circular design enables seamless construction. Working in continuous rounds means no more seaming – a game-changer for those of us who dread the finishing work of sewing pieces together.
Third, I immediately noticed how the weight distribution changed when I switched to circulars. Instead of all the weight hanging from the needles (and by extension, my hands), the bulk of my project rested comfortably in my lap.
Fourth, the compact nature of circulars makes them far more portable. Your work stays safely on the cord, with much less risk of stitches slipping off during travel. I can tuck a circular project into my bag without worrying about needle tips poking through or stitches escaping.
Finally, their versatility is best – you can use circulars for both round and flat knitting. Many knitters, myself included, eventually switch to using circulars for almost everything.
One important note: the quality of the join between needle tip and cord makes a huge difference in your knitting experience. Good circular knitting needles have smooth transitions that prevent yarn from catching as stitches move from needle to cord. When shopping, run your fingertip over this join area – the smoother, the better!
Why a Circular Knitting Needle Can Save Your Wrists
The ergonomic benefits of circular knitting needles might be their most compelling feature, especially if you’ve experienced discomfort while knitting. Traditional straight needles place the entire weight of your project on your wrists, which can lead to fatigue, strain, and even repetitive stress injuries for dedicated knitters.
Circular knitting needles completely change this equation. The flexible cord allows most of your project’s weight to rest in your lap rather than hanging from your needles and wrists. I noticed the difference immediately when working on a heavy wool sweater – instead of feeling the strain after 30 minutes, I could knit comfortably for hours.
Your body position changes too. With straight needles, your arms often extend outward to accommodate the length, creating tension in your shoulders and upper back. With circulars, your elbows can stay closer to your body in a more natural position, promoting better posture throughout your knitting session.
For substantial projects like blankets or oversized sweaters, the distributed weight makes all the difference. Instead of one wrist bearing the load of dozens of stitches, the weight spreads evenly across your lap.
I’ve heard from countless knitters with arthritis, carpal tunnel syndrome, or tendonitis who thought their knitting days might be over until they finded circulars. The more neutral wrist position and better weight distribution allowed them to continue their beloved hobby with significantly less pain.
As one of my knitting circle friends shared, “After developing wrist problems from my computer job, I thought knitting would have to become an occasional treat rather than my daily therapy. Switching to circular needles was a revelation – I can still enjoy my daily knitting time without paying for it with pain the next day.” For more on how knitting can actually benefit your health when done with the right tools, check out our article on Knitting Benefits.
Choosing the Right Needle: Types, Lengths & Sizes
Finding your perfect circular knitting needle match is a bit like dating—you need to know what you’re looking for and be willing to try a few options before settling down! I’ve spent years experimenting with different needles, and I’m excited to share what I’ve learned to help you find your ideal match.
Types of Circular Needles
When I first started exploring circular knitting needles, I was surprised by the variety available. Each type serves different needs and knitting styles.
Fixed circular needles are the straightforward option—one continuous piece with a permanent cord length. I recommend these for beginners since they’re ready to use without any fuss. They’re like the “plug and play” version of knitting needles!
Interchangeable circular needles changed my knitting life completely. These clever sets have detachable tips that connect to various cord lengths. While they require a bit of assembly, the flexibility they offer is incredible—like having dozens of needles in one compact case.
For those tiny projects like baby socks, short circular needles are a game-changer. With very short tips and cords (usually 9-12″), they’re specially designed for small-circumference knitting. I find them a bit awkward at first, but they’re wonderful once you get used to them.
Some innovative brands also offer double-ended cables that allow you to create custom lengths or connect multiple cables. These are particularly handy for unusually sized projects or when you need extra-long needles for massive blankets.
Fixed vs Interchangeable Systems
I started with fixed needles but eventually invested in an interchangeable set—and the difference was night and day!
With fixed circular needles, you get reliability. There’s nothing to assemble, no parts to lose, and no connections that might come loose mid-project (a knitter’s nightmare!). They’re typically less expensive individually, which is great when you’re just trying out circular knitting. The downside? If you become an avid knitter, you’ll eventually need to buy many different size/length combinations.
Interchangeable circular needles feel like a splurge initially, but they’re actually more economical for frequent knitters in the long run. I love that they take up minimal storage space compared to a collection of fixed circulars. The variety of connection types surprised me:
The twist-lock systems click satisfyingly into place—I find these quick and secure. Screw-on tips thread into the cable and provide a very secure connection, though they take a bit longer to set up. Some premium sets even include key-tightened connections for extra security on slippery yarns.
I’ve noticed the ChiaoGoo Twist Red Lace interchangeable set has an impressive 4.8 out of 5 stars from over 876 reviews—not surprising as their smooth joins are practically legendary among knitters. The Knit Picks Options Wood set maintains a strong 4.6-star rating across more than 2,700 reviews, showing they consistently deliver quality at a more accessible price point.
Length & Size Cheat-Sheet
Choosing the right cord length for your circular knitting needle makes all the difference between comfortable knitting and constant frustration. I learned this the hard way when I tried making a hat on a 32″ needle—it was like trying to stretch a rubber band around a marble!
For the smallest projects, 9″ circulars are perfect for baby hats, sleeves, and socks, though their tiny tips can feel a bit cramped. 16″ circulars are my go-to for adult hats and cowls—they provide just enough room without stretching the fabric.
When I’m making small sweaters or shawls, 24″ circulars offer the perfect balance. For adult-sized sweaters and larger circumference projects, 29-32″ circulars give plenty of room for stitches to spread out comfortably. And for those gorgeous blankets and large shawls, 40″ and longer needles are essential—they’re also perfect for the Magic Loop technique when you need to work on smaller circumferences.
Here’s my golden rule that’s never failed me: your circular needle length should be slightly shorter than the circumference of your project when knitting in the round. For flat knitting, choose a length that comfortably accommodates your stitch count without crowding.
For needle sizes, I always follow my pattern recommendation or check the yarn label. In the US system, sizes range from 0 (very thin, 2mm) to 50 (super bulky, 25mm), with the most common sizes being 6-10 for medium-weight yarns. Don’t worry if you don’t have the exact length needed—you can often use a longer needle with the Magic Loop technique, which allows you to work small circumferences on long cables.
Material Matters
The material of your circular knitting needle can completely transform your knitting experience—something I wish someone had told me when I started!
Bamboo and wood needles feel warm and natural in your hands. I love them for slippery yarns like silk or mohair because they provide just enough grip to keep stitches from sliding off accidentally. They create a wonderfully quiet knitting experience (perfect for Netflix binging!), and while they’re slightly slower, the control they offer is worth it. I always recommend these to beginners who need stitches to stay put while they’re learning.
Metal needles (usually aluminum or stainless steel) create lightning-fast knitting with their slick surface. They’re incredibly durable—I’ve had some for over a decade without issues. They can feel cold initially, but warm up quickly in your hands. I reach for these when working with sticky wools or when I’m trying to finish a gift on a tight deadline! Speed knitters tend to prefer these smooth surfaces.
Plastic and acrylic needles are wonderfully lightweight and budget-friendly. I appreciate that they’re warm to the touch and more flexible than metal or wood, making them comfortable for long knitting sessions. They’re available in larger sizes for those chunky blanket projects, and they’re a lifesaver for knitters with metal allergies.
I’ve noticed the Clover Takumi bamboo circular needles have earned a remarkable 4.7-star rating from over 2,000 reviews, with knitters praising their smooth joins and comfortable grip. For metal needle fans, the ChiaoGoo Red Lace 16-inch stainless steel needles boast an exceptional 4.9-star rating from more than 650 reviews, highlighting their durability and smooth knitting action.
When choosing your needle material, consider your personal knitting style (do you knit loosely or tightly?), the yarn you’re using (slippery silk or sticky wool?), comfort issues (do you have joint sensitivity?), and even noise levels (metal needles can create quite the symphony during quiet moments!).
Techniques Every Knitter Should Know: Round, Flat, Magic Loop
Mastering a few essential techniques will help you get the most from your circular knitting needles. Let’s explore the fundamental methods that every knitter should know.
Knitting in the Round
To begin knitting in the round with circular knitting needles:
- Cast on the required number of stitches onto your circular needle.
- Arrange stitches carefully along the needle and cord, ensuring they’re not twisted.
- Join the round by knitting the first stitch you cast on. Place a stitch marker at this join to mark the beginning of each round.
- Create an invisible join (optional): Cast on one extra stitch, then slip the first stitch over the last one when joining the round.
- Knit every round for stockinette stitch (unlike flat knitting, which requires alternating knit and purl rows).
A key tip from experienced knitters: “The most common mistake when starting to knit in the round is getting a twist in your work. Before joining, lay your needles on a flat surface and make sure all stitches are oriented in the same direction.”
Circular Knitting Needle Tricks for Flat Knitting
Circular knitting needles aren’t just for round projects! They excel at flat knitting too:
- Cast on as you would with straight needles.
- Knit across the row, working from right needle to left.
- Turn your work when you reach the end of a row, just as you would with straight needles.
- Switch hands so the needle with stitches is in your left hand again.
- Continue alternating knit and purl rows for stockinette or following your pattern.
The advantages of using circular knitting needles for flat knitting include:
– Better weight distribution for large projects like afghans and blankets
– No risk of stitches falling off the back end of the needle
– Ability to hold many more stitches than straight needles
– More comfortable on your wrists for extended knitting sessions
Magic Loop Technique
The Magic Loop method allows you to use a long circular knitting needle (usually 32″ or longer) to knit small-circumference projects:
- Cast on your stitches.
- Slide stitches to the middle of the cable.
- Fold the cable in half, creating two loops on either side of your stitches.
- Pull out a loop of cable at the halfway point of your stitches.
- Arrange stitches so half are on each needle tip, with cable loops extending from between them.
- Knit the stitches on the front needle, then pull the back needle forward and knit those stitches.
This technique is incredibly versatile, allowing you to knit items of any circumference on one long circular needle. It’s particularly useful for:
– Small items like socks and sleeves
– Decreasing crown sections of hats
– Projects where you don’t have the ideal needle length
The Two-Circular Method is another option, where you use two circular needles instead of one long one, with half the stitches on each needle.
Circular Knitting Needle Tips for Knitting in the Round
To achieve professional results when knitting in the round with circular knitting needles:
- Use stitch markers liberally:
- Mark the beginning of rounds
- Indicate pattern repeats
-
Highlight decrease or increase points
-
Count rounds systematically:
- Use a row counter that attaches to your needle
- Try the “paper clip method” (move a paper clip up your work after completing a specific number of rounds)
-
Use a knitting app to track progress
-
Create jogless stripes:
- When changing colors, knit the first stitch of the new round, then slip the second stitch purlwise
-
Or, pick up the right leg of the stitch below the first stitch and knit it together with the first stitch
-
Prevent laddering (gaps between needles):
- Pull the second stitch on each needle extra tight
- Periodically shift where your round begins
- Use a slightly smaller needle size for the first few stitches of each needle
One knitter shared: “I struggled with laddering until I learned to give an extra tug on the second stitch of each needle. That simple trick transformed my circular knitting!”
Projects, Brands & Accessories Guide
Once you’ve mastered the basics of circular knitting needles, a whole world of creative possibilities opens up! From cozy hats to elaborate sweaters, these versatile tools can handle almost any project you can imagine.
Perfect Projects for Circular Needles
Hats are often the gateway project for circular needle beginners. There’s something magical about watching a hat take shape on a 16″ circular needle—no seams, just round and round until you have a perfectly fitted beanie. I still remember the pride I felt finishing my first hat in the round!
Sweaters become significantly less daunting when you can create them seamlessly on circular knitting needles. Top-down raglan styles are particularly beginner-friendly since you can try them on as you go. One knitter told me, “I avoided sweaters for years until I finded circular needles—now I’ve made six!”
Socks might seem intimidating, but with the Magic Loop method or two circular knitting needles, you can create perfectly fitted footwear. You can even work two socks simultaneously (one inside the other) to avoid the dreaded “second sock syndrome”!
Blankets and afghans benefit enormously from circulars, even when knit flat. The flexible cord holds the weight so your wrists don’t have to. I once watched a friend struggle with a heavy baby blanket on straight needles before introducing her to circulars—the relief on her face was priceless.
Shawls and wraps grow to hundreds of stitches, which circular knitting needles accommodate beautifully. The same goes for cowls, infinity scarves, and even stuffed toys that can be knit seamlessly for a professional finish. For more toy inspiration, check out Ravelry Free Toy Knitting Patterns.
Popular Sets & Customer-Loved Brands
When investing in circular knitting needles, quality truly matters—especially at the join between needle and cord. Here are some brands knitters consistently rave about:
ChiaoGoo Twist Red Lace needles have earned an impressive 4.8-star rating from 876 reviews. With their stainless steel tips and memory-free red cables, they’re a premium choice that knitters swear by. “The joins are so smooth, my yarn never catches,” one devoted user told me.
For those who prefer wood, Knit Picks Options offers beautiful rainbow or sunstruck finishes with a 4.6-star rating from over 2,700 reviews. The warm wooden tips provide excellent grip for slippery yarns.
Clover Takumi bamboo needles (4.7 stars from 2,000+ reviews) are perfect for beginners who need their stitches to stay put. Their smooth joins and lightweight feel make learning much easier.
The gorgeous gray-toned Lykke Driftwood needles have earned 4.8 stars for their beautiful appearance and comfortable feel. You can explore the Lykke Driftwood set if you’re looking to treat yourself.
Speed knitters often reach for Addi Turbo needles with their slick brass tips and flexible blue cables. German engineering at its finest!
If you’re on a budget, the Ruidi interchangeable set has become increasingly popular, with over 1,000 purchases in a recent month. They offer good quality without breaking the bank—perfect for those just testing the waters.
Handy Add-Ons That Make Life Easier
The right accessories can transform your circular knitting needle experience from good to great. Here are some must-haves:
Stitch markers are essential little rings that slip onto your needles to mark pattern sections or the beginning of rounds. I’ve used everything from store-bought markers to safety pins in a pinch!
Cable connectors allow you to join multiple cords for extra-long projects like blankets. My friend used these to create a king-sized wedding gift on a single (very long) circular needle.
When the size markings wear off your needles (and they will), a needle gauge becomes invaluable. This small tool with various-sized holes lets you measure needle diameter accurately. As one knitter told me, “My needle gauge is probably my most-used tool after my actual needles.”
For interchangeable sets, cord keys or tighteners help secure the tips to their cords. There’s nothing worse than having your needle disconnect mid-project (trust me, I’ve been there!).
Row counters that clip directly onto your needle eliminate the need for tally marks or apps. Swivel cords prevent twisting, while cable stoppers cap the ends when you need to set work aside temporarily.
Don’t forget a good project bag designed to accommodate circular needles without tangling. Some even have grommets to feed your yarn through while keeping it clean.
For more helpful accessories and techniques, check out our collection of Knitting Tips that will lift your crafting experience.
With the right circular knitting needles and accessories, you’ll be well-equipped to tackle projects from simple hats to complex sweaters. The initial investment in quality tools pays dividends in knitting enjoyment for years to come!
Care, Ergonomics & Troubleshooting Tips
Taking good care of your circular knitting needles isn’t just about making them last longer—it’s about creating a more enjoyable knitting experience for yourself. I’ve found that a little maintenance goes a long way in preventing frustrating interruptions to your knitting flow.
When I first started using circular knitting needles, I was surprised by how much smoother my knitting became after I started giving them regular TLC. After each project, I gently wipe down my needles with a soft cloth to remove any oils from my hands and tiny fiber bits that inevitably accumulate from the yarn. This simple habit keeps stitches gliding smoothly instead of catching on buildup.
For wooden or bamboo needles that develop tiny rough spots over time, a light touch with fine sandpaper works wonders. Metal needle fans can use a nail buffer to smooth out any burrs that develop. Your fingertips will thank you!
The connection between your needle tips and cable is crucial for smooth knitting. I make it a habit to check these joins regularly, especially on my interchangeable sets. Nothing disrupts your knitting zen quite like a tip that decides to unscrew itself mid-row!
Proper storage makes a huge difference in how your circular knitting needles perform. I learned this lesson the hard way after finding my favorite needle with a permanently kinked cable! Now I store mine either hanging or lying flat in a dedicated case. For stubborn cables that have developed “memory,” a quick dip in warm (never hot) water for a few minutes helps them relax and straighten out.
One tip that’s saved countless projects: check and re-tighten interchangeable connections every few rows. These clever systems have revolutionized knitting, but they do tend to loosen as you work.
When Things Go Wrong
Even experienced knitters run into troubles with their circular knitting needles. The good news? Most problems have simple solutions.
That annoying catch at the join between needle and cable? It’s usually a tiny rough spot or gap. I’ve fixed many by gently smoothing the area with a fine emery board or applying the tiniest dab of clear nail polish to fill any gap. This simple fix transforms a frustrating needle into a joy to use.
Cable kinking drives me crazy, but there’s an easy solution. Soaking the cable in warm water for a few minutes, then hanging it straight with light weights attached to the ends (I use binder clips) works like magic. For a quick fix during a knitting session, I gently stretch the cable and run it between my fingers to warm it.
When my interchangeable tips started coming loose during an important gift project, I learned to use the tightening key regularly and check connections every few rows. Now it’s part of my knitting routine, like checking gauge or counting stitches.
Those pesky ladders (gaps) where rounds meet used to plague my sock knitting until another knitter shared her secret: pull the second stitch on each needle extra tight. This simple trick transformed my circular knitting! Another approach is to periodically shift your starting point by a few stitches to distribute any tension issues.
One knitter at our local group shared her emergency fix: “When my cable separated from the metal tip mid-project with 200+ stitches, I used dental floss threaded through the stitches as a temporary holder until I could get a replacement needle.” Brilliant improvisation!
Twisted stitches after joining in the round can be heartbreaking to find several rows in. If you notice this early, it’s worth starting over. For later findies, you can either add a seam by cutting and sewing (for the brave!) or accept it as a “design feature”—sometimes the most unique projects come from happy accidents.
Keep Your Hands Happy
Knitting should bring joy, not pain. After developing some wrist strain early in my knitting journey, I finded these ergonomic tips that have kept my circular knitting needle sessions comfortable for hours.
Taking regular breaks makes a huge difference. I set a timer for 25-30 minutes and do a quick hand-stretching routine when it goes off. My favorite stretch is opening and closing my hands wide, then gently rotating my wrists in circles. Just 30 seconds of this keeps pain at bay.
Circular knitting needles are already more ergonomic than straight needles, but adding silicone or foam grips can make thin needles even more comfortable to hold. This is especially helpful for metal needles or those with arthritis or joint sensitivity.
Supporting larger projects properly prevents shoulder and neck strain. I place a pillow on my lap to bear the weight of blankets or sweaters rather than holding it all in my hands and wrists. This simple adjustment transformed my comfort level during marathon knitting sessions.
Posture matters more than you might think! Sitting with feet flat, back supported, and work at elbow height prevents all sorts of aches and pains. I notice immediately when I’ve been hunching over my work.
Exploring different knitting styles opened up new possibilities for me. When my right wrist was bothering me, switching from English to Continental style gave those muscles a rest while I continued my project. Portuguese and lever knitting styles are also worth exploring if you experience discomfort.
The material of your circular knitting needles can affect hand comfort too. Many knitters with joint issues find wooden needles cause less hand fatigue than metal ones due to their warmth and slight give. The ChiaoGoo Red Lace Circular 16-inch stainless steel needle has earned an impressive 4.9 out of 5 stars from over 650 reviews, with many knitters specifically mentioning how the smooth action reduces hand fatigue during long knitting sessions.
Traditional tools like knitting belts or Norwegian thimbles might look strange to modern eyes, but they’ve helped generations of knitters work comfortably for hours. Sometimes the old ways have wisdom we can benefit from!
Frequently Asked Questions about Circular Knitting Needles
Do I really need a circular knitting needle for flat pieces?
No, you don’t need circular knitting needles for flat pieces, but I’ve found they’re a game-changer for many knitters (myself included!).
When I first switched to circulars for flat knitting, I was amazed at how much more comfortable it felt. The weight of your blanket or sweater back rests in your lap instead of hanging from straight needles, which makes a huge difference during longer knitting sessions. Your wrists will thank you!
Circular knitting needles also hold significantly more stitches than straight needles, which is perfect for those wide projects like blankets or shawls. Plus, there’s that wonderful security of knowing your stitches won’t accidentally slide off the back end while you’re working or setting your project down.
I remember one knitter at our local yarn shop saying, “I switched to circulars for everything years ago. Once you get used to them, straight needles feel awkward and limiting.” That’s been my experience too!
Using circulars for flat knitting couldn’t be simpler – just work back and forth, turning your work at the end of each row exactly as you would with straight needles. The flexible cord becomes second nature very quickly.
What length circular knitting needle should I use for hats or sleeves?
For adult hats, a 16″ circular knitting needle is your best friend. This length works perfectly for the typical adult head circumference of 20-23″. I’ve made dozens of hats on 16″ circulars, and they’re just right – not too tight, not too loose.
When making hats for the little ones in your life, you might reach for a 12″ or 16″ circular, depending on the child’s age and head size. For toddlers, I often find the 12″ works well, while school-aged children are usually fine with the 16″.
Sleeves can be a bit trickier, and your approach will depend on the sleeve circumference:
For wide, flowy sleeves, 12″ or 16″ circulars work beautifully. Medium-sized sleeves might call for 9″ circulars, though be aware these have very short tips that some knitters (particularly those with larger hands) find uncomfortable to hold.
For narrow sleeves or when you don’t have the perfect size needle, the Magic Loop method with a longer circular (32″ or more) is incredibly versatile. I used this technique for years before investing in shorter circulars, and it works wonderfully once you get the hang of it.
Remember this golden rule: your circular knitting needle should generally be slightly shorter than the circumference you’re knitting. The ChiaoGoo Red Lace Circular 16-inch needle in size US 7 has become a favorite among hat knitters, earning a nearly perfect 4.9-star rating from over 650 reviews.
How can I stop my circular knitting needle cord from twisting?
Those stubborn, twisty cords on circular knitting needles can drive even the most patient knitter a bit crazy! After battling with this issue for years, I’ve collected several tried-and-true solutions that really work.
My favorite quick fix is the warm water method. Simply dip just the cord (keep those tips dry!) in warm water for a few minutes, then hang it straight with something light attached to the bottom while it dries. I use a clothespin with a couple of quarters inside, but any small weight works.
For persistent kinks, try gently stretching the cord. Pull it straight and hold it taut for about 30 seconds, then repeat several times. You’ll be surprised how well this can work, especially for milder cases of “cord memory.”
If you’re careful, a bit of steam can work wonders. Hold the cord (never the tips) a safe distance above steam from a kettle for just a few seconds, then straighten it out. Just be very careful not to get too close or burn yourself!
Proper storage makes a huge difference in preventing the problem in the first place. I hang my circulars on a special holder, but even draping them over a hanger works well. The key is avoiding tight coils that reinforce the circular memory.
Some brands have addressed this issue with special “memory-free” cables. ChiaoGoo’s red cables are particularly good at resisting kinks, and many knitters swear by them. For interchangeable sets, look into swivel cords that rotate freely at the connection point.
One clever knitter from our local group shared this tip: “I loop my circular needles over a doorknob overnight with a light weight hanging from the bottom. Works like a charm for stubborn cords!” I’ve tried this with a small bag containing a few marbles, and it’s remarkably effective.
With these techniques, you’ll spend less time fighting with your tools and more time enjoying your knitting!
Conclusion
Circular knitting needles have truly transformed the knitting landscape. I remember when I first switched from straight needles to circulars—that moment of revelation when I realized my wrists weren’t aching after a long knitting session! It’s no wonder these versatile tools have become beloved staples in knitting bags worldwide.
The beauty of circular knitting needles lies in their remarkable adaptability. Whether you’re crafting a seamless hat, working on a blanket without the weight pulling on your wrists, or simply enjoying the peace of mind that comes from never losing a needle between couch cushions, these tools solve so many common knitting frustrations.
Throughout this guide, we’ve explored the wonderful diversity of circular knitting needles—from fixed to interchangeable systems, bamboo to metal materials, and lengths ranging from tiny 9″ sock circulars to expansive 60″ cables for blankets. Each option serves different purposes, and finding your perfect match depends on your unique hands, projects, and knitting style.
As you continue your circular needle journey, keep these essential tips in mind:
Your needle length should generally be slightly shorter than your project’s circumference for comfortable knitting in the round. The material you choose matters tremendously—bamboo offers grip for slippery yarns, while metal provides speed for experienced knitters. If you’re looking for maximum flexibility without filling your craft drawer, interchangeable sets offer wonderful versatility. And remember, techniques like Magic Loop can save the day when you don’t have the ideal needle size on hand.
Taking good care of your circular knitting needles will ensure they serve you well for years. Store them properly uncoiled, check joins regularly, and don’t be afraid to give those stubborn cables a warm water bath when they develop memory.
Here at Crochet Craze, we’re passionate about helping fellow crafters find joy in their creative journey. We hope this guide has untangled some of the mysteries surrounding circular knitting needles and perhaps inspired you to try new techniques or projects.
Whether you’re just beginning to explore beyond straight needles or you’re an experienced knitter looking to refine your circular techniques, practice makes progress. Your next seamless sweater, cozy hat, or heirloom blanket is just a cast-on away!
For more knitting inspiration, tutorials, and resources to help you grow your skills, be sure to explore our other knitting articles and guides. We’re here to support you every stitch of the way. Happy knitting!