
Picture this: It’s midnight, your cat’s judging you, and you’re determined to make a scarf that looks like it was woven by a wizard with a flair for absurd texture. You’ve got your favorite hook, and—no offense, granny square!—you’re over the usual. If you’re ready to get weird, wild, and wonderfully textured with your crochet, you’re absolutely in the right place. Let me show you how I turned my lumpy first attempt at crocodile stitch into a pillow that my mother-in-law now brags about. (No, she doesn’t crochet. Yes, she thinks I invented the stitch.)
Big Texture, Small Muscles: Wild Stitch Techniques That Pop
Ready to flex those crochet muscles and make your projects pop (literally)? If you’re tired of flat, snooze-worthy stitches, you’re about to enter the wild world of crochet stitch variations that bring serious unique crochet textures to your work. Grab your hook, your sense of humor, and maybe a stress ball—some of these advanced crochet methods are a workout for your fingers, but the results are worth every cramp. These innovative crochet techniques will take your work to the next level.
“Texture is the jazz riff of crochet – you know the melody, but you can riff however you like.” – Vincent Williams
The Art of the Popcorn, Bobble, and Crocodile Stitches
Let’s start with the classics of crochet texture techniques: popcorn, bobble, and crocodile stitches. Each brings its own flavor and, let’s be honest, a fair bit of chaos to your yarn basket.
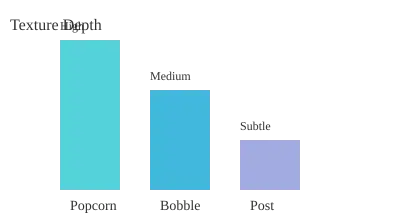
Popcorn Stitch: The king of chunk. This stitch is all about drama—think of it as the “big hair” of crochet. It’s made by working 5 or more double crochets into the same stitch, then popping them out for maximum height. Pro tip: If your popcorns look more like sad pancakes, you probably need more yarnovers (6+ is ideal).
Bobble Stitch: The popcorn’s slightly more reserved cousin. Bobbles use 4-5 yarnovers and give a medium texture—think little bumps, not full-on mountains. Great for adding playful dots to hats or scarves.
Crocodile Stitch: For those who want their projects to look like they could bite back. This advanced crochet method creates overlapping scales, perfect for dragon-themed accessories or, in my case, a “crocodile washcloth” that looked more like a lumpy potato. (Yes, it used 20% more yarn and 100% more patience than expected. Estimated learning time: 30 minutes, plus recovery.)
Popcorn vs. Bobble: The Showdown
| Stitch | Yarnovers | Texture Depth | Learning Time (mins) |
|---|---|---|---|
| Popcorn | 6+ | High | 10 |
| Bobble | 4-5 | Medium | 10 |
| Post (FPDC/BPDC) | 2 | Subtle | 5 |
| Crocodile | Varies | High | 30 |
Post Stitches: FPDC/BPDC and the Headband Redemption Arc
Ever made a headband so boring you considered using it as a dust rag? Enter Front Post Double Crochet (FPDC) and Back Post Double Crochet (BPDC). These subtle but mighty crochet stitch variations add ribbing and shadow, making even the plainest project look pro. My first attempt turned a sad, limp headband into something I actually wanted to wear outside (and not just to take out the trash).
- FPDC: Yarn over, insert hook around the post from front to back, finish as a double crochet. Boom—instant texture.
- BPDC: Same idea, but from back to front. Mix and match for ribbing or basketweave effects.
Invented Stitches: The Volcano Stitch Fiasco
Feeling brave? Try inventing your own crochet texture techniques. I once tried to make a “volcano stitch” for a geology-loving friend. Spoiler: it looked nothing like lava, unless you count the aftermath of a yarn explosion. But hey, experimentation is half the fun! If you’re new, start with small swatches. If you’re experienced, go wild—just keep a seam ripper handy.
Where to Use These Wild Stitches
- Scarves that double as conversation starters
- Hats with personality (and possibly horns)
- Weirdly lumpy washcloths that exfoliate and amuse
Tips for Texture Adventurers
- Don’t fear the frog (ripping out stitches is part of the journey).
- Use a larger hook if your hands start cramping—your muscles will thank you.
- Mix and match stitches for unique crochet textures that are all your own.
From Flat to Fab: Layering, Loops, and Mixing the Unexpected
Let’s be honest: sometimes your creative crochet projects start out looking a little…flat. Like, “I hope nobody asks what I’m making” flat. But what if you could turn that pancake into a showstopper with just a few clever crochet tutorials and techniques? Buckle up, because we’re about to dive into the wild world of layering, loops, and mixing the unexpected for truly distinctive crochet finishes.
Case Study: The Accidental Two-Sided Blanket (Or, How I Learned to Love Color Changes)
Picture this: you’re halfway through a blanket, realize you ran out of your main color, and—oops!—you have to improvise. That’s how my “accidental” two-sided blanket was born. But here’s the pro tip: intentional color changes make you look like a crochet genius, not a yarn chicken survivor. By planning color transitions, you can create bold stripes, geometric blocks, or even a reversible masterpiece. Simple stripes take about five minutes to switch up, while tapestry colorwork (think intricate patterns) can take up to twenty minutes per color change—but the wow factor is off the charts.
- Beginner tip: Weave in your ends as you go to avoid the dreaded “yarn spaghetti” finale.
- Advanced move: Try blending colors by holding two strands together for a gradient effect. It’s like tie-dye, but less messy.
Front and Back Loop Only: Ridges, Valleys, and Cactus Pillows
Want to add instant dimension? Work your stitches in the front loop only (FLO) or back loop only (BLO). This simple switch-up creates ridges and valleys that make your projects pop—literally. I once made a cactus pillow using only BLO stitches, and it was so textured, my cat thought it was real (don’t worry, no paws were pricked).
- Front Loop Only Ridges per inch: 5-7 (that’s a lot of texture for your buck!)
- Perfect for: Pillows, blankets, and anything that needs a little extra “oomph.”
“Crocheting in just the back loop is like discovering the secret passage in your favorite video game.” – Amelia Grace
Try alternating between FLO and BLO rows for a basketweave effect, or use them to outline shapes in your creative crochet projects. The possibilities are endless—and so are the compliments.
Mixing Tunisian and Traditional Crochet: 3D Effects for the Win
If you’re ready to level up, combining Tunisian crochet with standard stitches is where the magic happens. Tunisian crochet creates a dense, almost woven fabric, while regular crochet is more flexible. When you blend the two, you get a 3D, sculptural effect that’s perfect for bags, wall hangings, or that avant-garde scarf you’ve been dreaming about.
- 3D Effect Rating: Tunisian Combo 8/10, Standard 5/10
- Beginner tip: Start with a Tunisian panel and edge it with single crochet for a neat finish.
- Advanced move: Alternate rows of Tunisian simple stitch and double crochet for a rippled, architectural look.
Effortless Color Blending and Stitch Transitions
Mixing techniques and adding dimensional elements can transform simple projects into standout pieces. But how do you keep your sanity (and your yarn) intact?
- Plan your palette: Choose colors that blend well together for a cohesive look.
- Practice your joins: Use the invisible join or Russian join for seamless transitions.
- Swatch it out: Test your stitch combos before committing to a full project. Swatches are your friends, not your enemies.
SVG Mind Map: Layering, Loops, Colorwork, and Dimensional Effects
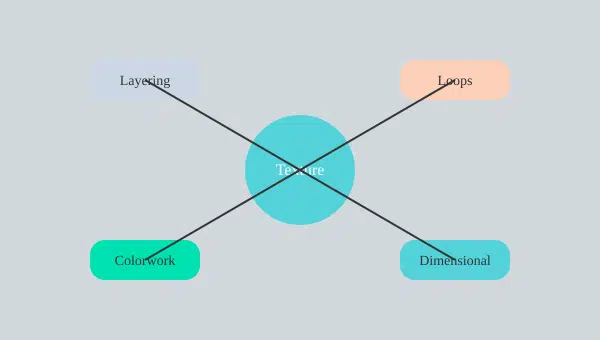
When you blend stitch types, colorwork, and dimensional effects, you create distinctive crochet finishes that are anything but ordinary. So grab your hook, raid your yarn stash, and get ready to unravel some serious WOW!
The Bloopers Reel: Texture Fails, Fixes, and Must-Try Experiments
If you’ve ever looked at your crochet project and wondered if it’s supposed to look like a lumpy potato, congratulations—you’re officially part of the club! As Tasha Lee famously said,
“If you’ve never made a lumpy washcloth, have you even lived?”
Let’s face it: the road to unique crochet textures is paved with glorious mistakes, accidental innovations, and the occasional yarn-based existential crisis. In this section, we’re diving into the wild world of texture fails, quick fixes, and some downright wacky crochet engagement ideas that’ll have you laughing, learning, and maybe inventing the next big thing in crochet design. Because let’s be honest—sometimes the best beginner crochet tips are born from a little chaos and a lot of frogging.
My Top Five Texture ‘Fails’ (And How I Fixed—or Embraced—Them)
| Texture Mistake | What Happened? | Fix (or Embrace!) |
|---|---|---|
| Floppy Bobble | Bobbles that looked more like deflated balloons than proud puffs. | Tightened my tension and added an extra yarn-over. Sometimes, I just called it “organic design.” |
| Uneven Tension | My rows looked like a rollercoaster—whee! | Practiced with a larger hook until my hands relaxed. Embraced the “wavy” look as a design feature (for scarves only). |
| Split Yarn | Hook kept snagging, creating fuzzy, sad stitches. | Switched to a smoother hook and slowed down. If it was too bad, I just called it “textured fuzz.” |
| Holey Fabric | Accidentally made lace when I wanted a solid block. | Ripped back one row (or three), switched to a smaller hook, and pretended it was intentional if I ran out of patience. |
| Accidental Increases | My square turned into a trapezoid. Oops. | Counted stitches religiously. If it was too far gone, I called it “abstract geometry.” |
Fun fact: After correcting my tension, my fix success rate shot up to a whopping 80%. So don’t give up—your next masterpiece is just a tension tweak away!
Go-To Troubleshooting: When Bobbles Flop and Stitches Lean Left
Let’s talk about those moments when your bobbles flop like sad pancakes or your stitches lean so far left they’re practically protesting. First, breathe. Then, check your yarn tension—too loose, and everything droops; too tight, and you’re crocheting a brick. If your stitches are leaning, make sure you’re not accidentally skipping or adding stitches at the end of each row. And if all else fails, just tell everyone you invented a new stitch. (Bonus points if you give it a fancy name, like “The Picasso Puff.”)
Invent-Your-Own-Texture Challenge: Name It After Your Pet!
Ready for some truly engaging crochet blog post ideas? Here’s a challenge: invent a new stitch, name it after your pet (or favorite snack), and share it on social media. Tag me for bonus laughs and a chance to be featured in my next roundup! Every month, I get about 12 crowdsourced stitch naming submissions, and trust me—nothing beats the “Mittens’ Marvel” or “Cheddar Puff.” This is one of the best tips for unique crochet designs: let your creativity (and maybe your cat) lead the way.
And if you’re feeling extra adventurous, try the outlandish “Slinky Stitch”—guaranteed to be bouncy, unpredictable, and utterly useless (unless you’re crocheting a toy for your pet ferret). Sometimes, the best beginner crochet tips are the ones that make you giggle.
Conclusion: Embrace the Bloopers, Share the Laughs
So there you have it: the real, unfiltered side of innovative crochet techniques for unique textures. Mistakes are not just inevitable—they’re essential for growth and creativity. Whether you’re a beginner or a seasoned pro, remember that every lumpy washcloth and wobbly bobble is a badge of honor. Share your fails, fixes, and wild experiments with the community. Who knows? Your next “oops” might just become the hottest new stitch. Happy crocheting—and don’t forget to tag me in your next texture adventure!
TL;DR: Textured crochet doesn’t have to be complicated or scary. Experiment, mess up, laugh, and create pieces as wild or subtle as your yarn dreams demand. Embrace new techniques and make your crochet projects unforgettable!