
Turning a big ol’ stack of individual crochet squares into an actual finished piece feels a little like magic, doesn’t it? The secret is picking a joining method that vibes with the look you’re going for. You can go for nearly invisible seams that let your squares be the star of the show, or you can choose decorative joins that add their own texture and flair. The right technique is what takes a pile of motifs and turns them into a cohesive, professional-looking blanket, bag, or sweater.
Your Guide to Assembling Crochet Squares
Making the leap from crafter to finisher can feel like a huge step, but I promise, it’s not as scary as it looks. This guide is here to demystify the whole assembly process. Your choice of seam can totally change your project’s final look, so we’ll walk through some of the most popular options together. And hey, if you’re just getting started with the building blocks themselves, our step-by-step granny square tutorial for beginners is the perfect place to begin.
I’ll cover everything you need to know, including:
- Methods for a completely flat, invisible seam.
- Techniques that create a decorative, textured border.
- The essential prep work to make sure your final piece looks polished.
By the end of this, you’ll have all the confidence you need to join your crochet squares and create something you’re truly proud of.
So, What’s the Best Joining Method?
Let’s be real: there’s no single “best” way. It all comes down to what you’re making and the look you want. A delicate baby blanket might call for a soft, flat seam, while a rustic, chunky throw could look amazing with a bold, braided join.
To help you decide, here’s a quick rundown of my go-to methods.
| Quick Comparison of Joining Methods | ||
|---|---|---|
| Method | Best For | Final Look |
| Slip Stitch | Sturdy projects that need a flat, strong seam. Think bags and blankets. | Creates a subtle, flat braid on one side. Mostly invisible on the right side. |
| Whip Stitch | A nearly invisible seam. Great for when you want the granny squares to be the focus. | A very clean, flat, and almost seamless join. |
| Single-Crochet Join | Projects that could use a decorative, raised ridge. Perfect for adding texture. | A visible, decorative ridge that adds dimension and a sturdy feel. |
| Continuous Join-As-You-Go | Large projects with lots of squares, like big blankets. Saves a ton of time! | Varies depending on the stitch used, but it’s efficient and creates a cohesive look. |
Each of these techniques has its own personality and perks. Don’t be afraid to make a few test swatches to see which one you like best before committing to a whole blanket’s worth of seams. Trust me, it’s worth the extra few minutes
Essential Prep Work for a Flawless Finish
Alright, before you dive into joining those beautiful crochet squares, let’s talk about the prep work. I know, I know—it’s the part everyone wants to skip. But trust me, taking a little time now will save you from a world of frustration later. These two steps are the secret handshake between a project that looks homemade and one that looks polished and professional.
First up, and I can’t say this enough: weave in your ends. Every single one. It might feel like the most tedious chore on the planet, but grabbing a yarn needle and securing those tails is non-negotiable. It’s what keeps your masterpiece from slowly unraveling after its first wash. Been there, done that, and it’s a tragedy.
Next comes the real magic: blocking. If you’ve ever wondered how people get their granny square blankets to lay perfectly flat, this is it. Blocking is just a simple process of getting your squares a bit damp and pinning them out so they all dry to the exact same size and shape.
Blocking is the game-changer. It forces every square to be identical, which makes the actual joining process a breeze. No more fighting with mismatched edges or weird puckers. It’s the secret to a flat, professional-looking final project.
How you block—wet, steam, or spray—really just depends on your yarn fiber. But getting it done ensures that when you pick a joining method from a detailed crochet stitch guide, your seams will come together as smooth as butter. No fuss, no puckering, just perfectly straight lines.
Creating Invisible Seams for a Flawless Finish
Sometimes, you’ve poured so much love into your intricate stitchwork and carefully chosen colors that you want them to be the only thing people see. When that’s the goal, a flat, invisible seam is your best friend. These methods make sure your joins blend in so perfectly, the squares themselves get all the glory.
Two of my absolute go-to techniques for this are the classic whip stitch and the ever-reliable slip stitch join.
The Whip Stitch Method
For the whip stitch, you’ll grab a yarn needle to create a join that’s so clean, it’s nearly impossible to spot from the front. The real trick here is to hold your squares with the right sides together. Then, you just work your needle through the loops closest to you on each square. It’s simple, effective, and gives you a beautifully flat finish.
The Slip Stitch Join
Another fantastic option is the slip stitch join, which creates a similarly flat and uniform seam using your crochet hook instead of a needle. It’s a personal favorite for its sturdiness and clean lines. This little sketch here shows the basic movement for connecting two squares.
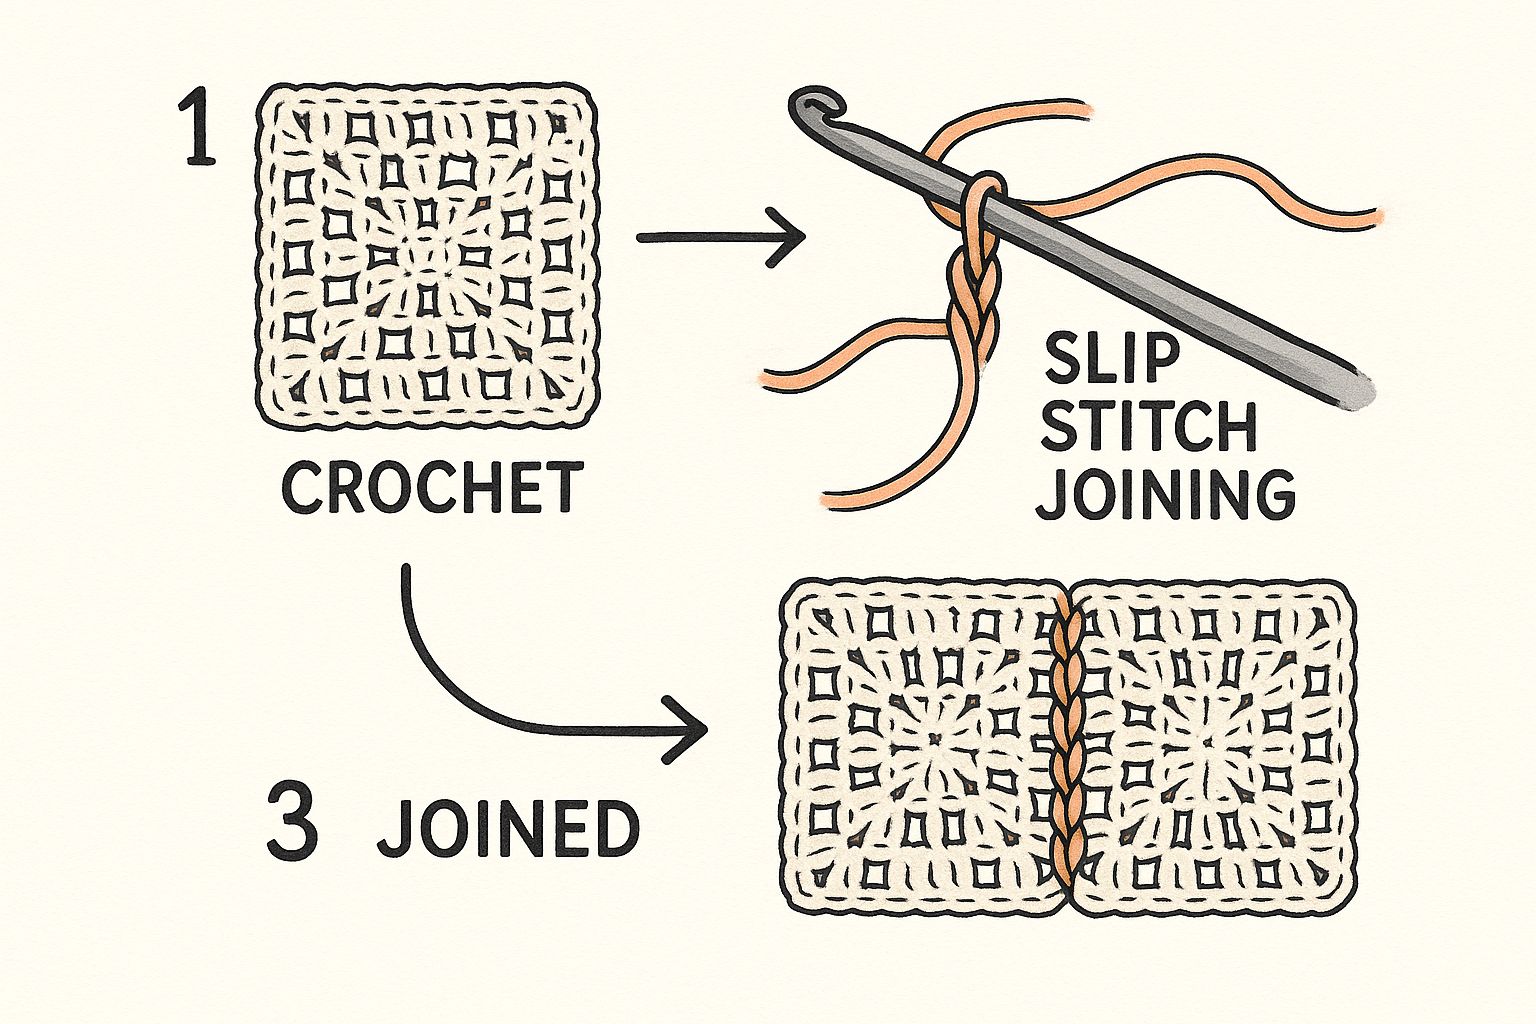
As you can see, the stitch neatly pulls the edges together without adding any extra bulk.
Here’s a pro tip from my own experience with big projects: tackle all the horizontal joins first, creating long strips of squares. Once those are done, move on to the long vertical seams. This assembly-line approach keeps everything lying flat and gives you a truly professional-looking finish every time. If you want to see this technique in action, you can discover more insights and a great tutorial on Attic24.
Using Textured Joins as a Design Element
Why on earth would you hide your seam when it can be a beautiful part of the design? I’ve learned over the years that sometimes, the way you join your crochet squares can become a standout feature, adding a pop of texture and visual flair. This is where decorative techniques really get to shine, turning a simple seam into a deliberate style choice.
The single crochet join is my go-to for this. It’s tough, surprisingly straightforward, and creates this gorgeous raised seam that perfectly frames each square. I find this technique is especially fantastic for projects like afghans and pillows where you need both durability and a bit of extra personality.
Two Looks From One Stitch
The real beauty of the single crochet join is just how versatile it is. I’ve used it in a couple of different ways depending on the look I’m after.
One of my favorite methods is to place the wrong sides of the squares together. This creates a sturdy, three-dimensional ridge on the front of your work that really makes the squares pop. On the other hand, if you place the right sides together, you get a much flatter look, with the raised seam neatly tucked away on the back. You can see these single crochet join variations in action and decide which one fits your project’s vibe.
If you’re anything like me, the idea of sewing together a mountain of granny squares at the end of a big project is enough to make you question all your life choices. The thought of all those ends to weave in? No, thank you. For anyone who dreads that final assembly phase, the Join As You Go (JAYG) method is an absolute lifesaver.
This technique is exactly what it sounds like: you join your squares while you’re still crocheting them. Imagine connecting a new square to your growing blanket as you work its final round. It’s a beautifully efficient process that completely cuts out that tedious sewing stage at the end.
Frankly, this is my go-to method for any large afghan project. It saves a wild amount of time and drastically cuts down on the number of ends you have to deal with later. It’s pure magic.
The JAYG method works by using your hook to attach a new square to the completed ones while you’re still working its last round or border. This creates a really clean, seamless look that often feels much more integrated than a sewn seam.
Ready to give it a try and ditch the sewing needle for good? You can learn more about this awesome technique and check out an excellent JAYG tutorial over on Knotions. Your future self will thank you.
Common Questions About Joining Squares

Even after you’ve learned a few different ways to join crochet squares, questions are bound to pop up. Don’t worry, it’s a totally normal part of getting the hang of any new technique. Let’s dive into some of the most common questions I get from fellow crafters.
What Is the Best Crochet Join for Blankets?
Honestly, the “best” join is all about the look you’re going for. There’s no single right answer, just the right one for your project.
If you want a super smooth, flat blanket where the squares themselves are the main event, I always recommend the slip stitch or whip stitch. They create a nearly invisible seam that lets the colors and patterns of your squares shine. But if you’re after a sturdier blanket with a bit more character, the single crochet join is a fantastic choice. It adds a decorative, textured ridge that can really make your project pop.
How Do I Stop My Seams From Puckering?
Ah, the dreaded pucker. We’ve all been there. Puckering is almost always a sign of tension trouble or misaligned stitches. The number one thing you can do to prevent it? Block all your squares to the same size before you even think about joining them. It’s a game-changer.
As you join, try to keep your tension relaxed and even—not so tight that the yarn strains, but not so loose that it’s floppy. And double-check that you’re working stitch-for-stitch across each square. Consistency is your best friend here.
Here’s a little design secret: using a contrasting yarn color for your join can transform the seam from a necessity into a stunning feature. It creates a bold grid or frame that highlights each square individually, and it works especially well with a decorative technique like the single crochet join.
If you feel like your tension still needs some work, don’t sweat it. Spending some time with various crochet patterns for beginners is a great way to practice and build that muscle memory.