Crochet tension is like the heartbeat of your project. It keeps your sweater fitting right or turns it into a surprise tent. Even stitches mean clean texture and patterns that look just like the pictures.
But, if your tension is off, your pieces might shrink, stretch, or look amateurish. You don’t need fancy tools or years of experience to get it right. Small, smart changes can make a big difference in just days.
Learning how your natural rhythm affects your stitches is key. It’s about finding the right habits to tweak. This guide offers seven practical tips to improve your gauge control.
There’s also a Tension Mastery Checklist and a 7-day email course to help you achieve even stitches. Remember, steady practice and small adjustments are more important than trying to be perfect every time.
Key Takeaways
- Consistent crochet tension is the main factor behind even stitches and accurate sizing.
- Perfect tension comes from small, repeatable habits, not expensive gear.
- Identify if you crochet tight or loose to choose the right hook and improve gauge control faster.
- Yarn feeding method and a relaxed grip impact tension more than you think.
- Follow a short routine and the Tension Mastery Checklist for steady improvement.
Why Crochet Tension Matters for Sizing and Texture
You want your crochet pieces to look and fit right. The tension you use affects how tight or loose they are. This is key for sizing, as it determines if a sweater fits snugly or is too big.
Gauge importance is also critical. Patterns give chest measurements based on tension. If you deviate from the pattern, your garment won’t match the expected size.
How tension affects finished dimensions
Tight stitches make fabric shrink, reducing its length and width. On the other hand, loose stitches can add inches you didn’t plan for. It’s wise to check your gauge before starting to avoid these issues.
Texture and professional-looking fabric
Consistent tension and texture are essential for a smooth fabric. When your stitches are even, edges will lie flat and seams will be neat. To achieve professional-looking fabric, make small swatches and adjust your hook size instead of forcing your hands to change.
Real-life examples: garments, amigurumi, and blankets
Poor tension can ruin the fit of garments. For amigurumi, tight rounds give a crisp shape, while loose ones make it look sloppy. Blankets need steady tension and texture for clear stripes and motifs.
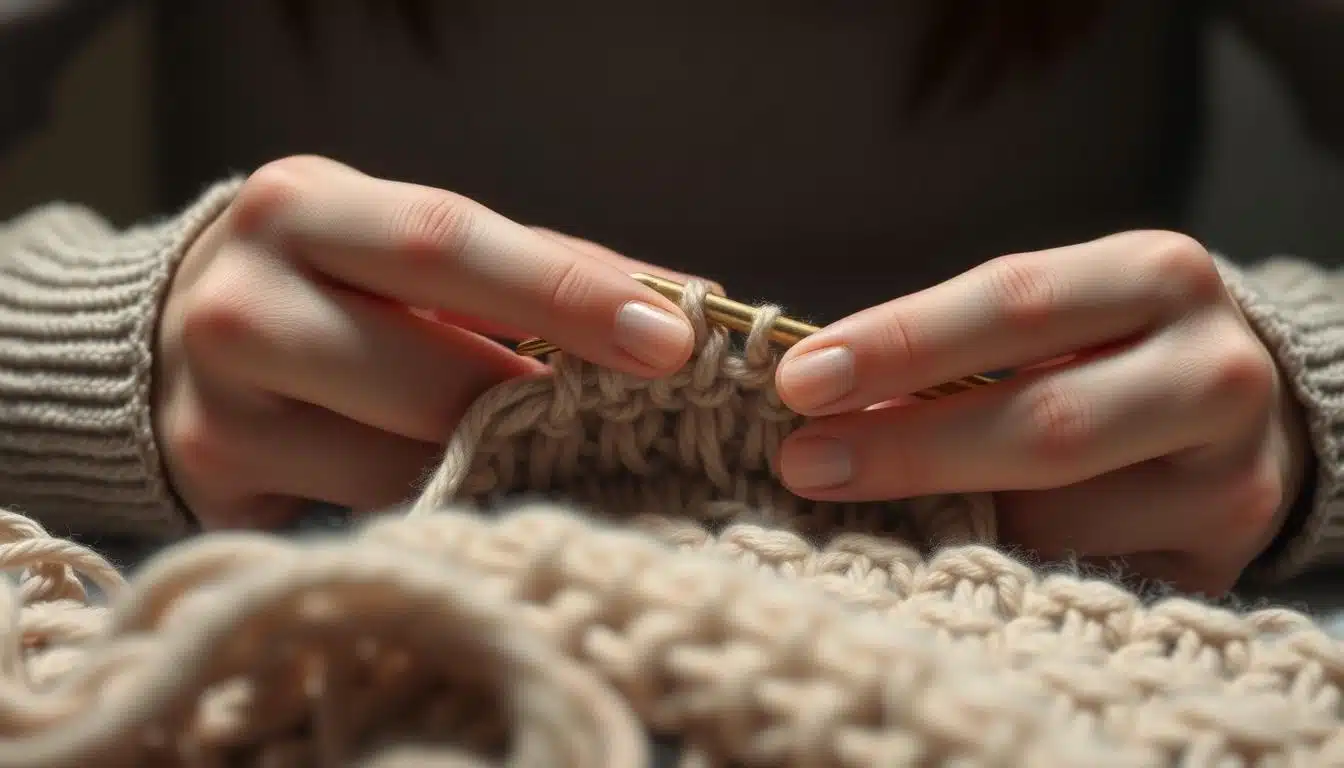
Identify Your Natural Crochet Style: Tight or Loose
Before you blame the yarn or the pattern, find your natural rhythm. A quick swatch test will reveal whether you’re a tight crocheter or a loose crocheter. Use a 4×4 swatch in rows, work a few repeats, then measure it before and after blocking to see how your true gauge settles.
Simple swatch test to find your baseline
Make a small swatch with the yarn and hook the pattern recommends. Count stitches across four inches and note the feel of the fabric. If your stitches crowd and the fabric puckers, you act like a tight crocheter. If stitches gape and the fabric drapes loosely, you behave like a loose crocheter.
Keep a tension diary with date, hook, yarn, and a photo. Weekly swatches and short warm-up chains speed muscle memory. If your foundation chain is rigid, try starting the chain with a slightly larger hook, then switch to the chosen hook for the body.
How being a tight or loose crocheter changes hook choice
Your swatch test should guide hook sizing. Tight crocheters usually gain better drape and correct gauge by sizing up one hook. Loose crocheters often drop a size to tidy stitches and meet gauge. Buy a small range of hooks from brands like Clover and Boye; experimenting is inexpensive and revealing.
Consistency matters more than perfect tension. Keep the same hook and feeding method within a project so gauge does not shift mid-row.
Common beginner pitfalls and mindset tips
Beginners trip over a few repeatable mistakes: gripping too hard, skipping the swatch test, and switching hook sizes mid-project without re-measuring. These beginner crochet pitfalls make sizing and texture unpredictable.
Be kind to yourself. Relaxing grip and practicing short routines calm the hands and improve tension. When in doubt, run one more swatch and visit a practical guide like Mastering Your Crochet for focused fixes and simple drills.
Ergonomic Hooks and Tools That Improve Tension
If your stitches wobble or your hands ache, the right tools can change everything. A small kit of ergonomic crochet hooks and simple helpers can make a big difference. You don’t need a lot of gadgets to see a change; just a few quality items and some practice.
Why rubber grips matter: Soft handles reduce slip and pressure on fingers. This keeps your grip relaxed, helping stitches sit evenly. The Clover Amour line is a top pick for its cushioned comfort and smooth heads that let yarn glide without catching.
Budget-friendly tension helpers: A yarn bowl keeps the feed in check, stopping yarn from running free across your lap. Decorative tension rings wrap around a finger to create repeatable resistance. Prices are modest: Clover Amour hooks cost about $7–$10, tension rings $3–$15, and yarn bowls $10–$25. You can mix and match without spending a lot.
What to buy and why for U.S. shoppers: Start with one ergonomic crochet hook, a yarn bowl in wood or smooth plastic, and an optional tension ring. Wooden bowls and smooth finishes prevent snags and pair well with yarn cakes for steady unwinding. These are practical, affordable crochet tools USA makers and retailers stock widely.
Quick buying tips: Feel the handle before you commit. Choose a hook head that matches your yarn type so stitches form cleanly. Pick a bowl with a smooth rim and a size that fits your usual skeins. A small decorative tension ring can be the final piece that gives you consistent stitch resistance.
Yarn Feeding Methods That Create Consistency
You want steady stitches without guessing games. Choose a yarn feeding method that matches your rhythm and the yarn. Small changes in how yarn moves from skein to hook make big differences in even stitches.
Wrap & hold yarn method explained
The wrap and hold technique helps with slippery skeins, giving you steady resistance. Place the yarn between your pinky and ring finger. Then, wrap it once around your pinky, guide it under your middle and ring fingers, and over your index finger. Your fingers act as brakes; tighten for firmer tension, loosen for a relaxed gauge.
Many experienced crocheters use this method with Clover Amour hooks. It reduces hand fatigue while keeping stitches even.
Inside pull vs outside pull, and why yarn cakes help
You can feed yarn from the center or the outside of a ball. Inside pull lets the yarn unwind smoothly while the cake stays put. Outside pull gives a quicker feed and is less prone to tangles when you move around. A yarn cake combines the best of both worlds by delivering a tidy, snag-free feed that resists rolling.
Winding a skein into a yarn cake and pairing it with a yarn bowl improves consistency across long sessions. For a deeper dive into tension tweaks, visit a practical guide here: crochet tension hacks.
DIY tension ring using a hair tie and when to use it
A DIY tension ring helps if you tend to crochet loosely. Place a small hair elastic around your index finger and thread the yarn under it. The elastic adds gentle resistance so stitches stop fluctuating mid-row. Keep the elastic snug but never tight to avoid numbness.
Use a DIY tension ring for lace and fingering yarns when you need higher control. For bulky yarns, relax the wrap and skip the ring to keep fabric fluffy.
- Quick tip: Match your feeding method to the yarn type—slippery fibers benefit from firmer wraps, sticky fibers from looser feeds.
- Tool pairing: Combine wrap and hold with a yarn cake and a bowl for marathon crocheting sessions.
Effective Grip and Posture Habits to Prevent the Death Grip
You don’t need a tight grip to finish a sweater. Small posture changes and a gentle crochet grip can help. Try these habits one at a time and keep what works for you.
Choose between a knife hold and a pen hold based on comfort. If a knife hold gives you control without tension, use it. If a pen hold lets your fingers move freely, that’s okay too.
Watch for the death grip: fingers clenched, shoulders up, and tight stitches. Check your hands before each row. Shake your hands and then gently lift into the next stitch. This reduces drag and prevents hand cramping.
Good crochet posture and a relaxed grip go hand in hand. Sit straight, feet flat, and elbows on pillows or armrests. A cushion under your forearm keeps your wrists neutral and reduces fatigue.
Take breaks that do something useful. Stretch your fingers, roll your wrists, and flex your shoulders. Short, frequent rests keep tension steady and prevent the death grip.
Try this simple habit checklist during a project:
- Scan your crochet grip at row start and mid-row.
- Switch between knife hold and pen hold if one side gets sore.
- Use pillows for arm support and adjust your crochet posture every 20–30 minutes.
- Pause to stretch hands to prevent hand cramping.
| Habit | What to Do | Benefit |
|---|---|---|
| Grip check | Consciously relax fingers before each row | Reduces tight stitches and lowers strain |
| Hold choice | Use knife hold or pen hold based on comfort | Maintains consistent tension throughout the project |
| Arm support | Rest elbows on cushions or armrests | Improves crochet posture and reduces shoulder fatigue |
| Active breaks | Shake hands, stretch fingers, roll wrists | Helps prevent hand cramping and keeps tension steady |
Swatching, Blocking, and Measuring Gauge Like a Pro
Begin by making a practical swatch 4×4 with the yarn and hook you plan to use. Crochet a square that’s at least 6 inches across. This size allows you to trim the edges easily. Create a grid of stitches that matches the pattern stitch. This gives you enough fabric to measure and see any edge distortion.
Measure the gauge in the center of the swatch before any finishing touches. Count the stitches and rows across a true 4×4 area. After that, wet-block or steam the swatch like you would the finished piece. Then, measure again. This step shows how your tension relaxes and how the finished fabric will behave.
If your numbers are off, adjust the hook size and make a new swatch. If the swatch is too tight, try going up one or two hook sizes. If it’s too loose, go down a size. Keep notes in your tension diary so you don’t repeat trial and error mid-project.
Place stitch markers for gauge at regular points to make counting easy while you work. Mark one-inch intervals or the exact 4×4 corners to track drift as you crochet. Use stitch markers for gauge to spot tension shifts before they ruin rows.
When you measure gauge, always compare your post-blocking numbers to the pattern gauge. If they match, you’re set. If they don’t, repeat the swatch with a different hook and compare results. That small upfront effort saves frustration and keeps sizing true.
Practical Tension Hacks for Beginners
Get ready for seven quick tension hacks to help you stitch steadily. These tips are easy to try in just 10 minutes. They’ll speed up your progress in your warm-up chain and daily practice.
Start with the gear that helps. Choose ergonomic hooks like Clover Amour or Tulip. They reduce hand fatigue. A cushioned handle makes your grip relax naturally.
Stabilize with a simple touch. Use the finger anchor method. Place your non-dominant index finger about an inch behind the working area. This stops over-pulls and keeps stitches even.
Begin every session with a short ritual. Start with a 20-stitch warm-up chain. It warms your tendons and trains your rhythm. If your foundation feels tight, try a slightly larger hook for the chain to loosen it up.
Extra micro-habits that matter:
- Wrap & hold yarn around your fingers to steady tension; one wrap for tight crocheters, two for looser hands.
- Create a hair-tie tension ring on your finger for quick, consistent control when you switch yarns.
- Place stitch markers on your swatch to check consistency while you work.
Make these moves part of your short practice routines before each project. Even three minutes of focused warm-ups build muscle memory faster than hours of stitching.
Keep a tension diary and jot a few lines after each practice. Note your hook, yarn, and whether the finger anchor or a different wrap helped. Small, steady notes reveal big improvements in a month.
How Yarn Weight and Fiber Affect Tension
For consistent results, match your yarn to your technique. The weight of the yarn changes how stitches look. Thin yarns, like lace, can pull tight or slip, depending on the fiber. Bulky yarns, on the other hand, can hide uneven stitches but show off any tension issues.
Make a quick swatch for each yarn you choose. A swatch with lace or thread will show if you’re gripping too hard. You might need a bigger hook or a tension ring. Fingering and sock yarns often lead to tight stitches. DK and worsted yarns are more forgiving for beginners. Bulky yarns need looser wraps and a steady rhythm to avoid lumps.
Slippery fibers like silk and bamboo let your hook slide, making fabric loose. Sticky fibers, such as wool and cotton, grab the hook, tightening your fabric. Test each fiber with the same hook and adjust: loosen with sticky cotton, tighten with slippery silk.
In amigurumi, you want firm fabric to hide stuffing. Use a smaller hook than the yarn label suggests and keep a snug tension. Choose an amigurumi yarn and hook that balance stitch density and wrist comfort. If tight stitches hurt, try an ergonomic hook like Clover Amour and take breaks.
Here are quick tips: increase hook size for lace yarn tension, relax grip for fingering yarn, use ergonomic hooks for bulky yarn, and swatch when changing fiber or project. Notes from each swatch help you repeat successes and avoid tension surprises.
Troubleshooting Common Tension Problems
If your stitches look uneven, you can fix them with a few quick tests and tiny habit changes. Start by checking a small swatch and measuring gauge. This helps you decide whether to adjust tension by changing hook size, tweaking how you hold yarn, or swapping feeding methods. For extra reading on gauge troubleshooting, consult a practical guide at crochet gauge problems.
Solutions for too-tight stitches
When you have too tight crochet solutions, first try moving up one hook size. If that’s not enough, jump two sizes and test again. Hold the hook a bit further back from the head to reduce grip pressure.
Loosen your thumb and index finger on the hook and take short breaks to avoid the death grip. Practice lifting the finished stitch slightly with the hook before starting the next loop. Use a yarn bowl or cake to prevent accidental tugging from a tangled ball; this steady feed reduces tightened tension caused by uncontrolled pull.
Solutions for too-loose stitches
For too loose crochet solutions, drop a hook size and test another swatch. Add an extra wrap around a finger or switch from yarn over to yarn under to tighten the working yarn. Hold your work closer to the hook for a bit more control.
Consider a tension ring or finger anchor to stabilize the strand when single crochet or amigurumi calls for compact stitches. If you use bulkier yarn, try a smaller hook instead of forcing tighter work with a large hook.
Why tension changes in the round and how to compensate
Tension in the round often tightens because you never turn your work; the repetitive motion compresses stitches. Be mindful of the tightening trend and consciously relax your grip at the end of each round.
Use stitch markers to track rounds and check gauge frequently. If you spot drift, either up your hook size slightly for all rounds or mix techniques: loosen grip on the first stitch of each round and maintain normal tension for the rest. For step-by-step hook sizing guidance, see a beginner-friendly hook size primer at crochet hook sizes.
| Problem | Immediate Fix | Practice Habit |
|---|---|---|
| Too many stitches / compact swatch | Increase hook size; loosen grip | Hold hook farther back; take short breaks |
| Too few stitches / loose swatch | Decrease hook size; add extra wrap | Hold work closer; try yarn under method |
| Tightening during rounds | Consciously relax grip at round starts; check gauge | Use stitch markers; monitor every few rounds |
| Uncontrolled yarn pull | Use a yarn bowl or cake for steady feed | Unwind as you go; avoid pulling from a loose ball |
Practice Routines and Tracking Progress with a Tension Diary
Start a simple tension diary and you’ll stop guessing and start improving. A short swatch routine once a week helps you spot patterns in size and texture. Take a photo, note the date, jot down mood and posture, and record the hook and yarn used.

Keep entries small. Track crochet progress by listing measurements, stitch count, and any adjustments you made. Over a month, your notes will show whether you trend tight or loose and which fixes actually work.
Use a crochet checklist to standardize each session. Check off yarn, hook, lighting, and a 15–20 minute warm-up. Repeat the same swatch pattern so your comparisons stay valid.
Make practice sessions brief and focused to build muscle memory. Fifteen minutes of targeted drills beats an unfocused hour. Record which drills you did and how your hands felt afterward.
Photographs reveal subtle changes that numbers miss. Date each photo, angle it the same way, and keep them with your notes. When you review, you’ll see posture or yarn type linked to tension shifts.
Below is a straightforward weekly plan and tracking table you can copy into your journal. Use it to track crochet progress, maintain a swatch routine, and follow a crochet checklist that trains muscle memory.
| Day | Action | What to Record |
|---|---|---|
| Monday | 15 min warm-up swatch | Hook, yarn, stitch count, mood |
| Wednesday | Technique drill (tension hold) | Grip notes, adjustments, photo |
| Friday | Repeat swatch routine | Measurements, compare to Monday, note tight/loose |
| Weekend review | Weekly summary | Trends, changes to crochet checklist, plan for next week |
Creative Tips to Keep Tension Consistent While Changing Yarns or Colors
Ever felt that sinking feeling when a color change messes up a row? Don’t worry. A few smart habits can keep your gauge steady and avoid tension spikes during joins.
Always swatch new yarn before starting a project. A small swatch helps you see how the yarn behaves and if your gauge is right. This step is key to avoiding surprises with color changes.
Practice the join on a scrap first. Use stitch markers to mark where you’ll switch colors. Try different methods until you find one that keeps your tension even. This practice makes your finished piece look better.
Keep your yarn-feeding method consistent across transitions. If you wrap and hold, keep doing it. If you use a tension ring or yarn bowl, keep it up. This steady feeding prevents sudden tight pulls and avoids tension spikes.
Wind skeins into cakes and use a yarn bowl for smooth feeding. A bowl helps avoid tangles and keeps yarn tension even when using multiple colors. You’ll see fewer tight spots and cleaner stripes.
When changing color, only tighten the final loop of the old color. Start the new color with a gentle pull. Hold the tail and working yarn close to the hook for a few stitches. This habit prevents uneven joins and keeps tension steady.
Changing your hook or grip mid-project can cause trouble. Stick to one grip and one hook size in a section. Changing your hold or tool can affect stitch size and cause tension issues.
Lastly, keep a log of your experiments. Note which join method and yarn-feeding setup work best. A short record helps you repeat success on future projects.
Conclusion
Mastering crochet tension is a journey, not a quick fix. Start with one or two tips at a time. Try an ergonomic hook, a wrap & hold method, or a simple swatch. See what works best for your projects.
Improvement comes slowly. Knowing if you crochet tight or loose helps you choose the right hook size. Adjusting to new yarns becomes easier. Use yarn cakes or a bowl for steady feeding and warm-up chains to get your hands ready.
Keep a tension diary to track your progress. This helps you achieve even stitches. With the right tools, daily routines, and practice, you’ll gain control. Aim for consistent tension that suits your project.
Stick to these habits for better results. You’ll see your work become more professional-looking. It’s all about finding reliable tension with practice.
FAQ
What is crochet tension and why should you care?
Crochet tension is how tightly or loosely you hold the yarn. It affects the size, texture, and look of your projects. Getting it right means your finished work will match the pattern and look professional.
How does tension change finished dimensions?
Tension changes the size of your finished project. Tight stitches make it smaller, while loose stitches make it larger. Patterns include a gauge to help you get the right size.
How does tension affect texture and drape?
Good tension gives your fabric a smooth, even look and a nice drape. Bad tension can make it uneven and look bad. For things like sweaters, you want even stitches. For stuffed animals, tighter stitches are better.
How can I tell if I’m a tight or loose crocheter?
Make a simple swatch with your project yarn and the hook the pattern suggests. If it’s small, you’re tight. If it’s big, you’re loose. Keep track of this in a tension diary.
If I’m tight or loose, how should I choose a hook?
If you’re tight, try a bigger hook and relax your grip. If you’re loose, use a smaller hook and add a wrap to your finger. It’s easy to try different hooks until you find the right one.
What beginner pitfalls affect tension and how do I avoid them?
Common mistakes include holding the hook too tight and not feeding the yarn evenly. To avoid this, relax your grip and use a yarn bowl. Do some warm-up chains or short practice routines.
Do ergonomic hooks make a real difference?
Yes. Ergonomic hooks like Clover Amour help you crochet for longer without getting tired. They also help you keep the right tension. They’re worth trying if you crochet a lot.
What affordable tools improve tension quickly?
Start with a Clover Amour-style hook, a yarn bowl, and a decorative tension ring. These tools help you feed the yarn evenly and improve your tension. They’re not expensive but make a big difference.
What is the wrap & hold method and how does it help?
The wrap & hold method involves feeding yarn between your fingers and wrapping it around your pinky. This lets you control the tension without changing the hook size. It’s a simple way to adjust your stitches.
Inside pull vs. outside pull—which is better?
Both methods work, but consistency is key. Inside pull is smoother and keeps the ball tidy, while outside pull is quicker and less likely to tangle. Use a yarn bowl for the best feed.
Can I make a DIY tension ring?
Yes. Use a small hair elastic around your finger to guide the yarn. It should be gentle, not too tight. This is helpful for loose crocheters.
Which grip style should I use—knife or pen?
Choose what feels comfortable to you. Both grips can work well if you’re consistent. Focus on keeping your grip and yarn feed the same throughout a project.
How do I avoid the “death grip” and hand cramping?
Check your grip before each row and relax your shoulders. Rest your elbows and take breaks. Use ergonomic hooks to reduce strain. A looser grip is usually better.
How do I make and measure a proper swatch?
Crochet a 4×4 inch swatch in the stitch the pattern uses. Use the same yarn and hook. Measure it before and after wet-blocking to see if it matches the pattern.
What if my swatch is too tight or too loose?
If it’s too tight, try a bigger hook or loosen your grip. If it’s too loose, use a smaller hook or add a wrap to your finger. Keep track of these changes in your tension diary.
How do stitch markers help with tension?
Use stitch markers at 1-inch intervals or at key points to check your tension. They help you spot any issues early and keep your stitches even. Use them during rounds and long rows.
What are the best warm-up routines before starting a project?
Do a 20-stitch practice chain and a few rows of your main stitch. Also, do hand stretches. These warm-ups loosen your fingers and help you crochet smoothly. Short practice sessions before starting a project can also help.
How does yarn weight and fiber change tension?
Yarn weight affects how easy it is to control. Lace and thread can tighten easily, while bulky yarn needs looser wraps. Fiber also matters—silk and bamboo tend to go loose, while wool and cotton can tighten your stitches. Always swatch each fiber.
How should I crochet amigurumi differently for tension?
Use tighter stitches and a slightly smaller hook for amigurumi. This keeps the stuffing inside. Use ergonomic hooks and take breaks to avoid wrist strain.
Why does tension often change when crocheting in the round?
Crocheting in the round can make you tighten your grip. To avoid this, consciously loosen your stitches in rounds. Use stitch markers to track your progress and check your gauge often.
What daily habits make tension more consistent?
Use consistent yarn feeding, keep the same grip and wrap method, and do short warm-up chains. Practice weekly swatches and use ergonomic tools. Small habits can make a big difference over time.
How should I track progress with a tension diary?
Record date, yarn, hook size, stitch, mood, seating, feed method, and a photo for each swatch. Note any adjustments and how you feel. Review it monthly to see trends and refine your routine.
Any hacks to keep tension steady when changing yarns or colors?
Always swatch new yarns and match gauge before joining. Use stitch markers to mark color-change points. Keep the same yarn-feeding method across joins. Wind new skeins into cakes for smoother feeding. Practicing joins on scrap helps avoid tension spikes in your main piece.
What quick fixes help when tension drifts mid-project?
Stop, check your grip, and take a break. Compare recent rows to a stored swatch. Use stitch markers to realign. If drift persists, frog back to a consistent point, swatch again, and adjust hook size or your wrap method. Small, steady corrections are better than drastic changes.
Which three tools should a U.S. crocheter buy first to improve tension?
Start with a Clover Amour-style hook, a yarn bowl, and an optional decorative tension ring or small hair elastic. These tools are affordable and make a big difference in consistency and comfort.
How long does it take to master tension?
Mastery takes time, but focused practice and a few hacks can transform your tension in weeks. Be patient—consistent practice and small adjustments will build reliable muscle memory without expensive tools or years of struggle.