
Crochet Coasters Easy: 10 Stunning Tips for 2023!
Why Choose Easy Crochet Coasters?
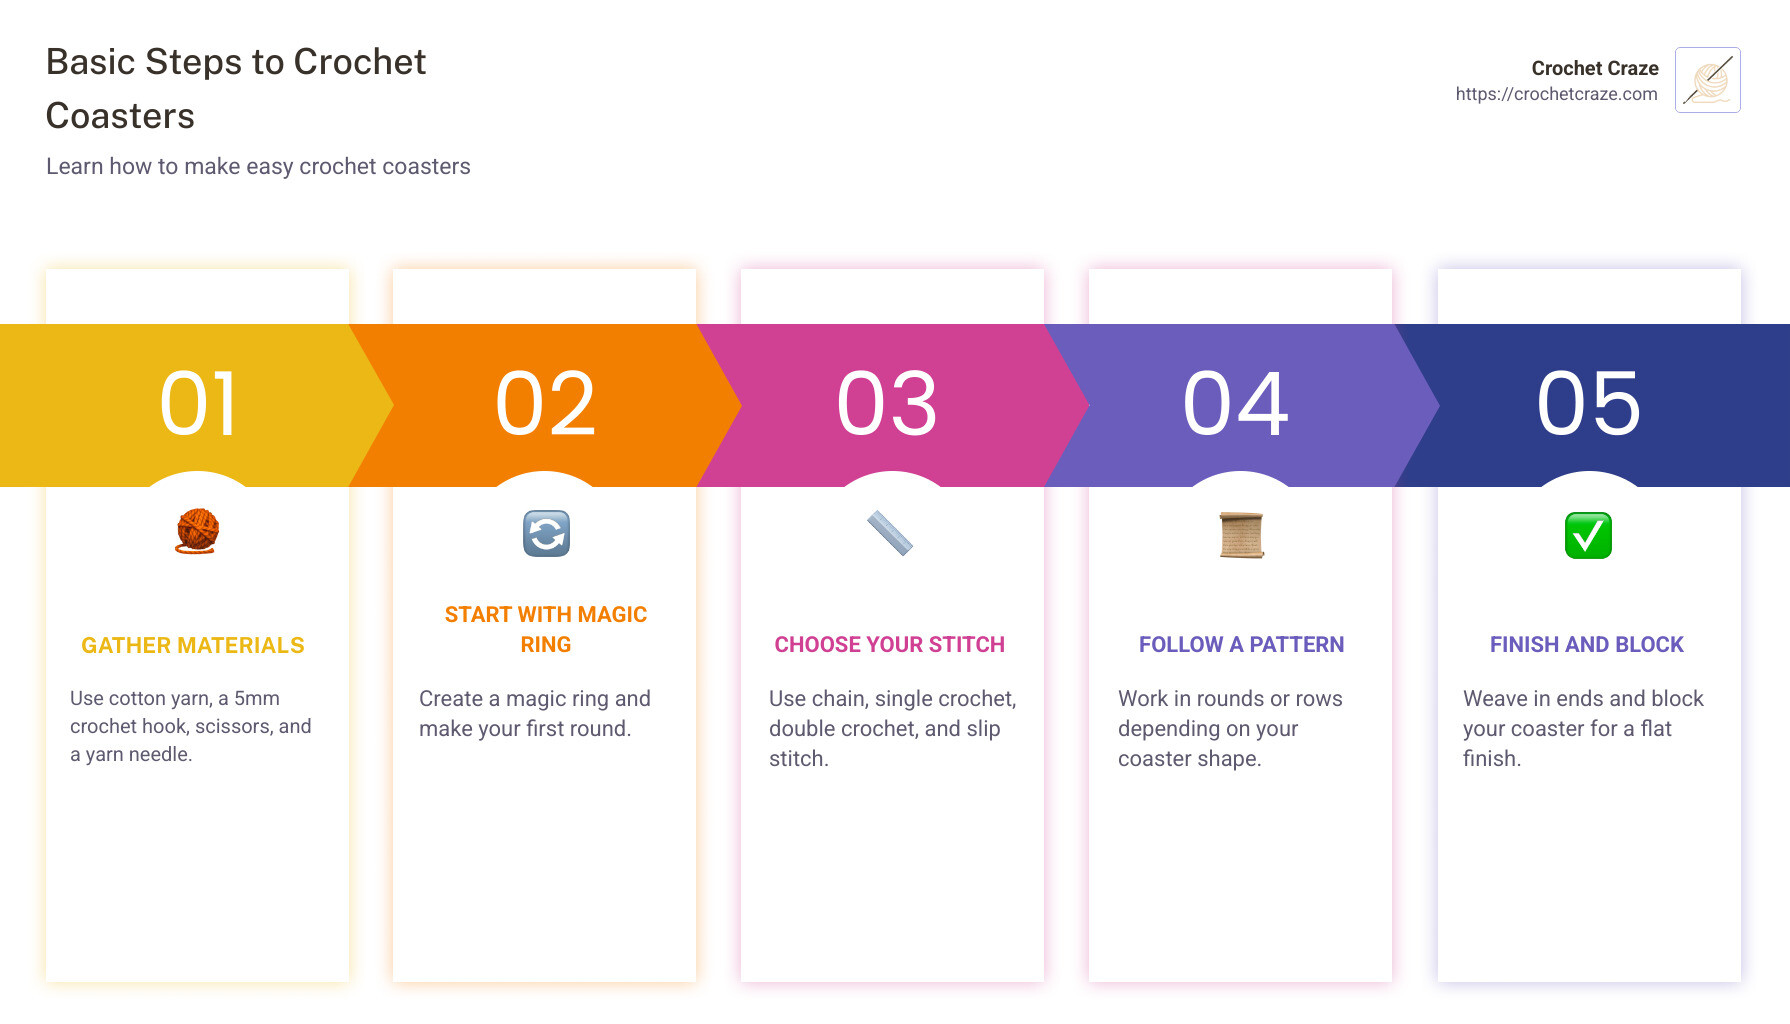
crochet coasters easy is a great beginner crochet project. Here’s a quick answer to help you get started:
- Use cotton yarn (it’s durable and absorbs moisture well).
- Basic stitches you need are the chain stitch, single crochet, double crochet, and slip stitch.
- A 5mm crochet hook is ideal for medium-weight yarn.
- A simple round coaster takes about 20–30 minutes to complete.
Crochet coasters not only add functional style to your home decor but also offer a straightforward, stress-free way to start your crochet journey. Whether you’re aiming to create thoughtful gifts or simply protect your furniture in a charming way, these small projects allow instant creativity, even for crochet newcomers. As a quick project that requires minimal materials and time, crochet coasters help beginners like you build confidence and master foundational crochet skills.
I’m Sonji Huerta, and as a fellow beginner, I’ve recently finded the joy and simplicity of crafting crochet coasters easy. My dedicated practice and OCD-like attention to detail have helped me grasp essential crochet techniques quickly, and I’m excited to share this crafting journey with you.
Crochet coasters easy word roundup:
– easy chunky crochet shawl
– easy crochet projects with thin yarn
When it comes to beginner crochet projects, coasters offer the perfect balance of simplicity and satisfaction. But why should you choose to make crochet coasters easy as one of your first projects?
“Crochet coasters are the perfect quick project to practice new techniques while creating functional, stylish drink mats.”
This quote perfectly encapsulates why coasters are ideal for beginners. Let’s explore the benefits:
Quick Completion: One of the most satisfying aspects of making crochet coasters easy is how quickly you can finish them. Unlike larger projects like blankets or sweaters that might take weeks or months, you can complete a coaster in under an hour. In fact, with practice, you might even be able to make one in just 10 minutes, as some experienced crocheters have timed!
Minimal Materials: Coasters require very little yarn. With just one 1.75 oz (50g) ball of yarn, you can make approximately 6 coasters. Each coaster requires just over 13 yards of yarn, making them perfect for using up leftover yarn from other projects.
Skill Building: Working on coasters allows you to practice fundamental crochet techniques like creating a magic ring, working in rounds, and maintaining consistent tension – all crucial skills for future projects.
Functional Art: Unlike some beginner projects that might not have practical use, coasters serve an important purpose in protecting your furniture from water rings and heat damage.
Gift-Worthy: Handmade coasters make thoughtful, personalized gifts that friends and family will actually use. You can customize colors to match someone’s home decor for an extra special touch.
Eco-Friendly: By creating your own coasters, you’re making a sustainable choice that reduces waste and avoids mass-produced alternatives.
As one crafter noted, “I’ve been crocheting these Super Simple Drink Coasters for several years for use in my home.” This long-term utility demonstrates how these simple projects can become cherished household items.
Materials Needed for Easy Crochet Coasters
Before diving into your crochet coasters easy project, having the right tools and materials on hand will make your experience smoother and more enjoyable. Don’t worry; the shopping list is short, sweet, and beginner-friendly!
Yarn Selection
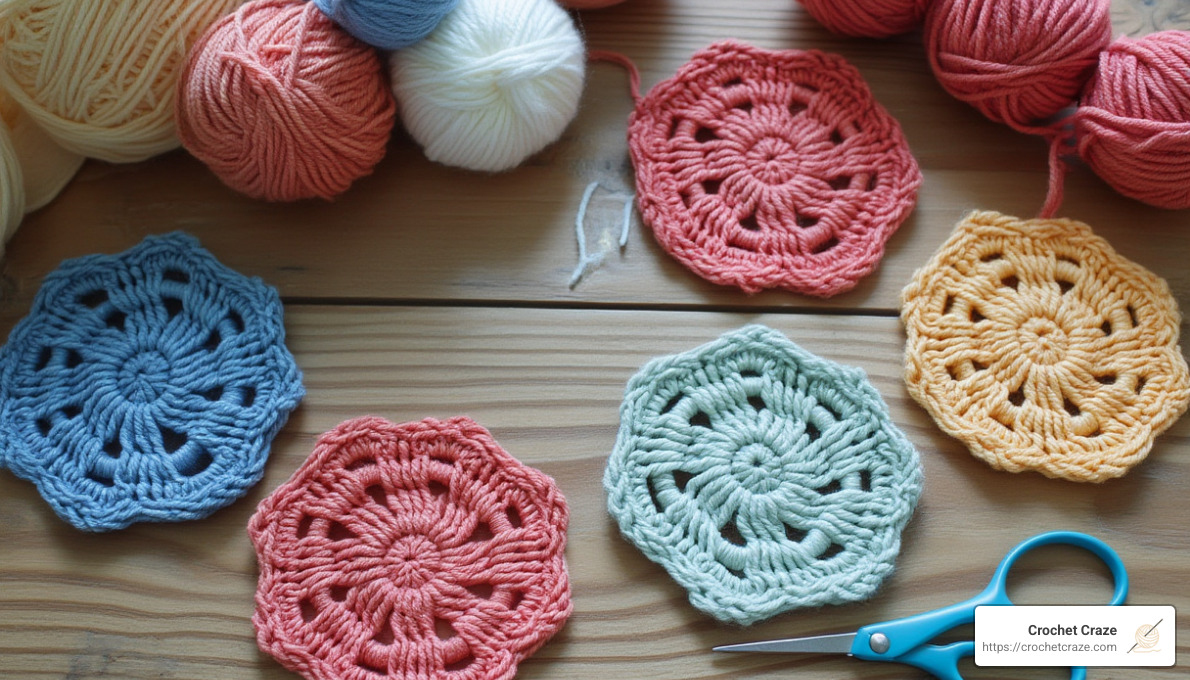
First up: yarn. Choosing the right yarn can make all the difference when creating your crochet coasters. For best results, I highly recommend using 100% cotton yarn. Cotton ticks all the boxes for making beautiful, practical coasters—it’s absorbent (goodbye, annoying condensation rings!), durable enough for frequent use, and heat-resistant, so it won’t melt or warp with hot mugs of tea or coffee.
A few favorite cotton yarn options loved by crocheters include Lion Brand 24/7 Cotton, Lily Sugar’n Cream, Bernat Handicrafter Cotton, and Paintbox Cotton DK. These are all beginner-friendly yarns that are easy to find, affordable, and come in lots of cheerful colors.
You might be tempted by acrylic yarn because it’s widely available—but let’s chat quickly about why cotton is better. Acrylic yarn doesn’t absorb very well, and it can even melt when in contact with very hot cups (trust me, you don’t want a melted coaster situation!). Stick with cotton, and you’ll thank yourself later.
Crochet Hooks
Next, you’ll want a good crochet hook. For most crochet coasters easy patterns that use medium-weight cotton yarn (also called worsted weight or category 4 yarn), crochet hooks sized between 4mm and 5mm (US sizes G/6 to H/8) work perfectly. If you’re new to crochet, a 5mm hook is an excellent starting point because it’s easy on your hands and creates evenly-sized stitches.
If you tend to crochet tightly, switching to a slightly bigger hook can help your coaster stay flat and neat. If your stitches are loose, sizing down a hook helps tighten things up. Feel free to experiment—it’s part of the fun!
Additional Tools
Along with yarn and a hook, you’ll also need a few small items to help make your project enjoyable and polished:
- Scissors: Keep a pair nearby to snip yarn ends neatly (and avoid yarn tangles!).
- Yarn needle: Essential for weaving in those pesky yarn tails, giving your coaster a professional finish.
- Stitch markers: These helpful little tools mark the beginning of your rounds and help you keep your place (no more stitch-counting headaches!).
- Measuring tape: Optional but handy to make sure your coaster matches the intended size—especially helpful if you want matching sets.
Yarn Quantities
Here’s some more good news—crochet coasters don’t require a lot of yarn. Typically, one 1.75 oz (50g) ball of cotton yarn (about 80 yards) can comfortably make around six coasters. Each coaster uses just over 13 yards of yarn, which means they’re perfect little projects for using leftover yarn from previous crochet trips.
Even a single skein of Lion Brand 24/7 Cotton can yield about 7-8 coasters, making it easy and affordable to try out different colors or create gift sets for family and friends.
Gathering your supplies ahead of time makes creating your crochet coasters easy projects fun and stress-free. Once you’re stocked up, you’ll be ready to crochet confidently and create beautiful, functional decor pieces your home (and coffee table!) will love.
Basic Crochet Stitches for Coasters
Starting your crochet coasters easy trip doesn’t need to involve complicated stitches. In fact, mastering just a few basic stitches gives you everything you need to whip up charming, practical coasters.
First up is the chain stitch (ch)—the building block for most crochet projects. Think of chains as the crochet version of a foundation. You start by making a slip knot on your hook, then yarn over (wrap yarn around your hook) and pull it through the loop. Repeat this motion to create a chain of your desired length. Voila—your coaster’s foundation is ready!
Next, let’s talk about the single crochet (sc) stitch. Single crochet creates a dense, sturdy fabric that’s perfect for making coasters that withstand daily use. Simply insert your hook into the stitch below, wrap yarn around your hook (yarn over), and pull the yarn through. You’ll now have two loops on your hook. Yarn over again, and pull through both loops. You’ve just made a single crochet!
Another handy stitch is the double crochet (dc). It’s taller than single crochet, working up faster and creating a flexible, slightly “airy” look—fabulous for adding texture to your coasters. To double crochet, yarn over, insert your hook into the stitch, yarn over again and pull the yarn through (three loops on hook). Yarn over once more, pull through the first two loops, yarn over again, and pull through the remaining two loops.
Looking for something in-between single and double crochet? The half double crochet (hdc) stitch is your best friend. It gives you a balance of density and flexibility. Similar to double crochet, you yarn over first, insert your hook into the stitch, and yarn over again pulling through (three loops on your hook). Then yarn over and pull through all three loops at once. Easy-peasy!
The slip stitch (sl st) is another stitch you’ll use frequently, especially for joining rounds or moving seamlessly from one stitch to the next. To slip stitch, insert your hook into the stitch, yarn over, and pull the yarn through both the stitch and the loop already on your hook. It’s great for neat finishing and joining rounds invisibly.
One super useful technique you’ll see often in coaster patterns is the magic ring (or magic circle). It’s a nifty trick to create a tight, closed center, avoiding the hole that sometimes appears when using chains. Simply wrap yarn around your fingers to make a loose loop, insert your hook into the loop, yarn over, and pull through. Chain one to secure. After you work your first round of stitches directly into the ring, gently tug the loose yarn end to close it tight. It may take a few tries at first, but soon you’ll wonder how you ever crocheted without it!
As one seasoned crocheter wisely said, “Simple stitches like slip stitch, chain, single crochet, and double crochet work perfectly for coasters. Single crochet creates a smooth, solid coaster, while double crochet gives you a looser, more flexible feel.”
Once you feel comfortable with these techniques, you’ll be ready to create beautiful crochet coasters easy projects in no time. Plus, mastering these stitches opens the door to even more creative projects (check out our guide to Creative Crochet Projects for inspiration).
Happy stitching!
Step-by-Step Guide: Easy Crochet Coasters
Now that you’ve familiarized yourself with the essential stitches, it’s time to create your first crochet coasters easy projects! We’ll walk through two charming patterns: a classic round coaster and a versatile square coaster. Both patterns are beginner-friendly, quick to finish, and delightful additions to your home decor.
Crochet Coasters Easy: Round Pattern
Round coasters are an excellent choice when starting out because they help you practice crocheting in continuous rounds. Plus, there’s something very satisfying about watching a circle neatly come together!
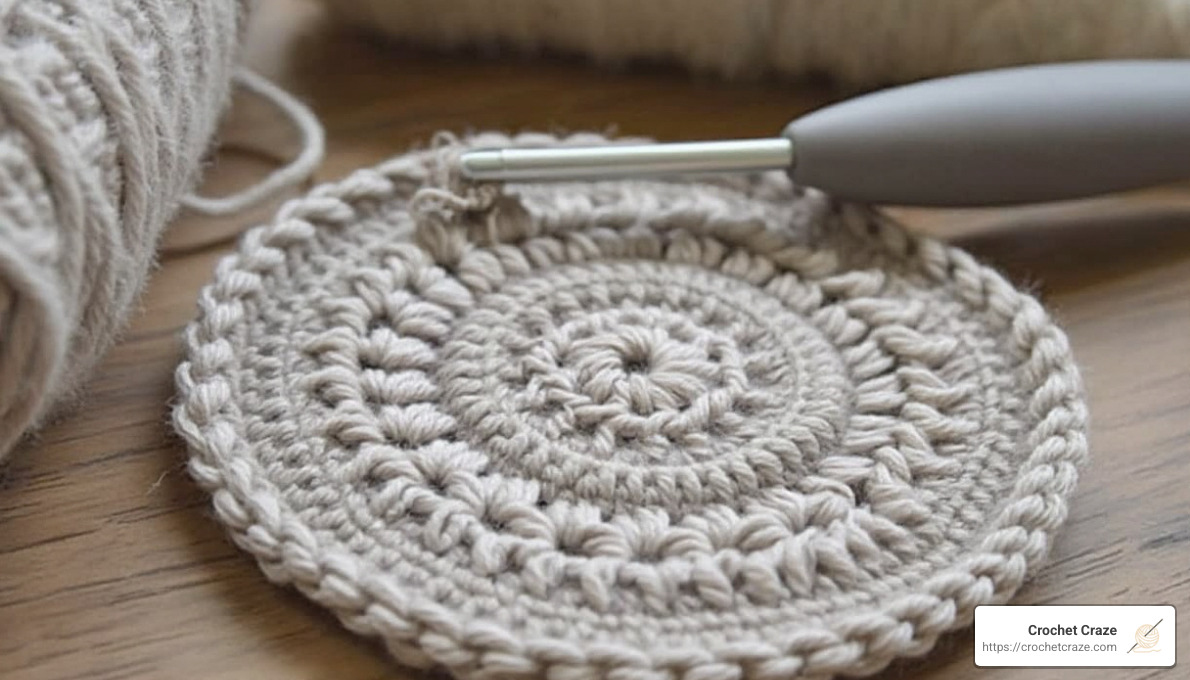
First, gather these materials: medium-weight (#4) cotton yarn, a 5mm (H/8) crochet hook, scissors, and a yarn needle.
To start, create a magic ring to ensure there’s no hole in the center of your coaster. Chain 3 (this counts as your first double crochet), then crochet 11 additional double crochets into the ring. Join your round with a slip stitch into the top of your starting chain. You now have a total of 12 double crochets.
Next, Round 2 is all about increasing stitches. Chain 3 again, then double crochet one more time in the same stitch. Work two double crochets into each remaining stitch around. Join with a slip stitch at the end, resulting in 24 double crochets total.
For Round 3, chain 3, then crochet one double crochet in the next stitch, then two double crochets in the stitch after that. Keep repeating this pattern around, then join with a slip stitch. You’ll end up with 36 double crochets.
In Round 4, chain 3, then crochet one double crochet in each of the next two stitches, then two double crochets in the following stitch. Repeat this around, then join once more with a slip stitch. You’ve made it to 48 double crochets—great job!
To finish your coaster, cut your yarn, leaving around 6 inches as a tail. Pull the yarn through the last loop and secure it, then weave in the ends neatly using your yarn needle.
Helpful tips for beginners: Use stitch markers to help you keep track of your rounds, count stitches often to stay accurate, and keep your tension relaxed but consistent to keep your coaster flat. Try not to pull too tightly on your magic ring until the first round is completed, so it’s easier to crochet into.
The final coaster measures approximately 4–4.5 inches across, just the right size for your favorite mug or glass.
Crochet Coasters Easy: Square Pattern
Square coasters offer a fantastic way to practice crocheting in rows and maintaining those neat, straight edges you’ve always admired.

You’ll need the same basic materials again: medium-weight (#4) cotton yarn, a 5mm (H/8) crochet hook, scissors, and a yarn needle.
Start by creating a foundation chain of 14 stitches. For Row 1, single crochet into the second chain from your hook and continue single crocheting across. This gives you 13 single crochets to start.
To begin Row 2 (and every row afterward), simply chain 1 (this doesn’t count as a stitch), turn your work, and single crochet into each stitch across. You’ll have 13 single crochets in each row. Continue repeating Row 2 until you’ve completed a total of 13 rows.
To give your coaster a clean, finished look, add a border around the entire square. Without cutting your yarn, chain 1 and single crochet evenly around all four sides. Work 3 single crochets into each corner stitch to create neat, sharp edges. Once you’ve gone all the way around, join the border round with a slip stitch.
Finally, fasten off your yarn, leaving a 6-inch tail to weave in securely.
Pro tips for consistency: Remember to chain 1 and turn at the end of each row. Counting stitches in every row helps you maintain the shape and size. Be sure to work your first stitch of each row directly into the first stitch of the previous row. When adding your border, keep your tension even to ensure your coaster lays flat.
Your finished square coaster will measure roughly 4 inches by 4 inches, offering ample protection for your surfaces while adding handcrafted charm.
Whichever pattern you choose, both of these crochet coasters easy projects are wonderful opportunities to build your skills and create something practical and beautiful. You might just find yourself hooked (pun intended!) and making plenty of these delightful coasters to gift or decorate your own home.
As one crafter enthusiastically shared, “These crochet coasters are SO PRETTY, with a scalloped edge that makes them look like flowers! Practice simple crochet stitches and make these beginner-friendly coasters that are great for skill building!” Who knew something so simple could be so rewarding? Happy crocheting!
Tips to Ensure Your Crochet Coasters Lay Flat
One of the most common problems beginners run into when crafting crochet coasters easy is keeping the coaster flat. It can be frustrating when your lovingly made coaster curls up like a taco shell or waves like the ocean! But don’t worry—this happens to everyone, and there are easy ways to keep your coasters perfectly flat and presentable.
Understanding Gauge and Tension
First off, let’s talk about gauge and tension. Gauge simply means how many stitches and rows fit into a certain measurement (usually 4 inches). Keeping this consistent throughout your project is crucial to a flat coaster.
If your tension is too tight, your coaster will begin to curl upward. On the flip side, if it’s too loose, you’ll end up with a floppy coaster. Aim for a balanced, even tension—each stitch should glide smoothly without too much tugging or too much slack.
A good habit to develop is periodically setting your coaster down on a flat surface as you work. If curling starts to happen, you can catch it early and adjust your tension accordingly.
Hook Size Matters
The hook size you choose also has a huge impact on how your coaster turns out. If your coaster starts cupping or curling inward, try switching to a slightly larger hook. Conversely, if it looks ruffled or wavy, a smaller hook might help tighten things up nicely.
One experienced crocheter wisely said, “You could try going up a hook size to see if that helps, but you may just need to block the coaster once it’s finished.” Experimenting with hook sizes is part of the fun of crochet—it’s all about learning what works best for you!
Counting Stitches Carefully
Another common cause of coasters curling up or not lying flat is incorrect stitch counts. Particularly for round coasters, it’s easy to accidentally add or skip stitches. To avoid this, count your stitches carefully at the end of each round or row. Using stitch markers to keep track of your rounds can also help you ensure accuracy and consistency.
Always follow your pattern increases exactly—too few stitches in a round of a round coaster will make it curl inward, while too many can create ruffles. For square coasters, make sure you have the same number of stitches in every row for straight, even edges.
Blocking: The Secret Weapon
Blocking can quickly become your new best friend. It’s a finishing technique that magically smooths out unevenness, flattens edges, and gives your coaster a professional finish. Cotton yarn, especially common for crochet coasters easy, responds beautifully to blocking.
Here’s how you do wet blocking:
- Soak your finished coaster in lukewarm water until it’s fully saturated.
- Gently squeeze out excess water (don’t wring!).
- Lay the coaster flat on a towel-covered surface and gently stretch it to your desired shape and size.
- Pin it in place with rust-proof pins, and let it air-dry completely.
If you have stubborn coasters that refuse to cooperate, steam blocking is another great method. Just hold your steam iron (carefully!) about an inch above the coaster without touching the fabric, letting the steam relax the fibers.
For a detailed guide on blocking, check out this helpful article: “Blocking Crochet Projects: Everything You Need to Know”.
Special Considerations for Different Shapes
With round crochet coasters easy, your increases must be evenly spaced according to your pattern. Most round coaster patterns increase by 6–12 stitches per round. Follow these instructions carefully—too few increases lead to curling, and too many create ripples.
For square coasters, consistent tension at the edges of each row is essential. Make sure your turning chains and corner stitches (usually three single crochets in each corner) remain consistent. Turning your work in the same direction each time also helps keep those edges nice and straight.
As one seasoned crafter noted: “You may just need to block the coaster once it’s finished. You can do this by pinning it out into shape to help it lay flat.” Blocking might seem like an extra step, but trust me—it’s worth it.
With these tips in your toolkit, you’ll have beautiful, flat crochet coasters every single time. Happy crocheting!
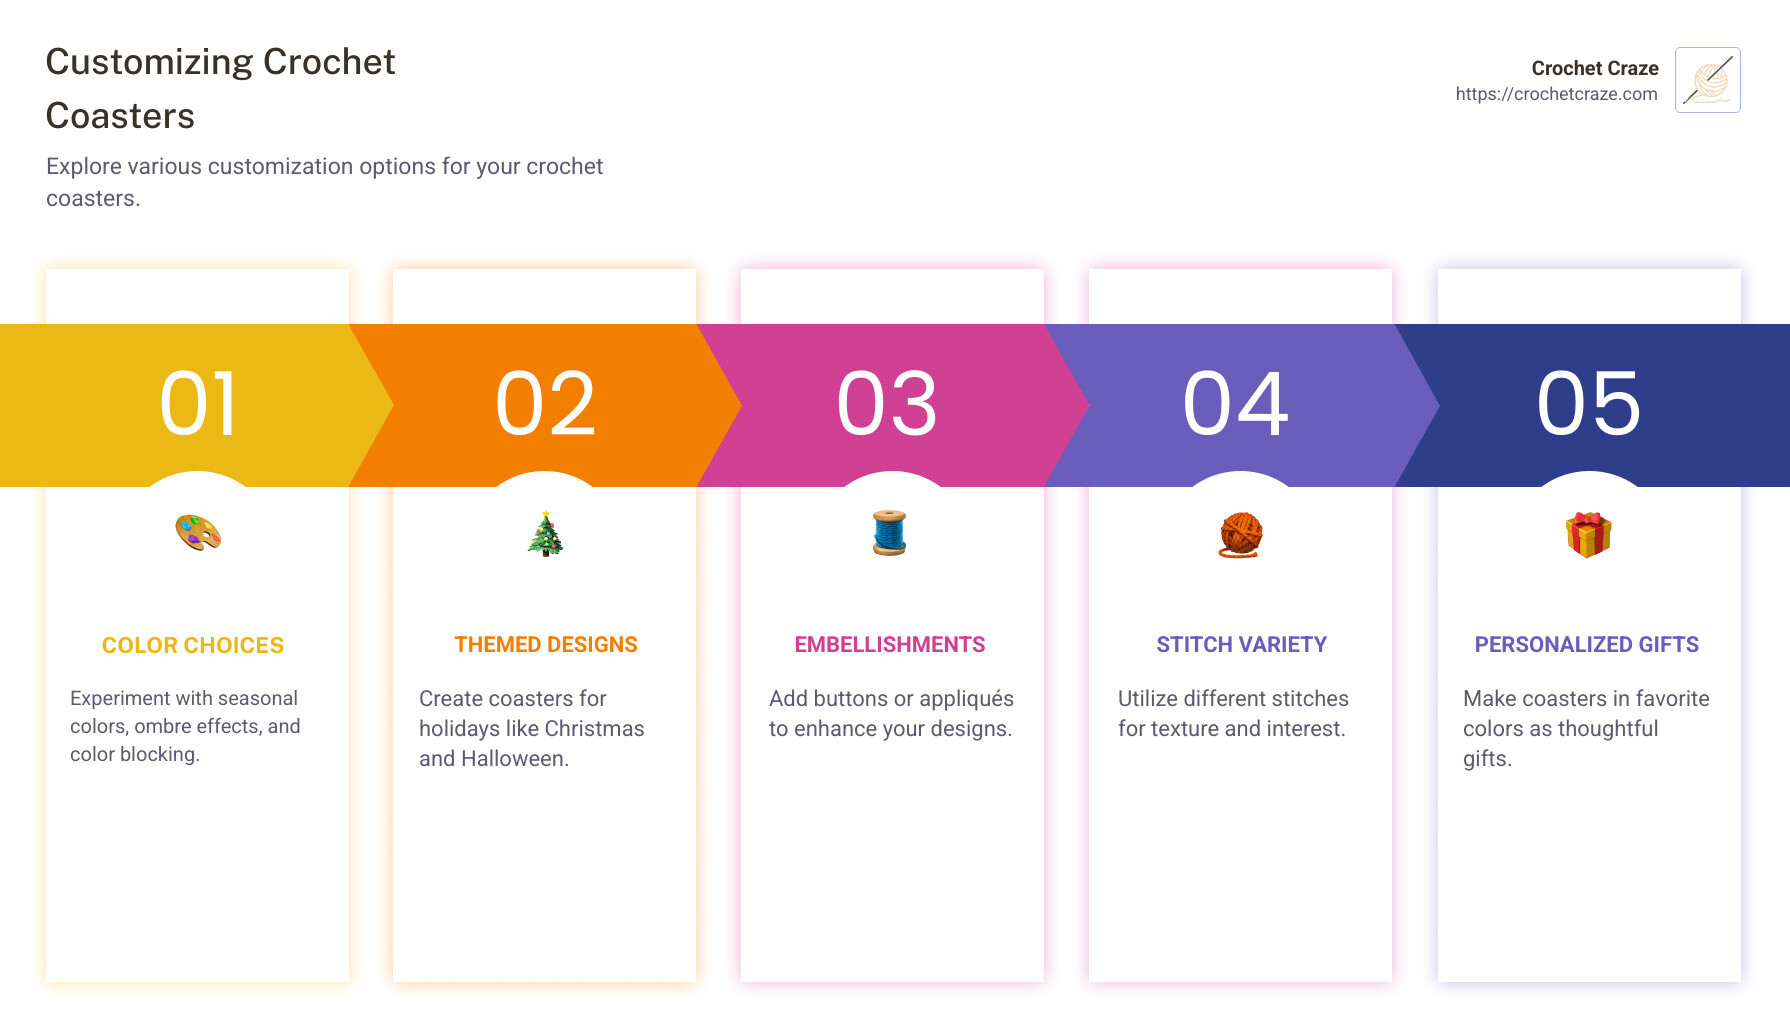
Customizing Your Crochet Coasters for Different Occasions
One of the absolute joys of creating crochet coasters easy projects is the freedom to personalize them. With just a little creativity, you can make each coaster uniquely suited to different occasions, seasons, or even specific people. Let’s explore some fun and simple ways to customize your coasters!
Color Choices and Combinations
The easiest way to make your coasters special is through your yarn choice. You can play around with seasonal colors—think cheerful reds and greens for the holidays, fresh pastels for springtime, or warm autumn hues like burnt orange or deep gold. If you’re gifting these coasters, consider using your friend’s or family’s favorite colors or matching their home’s decor. As one seasoned crocheter wisely noted, “Make coasters in the recipient’s favorite colors when creating them as gifts.” They’ll love the thoughtful touch!
You can also experiment with fun color effects, like an ombre gradient (shifting from dark to light colors) or bold color-block sections. Even a simple color change can completely transform the look of your coaster.
Themed Designs for Holidays and Special Occasions
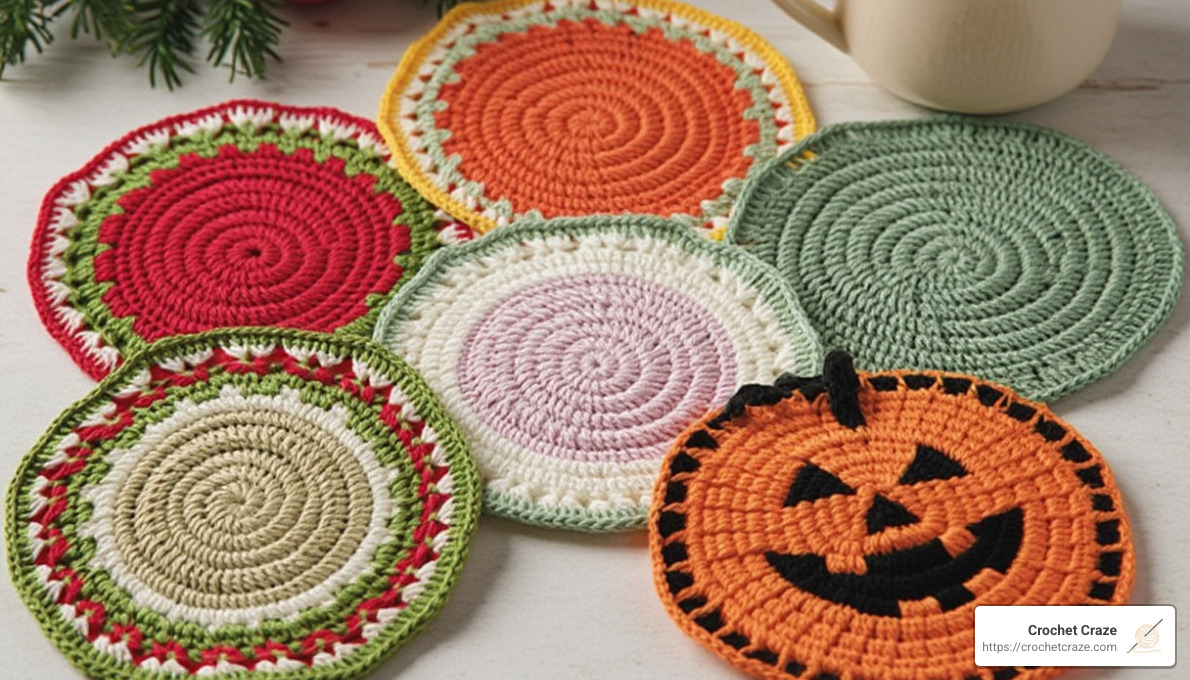
Why stick with basic shapes when you can celebrate special occasions with themed crochet coasters? Christmas is a fantastic chance to get festive with snowflake motifs or candy-cane stripes. For Halloween, spooky spider webs or adorable pumpkin-shaped coasters are always popular. And you can’t go wrong with delightful floral designs—like the trendy daisy flower coaster—perfect for spring and summer gatherings.
Weddings, birthdays, and baby showers also offer opportunities for themed coasters. Matching the couple’s wedding colors adds a sweet personal touch, while baby showers become even more memorable with pastel shades and cute shapes.
Adding Embellishments
Want to take your crochet coasters easy creations up a notch? Small embellishments can make a big difference. Add decorative buttons in the center or corners for charm. Tiny beads woven into the stitches can catch the light, creating lovely sparkle. Even adding little tassels to the corners of square coasters can transform something basic into something beautifully boho.
If you’re feeling crafty, why not add some simple embroidery on the finished coaster? A little heart, monogram, or even a fun phrase can really personalize your creation. Or create small crocheted appliqués—like hearts, stars, or flowers—and sew them onto your coaster for extra flair.
Using Different Stitches for Texture
Changing up your stitches is another fantastic way to personalize your coasters. Even beginners can have fun experimenting here! Try incorporating easy textured stitches like bobbles, puff stitches, or popcorn stitches around the coaster edges for added visual interest. Simple lacey patterns made from chain spaces can create delicate designs suitable for tea parties or bridal showers.
Just keep in mind: very textured stitches in the coaster’s center could make your drink unstable. Stick to smoother stitches in the middle and save texture for edges or borders.
Combining Techniques for Unique Creations
Let your creativity shine by combining different customization techniques. Imagine a simple square coaster with a charming flower appliqué sewn at its center. Or how about a coaster in solid colors with contrasting borders or a cute button accent? You might even use scrap yarn to create totally unique and colorful coaster sets—no two alike!
Here’s a quick glance at customization ideas to spark your imagination:
Customization doesn’t need to be complicated—just have fun with it! Even a small tweak like changing yarn colors or adding a special embellishment can turn your everyday coaster into something truly special. Let your personality and imagination guide your work—after all, that’s what makes handmade items so charming.
Whether you’re making coasters for yourself, family, or as thoughtful handmade gifts, personalization makes each one unique and meaningful. Need more project inspiration? Explore our other beginner-friendly ideas at Creative Crochet Projects and keep your crochet trip going strong!
Common Mistakes to Avoid When Crocheting Coasters
Even though crochet coasters easy projects are beginner-friendly, it’s perfectly normal to encounter a few hiccups along the way (trust me, we’ve all been there!). But don’t fret—knowing what mistakes to look out for can save you from frustration and help you create flawless crochet coasters right from the start.
Incorrect Stitch Counts
One of the most common challenges beginners face is getting mixed up with stitch counts. You might suddenly notice your coaster warping, curling, or looking a bit lopsided. Usually, this means you’ve accidentally added or missed stitches along the way.
To avoid this, simply slow down and count your stitches carefully at the end of each round or row. Using stitch markers to mark the beginning of rounds or important stitch positions will also make your crochet journey smoother. For instance, one crocheter shared their daisy coaster project, noting, “I had trouble with the stitch count in the 4th round.” An easy fix suggested was adjusting the pattern slightly (“2 sc, sc, sc”) to keep the count accurate.
Tension Issues
If your coaster sometimes feels tight and rigid, or other parts seem loose and floppy, it’s probably due to inconsistent tension (a common issue, even among experienced crocheters!). To fix this, try practicing consistent tension throughout your project. If you feel frustrated or tired, take a short break—you’ll be surprised how much of a difference fresh eyes and relaxed hands make.
If you’re unsure about your tension, making a small gauge swatch can help you identify if you crochet tighter or looser than the recommended gauge. It’s a quick step that can make a big difference in your finished coaster.
Skipping Stitches
Have you ever ended up with strange holes or gaps in your coaster where there shouldn’t be any? This usually happens when you accidentally skip stitches—especially at the ends of rows or rounds. To prevent this, always crochet in good lighting, carefully counting your stitches as you go, and take extra care at the turning points or round joins.
Not Weaving in Ends Properly
Few things are as annoying as seeing your lovely coaster solve after just a few uses! This often happens when yarn ends weren’t woven in securely. To prevent solveing, always leave tails of about 6 inches, and weave them in multiple directions through several stitches. As one crochet pro recommends, “Sew in the ends several times to really secure them.”
Using Unsuitable Yarn
Choosing the wrong yarn can also lead to disappointing results—even for something as simple as crochet coasters easy. Using acrylic yarn or blends might seem okay at first, but you’ll quickly find that they don’t absorb moisture effectively and might even melt under hot cups! Stick to 100% cotton yarn—it’s durable, absorbent, heat-resistant, and easy to care for. As we’ve repeatedly highlighted, cotton yarn truly is the best yarn for crochet coasters.
Starting with Too Complex Patterns
Truth be told, we’ve all felt overly ambitious when first starting out—picking a complicated pattern just because it looked amazing. Unfortunately, starting with intricate designs before mastering the basics can lead to frustration and discouragement.
Instead, begin with patterns labeled “beginner-friendly” or “easy.” These patterns focus on foundational stitches, letting you build confidence and skills gradually before moving on to more complex designs.
Ignoring Gauge Information
Gauge might seem tedious when you’re excited to jump into crocheting, but ignoring it can cause your coaster to turn out too small or too big. Always pay attention to the recommended hook size and gauge details—most patterns will indicate stitch counts, like “a 4-inch square equals 9 stitches wide and 10 rows tall.”
Taking the extra couple minutes to check gauge ensures your coaster is exactly the size you expect it to be.
Mistakes are simply an essential part of learning—and every crocheter experiences them! By being aware of these common pitfalls, you’ll have fewer setbacks and more joyful successes. Just keep practicing, enjoy the process, and your crochet coasters will soon look beautifully polished and professional.
If you’d like more in-depth help fixing crochet mishaps, check out this helpful guide: “Common Crochet Mistakes and How to Fix Them”.
Making Your Crochet Coasters More Durable and Absorbent
You’ve lovingly crafted your crochet coasters easy projects, and now you want to ensure they’re not just pretty but also practical. After all, nothing is worse than seeing a gorgeous coaster fail to protect your table from moisture or heat!
Here’s how you can make your crochet coasters both durable and highly absorbent, ensuring they stay beautiful and useful for years to come.
Choosing the Right Yarn
The key to durable, absorbent crochet coasters starts with choosing the right yarn. Hands-down, your best yarn choice is 100% cotton yarn. This material is the superstar of coaster yarns because it’s incredibly absorbent, durable, heat-resistant, and easy to wash. It checks all the boxes!
Cotton-acrylic blends (with at least 70% cotton content) can be a decent alternative, offering good absorbency and durability. However, avoid 100% acrylic yarn—it’s not absorbent and can even melt under hot cups (trust me, melted coaster yarn is definitely not a look you want!).
Wool yarn may seem tempting for its soft texture, but it’s not as durable or heat-resistant. Save wool for other beautiful crochet projects like scarves or hats.
Some fantastic cotton yarn choices for your crochet coasters easy projects include Lion Brand 24/7 Cotton, Lily Sugar’n Cream, Paintbox Cotton DK, and Bernat Handicrafter Cotton. Each of these yarns is reliable, absorbent, and beginner-friendly.
Yarn Weight Considerations
Alongside choosing cotton, selecting the right yarn weight (thickness) will impact your coaster’s performance. Most crocheters agree that medium weight (worsted weight – #4) yarn is ideal. It’s the sweet spot—not too thin, not too bulky—for creating absorbent and stable coasters.
If you’re looking for a thinner, more refined coaster texture, you might go down to a DK weight (#3). Just remember, thinner yarns make slightly thinner coasters, so you may sacrifice a bit of absorbency.
On the other hand, bulky yarn (#5) makes super-thick coasters that soak up moisture like champions, though they might feel overly thick under your mugs. Choose your yarn thickness based on how you prefer your coaster to look and feel.
Stitch Selection for Durability
Believe it or not, the crochet stitch you choose also affects your coaster’s durability and absorbency!
Single crochet stitches create dense, tight fabric that’s ultra-durable and excellent at soaking up moisture. They’re perfect if you want a solid, consistent coaster surface.
Half double crochet stitches are a great middle ground, offering a nice balance between durability and flexibility. Meanwhile, double crochet stitches work up fast but can create a looser fabric, slightly less absorbent.
Adding some textured stitches like puff stitches or bobbles can boost absorbency by increasing surface area. However, keep textured stitches around the edges or in moderation—too much texture can make your coaster unstable for drinks.
Increasing Absorbency Through Design
Beyond yarn and stitches, certain design tweaks can lift your coaster’s absorbency. Consider double-layered coasters, which are essentially two coasters crocheted together into one thick, sturdy drink mat.
Designs with a textured pattern, like ridges or gently raised stitches, also absorb condensation more effectively. Larger, slightly oversized coasters or designs with raised edges help catch drips and spills before they reach your beloved furniture.
Feeling adventurous? Try the popular “Magic Coaster” technique—it uses a continuous round method creating a double-layered coaster from a single starting chain. Clever and practical!
Proper Finishing Techniques
Your coaster’s durability also depends on those crucial finishing touches. Always weave in your yarn ends securely by sewing them back and forth multiple times with a yarn needle. This small but important step ensures your coaster won’t solve with repeated use and washing.
Another pro tip: consider blocking your coaster. Blocking involves gently dampening your coaster, shaping it flat on a towel, and allowing it to dry naturally. This easy step helps set your coaster’s shape, making it lay flat and helping your stitches look neat. You can learn all about blocking here.
For extra durability, some crocheters even add a felt backing to their coaster. This extra layer (use wool felt if you’ll be placing hot beverages on them) gives your coaster additional sturdiness and can help protect delicate surfaces.
Care Instructions for Longevity
Finally, taking proper care of your crochet coasters ensures longevity. Wash your cotton crochet coasters easily in warm water along with kitchen towels or similar items. After washing, avoid the dryer—air drying flat helps your coaster retain its shape and prevents curling.
If you ever notice your coaster becoming misshapen or uneven over time, simply reshape it gently and block again. It’ll be just like new!
By choosing the right yarn and stitch combinations, smart design tweaks, thoughtful finishing, and gentle care, your crochet coasters easy will remain beautiful, durable, and highly absorbent for years. That means fewer water rings on your tables and a happy, satisfied crocheter—you!
Happy crocheting~!
Creative Ways to Use Crochet Coasters Beyond Their Traditional Use
When you first start making crochet coasters easy projects, you might think their only purpose is protecting your coffee table from water rings. But these versatile little squares and circles can do so much more! Let’s explore some creative ways to use your handmade coasters that go far beyond just setting drinks on them.
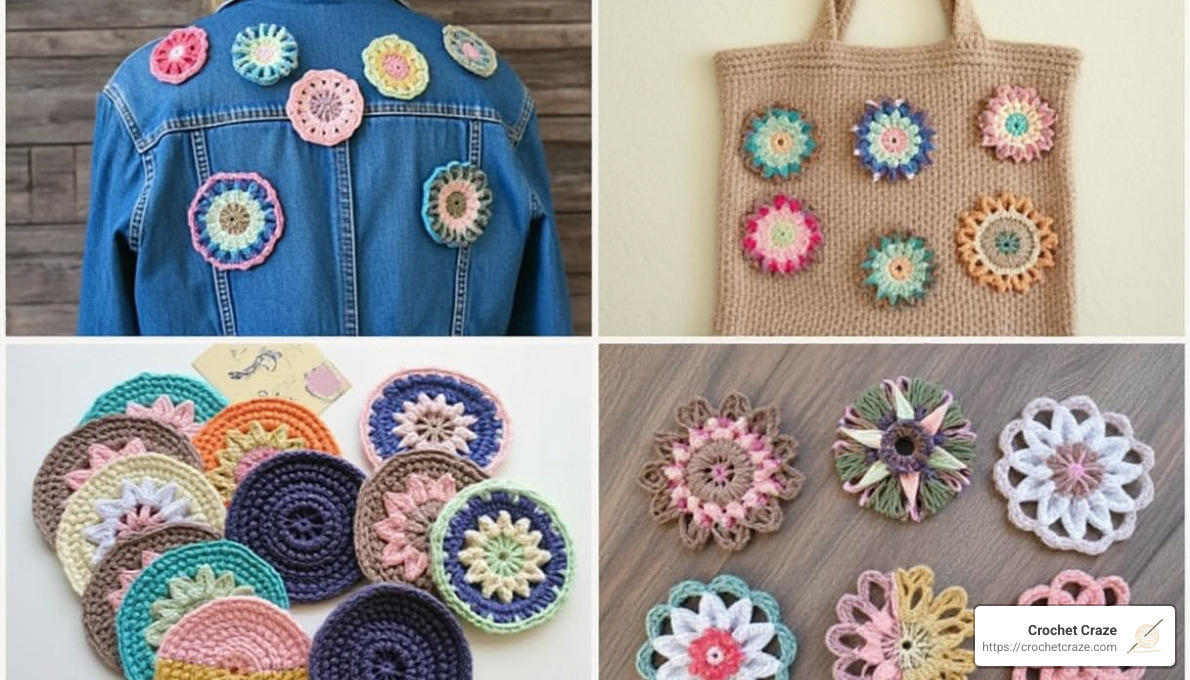
Decorative Appliqués
Those colorful coasters you’ve been making can transform ordinary items into something special. Imagine sewing a bright flower-shaped coaster onto a plain denim jacket for an instant fashion upgrade! I recently added a rainbow coaster to my daughter’s backpack, and she absolutely loves showing it off to her friends.
Your crochet coasters easy projects can also become beautiful embellishments for home items. Try attaching them to plain pillow covers for a pop of color and texture. One of my readers shared how she framed a collection of six coordinating coasters in a shadow box for unique wall art that always gets compliments from visitors.
During the holidays, adding a simple hanging loop to round coasters instantly transforms them into charming ornaments. I make a new set each Christmas with festive colors, and they’ve become treasured keepsakes my family looks forward to unpacking each year.
Home Decor Elements
Your crocheted creations can improve your home in countless ways. Those larger coasters you accidentally made? They’re perfect plant pot coasters! The cotton yarn absorbs excess water, keeping your windowsills and tables dry.
I’ve also started placing coasters under candles to catch drips and add a decorative touch to my mantel. The textured stitches create beautiful shadows when the candlelight flickers across them in the evening.
For a lovely scented drawer freshener, try sewing two coasters together with dried lavender tucked inside. They smell divine and look much prettier than store-bought sachets. With a bit of starch, you can even shape round coasters into small decorative bowls – perfect for holding paper clips on your desk or rings on your nightstand.
One of my favorite repurposing ideas came from a workshop student who rolls narrow rectangular coasters and secures them with decorative buttons to create unique napkin rings. They add such a personal touch to her dinner table!
Joining Coasters for Larger Projects
The beauty of crochet coasters easy projects is how they can combine to create something bigger. I’ve sewn several coasters in a row to make a colorful table runner that protects my wooden table while adding a handmade touch to dinner parties.
Connecting four or six coasters creates perfect placemats that coordinate with your coasters. The modular approach means you can replace just one section if something gets stained – much more sustainable than throwing away an entire placemat!
For hot dishes, join multiple coasters to create trivets large enough to protect your table from casserole dishes and serving platters. I made a set in autumn colors that I bring out every Thanksgiving, and they’ve become part of our family tradition.
One of my favorite reader stories came from Susan, who wrote: “I made a ton of these squares and used them to create a tote bag that I’ve been using for farmers market trips for three years now!” Her creativity shows just how versatile these simple projects can be.
Seasonal and Holiday Displays
Themed coasters add festive touches throughout the year. Last December, I crocheted 24 mini coasters in Christmas colors, numbered them, and strung them up as an advent calendar for my grandchildren. Each day, they’d flip over a coaster to find a small treat hidden behind it.
Heart-shaped coasters connected with ribbon make charming Valentine’s Day garlands. Pumpkin-shaped ones can be scattered across your Thanksgiving table as decorative “confetti.” I’ve even attached small holiday-themed coasters to packages instead of bows – a gift topper that becomes a gift itself!
Educational and Play Uses
If you have little ones at home, crochet coasters easy projects can become learning tools. I made a set with letters for my grandson, and we practice spelling simple words together. The tactile nature of the yarn makes learning more engaging for him.
For a homemade memory game, create matching pairs of coasters and turn them face down. Children flip them over trying to find matches – it’s screen-free entertainment that develops concentration skills. My friend’s daughter loves using small coasters as rugs in her dollhouse, carefully arranging them just like mom does in their real home.
Gifts and Packaging
Coasters make gift-giving more special. Fold and stitch a coaster to create a perfect gift card holder that’s much more thoughtful than a paper envelope. I like to place dried herbs between two sewn coasters to create fragrant sachets as housewarming gifts.
When giving handmade jewelry, a beautiful coaster makes an neat presentation base. One of my favorite gifting combinations is including a handmade coaster with homemade cookies – the recipient gets something sweet to eat and something lasting to keep.
The versatility of crochet coasters easy projects is truly amazing. What starts as a simple beginner project can transform into countless creative items that add warmth and personality to your home or become treasured gifts. As your crochet skills grow, you’ll likely find even more imaginative ways to use these humble squares and circles!
Turning Crochet Coasters into Functional Items
Once you’ve mastered making basic crochet coasters easy projects, you might find yourself with a growing collection of these lovely little creations. The good news? Those coasters can transform into entirely new functional items with just a bit of imagination and some simple techniques!
Making Bags or Pouches
I absolutely love turning coasters into adorable mini bags – it’s like magic watching these flat circles become three-dimensional treasures!
For a simple coin purse, just create two identical round coasters and stitch them together around the edges, leaving a small opening. Add a zipper, button, or snap closure, and maybe attach a cute wrist strap. Voilà – an adorable little pouch perfect for storing small items or giving as a thoughtful gift.
One of my favorite changes is turning flower-shaped coasters into charming pouches. As I found in my research, “For those who want a pouch/bag, create one more coaster and follow the linked video tutorial to connect them.” This technique works beautifully with daisy-shaped coasters, creating the sweetest little accessories.
You can check out the video HERE for a detailed tutorial on turning coasters into a bag or pouch.
Want something larger? Try your hand at a market bag by creating multiple square coasters (anywhere from 12-20 depending on your desired size). Join them in a pattern to form the body, add a solid crocheted base for stability, and finish with crocheted handles. These bags are not only eco-friendly but also showcase your crochet skills beautifully!
Joining Coasters for Larger Items
Combining multiple coasters creates functional household items that maintain that handmade charm while serving practical purposes.
Trivets for hot dishes are perhaps the most natural evolution of coasters. Join 4-6 coasters in a pattern and add a border around the entire piece for stability. Just remember to use 100% cotton yarn, as one crafter wisely asked, “What yarn is recommended for projects like hot dish trivets?” The answer was clear – “use 100% cotton yarn for its heat-resistant properties.”
Table runners make stunning dining table accents when you create multiple identical coasters and join them in a row. Adding a decorative border unifies the piece and creates a polished look. I’ve found that seasonal colors make these especially festive for holiday gatherings!
Placemats follow the same principle – join 6-9 coasters in a rectangular arrangement and add a border for a finished edge. Creating multiple sets gives you a coordinated dining presentation that’s sure to impress guests.
For home decor enthusiasts, cushion covers offer a wonderful way to showcase your crochet coasters easy skills on a larger scale. Make enough coasters to cover the front of a cushion, join them securely, create a solid back piece, and assemble. The textured result adds wonderful dimension to any sofa or chair.
The most ambitious project? Blankets! Use your coaster pattern as a motif, create dozens of identical pieces, and join them using your preferred method. As one crafter commented, “A reader mentioned making these coasters as quick Christmas presents,” showing how these simple projects can multiply into meaningful gifts.
Modifying Coaster Patterns for New Uses
With slight modifications, those same crochet coasters easy patterns can create entirely different items to enjoy or gift.
Bookmarks are perhaps the simplest adaptation – use just the first few rounds of a round coaster pattern, create an elongated rectangle instead of continuing in rounds, and add a tassel to one end. These make perfect little gifts for book-loving friends!
Cup cozies bring cozy comfort to your morning coffee or tea. Simply extend a rectangular coaster pattern, add buttons or other closures to wrap around a cup, and customize the size for specific mugs. They’re practical, adorable, and help keep your drinks at the right temperature.
Phone cases offer protection with personality. Create two identical coasters slightly larger than your phone, join on three sides (leaving the top open), and add a button closure or flap. You’ll have a one-of-a-kind case that’s sure to start conversations!
For the jewelry enthusiasts, try using thin cotton thread instead of yarn to create miniature versions of your favorite coaster patterns. Add findings to create earrings or pendants that showcase your crochet skills in wearable form.
The wonderful versatility of crochet coasters easy patterns is truly what makes them such valuable projects for beginners. As one enthusiastic crafter shared, “After making these three Sunrise Coasters, I couldn’t stop. And you won’t be able to either!” This addictive quality makes coasters the perfect gateway to more complex crochet projects – you’ll build skills while creating items that can transform into an entire world of handmade treasures.
Caring for Your Crochet Coasters
Your handmade crochet coasters easy projects deserve proper care to keep them looking beautiful and functioning well for years. With just a little attention, these small but mighty creations will continue protecting your surfaces while adding charm to your home.
Washing Instructions
The way you clean your coasters mainly depends on what yarn you used to make them:
For cotton yarn coasters (which I highly recommend), washing is pretty straightforward. Toss them in the washing machine with similar items like kitchen towels or dishcloths using warm water and a gentle cycle. A mild detergent works best to preserve colors and fibers. Just be mindful about washing with similar colors to prevent any surprise dye transfers!
If you notice coffee stains or other marks, don’t panic. Give those spots a little pre-treatment before washing, but skip the bleach—it’s too harsh and can damage both the fibers and those lovely colors you chose.
For coasters made with acrylic or blended yarns, use a cool or warm water wash on the gentle cycle. These synthetic fibers are generally more wash-resistant than natural ones, but a gentle approach still extends their life.
As one of our regular crocheters shared, “I just throw mine in with the kitchen towels every week,” which is perfectly practical—no need to make washing your crochet coasters easy projects complicated!
Drying Methods
How you dry your coasters makes a big difference in how they hold their shape:
Air drying is your best friend here. After washing, gently squeeze out excess water (don’t wring them!) and lay your coasters flat on a clean towel away from direct sunlight. If you’re in a hurry, press them between two towels to absorb more moisture, but still let them finish drying flat.
The dryer is not your coaster’s friend! As one experienced crafter warned, “Air-dry the coasters rather than using a dryer to prevent curling.” The heat and tumbling action can distort your beautiful handiwork, causing edges to curl or the entire coaster to warp.
Re-blocking After Washing
Sometimes even with careful washing, your crochet coasters easy projects might lose their perfect shape. Re-blocking—a simple process of reshaping while damp—works wonders:
While your coasters are still slightly damp, pin them to a flat surface (like a folded towel on your ironing board). Use rust-proof pins around the edges to secure them in the proper shape—perfectly round for circular coasters or with sharp corners for square ones. Then simply let them dry completely before removing the pins.
For particularly stubborn coasters that refuse to behave, try holding a steam iron about an inch above the surface (without touching!) to help relax the fibers. As one helpful crafter suggested, “You can do this by pinning it out into shape to help it lay flat.”
Stain Removal
Since coasters are literally designed to catch spills, stains are inevitable! Here’s how to tackle common ones:
Coffee and tea stains (the most common culprits) usually respond well to soaking in warm water with an oxygen-based stain remover. For wine spills, blot immediately and then treat with a mixture of gentle dish soap and hydrogen peroxide.
Oily stains benefit from pre-treatment with dish soap applied directly to the spot before washing. And for white or light-colored cotton coasters with stubborn marks, a diluted vinegar solution can work wonders.
Always test any stain treatment on an inconspicuous corner first to make sure it doesn’t affect the color of your beautiful handmade items.
Storage Tips
Smart storage keeps your crochet coasters easy projects ready for action:
Store your coasters flat to prevent curling or misshaping—stacking them in a drawer or displaying them in a small basket near where you’ll use them works perfectly. If you’ve made seasonal designs (like snowflakes for winter or flowers for spring), tuck them away in a labeled zip-top bag during their off-season.
Keep stored coasters away from direct sunlight which can fade those beautiful colors you selected. Also avoid damp storage areas that might encourage mildew—your coasters catch enough moisture when they’re doing their job!
Extending Coaster Life
A few thoughtful habits can help your handmade coasters last even longer:
Rotate your coasters regularly so they wear evenly, just like you would with towels. Consider creating separate sets for hot and cold beverages since hot drinks can put different stress on fibers. For frequently-used coasters, make extras so you can swap them out when some are being washed.
Every few months, give your favorites a refresh by re-blocking them—this simple step can make them look almost new again!
With these simple care techniques, your crochet coasters easy projects will remain beautiful and functional for years. As one dedicated crafter told us, “I’ve been using the same set of coasters I made three years ago, and they still look almost brand new.” That’s the beauty of handmade items—with proper care, they truly stand the test of time.
Frequently Asked Questions about Easy Crochet Coasters
After finding how fun and rewarding creating crochet coasters easy projects can be, you might still have some questions popping up. Don’t worry—you’re not alone! Let’s tackle some of the most common questions that beginners often ask.
What is the best yarn for crochet coasters?
When it comes to crocheting coasters, choosing the right yarn is crucial. Without a doubt, 100% cotton yarn is your best friend here. Why cotton, you might wonder?
Cotton yarn has excellent absorbency, making it perfect for catching condensation from cold beverages. Unlike acrylic yarn, cotton won’t melt when exposed to a hot mug. Plus, cotton yarn is wonderfully durable, holding its shape even after repeated washing—and it’s easy to take care of, too! Just toss your cotton coasters into a gentle washing cycle, and they’ll come out good as new.
Some popular, reliable cotton yarn options for your crochet coasters easy projects include Lion Brand 24/7 Cotton, Lily Sugar’n Cream, and Bernat Handicrafter Cotton. If you’re unable to find 100% cotton, look for cotton blends containing at least 70% cotton to ensure good absorbency.
How do I prevent my coasters from curling?
Ah, the dreaded curled coaster! If your coaster edges tend to curl up, there are a few simple tricks to fix that.
First, pay attention to your tension—that’s how tightly you’re holding and pulling your yarn. If you notice your coasters curling upward, try loosening your grip a little. If this alone doesn’t help, try going up a hook size. Often, simply using a slightly larger crochet hook can help your coaster lay flat.
Another magic fix is blocking. Once your coaster is complete, dampen it lightly, then pin it flat and let it dry. Blocking works wonders in smoothing out stubborn curls. And remember, always double-check your stitch counts! Missing or adding extra stitches accidentally can lead to unwanted curling.
Can I use other stitches for coasters?
Definitely! While most crochet coasters easy patterns stick to classic stitches like single crochet and double crochet, you can certainly play around with other stitch patterns to add texture and interest.
Want more dimension? Consider textured stitches like popcorn or bobble stitches. If you prefer a delicate look, openwork stitches such as the V-stitch or mesh stitch can create a lacy design. Combining stitches can also yield beautiful results: the moss stitch, lemon peel stitch, or seed stitch all create lovely, interesting textures that still work well for coasters.
Just keep in mind that heavily textured stitches might create an uneven surface—so reserve intricate textures for the coaster edges to maintain stability for your cups.
How many coasters can I make from one ball of yarn?
One of the joys of crochet coasters easy projects is how little yarn they require! Generally speaking, from one standard 1.75 oz (50g) ball of cotton yarn (approximately 80 yards), you can comfortably create around 6 coasters. Each coaster typically uses about 13–15 yards of yarn.
For example, one skein of Lion Brand 24/7 Cotton will usually yield about 7–8 coasters, making these projects perfect for using leftover yarn from larger crochet items.
Can I make my coasters waterproof?
While cotton crochet coasters naturally absorb moisture and protect surfaces, you might wonder about adding water-resistance. Although making coasters completely waterproof isn’t practical (as their main purpose is absorbing condensation), you can improve their durability by spraying them lightly with fabric protector sprays like Scotchgard. Another option is adding a waterproof backing, such as vinyl, to protect surfaces from moisture.
Just remember, the primary charm of crocheted coasters is their absorbency—so it’s usually best to accept their softness and absorption qualities rather than completely waterproofing them.
How do I join coasters to make larger items?
Once you’ve mastered making individual coasters, you might feel inspired to join them into larger projects like table runners, trivets, and bags. Joining coasters is simple, and there are several popular methods:
- Whip stitch: Using a yarn needle, sew the edges together with a simple stitch.
- Slip stitch joining: Use your crochet hook to connect pieces seamlessly.
- Single crochet joining: Adds decorative texture while securely joining your coasters.
- Zipper join: Creates a neat, raised seam between joined coasters.
Whichever method you choose, always block each coaster first to ensure uniform shapes and sizes, making your finished project look polished and professional!
Still have questions or want to dive deeper into crochet techniques? Feel free to check out our helpful beginner guides at Crochet Craze. There’s no wrong way to crochet—only endless opportunities to learn and create something beautiful!
Conclusion
Creating crochet coasters easy projects is truly the perfect gateway into the wonderful world of crochet. As we’ve finded throughout this guide, these small, manageable projects let you practice essential techniques while making something that’s both beautiful and useful. Whether they’re brightening up your coffee table or being gifted to a friend, handmade coasters bring a special touch to everyday moments.
From selecting the perfect cotton yarn (remember, it’s the absolute best choice for absorbency!) to mastering those basic stitches, you’ve now got all the knowledge you need to create gorgeous coasters that actually work. And don’t forget the magic of blocking – that simple technique can transform curly or uneven coasters into perfectly flat drink protectors that you’ll be proud to display.
One of the things I love most about coaster projects is how they invite creativity without overwhelming you. Play with colors that match your home, experiment with different stitches as your confidence grows, or try those holiday-themed designs we discussed. Each small project builds your skills and confidence a little more.
As one enthusiastic crafter in our community exclaimed, “Happy Crocheting~!” This perfectly captures the joy that comes from creating something beautiful with your own two hands. There’s something deeply satisfying about watching a simple ball of yarn transform into a functional item that will protect your furniture for years to come.
At Crochet Craze, we truly believe that everyone can learn to crochet, regardless of previous crafting experience. These coasters are just your beginning – once you’ve mastered these small projects, you’ll be ready to tackle more complex challenges like easy chunky crochet shawls or explore other creative crochet projects.
We’d absolutely love to see your coaster creations! Share your projects with us on social media and join our growing community of crochet enthusiasts. The most important part of any crafting journey isn’t perfection – it’s enjoying the process and celebrating your progress along the way.
So grab your hook and yarn, put on some good music or your favorite podcast, and give yourself the gift of creating something beautiful with your own hands. Your surfaces (and your stress levels) will thank you!