
Connecting Yarn in Knitting: 4 Powerful Seamless Methods 2025
The Essential Guide to Connecting Yarn in Knitting
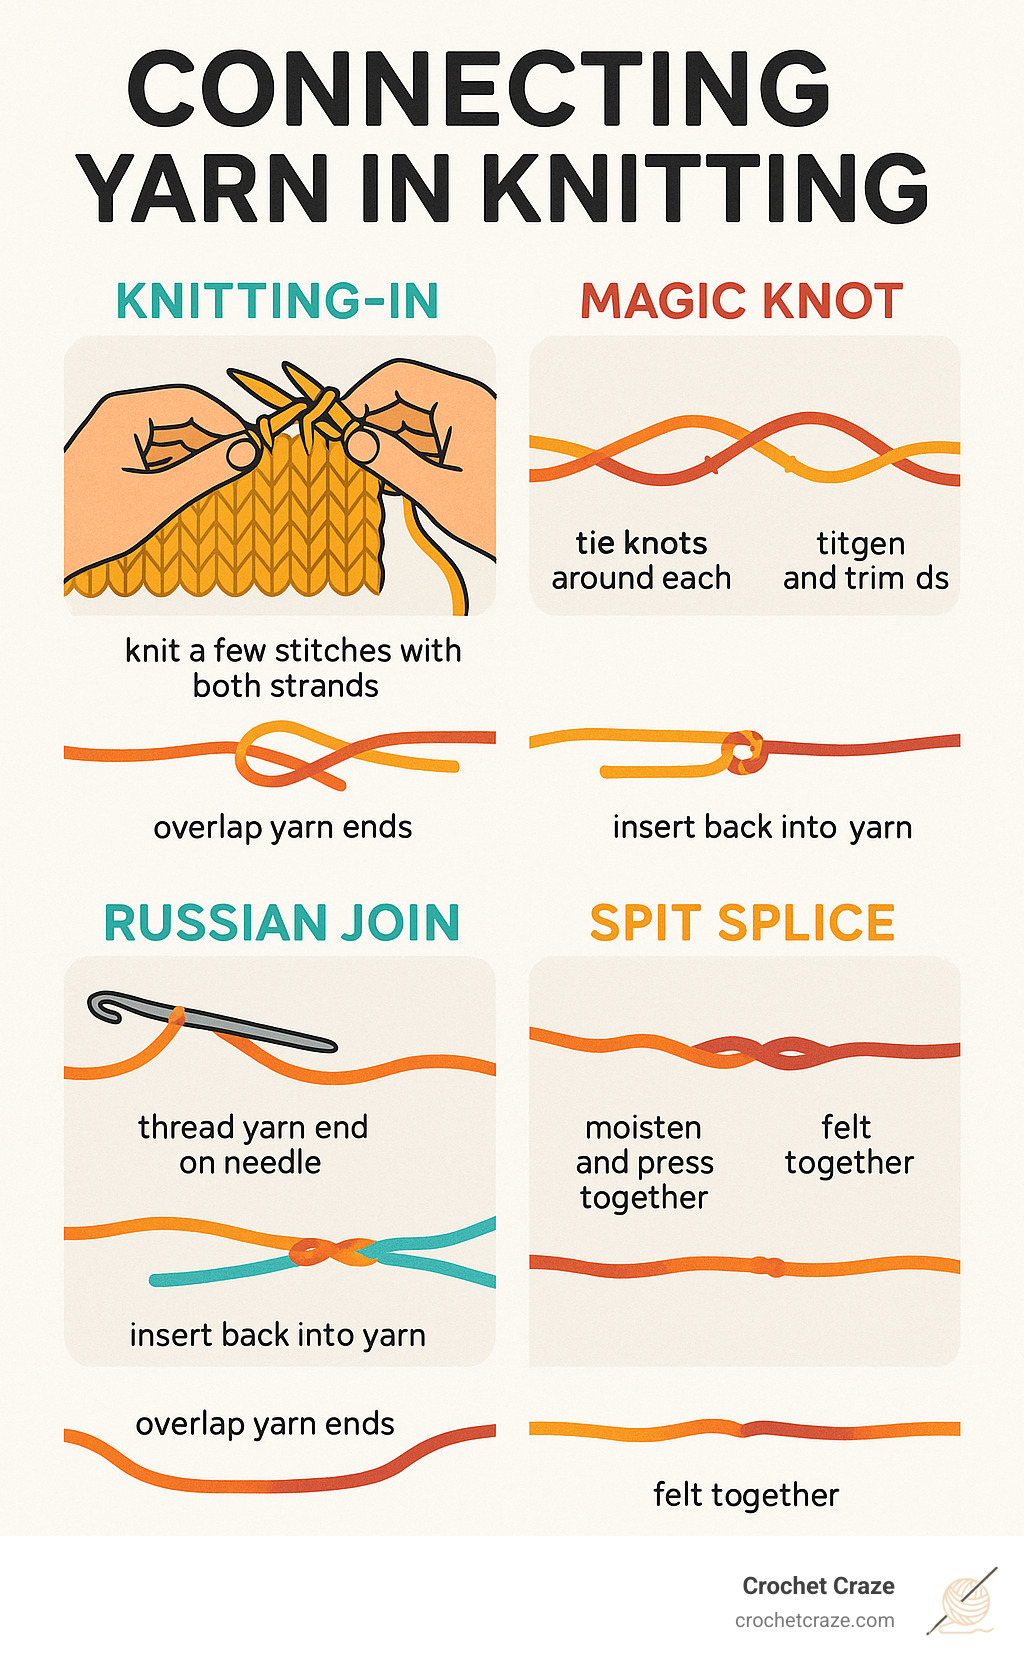
Connecting yarn in knitting is something every knitter will face, whether you’re working on a small project or a large afghan. Here’s a quick guide to the most common methods:
| Join Method | Best For | Difficulty | Visibility |
|---|---|---|---|
| Knitting-In | All fibers | Beginner | Low |
| Magic Knot | Most fibers | Beginner | Medium |
| Russian Join | Plied yarns | Intermediate | Very low |
| Spit Splice | Non-superwash wool | Beginner | None |
Running out of yarn in the middle of a project can feel like hitting a roadblock, but it doesn’t have to derail your knitting journey. Whether you’re simply reaching the end of your skein, changing colors for a striped pattern, or fixing a break in your yarn, knowing how to seamlessly connect yarn is an essential skill that will lift your knitting from beginner to confident crafter.
Most knitters will need to join a new ball of yarn at least once in every large project, and the good news is that there are several foolproof methods that don’t require complicated techniques or special tools. The right method for you depends on your yarn type, project visibility, and personal preference.
I’m Sonji Huerta, and while I’m relatively new to the fiber arts world, I’ve quickly learned that mastering the art of connecting yarn in knitting transforms frustrating interruptions into smooth transitions that maintain the integrity of your work.
Why and When You Need to Connect Yarn
Let’s face it – you’re going to run out of yarn at some point. It’s not a knitting emergency, it’s just part of the craft! Understanding when you’ll need to add more yarn helps you plan ahead and keeps your projects looking polished and professional.
Running Out Mid-Project
The most common reason for connecting yarn in knitting is simply reaching the end of your current skein. This happens to all of us, especially with larger projects like sweaters, blankets, or shawls that require multiple balls of yarn.
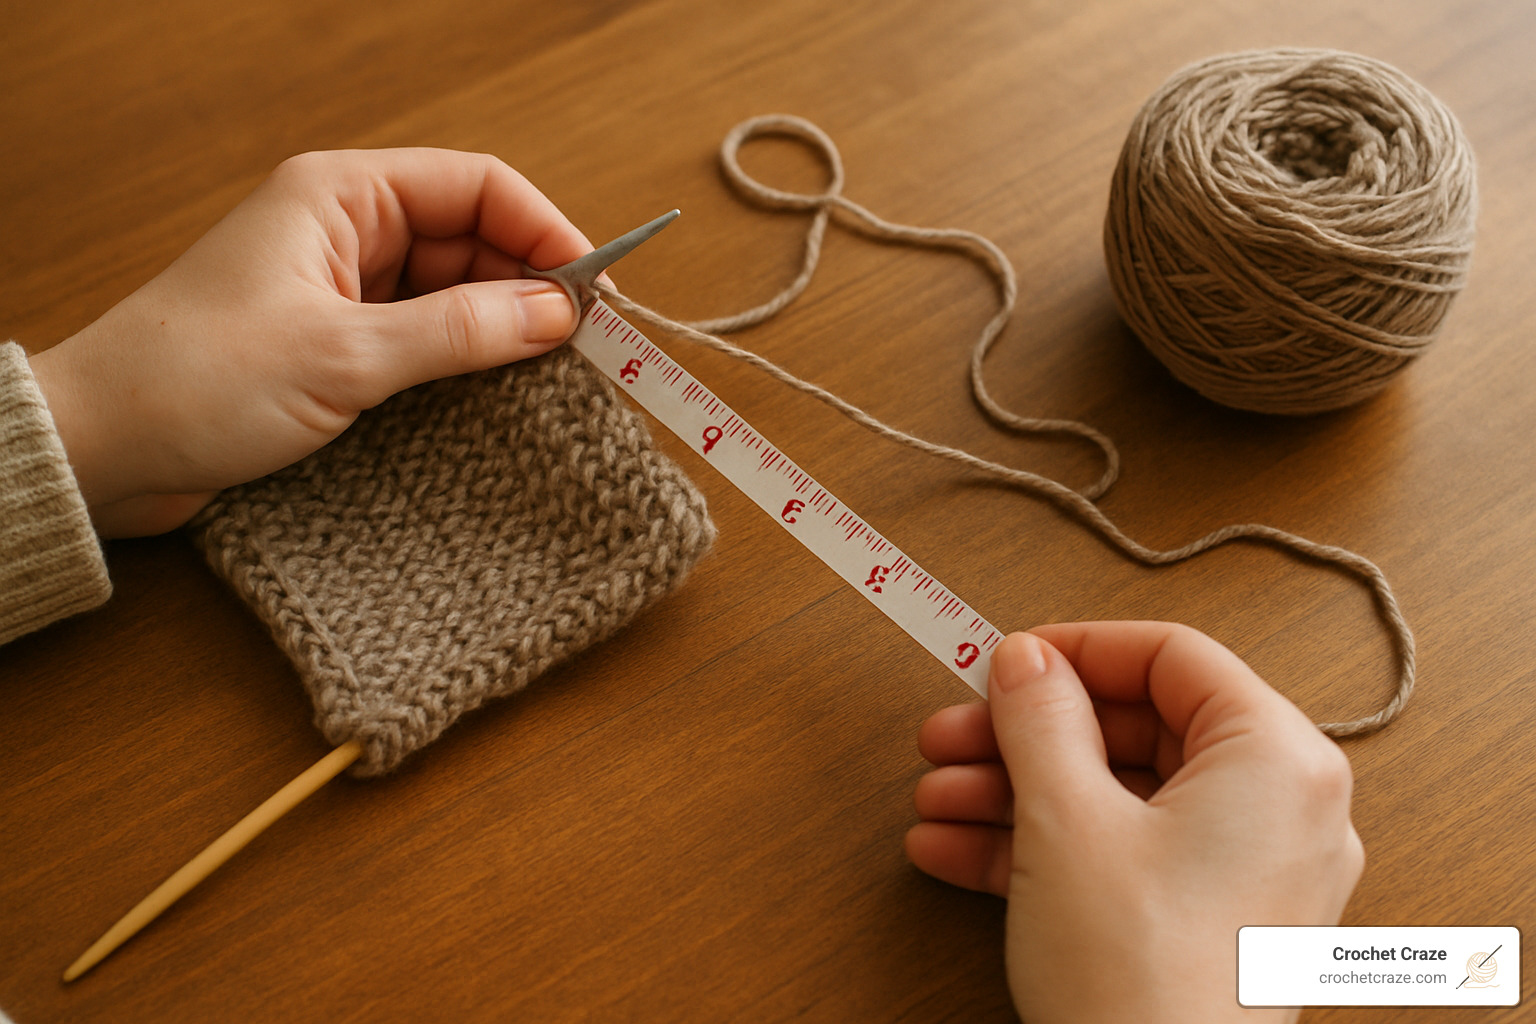
Here’s a little tip that will save you some stress: don’t wait until the very last inch of yarn to make your join. When you have about three times the length of your current row remaining, that’s your signal to prepare a new ball. Trust me, running out of yarn in the middle of a row is much more challenging than planning your join at the beginning of one!
Color Changes and Pattern Requirements
Adding stripes or working on Fair Isle patterns means you’ll be connecting new colors frequently. These color changes are what bring many knitting projects to life, but they can also leave you with a mountain of yarn ends to weave in later.
As the Knitting is fun! Weaving in endless tails of yarn is not blog post so perfectly puts it – the creative part is delightful, but dealing with all those loose ends afterward? Not so much. Planning your color changes and knowing the best joining methods can significantly reduce this finishing work.
Large Projects and Multiple Skeins
For larger projects, you’ll inevitably need multiple skeins. The key is being strategic about where you place those joins. Think about the finished item and where joins might be less noticeable.
One clever approach is to place joins near seams or edges where they’ll be naturally hidden. For example, when knitting a cardigan, joining yarn at the underarm or side seam means those ends won’t be visible in the finished piece. Always plan to leave tails of about 6 inches for secure weaving later.
Tension Control and Join Placement
Where you connect your yarn can affect the overall look and feel of your knitting. Whenever possible, try to join at the beginning of a row rather than in the middle. This keeps your tension more consistent and prevents awkward bumps in visible areas.
For projects knit in the round, consider placing your joins at the side “seams” where they’ll be less noticeable. This is especially important for items like hats or socks where both sides of your work will be visible.
Your yarn type also matters when choosing a joining method. Different fibers behave differently, so the perfect join for wool might not work as well for cotton or acrylic. Check out our Knitting Yarn and Knitting Tips sections for more fiber-specific advice.
A little planning goes a long way when it comes to connecting yarn in knitting. Taking a moment to think about where and how you’ll join can save you hours of frustration later on, especially when working on projects with Circular Knitting Needles where joins are more visible.
Method 1: The Magic Knot
If you’re looking for a quick, strong, and beginner-friendly way of connecting yarn in knitting, the magic knot (sometimes called the fisherman’s knot) might become your new best friend. While some knitters shy away from knots in general, this handy little trick is a favorite for its speed and reliability—especially when you’re tired of weaving in endless yarn tails.
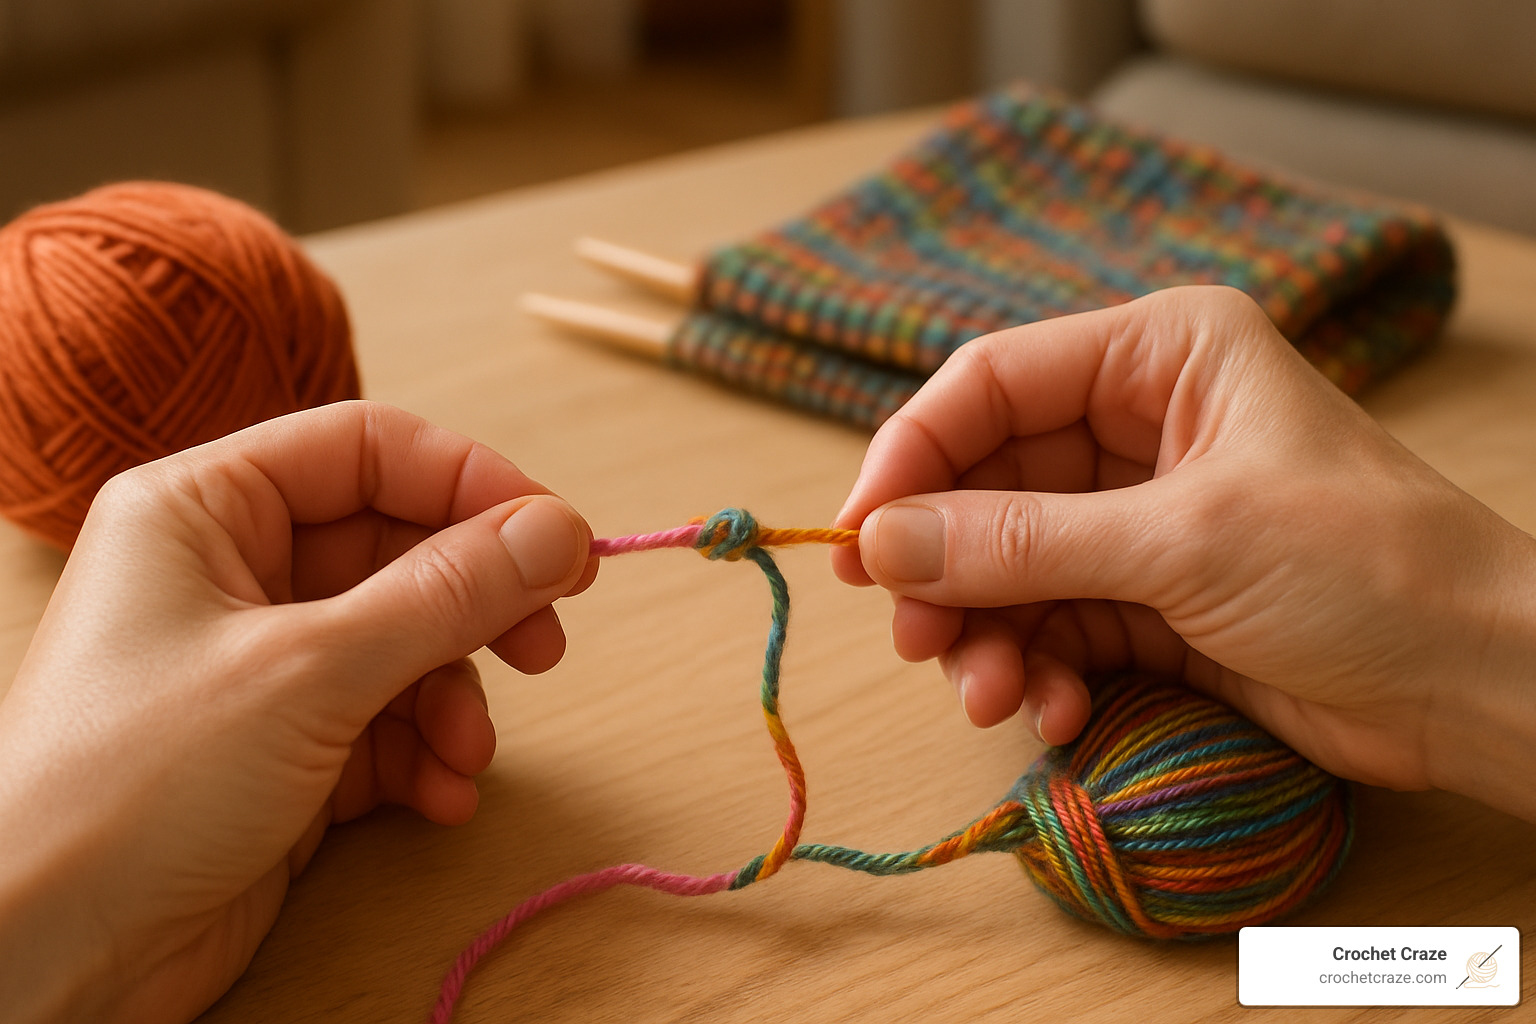
What Is a Magic Knot?
The magic knot is, at its core, two simple overhand knots tied around each other. When you pull them together, they lock securely—almost like magic! The beauty here is that the join is tidy, surprisingly tough, and the yarn tails can be trimmed very short. That means fewer ends to weave in, and more time actually knitting (the fun part). As one blogger put it, “This method is so easy and fast that I would almost call it foolproof.”
Step-by-Step Instructions
Here’s how you can make a magic knot:
- Line up the two yarn ends so they overlap for about 4–6 inches (10–15 cm), with the yarns pointing in opposite directions.
- Using the left yarn tail, tie an overhand knot around the right-side yarn.
- Now, take the right yarn tail and tie an overhand knot around the left-side yarn.
- Hold both standing yarns (the parts leading to your balls of yarn) and pull gently. The two knots should slide together and lock tightly.
- Give the knots a little tug to check the join. If it feels secure, trim the tails close to the knot.
When to Use (and When to Avoid)
The magic knot shines when you’re working with medium or bulky weight yarns, or anything with a bit of texture or fuzz. That texture helps the knot hide inside your stitches, making the join nearly invisible. It’s also a lifesaver for projects where you value speed—think blankets, chunky scarves, or hats.
But, it’s not perfect for every situation. If you’re knitting with slippery yarns (like silk blends), very fine lace yarns, or projects where the knot might land right in the middle of a high-visibility section, you might want to choose another method. In colorwork like stripes or Fair Isle, you may want more control over exactly where your join lands.
As one experienced knitter notes, “Fluffy or textured yarn can hide a tiny magic knot even if it appears on the right side.” But with smooth, shiny yarn, the knot could peek through and spoil your look.
Real-World Example
A fellow knitter shared how she used the magic knot while knitting a VENLIG sweater with nubby wool: “The texture of the yarn completely hid the joins, and I saved hours of weaving in ends. Even after multiple washes, the knots have remained secure and invisible.”
But always remember—knitting is fun! Weaving in endless tails of yarn is not. The magic knot can solve that frustration, as long as your project and yarn suit the method.
With a little practice, you’ll find the magic knot is a clever tool for connecting yarn in knitting projects—just be sure to give it a gentle tug and check your tension before you start stitching away on your next row!
Method 2: Knitting-In (Double Stitch) Join
The knitting-in (or double stitch) join is one of those classic “aha!” moments for anyone learning connecting yarn in knitting. It’s simple, beginner-friendly, and works with almost every yarn you can imagine—wool, cotton, acrylic, you name it. Best of all, you don’t need knots, fancy tools, or any magic tricks.
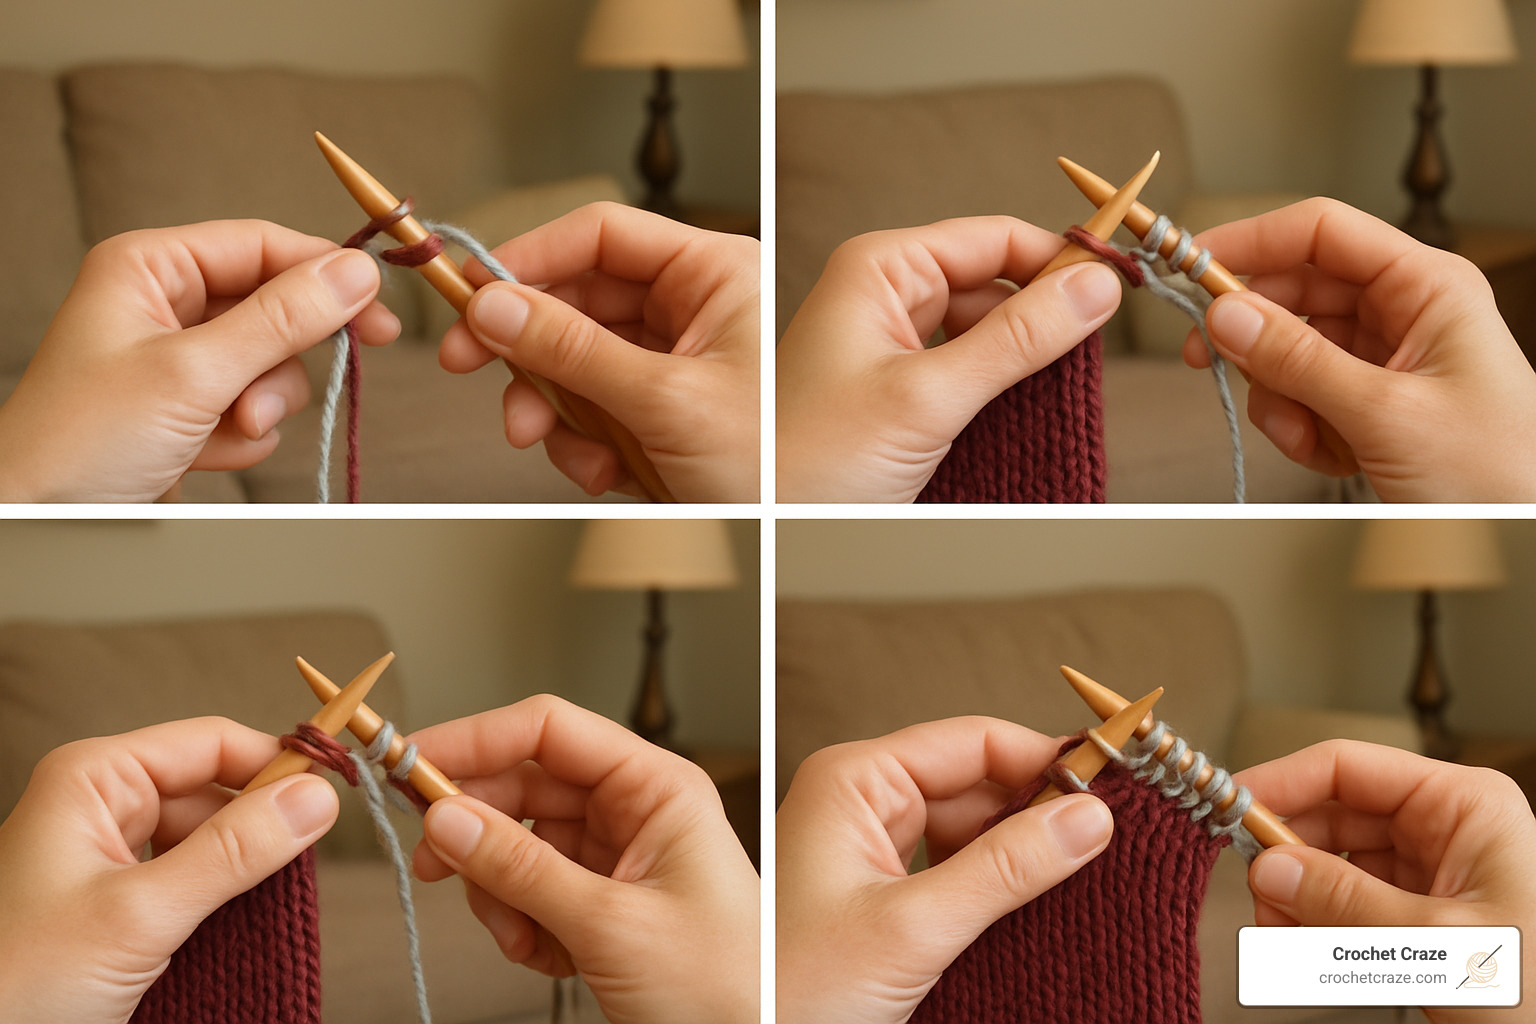
This method works by holding both your old yarn and new yarn together for a few stitches—usually three to five—right where you want to join. You just knit as usual, but with both strands running together through your stitches. On the next row, you’ll treat these doubled stitches as if they’re a single strand. Once you’re finished, the doubled-up area practically disappears—especially after blocking.
As knitting teachers love to say, “This trick is perfect for all kinds of fiber, and it’s the easiest way for new knitters to join yarn without fuss.” If you’re nervous about changing yarns mid-project, this is the place to start!
Here’s how to do the knitting-in join:
- When you’re ready to add your new yarn, simply lay the new tail alongside your working yarn.
- Knit the next 3–5 stitches with both strands held together.
- Drop the old yarn and keep working with your new yarn only.
- On your next row, treat those doubled stitches as one—just knit or purl as normal!
- Once you finish knitting, weave in your tails neatly for a polished look.
- After blocking, you’ll notice the doubled area blends right into the fabric.
The beauty of this method is how adaptable it is. At the start of a row, you can do your double stitch join on the edge—it keeps things tidy and makes weaving in ends even easier. If you’re in the middle of a row, you can hide your join under an arm, near a seam, or wherever you like. A knitter from our community says, “I love placing my joins under the arm of a sweater so they stay hidden. It’s a simple trick, but it makes a big difference!”
Adjusting for different yarns is also easy. With “grippy” yarns like wool or alpaca, three doubled stitches are usually enough. If you’re using slippery cotton or bamboo, go with five to be sure everything stays put. For thin yarns, just double up for one or two stitches to avoid extra bulk.
One tip from the pros: Don’t worry if the doubled stitches look a little chunky at first—after washing and blocking, they’ll settle right in. As one happy knitter shared, “I used the knitting-in join for an entire wool throw and, after blocking, I couldn’t even spot the joins. Best of all, no knots came undone!”
The knitting-in (double stitch) join is a great way to get started with connecting yarn in knitting—it’s flexible, reliable, and keeps your fabric looking smooth. Plus, if you’re just starting out in knitting or crochet, you’ll find plenty of helpful Knitting Tips and guides over at Crochet Craze to make your joining process even easier.
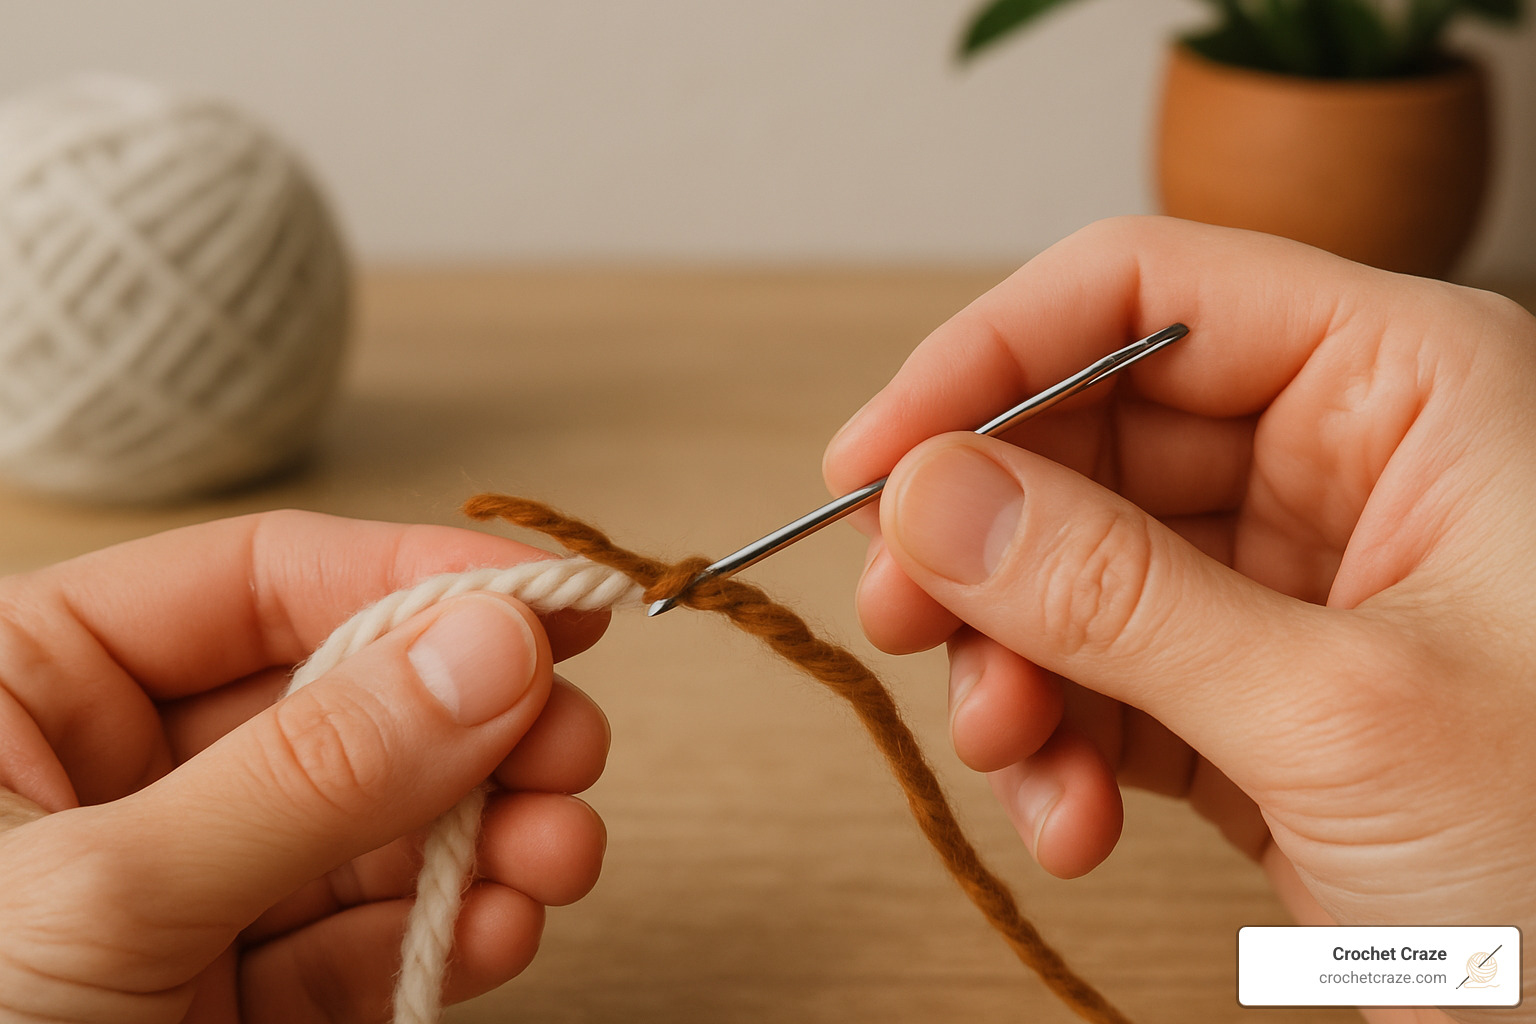
Method 3: The Russian Join
If you’re looking for a way to connect yarn in knitting that’s smooth, sturdy, and practically invisible, let’s talk about the Russian join. This method is a favorite among knitters who work with slippery or luxury yarns—think shiny silk, bamboo, or superwash wools—where a regular knot just won’t cut it. It does take a little more time and patience (and a needle), but the result? A seamless splice that’s almost magic.
What Makes the Russian Join Special?
What sets the Russian join apart is its clever use of the yarn’s own plies. Using a mix or darning needle (sometimes called a “mix needle”), you weave each yarn tail back through its own strands, creating a sturdy join without any knots or bulk. No doubled stitches either! The result is smooth and so strong, it can handle plenty of stretching—perfect for places like cuffs or neckbands where you don’t want joins to pop loose.
As one knitting pro puts it: “The Russian join offers the strongest knotless connection, ideal for heavily stretched areas.” It’s a lifesaver for anyone who’s ever had a knot wiggle free in a favorite sweater!
Step-by-Step Instructions
Ready to give the Russian join a try? Here’s how it works:
- Thread the end of your old yarn onto a mix needle (leave about 4–5 inches).
- Insert the needle back into the same yarn, weaving through the plies for about 2 inches. This creates a little loop at the end.
- Pull the yarn through, leaving that small loop.
- Thread your new yarn onto the needle and pass it through the loop you just made.
- Weave the new yarn tail back into itself for about 2 inches, just like you did with the old yarn.
- Carefully pull both yarns so the loops close up, forming a neat, smooth join.
- Trim any extra tails right where they emerge from the plies.
If you need a visual, check out this photo tutorial from Craftsy—it’s a great way to see the process in action.
When to Use the Russian Join
The Russian join really shines with plied yarns—those made of multiple twisted strands. It’s especially helpful for yarns that are slippery, don’t felt together, or need to be extra secure for high-stress spots. If you’re knitting something delicate (like lace) or using fancy fibers, you’ll love how invisible this join can be. Many knitters also use the Russian join for scarves, shawls, and anywhere they want their joins to be totally hidden.
As one luxury-yarn fan shared, “The Russian join is time-consuming but yields a neater finish than a magic knot, in my opinion.”
Limitations and Considerations
Of course, the Russian join isn’t perfect for every yarn. It works best with plied yarns—if you’re using a single-ply or roving-style yarn, weaving the tail through itself can be tricky. You’ll need a mix needle and good lighting. And while the join is strong, it can add a tiny bit of bulk in very fine laceweight yarns (though it’s usually much less obvious than a knot).
Real-World Success
One knitter recounted using the Russian join for a delicate silk-blend shawl: “I needed joins that wouldn’t show through the lace, and the Russian join was perfect. Even during blocking, with all that stretching, the joins stayed smooth and invisible.”
If you’re ready to take your finishing skills up a notch, the Russian join is absolutely worth learning. With a little practice, you’ll be able to connect yarn in knitting seamlessly, giving your projects that polished, professional look we all admire.
For even more tips and guides, be sure to check out our knitting resources here at Crochet Craze.
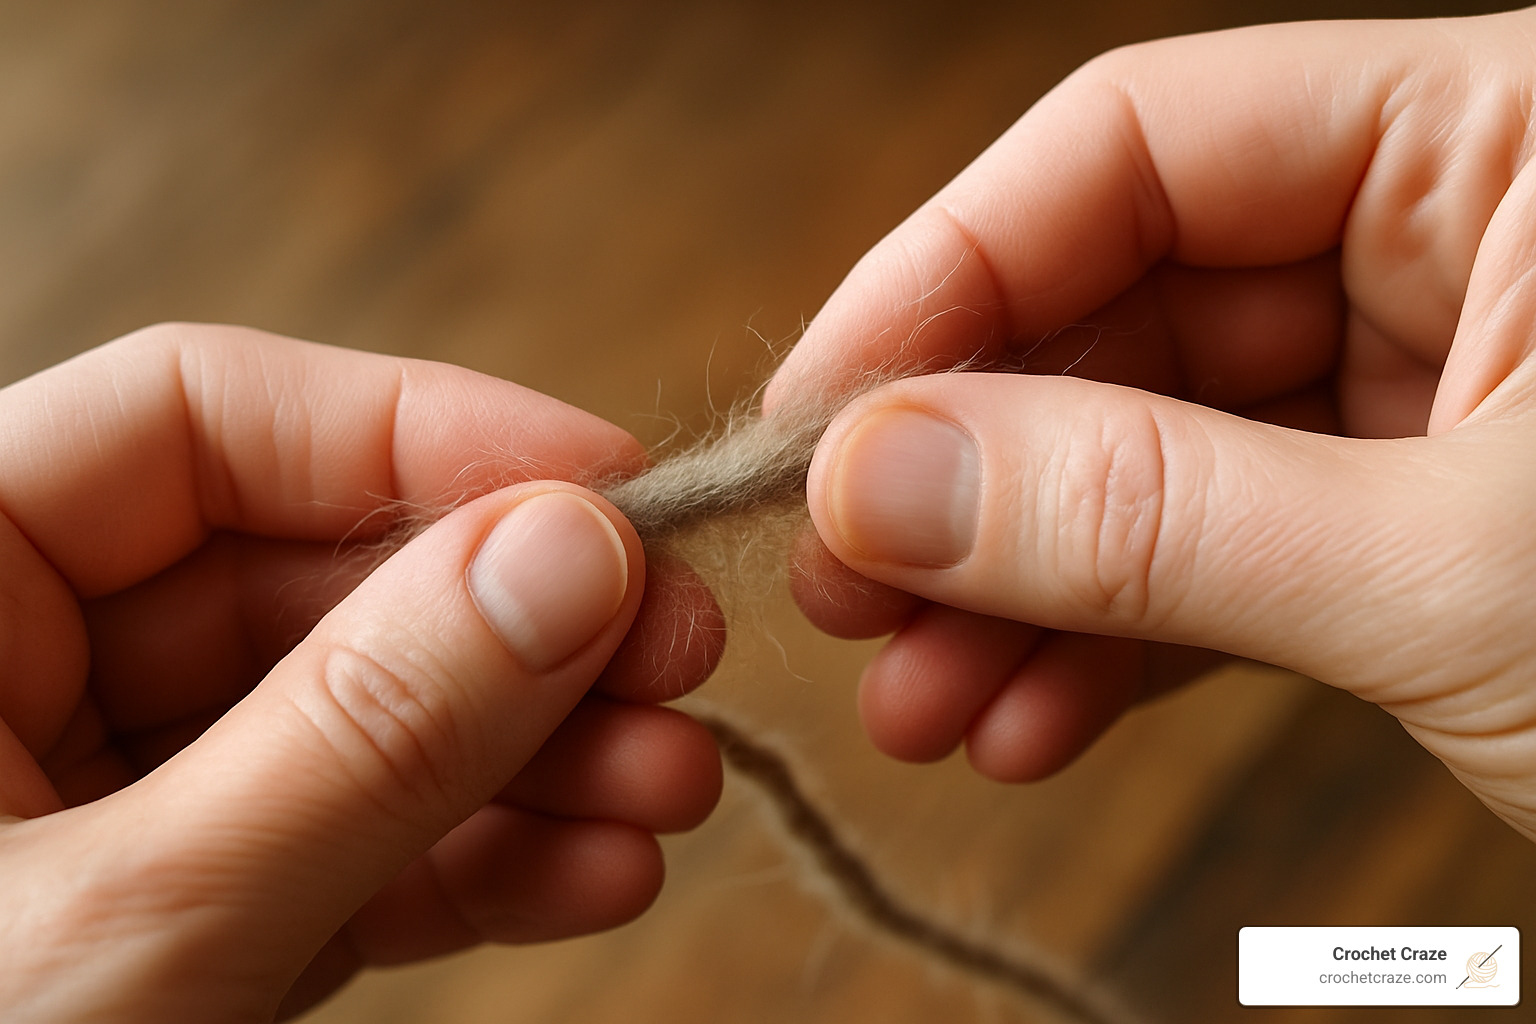
Method 4: Spit Splice (Felted Join)
For knitters working with non-superwash wool or other animal fibers that felt, the spit splice (also called the felted join) offers perhaps the most magical solution for connecting yarn in knitting. This method creates a truly seamless join with absolutely no ends to weave in—a dream come true for many knitters!
The Science Behind the Spit Splice
The spit splice works because wool and some other animal fibers have tiny microscopic scales on their surface. When these scales are exposed to moisture and friction, they open up and lock together permanently. This natural property allows you to essentially “felt” the fibers together, creating a join that becomes part of the yarn itself.
“The spit splice merges fibers so seamlessly that the join is nearly undetectable in wool projects,” explains a wool specialist I spoke with. “It’s like the yarn never ended at all.”
Step-by-Step Instructions
- Untwist and separate the plies of both the old and new yarn ends for about 1-2 inches.
- Thin out each end by gently pulling away some of the fibers (this prevents a bulky join).
- Overlap the thinned ends, intermingling the fibers.
- Moisten the overlapped section (with water or, traditionally, saliva—hence the name).
- Rub the moistened fibers vigorously between your palms until they felt together.
- Test the strength of your join with a gentle tug.
- Continue knitting with your newly joined yarn.
When to Use the Spit Splice
The spit splice is perfect for those cozy wool sweaters and accessories you’re making. It works wonderfully with non-superwash wool yarns and other feltable animal fibers like alpaca, mohair, or cashmere. If you’re working on a project where you want absolutely no visible joins, this method is your best friend.
I’ve found this technique particularly helpful when creating colorwork or striped patterns. One knitter told me, “Creating wide stripes on the Warm Up Sweater using spit splice left almost no tails to weave in.” Can you imagine finishing a striped project with barely any ends to weave in? That’s the magic of the spit splice!
Important Limitations
Not all yarns will play nicely with this technique. The spit splice only works with specific fibers. It does NOT work with superwash wool (which has been specially treated to prevent felting). Plant fibers like cotton or linen won’t felt together, nor will synthetic fibers like acrylic or nylon. Even some heavily processed or very smooth wools might resist your felting attempts.
“The spit splice is only effective for non-superwash wool and other feltable animal fibers,” a fiber expert reminded me when I was first learning this technique. “If your yarn won’t felt in the washing machine, it won’t felt in your hands either!”
A Curious Note on Saliva
While the traditional method uses saliva (hence the slightly off-putting name “spit splice”), you can absolutely use plain water instead. However, there’s actually some science behind the traditional approach!
“Although using spit sounds a little gross, the enzymes in saliva help speed up the felting process,” a knitting instructor explained to me. These enzymes can help break down the protein in wool fibers slightly, enhancing the felting action. But if you’re not comfortable with this approach (and many aren’t!), a small cup of warm water works nearly as well.
Real-World Application
I recently chatted with a knitter who created a traditional Fair Isle hat. She told me, “Using the spit splice on my Shetland wool saved me from having to weave in dozens of ends. The joins were completely invisible, even in the contrasting color sections. It was like magic!”
The spit splice might sound unusual at first, but for wool knitters, it’s often described as a revelation that transforms the experience of joining yarn from tedious to almost enjoyable. Here’s a great tutorial from Purl Soho for this method if you want to see it in action.
If you’re working with feltable wool, give this method a try on your next project. You might just find yourself looking forward to joining new yarn—a feeling most knitters never thought possible!
Special Scenarios: Color Changes, Fiber Types & Knitting in the Round
Connecting yarn in knitting isn’t always straightforward – sometimes you’ll face unique situations that require special consideration. Let’s walk through some common scenarios you might encounter and how to handle them with confidence.
Color Changes and Colorwork
Changing colors in your knitting creates beautiful effects, but requires a bit of planning for seamless transitions.
When creating stripes, I’ve found that working the double stitch method right at the beginning of a row creates the cleanest edge. As my knitting friend Marissa always says, “I typically work the double stitch in the first stitch for stripe color changes.” This naturally hides the transition where it belongs.
For more complex colorwork like Intarsia or Fair Isle, precision matters. Try using a stitch marker to mark exactly where your color change should happen. Sometimes I’ll even unknit a few stitches to position my join in the perfect spot – a little extra effort that makes a big difference in the final look.
If you’re knitting stripes in the round, you’ve probably noticed that annoying “jog” where the rounds meet. The jogless join technique is a game-changer here:
1. Complete your round
2. Switch to your new color
3. Slip the first stitch of the new round without knitting it
4. Continue knitting with your new color
This simple trick creates a much smoother transition between colors in circular projects.
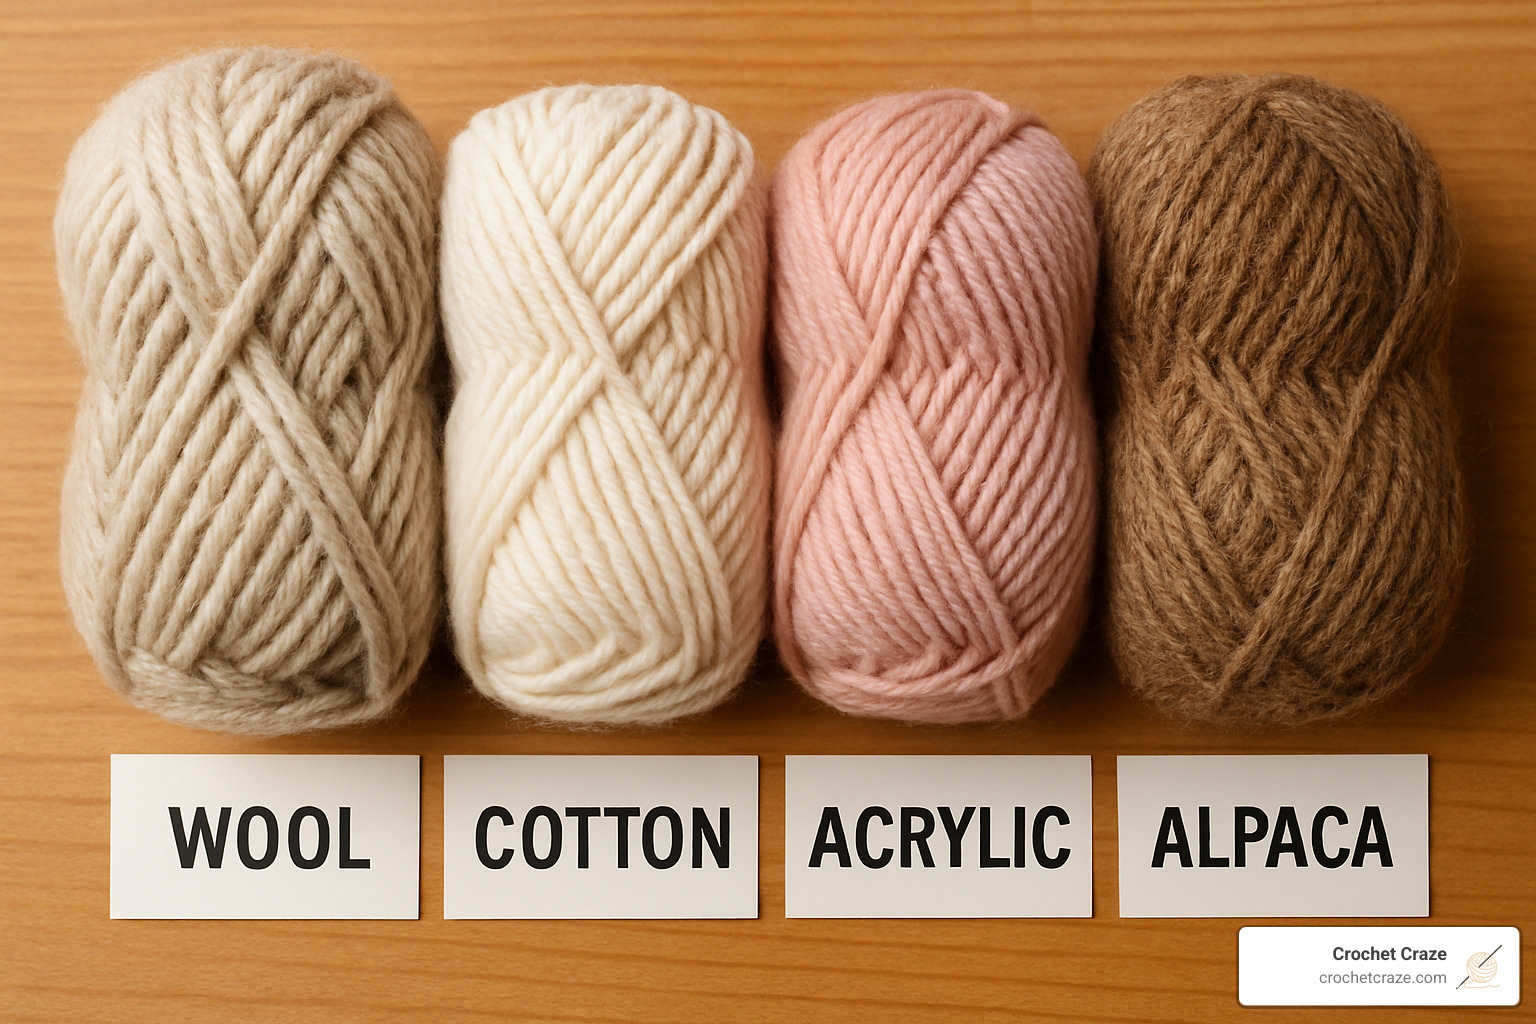
Fiber-Specific Considerations
Not all yarns are created equal when it comes to joining. Each fiber has its own personality and needs to be handled accordingly.
Natural, non-superwash wool is the most versatile – it plays nicely with virtually any joining method, especially the spit splice which creates truly invisible joins. As my wool-loving friend Beth puts it, “Once you try the spit splice on regular wool, you’ll never want to go back to weaving in ends!”
Superwash wool (treated to prevent felting) works beautifully with the Russian join or knitting-in methods, but skip the spit splice – it simply won’t felt together.
Cotton and plant fibers can be slippery customers. When using the knitting-in method, I recommend holding both yarns together for at least 5 stitches to ensure security. The Russian join also works wonderfully with plant fibers.
For those luxurious silk or extra-slippery yarns, the Russian join is your best friend. The magic knot can be risky here as these smooth fibers might slip free over time.
Acrylic and synthetic yarns are generally quite adaptable – just avoid the spit splice since these fibers don’t felt. Both the knitting-in method and Russian join create secure connections in acrylics.
As my knitting teacher always wisely noted, “Not every join method suits every project; matching technique to yarn fiber and project visibility is key.”
Knitting in the Round
Circular knitting presents its own set of challenges when joining yarn.
When working in the round, I always change yarns at the end of a round with the tail on the outside of the work. This makes it much easier to find and weave in the ends later. It’s a small thing that saves a lot of frustration during finishing.
For garments like sweaters knit in the round, think strategically about where your joins will be least noticeable. My friend who makes beautiful circular vests shared, “On a vest with a folded-over front, I placed the join near the underarm to keep ends hidden.” Side seams, underarms, and other naturally hidden areas are perfect for yarn joins.
One common pitfall with circular knitting is creating accidental “ladders” at your join. When you start with your new yarn, resist the urge to pull those first few stitches too tight. A gentle, even tension prevents those telltale gaps that can form at join points.
Large Projects with Multiple Joins
Blankets, sweaters, and other substantial projects will require multiple balls of yarn, so planning ahead makes a big difference.
I always recommend leaving a 6-inch (15 cm) tail when joining at the edge of a piece. This gives you plenty of yarn to work with when weaving in ends, ensuring they stay secure through years of use and washing.
Before starting any large project, consider creating a quick join plan:
– Estimate your total skein count
– Mark potential join locations on your pattern
– Choose appropriate methods for your specific yarn
– Keep notes about where your joins are located
My knitting journal has saved me countless hours of hunting for loose ends during finishing. A little organization goes a long way!
By thinking through these special scenarios before they arise, you’ll approach your connecting yarn in knitting with confidence, creating finished pieces that look professionally crafted, regardless of how many joins they contain.
Frequently Asked Questions about Connecting Yarn in Knitting
How can I minimize the visibility of joins?
Let’s face it—we all want our knitting to look as seamless as possible, especially when we’ve put hours into a special project. The good news is that with a few clever techniques, your joins can become practically invisible.
Strategic placement is your first defense against noticeable joins. “Starting at the beginning of a new row prevents an ugly knot from appearing in a visible spot,” as one knitting expert puts it. Whenever you can, try to place your joins at seams, edges, or in areas that won’t be front and center when your project is worn or displayed.
The yarn you’re using matters too. Different fibers show joins differently. Wool is incredibly forgiving—”The spit splice merges fibers so seamlessly that the join is nearly undetectable in wool projects.” Slippery fibers like silk or bamboo might benefit more from a careful Russian join instead.
Here’s a pro tip that many beginners miss: block your work before trimming those ends. “Blocking before trimming the yarn after knitting-in helps even out tension differences,” which gives you a much cleaner finish. Your fabric needs a chance to settle into its final shape before you make those permanent cuts.
The pattern you’re knitting can be your secret weapon too. Textured stitches like ribbing, seed stitch, or cables naturally camouflage joins. As one knitter shares about using the magic knot method, “It’s a very lovely technique when working with fuzzy yarns or loose gauge”—the texture simply swallows up any evidence of a join.
Finally, watch your tension when joining. When using the knitting-in method especially, keeping your tension consistent with your regular stitches prevents that telltale puckering or looseness that can draw the eye right to your join.
Are knots ever okay in knitting projects?
Ah, the great knot debate! This topic can spark some lively discussion in knitting circles.
“Knots are generally discouraged in knitting because even the tightest knots can solve or work their way to the front of the fabric, affecting the appearance and durability of the project,” explains one knitting resource. That’s the traditional view, and there’s wisdom in it.
But real knitters in the real world sometimes have more nuanced approaches. One experienced knitter admits, “Most of the time I just leave the knot in place rather than weaving in immediately.” She uses temporary knots while working but removes them during the finishing phase.
Another practical voice notes: “Unless cut short, knots won’t wiggle undone with long tails.” This suggests that if you do use a knot, leaving longer tails (at least 3 inches/8 cm) and properly weaving them in afterward can make the knot more secure and less problematic.
The general consensus seems to boil down to a few practical guidelines:
– Avoid knots in visible areas or in garments that will stretch a lot
– If you must use a knot, choose the magic knot over a simple overhand knot
– Always leave sufficient tails and weave them in properly
– Consider what your project will be used for when deciding if knots are acceptable
Sometimes, particularly in a pinch or for projects where durability outweighs appearance, a well-executed knot can be just fine. No knitting police will come to your door!
What’s the easiest joining method for beginners?
If you’re new to connecting yarn in knitting, don’t worry—there’s a method that’s perfect for beginners. Nearly all experts recommend starting with the knitting-in (double stitch) method.
“The ‘knitting in’ method, where both old and new yarns are held together for 3-5 stitches, is recommended for all fiber types and is considered the most beginner-friendly way to join yarn mid-project,” according to knitting educators.
What makes it so beginner-friendly? For starters, it works with literally any type of yarn you might have in your stash. You don’t need any special tools like mix needles—just your regular knitting needles. It’s also wonderfully forgiving if your tension isn’t perfect yet (and whose is when they’re starting out?). The join is secure and won’t come undone, and best of all, the technique is easy to remember even when you’re still getting comfortable with the basics.
One knitting instructor shared her experience: “I always teach the knitting-in method first because it gives new knitters confidence. They can see immediate results without worrying about complex techniques or special tools.” That confidence boost is so important when you’re learning!
If even the knitting-in method feels challenging right now, there’s an even simpler approach that’s totally valid: “At row start or end, drop old yarn and begin next row with new yarn. Leave 6″ ends, weave them with a needle for a few inches.” This basic method lets beginners continue their project without interruption, and you can learn proper finishing techniques as you grow more comfortable.
As your knitting skills develop, you can explore more advanced techniques like the Russian join or spit splice for specific yarns and projects. But remember, even experienced knitters often return to the simple knitting-in method—it’s a classic for a reason!
Conclusion
Mastering the art of connecting yarn in knitting transforms what could be a frustrating interruption into a seamless part of your crafting journey. After exploring these techniques, you’ve likely realized there’s no single “perfect” method—each approach shines in different situations depending on your yarn, project, and personal preference.
Before you dive into your next big project, take a moment to practice these joins on small swatches. This hands-on experience helps you see which techniques work best with your specific yarn and stitch pattern. As one experienced knitting instructor told me, “Test your chosen join on a swatch to ensure it’s secure and invisible before starting a large project.” This simple step can save you hours of frustration later.
Proper finishing makes a world of difference. Always weave in your ends securely, and resist the urge to trim them until after blocking your finished piece. This patience ensures your joins remain stable and invisible in the final product, giving your work that professional, polished look we all aspire to achieve.
When I first started knitting, I dreaded running out of yarn mid-row. Now, with these techniques in my toolkit, I see yarn joins as just another creative decision in the crafting process. The magic knot gives me quick security, knitting-in offers beginner-friendly versatility, the Russian join provides invisible strength for my slippery yarns, and the spit splice creates truly seamless transitions in my wool projects.
At Crochet Craze, we believe that mastering essential techniques like yarn joining opens up new possibilities for your knitting trips. As one knitter so perfectly put it, “Knitting is fun! Weaving in endless tails of yarn is not.” With these methods at your fingertips, you can spend less time wrestling with yarn ends and more time enjoying the meditative rhythm of your needles.
We’d love to hear about your experiences with different joining methods! Which technique has become your go-to favorite? Have you finded any unique approaches to connecting yarn in knitting that work especially well for your projects? Share your wisdom in the comments below—our community grows stronger when we learn from each other.
For more beginner-friendly guidance as you continue your fiber arts journey, explore our Knitting Tips section and find why so many crafters choose Crochet Craze as their trusted resource for knitting and crochet education. And if you’re just getting started with yarn selection, don’t miss our guide to More beginner yarn tips.
Happy knitting, and may all your joins be invisible!