
Quick and Easy Crochet Coasters: 5 Powerful Fun Ideas 2025
Quick and Cozy: Perfect Beginner Coasters
Looking for quick and easy crochet coasters that protect your furniture while showcasing your crafting skills? Here’s what makes them the perfect small project:
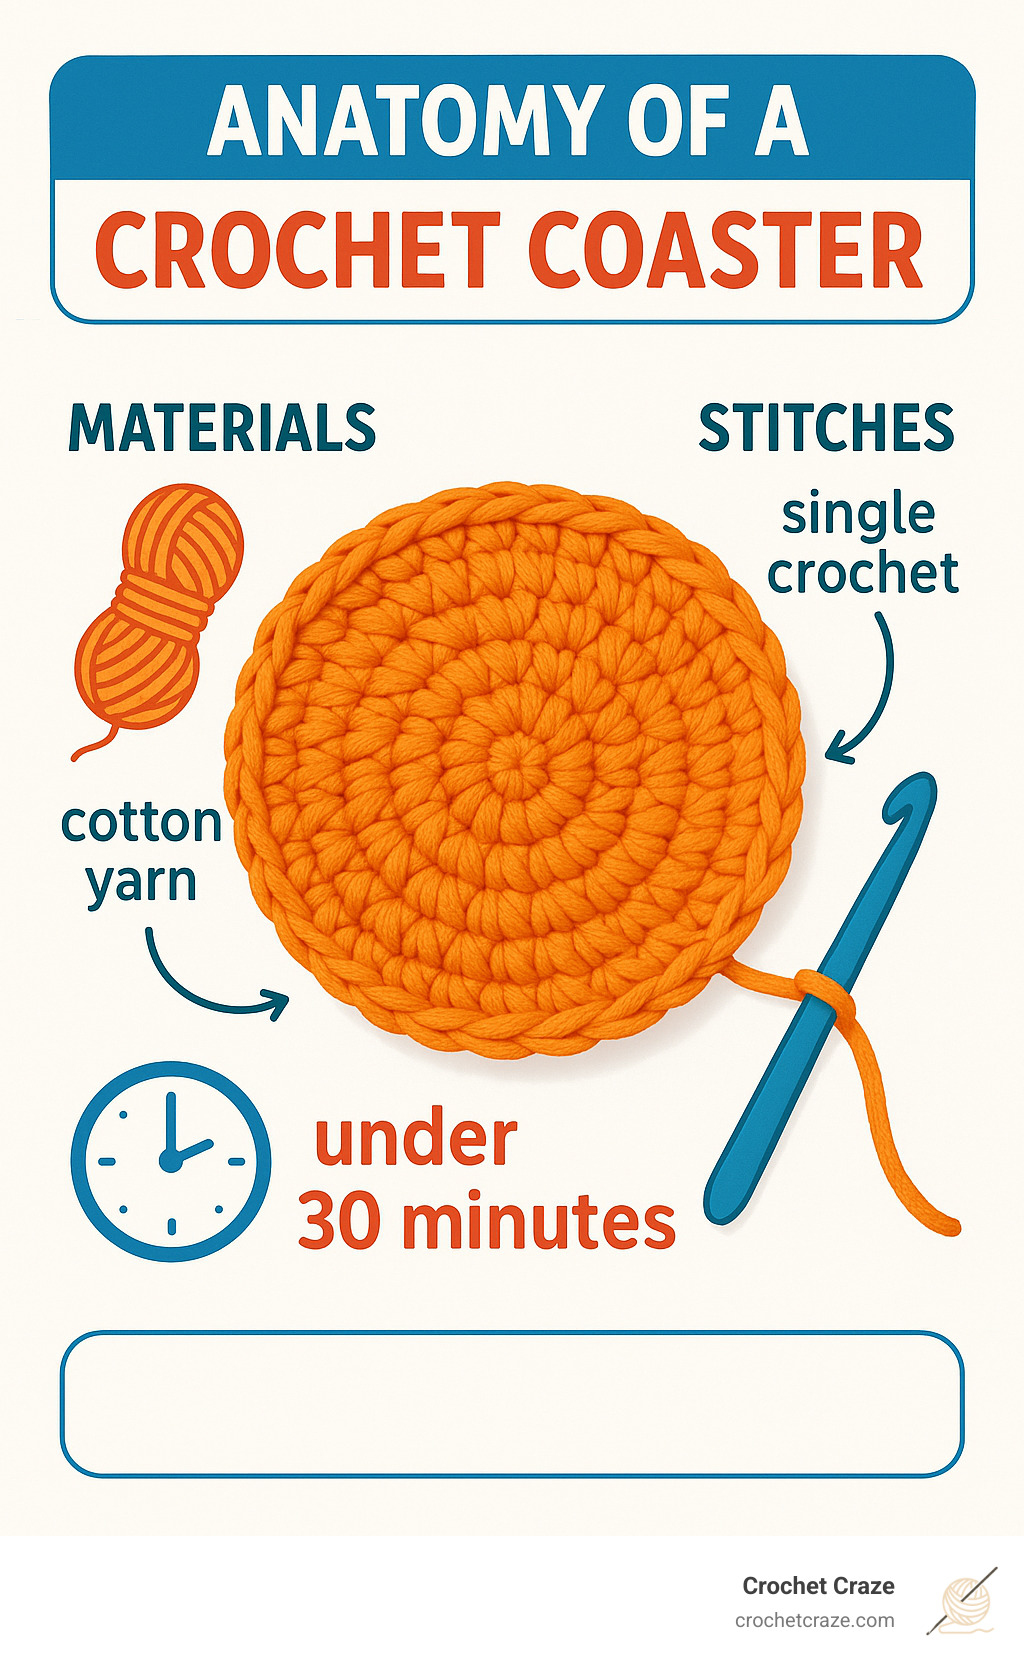
- Time investment: Most coasters take under 30 minutes to complete
- Materials needed: Just 20 yards of cotton yarn per coaster (one skein makes 7-8)
- Skill level: Ideal for beginners learning basic stitches
- Practicality: Absorbent, washable, and prevents water rings
- Gift potential: Pair with a mug for a thoughtful last-minute present
Crochet coasters are the perfect gateway project for crafters who want satisfying results without a major time commitment. They’re small enough to finish in one sitting yet practical enough to use every day. Cotton yarn makes them absorbent and durable, while simple stitches like single crochet create a tight, protective fabric that shields your surfaces from condensation and heat.
I’m Sonji Huerta, a newcomer to crochet who finded the joy of quick and easy crochet coasters when looking for beginner-friendly projects that deliver practical results without overwhelming complexity. I’ve found these simple projects perfect for building confidence while creating useful items for my home.
Essential quick and easy crochet coasters terms:
– easy chunky crochet shawl
– easy crochet projects with thin yarn
Why Crochet Coasters Belong on Your Hook
Have you ever grimaced at the sight of a water ring on your favorite wooden table? You’re not alone! One of our Crochet Craze community members confessed, “Wet notebook paper from a cold drink makes my skin crawl” – which is exactly why she learned to make quick and easy crochet coasters.
When we started Crochet Craze, we quickly finded that beginners crave projects with immediate payoff. Something you can finish in one sitting that actually serves a purpose in your daily life. That’s the magic of crochet coasters!
Beyond just being adorable additions to your home decor, these little fabric circles are practical powerhouses. They shield your beautiful furniture from water rings and heat damage while adding a personal touch to your space. Made with cotton yarn, they’re naturally absorbent, soaking up condensation from cold drinks before it ever reaches your tables.
For the eco-conscious crafter, washable crochet coasters are a sustainable alternative to disposable paper versions. Use them again and again – they only get softer and more character-filled with time!
Many of our community members maintain what they lovingly call a “coaster basket” – a collection of yarn scraps perfect for whipping up last-minute gifts. “I cranked out a set of coasters while binge-watching true crime documentaries on Netflix,” one member told us. Talk about productive relaxation!
These small projects are the perfect training ground for new crocheters. You’ll practice maintaining even tension and mastering basic stitches without committing weeks to a larger project. The near-instant gratification keeps motivation high – exactly what beginners need to stay hooked on the craft.
“I’ve made these little coasters for myself and given them to others as gifts. They’re always appreciated and used!” shared another community member. There’s something deeply satisfying about creating something both beautiful and useful, especially when it takes less than an hour of your time.
Gather Your Supplies for Quick and Easy Crochet Coasters
Ready to dive into making your first quick and easy crochet coasters? Let’s get your supplies together first! I always find something so satisfying about laying out everything I need before starting a new project – it’s like preparing for a little crafting trip.
Yarn Selection
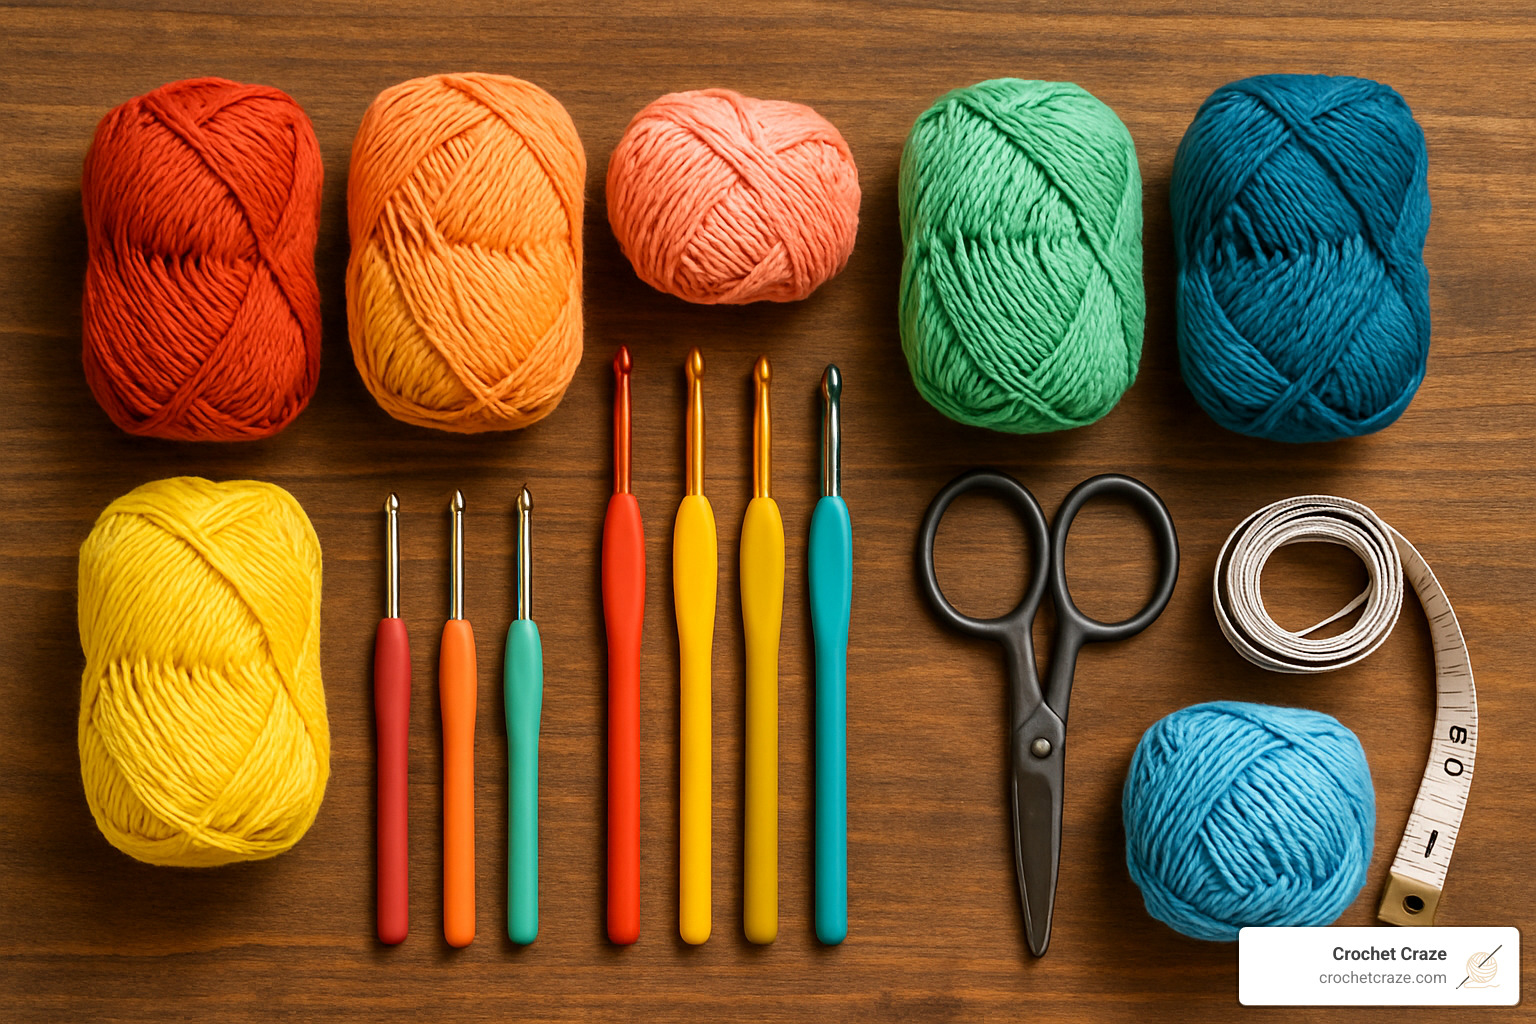
When it comes to coasters, cotton yarn truly shines as the perfect material. I’ve tried various fibers over the years, but nothing beats cotton’s ability to soak up condensation from a cold glass of lemonade on a hot summer day.
“I made the mistake of using acrylic for my first set of coasters,” shared Marissa, one of our Crochet Craze community members. “They looked pretty but didn’t absorb a thing! Now I’m a cotton convert.”
The best part? You only need about 20 yards per coaster – that’s practically nothing! One standard skein will make 7-8 coasters, making this the perfect project for using up those leftover bits from bigger projects. Your stash will thank you!
For the best results, look for 100% cotton yarn like Lily Sugar ‘n Cream or Lion Brand 24/7 Cotton. If you can’t find pure cotton, aim for blends with at least 70% cotton content. Stick with worsted weight (#4) for the ideal thickness – not too bulky, not too flimsy.
Tools You’ll Need
Your tool kit for these coasters is refreshingly simple:
A crochet hook between 4.0-5.0mm (US G6-H8) pairs perfectly with worsted weight cotton. I personally love using my 4.5mm Furls hook for coasters – it glides through cotton yarn like a dream! You can check out their collection here if you’re in the market for an upgrade.
Don’t forget a darning needle for weaving in those ends (the least fun part, but so important for durability!), a pair of scissors, and maybe a stitch marker if you’re working in rounds. If you want your coasters to look extra polished, some blocking pins and a spray bottle can help with the finishing touches.
Many of our community members swear by ergonomic hooks for projects like coasters where you’re making the same motions repeatedly. Your hands will definitely appreciate the extra comfort, especially if you’re planning a coaster-making marathon!
For more detailed guidance on selecting the perfect materials for beginners, our Best Yarn and Hook for Beginner Crochet guide has you covered with everything you need to know.
Now that we’ve got our supplies sorted, are you ready to start creating some beautiful, functional quick and easy crochet coasters? I know I am!
Master the Basics: Essential Stitches & Techniques
What I love most about quick and easy crochet coasters is how they let you practice fundamental techniques without overwhelming you. They’re like the perfect training wheels for your crochet journey!
Foundation Techniques
Let’s start with the building blocks that will set you up for coaster success.
The magic ring (sometimes called a magic circle) creates that perfect tight center with no hole—exactly what you want for round coasters. I remember struggling with this technique until a fellow crafter shared this tip: “Always tighten your magic circle fully after completing Round 1 for that professional-looking center.”
Next comes the chain stitch, which is truly the backbone of crochet. You’ll use these little chains to start your projects and create height where needed. Think of them as your crochet alphabet—simple but essential!
The slip stitch might seem humble, but it’s your secret weapon for joining rounds and creating those seamless finishes that make your coasters look store-bought. When my sister first started crocheting, she’d forget her slip stitches and wonder why her rounds looked disconnected!
Key Stitches for Coasters
Now for the fun part—the stitches that give your coasters their personality and function.
Single crochet creates that tight, dense fabric that makes your coasters super absorbent. It’s like the workhorse of coaster stitches—not flashy, but incredibly reliable for soaking up condensation from cold drinks.
Half double crochet is your middle-ground stitch—slightly taller than single crochet and works up more quickly. I find this stitch gives coasters a nice texture while still maintaining good absorbency.
Double crochet adds more height and speed to your project. When I’m really in a hurry to whip up a gift set, I often choose patterns with double crochet because they work up so quickly while still looking impressive.
Treble crochet appears in more decorative patterns, adding dramatic height and openwork that can make your coasters real conversation pieces.
Working in the Round
Most round coasters follow a predictable pattern that’s easy to master once you understand the logic behind it:
In Round 1, you’ll work a set number of stitches into your magic ring—usually between 6-12 depending on your pattern.
For Rounds 2-3, you’ll increase evenly to create that flat circle shape. This is where counting becomes crucial! As our Crochet Craze instructor Sarah always says, “Counting stitches after each row prevents wonky edges in simple projects.” This attention to detail ensures your coaster lies perfectly flat rather than curling up at the edges.
By Rounds 4-5, you’ll either add decorative edges or continue with even stitches to complete your coaster. This is where you can add personality with scalloped edges or color changes.
Tension matters tremendously with coasters—too tight and they’ll curl up; too loose and they won’t protect surfaces effectively. Finding that “just right” middle ground comes with practice, which is why coasters are such perfect learning projects.
Need a handy reference for these stitches? Our Basic Crochet Stitches Printable is perfect to keep by your side as you work through your first few coasters.
Quick and Easy Crochet Coasters – Step-by-Step Tutorial
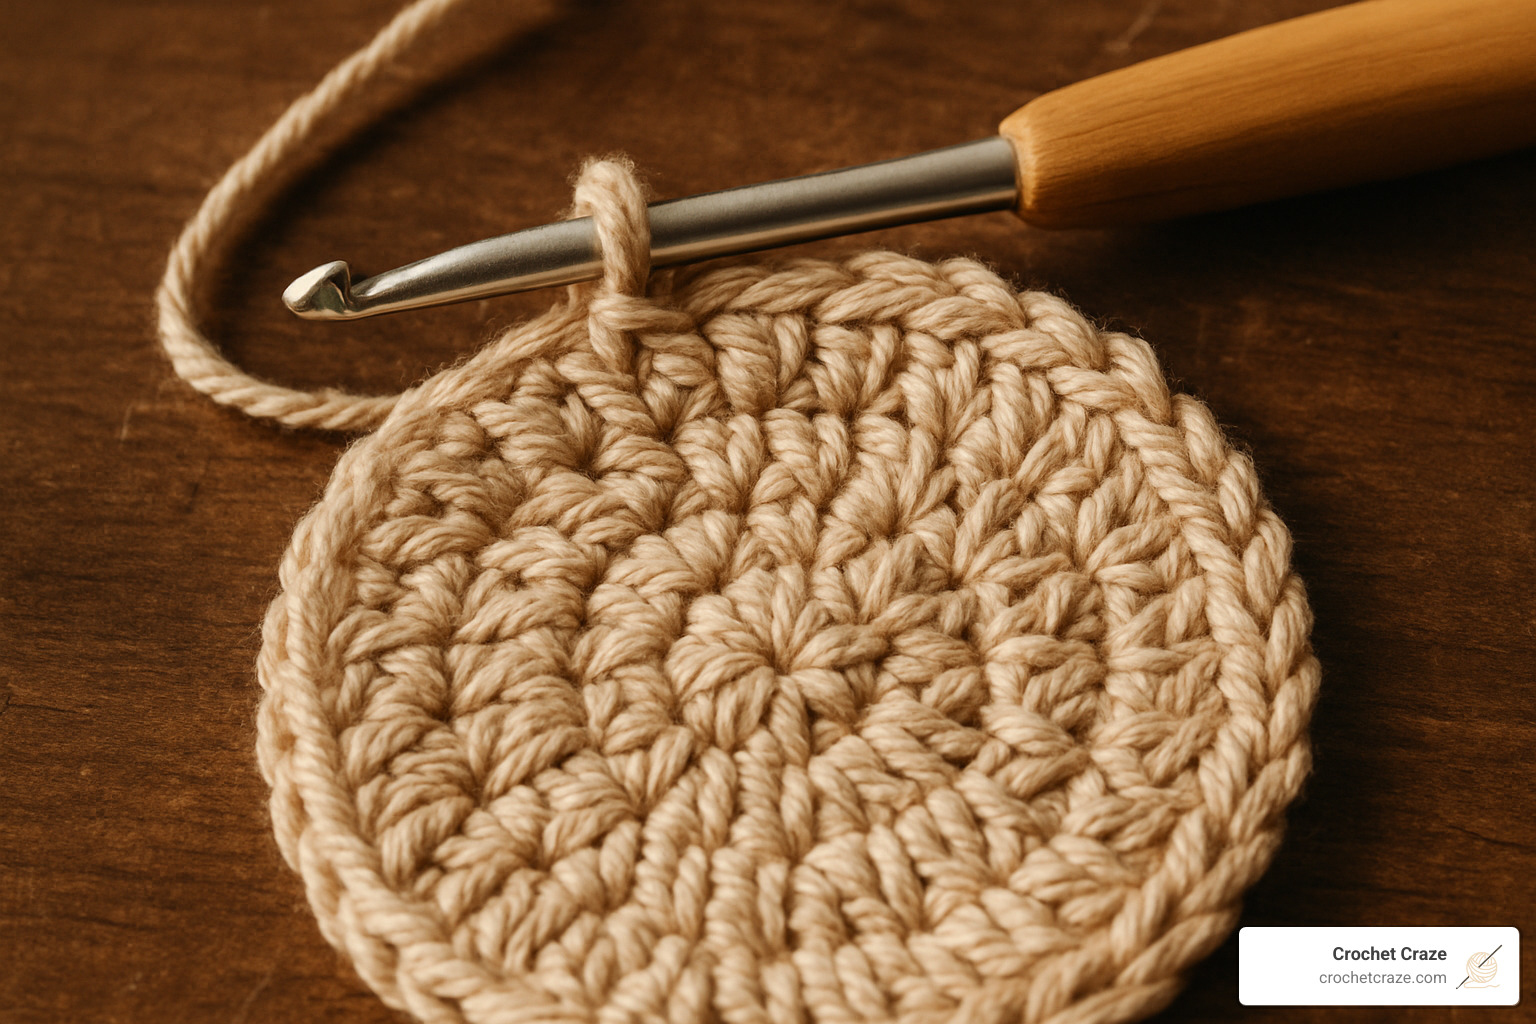
Now let’s dive into making a quick and easy crochet coaster that you can complete in under 30 minutes! This simple round coaster pattern is perfect for beginners and uses basic stitches to create a practical, attractive design that will protect your surfaces in style.
Step 1: Foundation & First Round
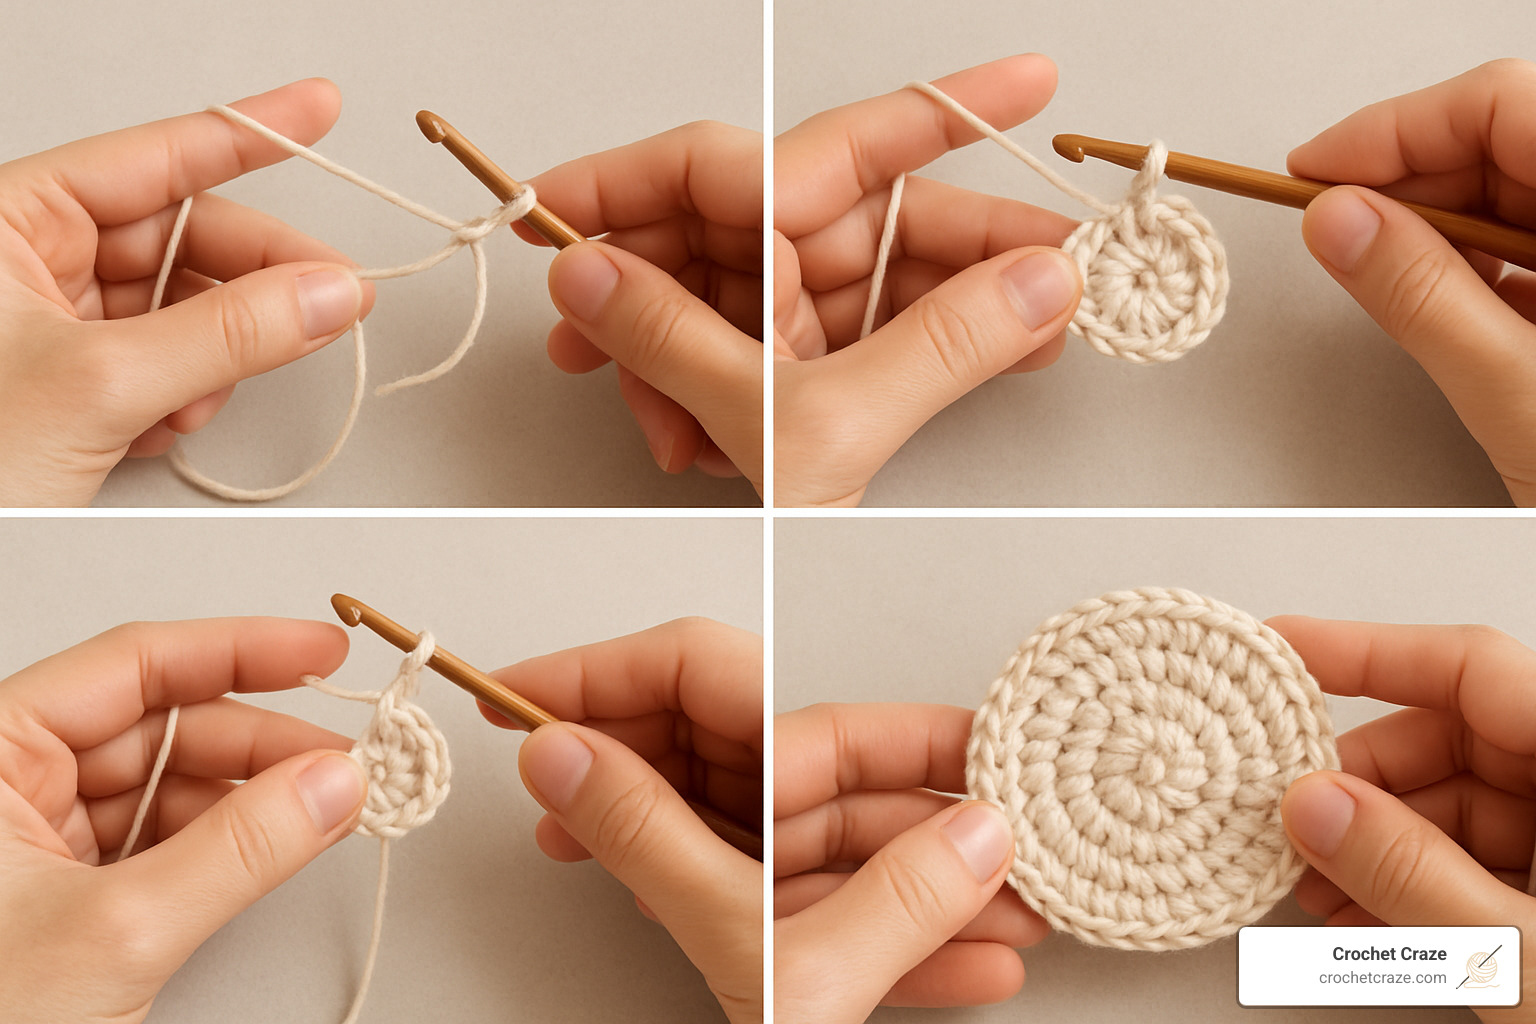
Start by creating a magic ring – this gives your coaster that perfect center with no holes where condensation could seep through. If you’re still mastering the magic ring technique, you can alternatively chain 4 and join with a slip stitch to form a ring.
For Round 1, chain 3 (this counts as your first double crochet), then work 11 more double crochets into the magic ring for a total of 12 stitches. Join with a slip stitch to the top of your beginning chain-3 to complete the round.
“Always count stitches after each row to maintain consistent stitch count,” says Sarah, one of our Crochet Craze instructors. “It’s a simple habit that saves you from frustration later on!”
Don’t forget to pull your magic ring tight before moving on – this creates that polished, professional look with no hole in the center of your coaster.
Step 2: Build the Base Fast
Round 2 is where your coaster really starts to take shape. Chain 3 (counts as your first dc), work 1 dc in the same stitch, then 2 dc in each stitch around. Join with a slip stitch to top of beginning chain-3. You’ll have 24 dc total when you finish.
For Round 3, chain 3 again, work 1 dc in next stitch, then 2 dc in next stitch, 1 dc in next stitch – repeat this pattern around. Join with a slip stitch. You should have 36 dc total, and your coaster is growing beautifully!
Round 4 continues the pattern: Chain 3, dc in next 2 stitches, 2 dc in next stitch, dc in next 3 stitches – repeat around and join with a slip stitch. You’ll end with 45 dc total.
If your coaster starts to cup or curl, don’t worry! “You may need to add more increases or go up a hook size,” suggests our pattern designer Jenny. “A flat coaster is what we’re aiming for, so don’t hesitate to make adjustments.”
Time Check: Finishing a “Quick and Easy Crochet Coaster” in Under 30 Minutes
The beauty of these quick and easy crochet coasters is that they’re truly quick! Most crafters can complete one in just 20-30 minutes, making them perfect for those moments when you need a last-minute gift or just want the satisfaction of finishing a project in one sitting.
To maximize your efficiency, try batch-crocheting several coasters at once. Work the same round on each coaster before moving to the next round – this creates a mini production line that can help you create a full set in record time. Many of our Crochet Craze community members report that their speed increases dramatically with each coaster they make, so your second and third will likely be even faster than your first!
Step 3: Edging & Fasten Off
The final round is where the magic happens! For Round 5, we’ll add a decorative edge that transforms your simple circle into something special. Chain 1, single crochet in same stitch, then skip 2 dc, 5 dc in next stitch (creating a pretty shell), skip 2 dc, sc in next stitch – repeat this pattern around, ending with a slip stitch to first sc.
To finish, fasten off by cutting your yarn with about a 6-inch tail, pull through your final loop, and tighten. Then use your mix needle to weave in those ends on the wrong side of your coaster.
“I love seeing the change that happens with the decorative edge round,” shares Melissa, one of our dedicated community members. “It takes the coaster from plain to polished in just a few minutes – that final round is so satisfying!”
Your quick and easy crochet coaster is now ready to use, gift, or display! The tight stitches create an absorbent surface that will protect your furniture while adding a handmade touch to your home.
Shape & Style Inspirations to Keep Things Fresh
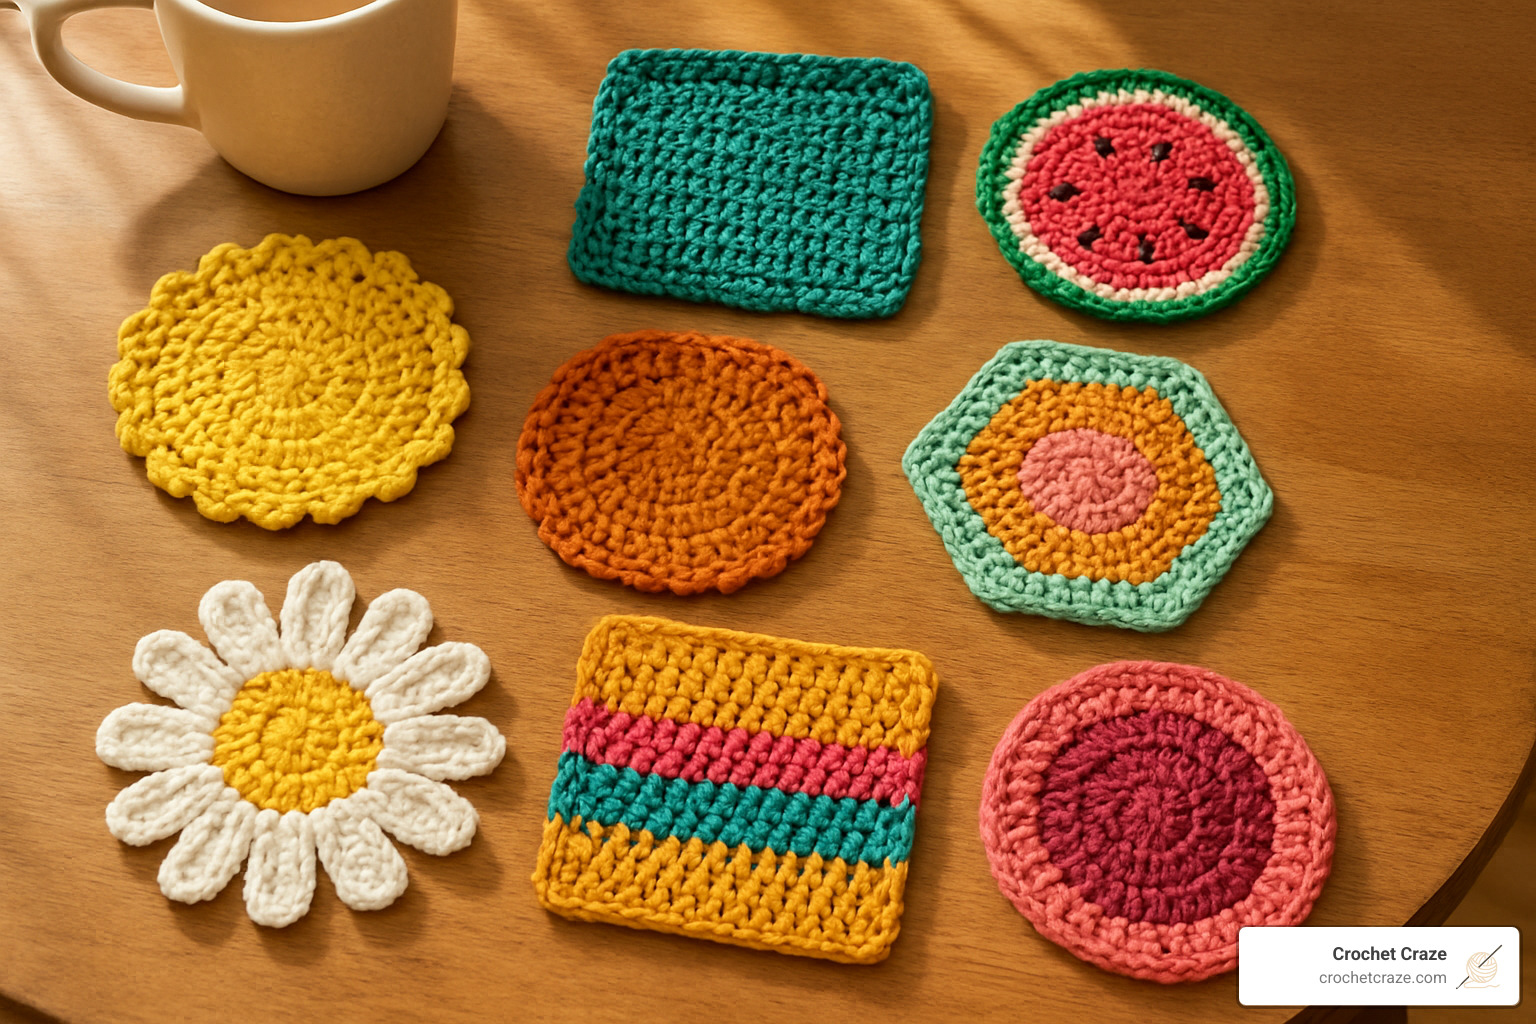
Once you’ve mastered the basic quick and easy crochet coasters, it’s time to let your creativity shine! The beauty of these tiny projects is how easily you can experiment with different shapes and styles without committing to a week-long project.
Popular Coaster Shapes
I remember when I first ventured beyond round coasters – it felt like finding a whole new world of possibilities! Round coasters are perfect when you’re just starting out, but don’t stop there.
Square coasters have become my personal favorite for practicing even tension. There’s something satisfying about those crisp, straight edges when you’ve done it right. If you’re looking to try these, our guide to Easy Square Crochet Coasters will help you get started.
Hexagon coasters add a touch of geometric interest to your coffee table while still being surprisingly simple to make. And when gift-giving occasions roll around, nothing says “made with love” quite like heart-shaped coasters – I’ve seen faces light up when presenting these sweet little tokens.
Themed and Novelty Designs
Our Crochet Craze community is always bubbling with creative ideas. Sarah, one of our long-time members, told me, “I sold wedding-style coaster sets at local craft shows and couldn’t keep them in stock!” Themed sets really do make wonderful gifts.
Fruit slice coasters are a summer favorite – imagine watermelon, lemon, and orange slices brightening up your patio gatherings. When holidays approach, our members love creating seasonal motifs like snowflakes for winter or shamrocks for St. Patrick’s Day.
Children (and the young at heart) adore animal face coasters – those little teddy bear designs make morning cocoa even more special. And for the nature lovers among us, flower patterns like sunflowers and daisies bring a touch of the garden indoors year-round.
Stitch Pattern Variations
The stitch patterns you choose can completely transform the look and feel of your quick and easy crochet coasters. A classic granny square pattern works beautifully as a coaster and connects to crochet’s rich heritage.
Mandala style coasters, with their concentric circles of different colors and stitches, create eye-catching designs that showcase your growing skills. For those who enjoy graphic patterns, mix crochet techniques allow you to create everything from geometric designs to playful images.
Don’t be afraid to play with texture! Bobbles, puffs, and popcorn stitches add wonderful dimension to your coasters, creating not just visual interest but a tactile experience too. I still remember a dinner guest absentmindedly running their fingers over a textured coaster I’d made, completely mesmerized by the feel.
The wonderful thing about coasters is that they’re small enough to finish quickly but visible enough to showcase your creativity. Each one is a tiny canvas for your crochet expression – what will you create next?
Pro Finishing, Care & Customization Tips
Those final touches can transform your quick and easy crochet coasters from homemade to handcrafted! I’ve gathered some pro tips that our Crochet Craze community swears by to give your projects that polished look.
Weaving in Ends Like a Pro
Nothing ruins a beautiful coaster faster than loose, dangling yarn ends! As Sarah from our crochet circle says, “Weave in ends loosely to avoid distortion of stitches.” This small detail makes a huge difference in how professional your finished coasters look.
I used to dread weaving in ends until I found this weave-in-ends guide that changed my approach completely. Now I actually enjoy this finishing step as it brings my project to completion.
Blocking for Perfect Shape
Ever notice how your coasters sometimes come out a bit wonky or wavy? Blocking is your secret weapon! This simple technique transforms your coasters into perfectly shaped pieces:
For cotton coasters, steam blocking works wonders. As Maria, one of our regular contributors notes, “Pressing cotton coasters with steam helps square them up quickly.” Just remember to press (up-and-down motion) rather than iron (back-and-forth) to preserve your stitches.
You can also try wet blocking by dampening your coaster, shaping it as desired, and letting it dry flat. For a quicker option, spray blocking works too – just mist with water, shape, and let dry.
Yarn Comparisons for Coasters
| Yarn Type | Absorbency | Durability | Washing | Best For |
|---|---|---|---|---|
| 100% Cotton | Excellent | Very good | Machine washable, air dry | Cold drinks, general use |
| Cotton Blend (70%+) | Good | Excellent | Machine washable | All-purpose coasters |
| Acrylic | Fair | Good | Machine washable & dryable | Hot drinks, decorative use |
| Cotton + Jute/Hemp | Very good | Excellent | Hand wash recommended | Rustic style, heavy use |
I’ve found that 100% cotton is truly the gold standard for coasters that need to absorb condensation from cold drinks, while cotton-jute blends give that wonderful rustic look for farmhouse décor.
Creative Customization Ideas
Your coasters can reflect your personal style with simple customizations! Try color changes to create stripes or ombré effects – they’re easier than they look. One of our community members, Jenna, added small buttons to the centers of her flower-shaped coasters, and they became instant conversation pieces.
For extra-durable coasters that can double as trivets, try incorporating rope or clothesline into your pattern. I’ve made these for my own kitchen, and they’ve withstood years of hot pots and pans!
Adding a special edging like picot, scalloped, or crab stitch borders gives your coasters that finished, professional look that friends will swear came from a boutique.
Selling and Gifting Your Coasters
Many patterns allow you to sell finished items, making quick and easy crochet coasters perfect for craft fairs or online shops. Just be sure to check the pattern’s terms before selling.
“Pair them with a mug for an amazing and thoughtful gift,” suggests Emma, who sells her handmade items online. This simple packaging idea transforms a humble coaster into a delightful present that anyone would love to receive.
Our Crochet Craze community has shared some lovely gift packaging ideas: tie sets of 4-6 coasters with natural twine, stack them and wrap with kraft paper and a sprig of dried lavender, or create a complete gift basket with matching mugs and specialty teas.
These little touches show the care that went into your handmade gifts – and isn’t that what makes handcrafted items so special?
Frequently Asked Questions about Quick and Easy Crochet Coasters
How much yarn do I need for one coaster?
One of the most common questions I hear from our Crochet Craze community is about yarn requirements. Good news! Quick and easy crochet coasters are incredibly economical projects that barely make a dent in your yarn stash.
Most coasters need less than 20 yards of yarn each, which makes them perfect for those odd bits of leftover yarn hiding in your craft basket. When I started making coasters, I was surprised at how many I could create from just one skein!
“A single skein of worsted weight cotton yarn can make 7-8 coasters, making these projects highly economical and stash-busting,” our materials expert at Crochet Craze often reminds beginners.
If you’re planning a square design, expect to use about 10-15 yards for a basic 4″ coaster, though more complex or textured patterns might need closer to 20 yards. Round coasters typically require 15-20 yards for a standard 4-5″ diameter size. Of course, smaller drink coasters will use less, while larger designs or trivets will need a bit more.
What hook size keeps coasters flat and sturdy?
Finding the right hook size can make the difference between a perfectly flat coaster and one that curls up at the edges (we’ve all been there!). When working with worsted weight cotton yarn, which is the gold standard for coasters, I’ve found these hook sizes work best:
A 4.0mm (US G/6) hook creates a tighter, denser fabric that’s wonderfully absorbent – perfect for those sweaty summer drinks! The 4.5mm (US 7) is our most recommended size at Crochet Craze, as it helps most crocheters achieve that ideal balance of tightness and flexibility. If you tend to crochet tightly, try a 5.0mm (US H/8) hook to prevent your coaster from curling up.
One of our community members shared this helpful tip: “Try going up a hook size or block the coaster by pinning it out into shape after finishing.” I’ve found this advice invaluable when troubleshooting stubborn coasters that refuse to lie flat.
If your coaster still has a mind of its own and won’t stay flat, you can try increasing your hook size, adding more increase stitches in your pattern, or blocking the finished coaster – sometimes a light steam is all it takes!
Can I sell the coasters I crochet from free patterns?
I love this question because it shows you’re thinking about the potential of your quick and easy crochet coasters! The short answer is: in most cases, yes!
Most designers allow crafters to sell items made from their patterns, though policies can vary. When using someone else’s pattern, I always recommend checking for specific selling permissions, which are usually stated somewhere in the pattern document or webpage.
Many designers appreciate receiving credit for their pattern in your listing – it’s a nice gesture that helps support their work. Remember though, while you can typically sell the finished coasters, the pattern itself remains the intellectual property of the designer and shouldn’t be distributed or sold.
As one pattern designer notes: “Pattern is written in English using US crochet terms. Finished coasters can be sold without requiring credit to the designer.”
At Crochet Craze, we believe in supporting the wonderful community of independent designers while also celebrating your crafting achievements. Those beautiful coasters you’ve made deserve to find happy homes – whether as gifts or as items in your craft fair booth!

Conclusion
Quick and easy crochet coasters have truly earned their place as the perfect pocket-sized project. I’ve found them to be the ideal balance of satisfaction and simplicity – something you can actually finish while binge-watching your favorite show! With most designs taking just 30 minutes from start to finish, they deliver that wonderful “I made something useful!” feeling without days of commitment.
Throughout this guide, we’ve seen how these humble projects punch above their weight. They’re not just practical items that protect your furniture – they’re also little skill-building laboratories where you can experiment with new stitches and color combinations without the pressure of a larger project.
Here at Crochet Craze, we absolutely love seeing beginners light up when they complete their first coaster. As Maria from our community recently shared, “I made my first set of coasters last weekend and gave them to my mom. She actually cried! I never thought something so small could mean so much.”
Remember what Annie, one of our longtime members, always says: “It’s okay if your first coasters aren’t perfect—you’re practicing on them!” Each one you make builds your confidence and improves your technique. The beauty of these small projects is that even “mistakes” are usually still perfectly functional coasters!
Whether you’re using up scraps from your yarn stash, practicing a new stitch pattern, or whipping up last-minute gifts, quick and easy crochet coasters offer endless creative possibilities. They’re the crafting equivalent of comfort food – satisfying, approachable, and always welcome.
We’d absolutely love to see what you create! Share your coaster creations with our Crochet Craze community, and when you’re ready for your next project trip, check out our guide to more creative crochet projects.
Happy hooking, friends! May your yarn never tangle and your coasters always lie flat.