
Learning how to make a classic granny square is surprisingly simple. You really only need to get the hang of three basic stitches. Honestly, with the right crochet granny square instructions, you could have your first one finished in an afternoon. This little square is the perfect gateway into the wonderful, yarn-filled world of crochet. For decades, this humble block has been a cornerstone of the craft, loved for its simplicity, versatility, and the beautiful way it uses up leftover yarn. It's a project that grows quickly, providing that instant gratification that keeps new crafters hooked. You'll be amazed at how a single, simple square can become the building block for stunning blankets, cozy cardigans, trendy bags, and so much more. This guide is designed to walk you through every step, ensuring your first foray into granny squares is a fun and successful one.
Choosing the Right Tools for Your First Granny Square
Before you dive in, grabbing the right supplies can make or break your first experience. Think of it as setting up your creative space for success—it ensures everything goes smoothly from that very first stitch. Choosing the wrong tools can lead to frustration, tangled yarn, and a finished product that doesn't look quite right. By taking a few moments to gather the ideal materials, you're not just preparing for a project; you're setting a foundation for an enjoyable and rewarding crafting session.
For beginners, a smooth, light-colored yarn is your new best friend. Trust me on this. Trying to see your stitches in dark or fluffy, textured yarns is a recipe for frustration and missed loops. A worsted weight (that's a Category 4) yarn gives you the perfect thickness; it’s not so thin that it’s fiddly, but not so bulky that it's hard to manage. This medium weight provides excellent stitch definition, meaning you can clearly see where your hook needs to go, which is essential when you're learning. Lighter colors like pastels, creams, or bright primary shades reflect more light, making the individual loops of each stitch stand out. This is a huge advantage over navy, black, or dark brown yarns, where stitches can blend together into an indistinguishable mass.
Your Granny Square Toolkit
Here's a quick rundown of the gear you'll need. Getting these few basics right is the first real step toward a beautiful granny square. While you can certainly find elaborate kits, these four items are the absolute essentials to get you started on the right foot.
| Tool | Beginner Recommendation | Why It's a Game-Changer |
|---|---|---|
| Yarn | Worsted Weight (Category 4) in a light color | It's easy to see your stitches, simple to handle, and forgiving for newcomers. Cotton or acrylic are great fiber choices for beginners. |
| Crochet Hook | H-8 / 5mm hook | This size is the ideal partner for worsted yarn, helping you create even stitches without them being too tight or too loose. |
| Scissors | A small, sharp pair | You need clean cuts for changing colors and finishing your project without frayed ends. Dull scissors can snag and separate yarn fibers. |
| Darning Needle | A blunt-tipped needle with a large eye | This is non-negotiable for weaving in your yarn ends so your square doesn't unravel. A metal needle is often more durable than a plastic one. |
Think of this little kit as your starting lineup for a project you'll actually enjoy making. As you gain experience, you might explore different yarn fibers like merino wool for softness or bamboo for drape, but for now, keeping it simple is the key to success.
Matching Your Yarn and Hook
Pairing your yarn with the right hook is absolutely crucial for getting those nice, even stitches we all crave. An H-8 / 5mm hook is a fantastic match for worsted weight yarn, and it really helps you keep a comfortable, consistent tension. This pairing is a standard for a reason: the hook head is large enough to grab the yarn cleanly without splitting the plies, and the shaft is thick enough to create stitches that have body but aren't stiff. If you were to use a much smaller hook with this yarn, your stitches would be incredibly tight, making the fabric dense and causing the square to curl. Conversely, a much larger hook would result in loose, floppy stitches with large gaps, creating a fabric that lacks structure. If you want to dive deeper, our guide on the best yarn and hook for beginner crochet has more detailed recommendations.
Pro Tip: If you notice your stitches are super tight and your square is starting to curl up like a little bowl, try going up a hook size. On the flip side, if your stitches are loose and floppy, go down a size. It’s all about finding what works for your hands. Everyone's natural tension is different, so don't be afraid to experiment to find your personal sweet spot. This is a fundamental skill in crochet that will serve you well in every future project.
The Finishing Touches
Finally, don't forget about the unsung heroes of any crochet project. These tools might seem secondary, but they are vital for a polished and durable finished piece. You'll need:
- A sharp pair of scissors for clean, crisp cuts when you finish or switch colors. Using dedicated craft scissors prevents them from becoming dull from cutting other materials like paper. A clean cut prevents the yarn from fraying, which makes it much easier to thread through your darning needle.
- A darning needle (also called a tapestry needle or yarn needle) to securely weave in those pesky yarn ends. Seriously, don't skip this step! It’s the difference between a square that lasts and one that falls apart in the wash. Weaving in ends properly secures the final stitch and ensures all your hard work doesn’t unravel. This is the mark of a well-finished project.
Learning the Language of Crochet Patterns
Diving into your first crochet pattern can feel like trying to read a secret code. It’s full of abbreviations and strange terms, but trust me, it’s much simpler than it looks. Once you crack a few key terms, you’ll unlock a whole new world of projects, starting with the classic granny square. These abbreviations are a universal language (though with slight variations between US and UK terms) that allows designers to write complex instructions concisely. This guide uses standard US crochet terminology.
Think of it as learning a bit of shorthand. You don’t need to memorize a dictionary, just a few core commands that tell your hook what to do. The big three are ch (chain), sl st (slip stitch), and dc (double crochet). Once you get those down, you’ve got everything you need to tackle most beginner crochet granny square instructions. The chain stitch is the foundation of almost all crochet. The slip stitch is used for joining and moving across your work without adding height. The double crochet is the tall, elegant stitch that gives the granny square its classic look and quick growth.
That slip stitch (sl st) is the quiet hero of any project worked in the round. It’s the nearly invisible stitch you’ll use to join your rounds together, creating a seamless, continuous circle that looks polished and professional. It's an essential technique for closing off each round of your granny square before you begin the next one.
The Heart of the Granny Square
So, what gives a granny square its iconic, blocky look? It all comes down to two key ingredients that work together in every single round: clusters and chain spaces. This is the magic duo that makes your square grow. Understanding this fundamental structure is the key to mastering the pattern. Once you grasp this concept, you can create a granny square of any size without even looking at the instructions.
- Cluster: This is just a fancy name for a group of three double crochet (dc) stitches all worked into the same spot. These clusters create the solid, colorful blocks that make granny squares so recognizable. On the first round, you work them into the center ring. On every subsequent round, you work them into the spaces created in the round before.
- Chain Space (ch-sp): This is the gap you create by making a few chain stitches between your clusters. These spaces serve a dual purpose: the chains that form the corners give the square its shape, and the chains along the sides provide the exact spot to place the clusters of the next round. On the very next round, these little gaps become the perfect home for your new clusters. It’s a simple, brilliant system.
This back-and-forth rhythm of making clusters in the spaces from the round before is what makes the granny square so wonderfully simple and addictive. It’s why it has been a go-to project for generations, perfect for using up every last bit of scrap yarn. If you want a deeper dive into decoding patterns, check out our guide on how to read crochet patterns without getting lost.
The traditional pattern is a beautiful, rhythmic dance of three-stitch clusters and chain-space corners. Its versatility makes it a favorite for everyone from absolute beginners to seasoned experts, and its knack for using up leftovers keeps it right at home in the modern, eco-conscious crafting world. You're not just following steps; you're engaging in a logical and satisfying process of construction.
A Round-by-Round Guide to Your First Square
Alright, this is where the real fun starts. You’ve got your yarn, you’ve got your hook, and now we’re going to transform those individual stitches you’ve learned into a classic granny square. These instructions will break down each round into a simple, rhythmic motion. Trust me, before you know it, you'll have a finished square without even thinking about it. Take your time with each step, and don't be afraid to pull out your stitches (a process known as 'frogging' because you 'rip-it, rip-it') and start again if you make a mistake.
The process is so satisfying. You’ll start with a tiny little loop, watch it grow with clusters of stitches, and see those distinct corners take shape right before your eyes. Let's start from the very beginning.
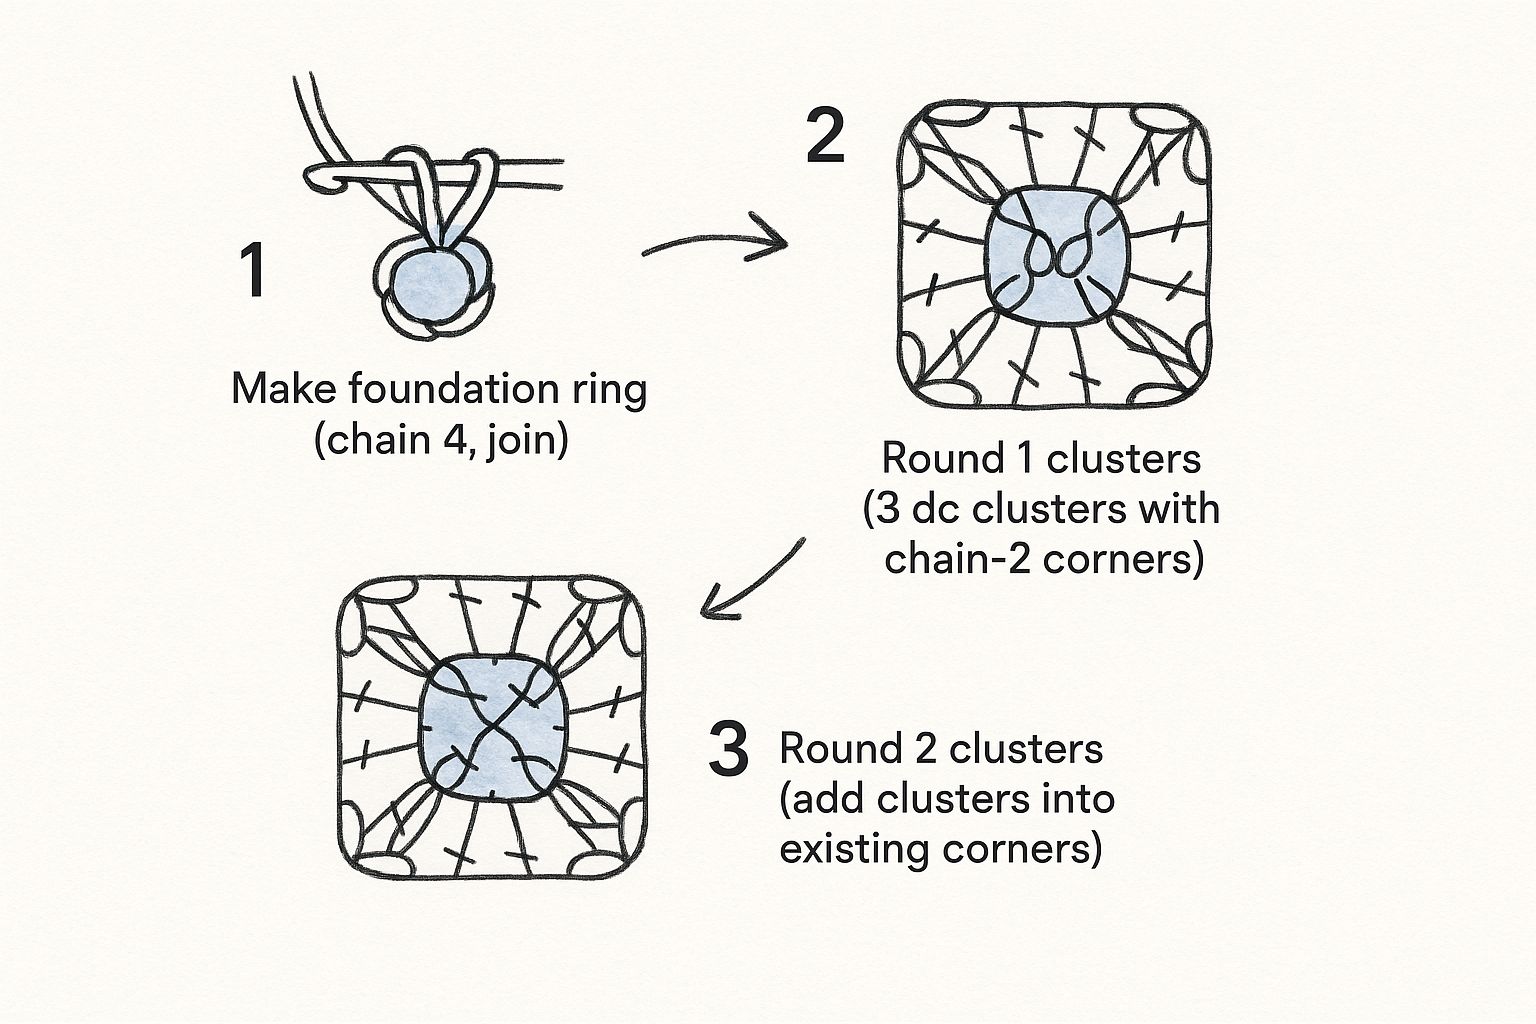
Creating the Foundation Ring
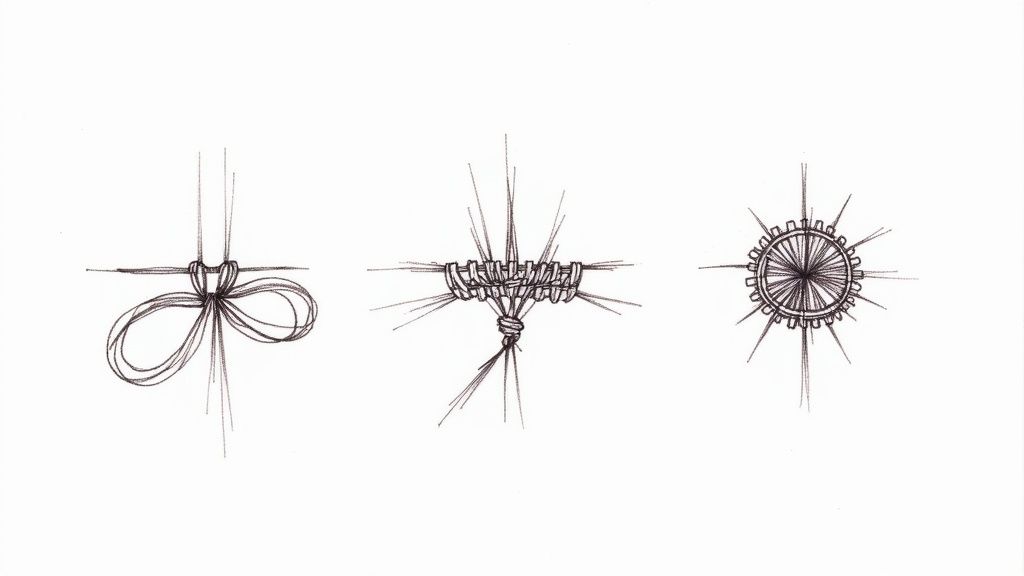
Every granny square begins with a central ring. While you'll eventually hear about the "magic ring," for your very first square, we’re going to stick with the classic, simpler chain method. It’s foolproof and provides a stable, secure center that's perfect for beginners. The magic ring, while useful for creating a tightly closed center, can be a bit tricky to master at first. The chain ring method is more straightforward.
- First, make a slip knot and slide it onto your hook. Cinch it down so it's snug but can still slide easily.
- Next, chain 4 stitches. It will look like a tiny little braid dangling from your hook.
- Now, insert your hook into the very first chain you made (the one farthest from the hook, right next to the slip knot). Make sure to go under both loops of the chain for a secure join.
- Complete a slip stitch to join the ends. To do this, yarn over and pull the yarn through the chain and the loop on your hook in one smooth motion. Just like that, you've formed a small loop. This little ring is the foundation for your entire first round.
This handy visual breaks down the core process, from that first ring to building out the first couple of rounds.
See how each round builds on the last? New clusters just slot perfectly into the spaces you created in the previous round. It's brilliant. This visual illustrates the core logic of the granny square: you work this round's stitches into last round's spaces.
Working the First Round
With your ring complete, it’s time to add the first set of clusters that will form the sides and corners. This round sets the whole structure, so pay close attention here. This is the most crucial round because it establishes the four-sided foundation.
To start, chain 3. This chain is a clever little shortcut that acts as your very first double crochet stitch—you'll see this trick in tons of patterns. It's called a 'turning chain' and it brings your hook up to the correct height for the stitches in that round. Now, working directly into the center of the ring, go ahead and make two more double crochet stitches. Boom. You've just made your first "cluster." That initial chain-3 plus the two double crochets together count as your first group of three.
Next, chain 2. This creates the very first corner space. You’re going to repeat that exact sequence three more times: work three double crochets into the ring, then chain two. [3 dc into ring, ch 2] three times.
Key Takeaway: By the end of this round, you should have four clusters of three double crochet stitches, each separated by a chain-2 space. To finish it off, find the top of that first chain-3 you made and join with a slip stitch to close the circle. Count your clusters and your chain spaces to make sure you have four of each before moving on.
Building Round Two and Beyond
This is the part where you'll have an "aha!" moment and see the beautiful simplicity of the pattern. To kick off Round 2, you need to get your yarn over to the nearest corner. Just slip stitch your way across the top of the next few stitches until you're sitting in that chain-2 corner space. This repositions your yarn so you can start the round in the correct place without creating a visible seam.
From that corner space, you'll work a full corner group: (chain 3, 2 double crochet, chain 2, 3 double crochet). This single, beefy set of stitches creates that classic, sharp granny square corner. The first part (ch 3, 2 dc) forms the end of one side of the square, the chain 2 creates the corner point, and the second 3 dc forms the beginning of the next side.
Now, chain 1 to travel across the side of the square. This chain-1 creates the space where you will work a cluster on the next round. In the next corner space, you'll work another full corner group: (3 double crochet, chain 2, 3 double crochet). Just keep repeating this for the last two corners. After the final corner, chain 1 and join with a slip stitch to the top of the initial chain-3 to close the round.
For Round 3 and every single round after that, the pattern is pretty much the same. You'll work corner groups into the corners, and simple clusters (just 3 double crochets) into the chain-1 spaces along the sides. This easy repetition is what lets your square grow as big as you want. Each round adds one more cluster to each side. So, Round 3 will have two side clusters between the corners, Round 4 will have three, and so on.
Time for the Finishing Flourish
Let’s be real: the little things you do after that final stitch are what separate a pile of handmade squares from a polished, professional project. These finishing steps are the secret sauce that makes your work look truly impressive and ready to become part of something bigger. Taking the time to finish your work properly honors the effort you put into making it.
Two techniques make all the difference: weaving in your ends like a pro and blocking your squares to perfection. Skipping these can leave your project looking a bit messy or, worse, at risk of unraveling down the road. Honestly, mastering these simple skills is just as important as learning the stitches in any good crochet granny square instructions. A beautifully stitched square with messy, unsecured ends is a tragedy waiting to happen.
Weaving In Your Yarn Ends
The biggest rookie mistake? Snipping the yarn tails right next to the knot. I’ve seen it happen, and trust me, it’s a recipe for disaster. Those little ends will wiggle their way free, and all your hard work could start to come undone. The right way ensures your project is secure for years to come. Yarn has memory and stretch, and without being properly secured, tails will inevitably pop out.
Here’s how you do it: thread your yarn tail onto a darning needle. Now, carefully work that needle under the stitches on the back of your square. The trick is to change direction a few times—go up, then down, then maybe sideways—to really lock that tail in place. Weave in one direction for about an inch, then reverse and weave back in the opposite direction through a slightly different path of stitches. This creates friction and makes it nearly impossible for the end to pull free. Once you’ve woven it through at least an inch of stitches (more is better!), you can snip the rest of the yarn with confidence.
My Favorite Trick: I always try to weave ends into stitches of the same color. If I’m finishing a yellow round, I’ll bury that yellow tail in the back of the other yellow stitches. It makes your finishing work practically invisible from the front. This is especially important in projects with high-contrast color changes where a dark tail woven into a light section would be very noticeable.
The Absolute Magic of Blocking
Ever finish a square and notice it’s a little… wonky? Maybe the sides are pulling in, or it just doesn't look perfectly square. This is totally normal, and blocking is the shockingly simple fix. Blocking is just a fancy word for using moisture to relax the yarn fibers, letting you gently shape your square into its final, perfect form. It evens out your stitch tension, opens up the lacey chain spaces, and gives your squares crisp, straight edges and sharp corners. This is especially vital when you plan to join multiple squares together into a larger item like a blanket.
There are a couple of popular ways to do this:
- The Soaking Method (Wet Blocking): Dunk your square in cool water, gently squeeze out the extra moisture (seriously, don’t wring it out!), and pin it to a foam blocking mat. Stretch it gently until it’s a perfect square. Use rust-proof T-pins to secure the corners and edges.
- The Steam-Powered Method (Steam Blocking): Pin your dry square to the mat first. Then, using a steamer or the steam function on your iron, hover over the square. Never, ever touch the hot iron directly to the yarn, especially if it's acrylic, as it can melt or "kill" the fibers! Just let the steam make it damp.
No matter which method you choose, let it dry completely before you unpin it. You will be absolutely amazed at the difference it makes. It’s like a little spa day for your crochet. Your squares will go from looking "homemade" to "handmade," with a professional, polished appearance.
A History Woven in Scraps: The Granny Square's Surprising Past
The humble granny square is so much more than a beginner project—it's a little piece of history. Every stitch you loop connects you to generations of crafters who found beauty and purpose in this simple design. Its story starts way back in the late 19th century, born not from a desire for style, but from sheer necessity. It represents a tradition of thrift, resourcefulness, and the creation of comfort.
This resourceful pattern was the perfect answer to a common problem: what to do with every last, precious scrap of yarn. Back then, textiles were a valuable commodity, and throwing away even the shortest lengths was out of the question. Wool and other fibers were expensive and labor-intensive to produce. The granny square was a stroke of genius, offering a way to turn a jumble of mismatched odds and ends into warm, beautiful blankets, often called "Afghan" blankets. Each square could be worked up with small amounts of different colors, and then the squares were joined together to create a large, functional textile.
Echoes of Quilting Traditions
It’s no coincidence that the granny square’s colorful, pieced-together look mirrored the popular “crazy quilting” fad of the Victorian era. Just as quilters artfully stitched together irregular fabric scraps, crocheters learned to combine vibrant, clashing yarn colors into a cohesive whole. This piecemeal approach was celebrated for its charm and individuality. Each blanket was unique, a record of the yarns that had been used for other, more formal projects.
Ever wonder why so many vintage squares have that iconic black border? It wasn't just a design choice. It was a practical trick to tame the riot of colors, making the whole chaotic mix look deliberate and unified. The dark, neutral border provided a visual frame for each colorful square, bringing harmony to the overall design when the blocks were joined. It was a clever design solution born from practicality.
The earliest known published pattern popped up in 1885 in the Prairie Farmer magazine, which showed folks how to create these small, colorful blocks and join them into an Afghan. You can dive deeper into its story and see how the design has been documented since the late 19th century.
Thinking about this history adds a whole new layer of meaning to your crochet granny square instructions. You’re not just making a square; you’re taking part in a long and beautiful tradition of turning scraps into treasure. You are a link in a chain of crafters stretching back over 130 years.
Uh-Oh, My Granny Square Looks… Weird.
Even with the clearest crochet granny square instructions, sometimes things go a little sideways. Your perfectly planned square might start curling, ruffling, or just looking a bit off. It’s a classic crochet frustration, but don't let a small hiccup kill your creative mojo! Almost every issue has a surprisingly simple fix. Troubleshooting is a normal part of the learning process for any crafter.
Nine times out of ten, the problem boils down to one of two culprits: tension or stitch count. Getting a feel for how tightly you hold your yarn is a skill that comes with practice, so be patient with yourself. If your square starts to look more like a tiny bowl, your stitches are probably too tight. On the flip side, if the edges get wavy and ruffled like a piece of lettuce, your tension is likely too loose. The other major culprit is an incorrect stitch count. Accidentally skipping a cluster or forgetting a chain space can throw off the geometry of the whole piece.
Key Insight: A shockingly common mistake is forgetting the chain stitches between your double crochet clusters. These little chains are the unsung heroes of a flat granny square—they give the next round's stitches the space they need to lie down properly. Skip them, and your square will pull inward and get stiff before you know it. Always double-check that you have a chain-1 between side clusters and a chain-2 in each corner.
Why Is My Granny Square Curling or Ruffling?
This is, hands down, the most frequent question I hear, and the answer is almost always about tension. The good news? It’s an easy fix once you know what to look for.
- Curling Up (The Bowl Shape): This means your stitches are too tight, pulling the whole fabric inward. This is often caused by a tight grip on the hook or yarn. Take a deep breath and consciously relax your grip on both the yarn and your hook. Let the yarn glide more freely through your fingers. If that doesn't solve it, switching to a slightly larger hook size (say, from a 5mm to a 5.5mm) can work wonders by forcing the stitches to be larger.
- Wavy Edges (The Ruffle Effect): Your stitches are too loose, which creates extra fabric with nowhere to go. First, check your corner chains. As a square grows, sometimes reducing the corner chains from two to one is all it takes to tame the waves, especially in later rounds. Alternatively, you might be adding extra stitches or chains by mistake. Otherwise, focus on keeping your tension a little more consistent and firm. A smaller hook can also help tighten up loose stitches.
For a deeper dive into diagnosing and fixing these kinds of issues across all your projects, our guide on mastering your crochet by fixing common mistakes is a lifesaver.
Nailing Those Clean Color Changes
A messy, jagged color change can really distract from an otherwise gorgeous square. The secret to a seamless transition is all in the timing—it’s a simple trick that makes a huge difference. You want the new color to begin with the new round, not halfway through the joining stitch.
Here’s how you do it: work the very last stitch of your round right up until the final step. If you're working a double crochet, that means you'll yarn over, insert your hook, pull up a loop, yarn over, and pull through the first two loops. You'll stop with two loops left on your hook. Now, drop the old color, yarn over with your brand-new color, and pull it through those last two loops to complete the stitch. This move perfectly anchors the new color, setting you up for a clean join and a flawless start to the next round. You can then perform your slip stitch to join the round using the new color, creating a virtually invisible transition.
At Crochet Craze, we believe that learning to crochet should be a joyful and rewarding experience, not a frustrating one. With hundreds of easy-to-follow video tutorials, free patterns, and a supportive community to cheer you on, we provide everything you need to go from beginner to confident creator. Start your creative journey with us today!