Do you feel the urge to pick up your hook again? Overlay mosaic crochet might be the answer. After a busy season, the designer of the Monthly Mosaic Mystery CAL found mosaic stitches brought back their creative spark. They helped beat the tiredness many crocheters face.
This mosaic crochet tutorial will show you why this stitch is so captivating. It uses special stitches to create bold color blocks without dealing with many strands. If you’re new to mosaic crochet, you’ll find the one-color-at-a-time approach makes complex designs easier.
The 2022 Monthly Mosaic Mystery CAL offered small victories: twelve afghan strips released monthly. They came with free charts and optional paid patterns. You can follow along via email updates or the Juniper & Oakes Crochet Community on Facebook. For more details, check the designer’s blog at Monthly Mosaic Mystery CAL.
In this article, you’ll learn the basics of overlay mosaic crochet. You’ll also get a list of tools and yarn notes, step-by-step learning resources, and tips for planning a mosaic blanket. This way, you can start a project like the CAL’s sample blanket, about 50″ x 66″. Ready to create bold, textured graphics with your hook? Let’s start.
Key Takeaways
- Overlay mosaic crochet offers dramatic colorwork while using one color at a time.
- Mosaic crochet beginner lessons focus on back loop stitches and drop-down double crochets.
- The Monthly Mosaic Mystery CAL released monthly strips with free charts and optional paid patterns.
- This mosaic blanket tutorial approach helps you plan a blanket around 50″ x 66″.
- You’ll need simple tools and a little practice to get polished, graphic results quickly.
Why overlay mosaic crochet is so addictive and perfect for your next blanket
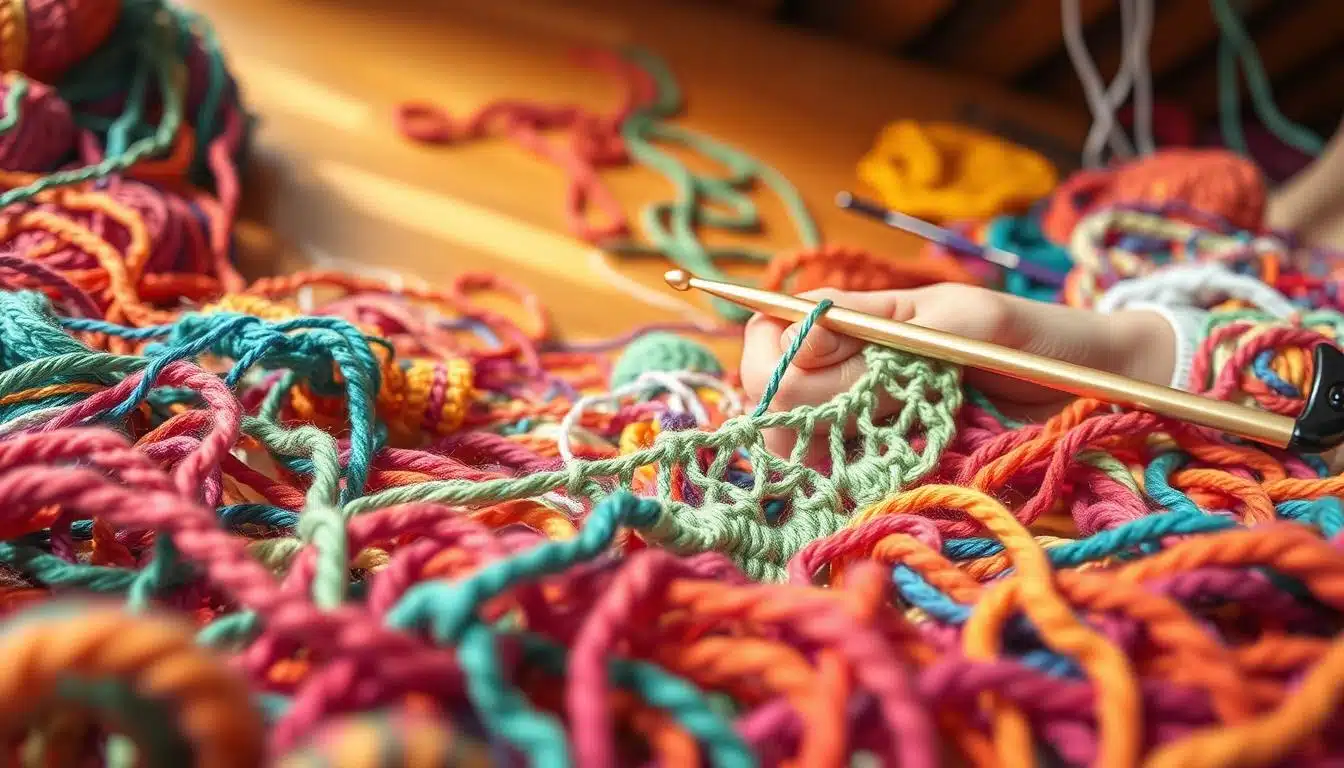
Are you tired of crochet and looking for something fun? Overlay mosaic crochet is perfect. It lets you focus on shapes and colors, not juggling many yarns.
One big reason it’s so appealing is the simplicity of using one color at a time. You work on a row, then start a new one in a different color. This keeps your yarn organized and your hands relaxed.
One-color-at-a-time colorwork made easy
This method avoids long floats and tangled yarn. Each row is a self-contained unit, making big projects like blankets easier. You get to switch colors often, keeping things interesting without the hassle of weaving.
How mosaic lets you “draw” with your hook — a designer’s dream
Mosaic stitch charts look like pixel art. If you’re into illustration or graphic design, you’ll love it. You can plan bold designs and execute them row by row, creating stunning graphic blankets.
Texture, depth, and modern graphic looks without endless color changes
The texture comes from working in the back loop only and using drop-down stitches. This creates a mosaic texture that’s both tactile and eye-catching.
With strong contrast and layered stitches, you get modern, gallery-worthy pieces. Overlay mosaic crochet offers clear visuals, a satisfying feel, and easy color management. It’s perfect for big, ambitious blankets.
What you need to get started: yarns, hooks, and tools for mosaic work
Are you ready to make your first mosaic blanket? First, gather the right supplies for your design. Choose your yarn and hooks before planning your repeats. This avoids size issues later.

Choosing yarn weight and fiber for blankets
For a big, cozy throw, use worsted weight yarn. It’s warm and structured. Lion Brand Heartland in Great Smoky Mountains and Congaree are good choices. Each strip needs about 150 yards, so a 12-strip blanket needs around 1,800 yards per color.
For a lighter blanket, try DK or sport/DK cotton like Tango from St. George. It’s perfect for smaller throws. Designers often use Scheepjes Catona or Schachenmayr Catania for cotton with similar yardage. Pick yarn based on your needs for warmth, breathability, or easy care.
Recommended hooks — why H/5.0 mm or J might be your sweet spot
Many patterns use an H/5.0 mm hook for a good balance. A designer chose H over J for a manageable size and clear stitches. Learn more about hook sizes at crochet hook sizes guide.
Comfort is key. Tools like the Furls Streamline Swirl hook are praised for their grip and yarn glide. While they’re nice, they’re not essential. Some designers use two hook sizes for better control over drape and density.
Swatching, stitch markers, tapestry needle, and other must-haves
Swatching is a must for crochet. It helps check your gauge. Measure across repeats and count rows to ensure your blanket is the right size.
Don’t forget these essentials: stitch markers for tracking, a tapestry needle for weaving ends, blocking tools, and good lighting. Sample blankets can guide you on swatch size, yardage, and hook choice.
| Item | Why it matters | Quick tip |
|---|---|---|
| Yarn (Worsted/DK/Cotton) | Controls warmth, drape, yardage needs | Buy extra yarn; plan ~2,000 yards per main color for large throws |
| H/5.0 mm hook (or J) | Balances size and stitch definition for many mosaic patterns | Try both H and J to see which suits your tension |
| Swatches | Prevents size surprises and adjusts gauge | Make multiple swatches, one in pattern and one in plain stitch |
| Stitch markers & tapestry needle | Keep pattern repeats straight and finish ends neatly | Use contrasting colors for markers and a blunt needle for weaving |
| Blocking tools & good light | Straightens panels and makes chart-reading easier | Block small swatches to see final drape |
Follow these steps to make your mosaic crochet supplies feel curated. Test your yarns and hooks, then commit. Your blanket will thank you.
Understanding overlay mosaic crochet technique
Want to make mosaic blankets pop? The secret is in the overlay mosaic technique. It’s all about a special stitch pattern. You work with front loops free and back loops for stability.
This setup lets new rows stack on top of old ones. It creates sharp, raised designs.
Working in the back loop only (BLO) and why it matters
Working BLO mosaic means focusing on back loops for each stitch. This keeps the front loop free for the next row. Even tension is key here. Uneven tension can ruin the look and shift your design.
Drop-down double crochet and how it forms the overlay
The drop-down double crochet is key. You hook into a front loop from below, pull up a loop, and finish the dc. This creates the mosaic’s floating bars and lines.
Practice these stitches before starting a big project. It helps build muscle memory.
Why rows are worked in one direction and the role of fastening off
Overlay crochet rows go in one direction. You finish a row, fasten off, and start the next with a new color if needed. This keeps colors separate and clean.
Reading charts is important. They show which loops to use for each stitch. With consistent tension and chart reading, your mosaic will look professional.
Mosaic crochet tutorial
Ready to make two colors into sharp shapes? Start with a small swatch, use high-contrast yarns, and pick a hook you like. This simple practice helps you get the back loop only (BLO) rhythm right before moving on to the overlay rows.
Practice step by step with photos or videos. A good mosaic double crochet tutorial will show you how to do BLO double crochet rows. Then, it teaches you the drop-down double crochet that makes the pattern stand out. Watch a clip, rewind, mimic the motion, and repeat until it feels natural.
Step-by-step photo/video plan to learn the basic mosaic double crochet
- Cast on a modest chain for a two-color swatch.
- Work a few rows of BLO double crochet in Color A to set your base.
- Fasten off, join Color B, and follow photo/video frames showing where to drop down for overlay rows.
- Repeat with annotated close-ups until you can do the drop-down without watching.
How to read mosaic charts: symbols for dc, drop-down dc, and sc
- Standard dc appears as a filled or open “T” mark. Count stitches under each symbol.
- Drop-down dc gets a modified symbol or an arrow pointing to a lower row. The chart will tell you which row to pick up.
- sc symbols mark edges or join rows. Designers often annotate where to pick up front loops; follow those notes to avoid guesswork.
Troubleshooting common beginner mistakes with simple fixes
- Mistake: Working in both loops instead of BLO leads to skewed overlays. Fix: place a stitch marker in the BLO until it becomes muscle memory.
- Mistake: Dropping to the wrong row for a drop-down dc makes motifs misalign. Fix: count your rows, mark reference rows on your chart, and cross-check before inserting the hook.
- Mistake: Tight or loose edges when fastening off each row. Fix: trim yarn tails and weave them in as you go; practice consistent starting chains and edge stitches for tidy borders.
If you want curated video help, follow designers like Juniper & Oakes, Daisy Knots, Tinna, and MJ’s Off The Hook Designs. They create clear visuals that speed up learning. Use a mosaic double crochet tutorial and learn to read mosaic charts while keeping a troubleshooting checklist on hand.
Designing your own mosaic blanket: planning, repeats, and size adjustments
Ready to design a mosaic blanket that fits your couch and style? Start with a small swatch. Measure how wide one repeat is with your yarn and hook. This will help you calculate the mosaic repeats needed for your blanket size.
To figure out mosaic repeats, measure the width of a single chart repeat on your swatch in inches. Then, divide your desired width by that number. For example, a 50″ x 66″ blanket will need about 20 repeats if one repeat is 2.5″. Vertical sizing works the same way.
Calculating repeats and estimating finished dimensions
Measuring your swatch is key. Make a 12–16 repeat swatch, block it, and count repeats per inch. Scale up from there. If your rows per repeat are shorter than 66″, add vertical repeats or use a larger hook.
The Timi blanket, at 33″ x 45″, shows how designers adjust size by adding or removing repeats.
Using strips or panels for big projects
Break big projects into strips or panels for motivation and portability. The Monthly Mosaic Mystery CAL uses 12 afghan strips, one each month. This way, you assemble a full blanket at the end.
Make sure gauge is consistent across all panels. Mismatched strip gauge ruins the mosaic blanket dimensions when sewing them together.
Color selection tips — contrast is everything for clear mosaics
Choose colors that read clearly at a distance. Strong light-versus-dark contrast makes mosaics pop. Avoid pairing hues with similar intensity. Instead, pair a light tonal with a dark tonal.
You can use multi-colored strips for variety. But keep two-color high-contrast pairings within each repeat for crisp pattern definition.
Need quick size guidance? Use a trusted size chart like this crochet size reference to compare your calculated repeats against common blanket targets. Adjust repeats, swap hook size, or change yarn weight until your math matches the mosaic blanket dimensions you want.
| Target Size | Repeat Width (in) | Repeats Needed | Rows per Repeat |
|---|---|---|---|
| 50″ x 66″ | 2.5 | 20 | 14 |
| 33″ x 45″ (Timi) | 2.75 | 12 | 12 |
| Lap Blanket 36″ x 48″ | 3.0 | 12 | 13 |
When repeats give awkward numbers, tweak edge stitches for symmetry or add a narrow border. This will help you reach precise mosaic blanket dimensions. Keep notes of repeat counts and color pairings as you work. This way, you can replicate or resize the design later.
Design tip: Test mosaic color contrast tips on a 4–6 repeat swatch in natural light. This confirms the effect before committing to yards of yarn.
Project ideas and pattern inspiration from real CALs and designers
Looking for new mosaic CAL ideas? A year-long monthly mosaic CAL offers skills and keeps you engaged. It gives you small goals, steady progress, and lots of pattern inspiration to share.
The Monthly Mosaic Mystery CAL from Juniper & Oakes released one strip each month in 2022. Each strip builds on the last, helping you improve your skills. You can follow free charts, buy the full pattern on Ravelry, or create your own monthly mosaic CAL.
Monthly Mosaic Mystery CAL: how a year-long project builds skill and content
Working on a monthly project makes big blankets manageable. You learn new stitches, improve your tension, and get better at reading charts. This rhythm helps you create content to share and connects you with others.
Strip themes to try: Peaks & Pillars, Hearts Galore, Mosaic Monstera, Nordic Star
Plan your strip schedule with clear contrast and repeating motifs. Themes like Peaks & Pillars, Hearts Galore, Celtic Knot, and Mosaic Squares are popular. May Flowers, Mosaic Monstera, Tybee Waves, The Plus Side, Lovely Lattice, Mosaic Pumpkins, Thanksgiving, and Nordic Star are also great choices.
For quick wins, try Hearts Galore or Peaks & Pillars. For a botanical look, go for Mosaic Monstera. Add Mosaic Pumpkins or Nordic Star for a seasonal touch.
Designers and resources to follow for overlay mosaic inspiration
Follow creators like Juniper & Oakes for the Monthly Mosaic CAL. Daisy Knots and Tinna offer easy mosaic pattern inspiration. MJ’s Off The Hook Designs shares clear charts and motifs. Adventures in Mosaic Crochet promotes global CALs for collaboration.
Join Facebook groups and post your progress on Instagram. This way, you can share tips, get feedback, and find pattern updates on Ravelry. For more mosaic crochet patterns, check out Joy of Motion Crochet.
| Project Type | Skill Target | Why Try It |
|---|---|---|
| Monthly strip CAL | Pattern reading, repeat planning | Steady progress, community sharing, ideal for monthly mosaic CAL |
| Signature blanket (Timi-style) | Custom motifs, cohesive charts | Personalized design inspired by pets or memories, tassel and finishing tutorials |
| Small accessories (hat, bag, coaster) | Color contrast, overlay techniques | Fast gratification, perfect for testing mosaic pattern inspiration |
| Panel or strip blanket | Seaming, layout planning | Mix-and-match themes like Peaks & Pillars and Nordic Star for visual impact |
| Sampler bundle | Chart interpretation, stitch variety | Gather motifs from mosaic designers to follow and build a reference stash |
Practical pattern resources: charts, written instructions, and video tutorials
You want reliable pattern options that match your learning style and project goals. Free mosaic crochet patterns are great for trying a motif. Paid bundles give you written guidance, multiple charts, and photo tutorials when you need full support and yardage estimates.
When to use free charts vs. purchasing written patterns
Try free charts to practice a stitch repeat or test color contrast before committing to a large blanket. Free charts often focus on the motif, not sizing or finishing tips. If you want step-by-step written rows, gauge notes, and border instructions, buy mosaic patterns Ravelry Etsy or designer shops for the complete package.
When to use free charts vs. purchasing written patterns
Charts are compact and quick to scan while you work. Written patterns save time when you prefer row-by-row clarity. Think of mosaic charts vs written patterns as tools in your bag: charts for visual readers, written instructions for speed and consistency.
Why videos and step-by-step photo tutorials speed up learning
Video makes BLO, drop-down double crochet, and chart reading click faster than text alone. Watching a technique in motion removes guesswork and shortens your learning curve.
You can find curated playlists and bite-sized demos that focus on overlay mosaic moves. Use a video link in a pattern or search a designer’s YouTube list to follow along while you crochet. For written-photo hybrids, a pattern with embedded images helps you confirm each step without replaying footage.
Where to find high-quality patterns and pattern bundles (Ravelry, Etsy, designer shops)
Ravelry remains a central hub for pattern updates, pattern bundles, and user reviews. Etsy hosts many independent shops that sell single patterns and curated sets. Designer sites sometimes sell exclusive bundles with charts, written rows, and video support.
For example, the Monthly Mosaic Mystery CAL offers free monthly charts on the blog and sells the full pattern pack on Ravelry; that model lets you sample the motif then buy the full kit when you’re ready. The Timi blanket sold through Dada’s Place on Ravelry and Etsy includes written instructions, picture tutorials, mosaic charts, and tassel guidance, showing what premium bundles offer.
Want a quick demo playlist? Check a curated video roundup for step-by-step help here. Use those videos alongside your chosen pattern to master tricky repeats sooner.
- Use free charts to test motifs and contrast.
- Buy pattern bundles for full support: charts, written rows, photos, and tips.
- Seek designers who offer mosaic crochet videos and galleries so you can compare finished pieces.
When you decide where to buy, weigh support, extras, and community feedback. If you plan to buy mosaic patterns Ravelry Etsy, look for samples, reviews, and included tutorials. That approach saves time and yields a cleaner, more confident finish.
Finishing touches: borders, envelopes, and caring for your mosaic blanket
You’ve finished the mosaic panels and the colors sing. Now, the last steps make your blanket feel polished and built to last. A neat finish hides tails, frames the design, and sets expectations for how to care for the piece.
Envelope/double border technique
The envelope border crochet method wraps raw ends into a folded edge so you don’t have to weave every tail. Use an extra 10–15% yardage when you plan a mosaic blanket border, or follow pattern notes—Heartland worsted estimates roughly 2000 yards per color for a dual-toned blanket with a double border.
Work the border in rounds that create a pocket along the edge. Fasten off and tuck the working ends into that pocket as you go. This keeps seams tidy and gives a clean frame that reads like a professional finish.
Blocking and yarn-specific care
Blocking evens motifs and sets final dimensions. Cotton yarns like Scheepjes Catona and Schachenmayr Catania usually benefit from wet blocking and gentle reshaping. Acrylics tolerate light steam or squaring while damp. Wool blends often need wet or steam blocking with caution for shrinkage.
Read the care instructions linked in pattern files and on yarn labels. When you wash a finished piece, follow the fiber guidance so you can preserve color contrast and stitch definition. Simple steps in care mosaic blanket routines prevent felting, stretching, and loss of drape.
Selling, gifting, and credit etiquette
If you sell or gift a finished blanket, follow crochet pattern credit etiquette spelled out in the pattern license. Many designers, including Juniper & Oakes, allow finished-item sales with attribution and a link back to the pattern. Tag credit on social media and use requested hashtags when designers ask for them.
Never redistribute pattern files or claim the design as your own. Email photos to the designer, join their test or fan groups, and share your process. That kind of respectful community-sharing builds goodwill and keeps creative work viable for everyone.
| Task | Best Practice | Why it matters |
|---|---|---|
| Border style | Envelope/double border crochet | Hides ends and creates a framed, clean edge |
| Yarn allowance | Add 10–15% extra; ~2000 yd per color for Heartland worsted dual-tone | Ensures enough yardage for borders and seams |
| Blocking | Cotton: wet block; Acrylic: light steam or damp squaring; Wool: gentle wet/block | Sets motifs, evens gauge, preserves shape |
| Washing | Follow yarn label and pattern care mosaic blanket notes | Prevents shrinkage, color bleed, and felting |
| Credit | Provide designer name, pattern link, and social tags per license | Respects creators and allows resale where permitted |
| Community sharing | Send photos, tag designers, join groups | Builds exposure and supports pattern authors |
Conclusion
Overlay mosaic crochet turns simple stitches into bold, graphic blankets. Start with a small swatch and a clear chart. You’ll find it surprisingly easy to follow one color at a time.
Using cotton like Scheepjes Catona or a worsted substitute keeps tension easy. This makes colors crisp for striking contrast.
A strip-based CAL is a smart way to learn overlay mosaic crochet. It breaks a large blanket into monthly strips. This gives steady progress and teaches new techniques.
It also lets you practice reading charts, photos, and videos from designers like Juniper & Oakes, Daisy Knots, and MJ’s Off The Hook Designs.
Gather yarn and hook, swatch for gauge, and pick high-contrast colors. Follow clear tutorials. Whether you join a community project or design your own, this guide will encourage you to try new motifs.
Finish with a modern, textured blanket you’ll love.
FAQ
What is overlay mosaic crochet and why should you try it?
Overlay mosaic crochet is a way to crochet using one color per row. It creates raised motifs by working stitches in the back loop only. This technique lets you “draw” bold, modern graphics with simple color management.
It’s great for when you’re feeling crochet tired. Mosaic can reignite your creativity. You get tactile depth and striking visuals without juggling many yarns.
How does the one-color-per-row approach work?
You work each row in a single color and fasten off at the end. Then, you start the next row with the next color at the starting edge. This method eliminates long color carries and complex joins.
The secret is working BLO for the base stitches. This keeps the front loops available for later drop-down stitches that form the mosaic motif.
What stitch creates the raised mosaic effect?
The drop-down double crochet (sometimes called mosaic double crochet) reaches down to pick up a front loop from a lower row. This makes a raised overlay. Combined with back-loop-only base stitches, these drops build the mosaic “pixel art” pattern.
Which yarns and weights are best for mosaics and blankets?
You can use worsted weight (like Lion Brand Heartland) for big, cozy blankets. Or sport/DK and cotton (Scheepjes Catona, Schachenmayr Catania, or St. George Tango) for lighter, crisper motifs. Choose high-contrast pairs—one light and one dark—to make the pattern pop.
How much yarn will I need for a large mosaic blanket?
Yardage varies by yarn, hook, and gauge. A 12-strip blanket using Lion Brand Heartland might need ~1800 yards per color. Designers recommend buying ~2000 yards per color for borders.
Always swatch and recalc based on your stitches per inch.
What hooks do mosaic designers recommend?
Many designers use H/5.0 mm for manageable blanket size. Some prefer J/6.0 mm for a plusher fabric. Tools like the Furls Streamline Swirl are praised for comfort and yarn glide but aren’t required.
Smaller hooks (e.g., 3.0–3.5 mm) are common with cotton thread-weight samples. Choose a hook that gets you the right gauge and comfortable tension.
How important is swatching and gauge for mosaic projects?
Critical. Swatching tells you stitch and row counts per inch. This lets you calculate repeats for width and length. Because mosaics rely on repeats, inconsistent gauge between strips or panels will make assembly tricky.
Make a swatch in the same yarn and hook you’ll use. Measure repeats, and adjust hook or repeat count as needed.
What tools should you have on hand before starting?
Make a small kit: yarn in your chosen colors, the hook you’ll use, stitch markers to track repeats, a tapestry needle for ends and tassels, blocking tools, good lighting, and access to photo or video tutorials. Swatch and keep notes on stitches-per-inch for repeat math.
How do I read mosaic charts and what symbols will I see?
Mosaic charts are read row by row and show where to work BLO dc, drop-down dc, and sometimes sc for edges. Common symbols: dc for double crochet, a modified dc symbol or annotation for drop-down dc, and sc for single crochet edges. Charts often annotate which front loop to pick up—count rows carefully to avoid misalignment.
Why do mosaic rows work in one direction and require fastening off?
You don’t turn at the end of rows because the front loops must stay available for later drop-down stitches. Fastening off neatens color separation and prevents long floats. Starting each row with a fresh color keeps the mosaic layers clean and sharp.
What are the most common beginner mistakes and quick fixes?
Mistake: Not working strictly in BLO → leads to staggered overlays. Fix: mark BLO with a stitch marker until it’s habitual. Mistake: Dropping to the wrong row for a drop-down dc → misaligned motifs. Fix: count and mark reference rows on your chart.
Mistake: Uneven tension when fastening off each row. Fix: practice consistent starting chains and weave in tails as you go or use the envelope border to hide ends.
How should I plan repeats to hit a target blanket size like 50″ x 66″?
Measure your swatch width per repeat. Divide desired width by swatch repeat width to find the number of repeats needed. For height, measure rows per repeat and multiply to reach your target length, or adjust hook/yarn to change repeat size.
The Monthly Mosaic Mystery CAL used 12 strips to assemble roughly 50″ x 66″, but final size varies with tension and materials.
Is it easier to make a blanket in strips or as one big piece?
Strips or panels make a large project portable, manageable, and forgiving—especiall for CALs. The key is consistent gauge across strips so seams line up. The monthly-strip model also breaks a big project into monthly goals, which many crocheters find motivating.
How do designers recommend choosing colors for mosaic blankets?
Pick high-contrast colors—one light and one dark—for crisp definition. Two-color schemes give the strongest graphic effect. If you want variety, use multi-colored strips while keeping each strip high-contrast internally so motifs read clearly.
What learning resources speed up mastering mosaic crochet?
Use step-by-step photo tutorials and video playlists from designers like Juniper & Oakes, Daisy Knots, Tinna, and MJ’s Off The Hook Designs. Many patterns (e.g., Timi blanket bundles) include picture tutorials, charts, and written row-by-row instructions. YouTube playlists and embedded videos accelerate learning of BLO, drop-down dc, and chart reading.
When should I use free charts versus buying a written pattern?
Use free charts to try a motif or practice technique. Buy written patterns or bundles when you want full support: row-by-row instructions, multiple charts, photo tutorials, yardage estimates, and finishing tips. Paid bundles often include extras like tassel tutorials and envelope border instructions.
Where can I find quality mosaic patterns and CALs?
Look on Ravelry for pattern updates and purchases, Etsy for designer shops, and designer websites like Juniper & Oakes or Dada’s Place. Follow designers’ blogs and Facebook groups (e.g., Juniper & Oakes Crochet Community) for free charts, CAL info, and community support.
How do I finish a mosaic blanket neatly and hide all those ends?
Many designers use an envelope or double border technique to frame the blanket and tuck ends into the border. This gives a clean, framed finish and reduces visible ends. Blocking before adding the border helps square motifs and set dimensions.
What are care and blocking tips for different fibers?
Cotton (Scheepjes Catona, Schachenmayr Catania) benefits from wet blocking and reshaping; many cottons are machine washable on gentle cycles but check yarn labels. Acrylic tolerates light steam or squaring while damp. Wool blends may need hand washing and gentle blocking. Always follow yarn-specific care instructions.
Can I sell or gift items made from paid mosaic patterns?
Generally, you can sell finished items if you credit the designer and link to the pattern, but check the pattern license. Juniper & Oakes and many designers request attribution and a link back. Never redistribute pattern files or claim the pattern as your own work.
How can joining a CAL help me learn mosaic crochet?
A CAL (like the Monthly Mosaic Mystery CAL) breaks a large blanket into monthly strips and releases charts progressively. That structure builds skills step-by-step, provides tutorials and community support, and keeps you motivated. You can follow free charts or purchase the full written pattern for extra help.
What’s a simple step-by-step plan to start learning mosaic today?
Start with a small swatch using two high-contrast colors. Practice BLO double crochet rows, then learn drop-down double crochet with photo or video guidance. Read a simple chart and make a repeat or two. Join a designer playlist or a CAL for guided strips, then scale repeats to design your blanket.
Which designers and communities are best for mosaic inspiration and help?
Follow Juniper & Oakes, Daisy Knots, Tinna, MJ’s Off The Hook Designs, and Dada’s Place. Join Facebook groups like Juniper & Oakes Crochet Community, browse Ravelry project pages, and follow pattern hashtags on Instagram to share progress, ask questions, and find inspiration.