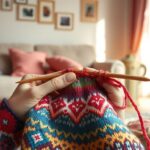
A colorwork knitting chart makes stranded knitting easier. It turns complex instructions into a simple grid. Fair Isle patterns, worked in the round, show how your work will look on the right side.
Think of a chart as a map. Start at the bottom-right and move left, then up row by row. Each square represents one stitch and row in knitting in the round. This view saves time and helps avoid mistakes when working with two colors.
Experts like Alice Starmore say charts are key to progress. Begin with simple doodles and two-color rounds. Then, move on to more complex yokes and multi-color projects. For a beginner’s guide, check out this resource from Knitting Therapy: colorwork knitting patterns for first-timers.
Key Takeaways
- A colorwork knitting chart gives a visual map of stranded knitting motifs.
- Fair Isle chart reading begins at the bottom-right and moves upward.
- In knitting in the round, each chart square equals one stitch per round.
- Charts reduce written complexity and help you manage multiple yarns.
- Start with two-color, short-float projects before attempting multi-color yokes.
Why You Should Use a Colorwork Knitting Chart for Your Next Project
Charts are great for getting cleaner results and avoiding mistakes. They show a pattern at a glance, making it easier to follow without counting all the time. This is why charts are essential for colorwork—they help keep your work smooth and error-free.
Visual clarity beats written chaos
One chart row can replace a long text like “knit 1 green, 1 blue, 1 green, 7 blue then repeat.” You can see the pattern on the fabric right away. Small marks or shading help guide you, making the pattern clear and easy to follow.
Speed and accuracy when knitting in the round
Charts are read from the bottom-right, matching how you knit in the round. This makes you faster and less likely to make mistakes. They also simplify complex repeat instructions, letting you knit more and read less.
Why charts are specially helpful for stranded/fair isle techniques
Stranded colorwork means managing yarn with every stitch. Charts help plan color changes and yarn lengths before starting. They make learning and mastering complex patterns easier, boosting your confidence with each row.
Understanding Chart Basics: Reading Direction, Squares, and Repeats
Charts are like tiny maps for your knitting. Learning to read them makes them feel friendly. This guide covers the basics: starting, understanding each square, and chart repeats in the round.
Where to start: bottom-right is your new best friend
When knitting in the round, start at the bottom-right. Read the chart from right to left. Focus on one row at a time.
Block out everything but the current bottom row when learning. This helps fix the chart reading direction in your hands and eyes.
Each square equals one stitch: translating chart width and height to stitches and rounds
Every square equals one stitch. Chart width shows the number of stitches in a repeat. For example, a 24-square chart means a 24-stitch repeat.
Chart height shows the number of rounds or rows before the motif finishes. Different square colors match different yarn colors, making color changes easy to see.
Chart repeats and working a motif around a round
For repeating motifs, work the chart repeat around the round until it’s complete. Then, move up a row and repeat. Charts often show repeats with bold lines or marks every five squares to help you count quickly.
If working flat, note that reading direction alternates. But in the round, it stays consistently right-to-left for each round.
Break down big charts into single-row tasks and smaller repeats. Small, steady wins build speed and confidence. Practice reading charts, following directions, and lining up repeats while remembering squares = stitches.
Colorwork Knitting Chart
Charts should save time and avoid mistakes. Treat the chart as your guide: follow it from bottom to top, stitch by stitch. Clear color rules help keep your work consistent and make errors easy to find.

Color conventions: MC, CC1, CC2 and how they map to chart colors
Patterns usually use Main Color (MC) for the background, Contrast Color 1 (CC1) for the main design, and Contrast Color 2 (CC2) for accents. On charts, you’ll see white, light gray, and dark gray or the actual yarn colors for MC, CC1, and CC2. Always use one yarn for each color throughout the project.
Designers might add small marks inside squares for extra guidance. These marks are just visual helpers, not extra instructions. Always check the pattern notes or the designer’s legend before changing a color choice.
Using high-contrast vs. realistic colored charts
High-contrast charts are best for knitting in low light or if you have vision issues. They have bold fills and clear borders to help avoid mistakes and speed up counting. Use them to learn a pattern, then switch to a realistic chart to see how it will look finished.
Choosing between high-contrast and realistic charts affects how colors appear. Dianna Walla and other designers suggest swatching to see which yarn looks dominant on your fabric. This is important when MC and CCs are similar in color.
Interpreting chart keys and symbols for non-standard stitches
Charts usually assume stockinette in the round unless the key says differently. Any special stitches or slipped stitches must be explained in the chart keys and symbols. Non-rectangular charts with missing squares mean you need to change stitch counts; the key should explain how.
Advanced tutorials help with symbol meanings and when to look up pattern notes or take a class. If a symbol seems unclear, stop and compare it to the legend and written instructions before moving on.
| Element | What to look for | Practical tip |
|---|---|---|
| MC CC1 CC2 chart colors | Consistent mapping of yarn to square color | Annotate your printed chart with yarn names and keep a swatch |
| chart color conventions | White/light/dark fills or true yarn shades | Use high-contrast knitting charts for tracking, realistic colors for preview |
| chart keys and symbols | Definitions for non-standard stitches and missing squares | Mark ambiguous symbols and check designer notes or interpreting-color-work-charts for examples |
- Repeat markers: place stitch markers to show each 12-stitch or designer-specified repeat.
- Row tracking: use sticky notes or a magnetic board to mark current row when charts run long.
- Back-of-work care: keep floats loose; tight floats will pucker the fabric.
Techniques That Make Charts Work for You: Yarn Holding and Float Management
Charts are only as useful as your skills. Managing yarns and floats is key in stranded knitting. Master these, and the chart becomes a guide, not a mystery.
Options for holding multiple yarns: same hand, split-handed, and continental vs. English
You can hold both yarns in one hand, or each in a different hand. You can also choose between continental or English tensioning. Try each on a swatch to find your rhythm. Split strand knitting lets you control each color easily.
English style might feel natural if you’re used to it. Continental style keeps one hand calm and can reduce tension. Mixing styles? Practice until your gauge is even.
Float length and tension: keeping your fabric even
Floats are the yarns carried across the back of your work. Too tight, and the fabric puckers. Too loose, and it snags or gaps. Aim for floats as wide as two stitches.
Practice with short strips to match tension across colors. Watch Sarah Keen or Craftsy for tips on stranded tension and managing floats.
Trapping long floats and avoiding puckering
For long floats, twist the yarns once or twice on the wrong side. This anchors the float without bunching. It keeps your colorwork smooth.
Use small, regular traps to avoid gathering. Trapping in more places keeps your design intact.
Choosing Beginner-Friendly Projects That Match Chart Skills
Start with projects that are easy to learn. Look for pieces knitted in the round, using only two colors per round. They should have short floats to keep things simple and fix mistakes easily.

Begin with cowls, simple hats, or narrow bands. A small cowl is great for practicing colorwork without worrying about shaping. Hats teach you how to work with curves, and bands are perfect for practicing before moving to full garments.
Choose patterns that are clear about their requirements. They should be knitted in the round, use two colors per round, and have short floats. This makes it easier to focus on learning chart reading and managing floats.
Pacific Knit Co’s doodle charts are perfect for beginners. They offer 24-stitch formats for quick practice. For more structured projects, try the Dessau Cowl or the Netty Cowl to see how designers manage short floats.
Easy Fair Isle patterns are great for learning colorwork. They teach you how to change colors smoothly and usually avoid long floats. If you learn better from videos, find tutorials that explain colorwork and yarn management.
Start with small yokes or simple motifs for your first projects. Try Andrea Rangel’s Amira pullover or Mary Jane Mucklestone’s Muckle Mitts for confidence-building sections. Kate Gagnon Osborn’s Selbu Modern hat and Alexis Winslow’s Vega hat are also good choices for beginners.
Begin with doodle charts and cowls, then move to small yokes or hats. Bookmark a guide like stranded colorwork knitting guidance for quick tips on charts and floats.
Keep your projects short and rewarding. Each finished piece helps you get better at rhythm and tension control. This steady improvement will make you more confident in your colorwork knitting skills.
Advanced Chart Challenges and How to Tackle Them
Stepping up from simple motifs, charts become more complex but rewarding. You’ll face patterns with changing stitch counts and rounds with three colors. Odd-shaped charts also drop squares where stitches disappear. With a plan, your confidence will grow quickly.
Handling changing stitch counts in yokes, mittens, and hat crowns
Charts with changing stitch counts have gaps where stitches disappear or appear. It’s important to read the key carefully. This tells you if a missing square means a decrease, a stitch that lives on the next round, or no stitch at all.
Mark increases and decreases on a separate chart copy. This small habit can save you from re-knitting an entire yoke.
Three-color rounds and when to attempt them
Three-color rounds add depth but require tight float control and confident trapping. Start by practicing two-color rounds until your floats are flat and tension is even. Then, try multi-color rounds on small swatches before starting a full Gloaming-style mitten or complex yoke.
Reading non-rectangular charts and missing square conventions
Non-rectangular charts use missing square charts to show where rounds narrow or widen. Designers should explain their layout in the chart key. If the key is unclear, translate the chart to a stitch list for the first few rounds. This helps confirm stitch counts on your needles.
- Copy critical rows by hand to track changing stitch counts.
- Use a contrast marker for three-color rounds so you can see dominance and floats.
- When you see missing square charts, match each row to actual stitches before you knit it.
Video lessons from experienced teachers can help you progress faster. Choose tutorials that cover trapping, tension checks, and tracing non-rectangular charts step by step. With practice, those challenging advanced colorwork charts will become manageable and enjoyable.
Tools and Tricks to Make Chart Knitting Easier
Choose a few simple tools to make chart knitting easier. Highlighters, sticky notes, or a magnetic board can help. They keep track of rows and prevent mistakes.
Digital tools like DoodleHQ and Pacific Knit Co. offer zoom and marking features. They help you focus on tricky parts without damaging your pattern.
Use highlighters, sticky notes, or a magnetic board to track rows
Highlight each row as you finish it to avoid mistakes. Use sticky notes for skipped sections. A magnetic board keeps your place and moves with you.
These tools help you stay on track and build confidence. They’re key for long, complex motifs.
Swatching with your chosen colors to test dominance and tension
Make small swatches to see which color leads. Pacific Knit Co. shares tips on color dominance. Swatches also show how floats affect gauge and tension.
They help you adjust before starting a big project. This ensures your work looks great.
Video resources and classes that teach good stranded habits
Beginner classes from experts like Mary Jane Mucklestone and Dianna Walla are helpful. Johnny V.’s YouTube has step-by-step guides. These resources help you practice and improve.
Use both analog and digital tools for the best results. Track rows with tools while following tutorials. Then, test color dominance with swatches. This approach makes your knitting neater, faster, and more enjoyable.
Troubleshooting Common Colorwork Chart Problems
Charts can seem like a secret code at first. But, take a deep breath. Start by breaking the chart into the bottom row. Work on one small repeat at a time.
Charts feel intimidating — break them into bite-sized rows
Begin by focusing on the current bottom row. Knit it until it feels comfortable. Use a sticky note or highlighter to mark your repeat.
If you lose focus, stop and count your repeat. This way, you can pick up where you left off easily.
For quick tips on fixing mistakes, check out this guide: fix knitting mistakes. It shows how to make small repairs to keep your project going.
Fixing uneven tension and correcting tight floats mid-project
Uneven tension often comes from tight floats. Gently stretch the fabric and tug the floats to loosen them. If a float looks better long, let it span more stitches.
For mid-project fixes, ladder back a few stitches or loosen the nonworking yarn. Practice on a small swatch first. This will help you fix color dominance and tension before it’s too late.
When the chart and written instructions disagree — how to decide
When charts and written instructions don’t match, check the chart key and pattern notes first. Designers like Debbie Bliss and Brooklyn Tweed often show the right-side layout on the chart. This makes the chart the main guide for color.
If you’re unsure, look for pattern errata or read designer notes. Join community threads to compare charts and written instructions. Choose the version that matches the visual motif and your stitch count.
- Pause and re-evaluate technique if mistakes repeat.
- Step down to simpler charts to rebuild confidence.
- Watch targeted tutorials to sharpen a single skill like correcting floats.
Good chart troubleshooting is about method, patience, and practice. View each error as a clue. Fix colorwork tension early to make the rest of the project smoother.
Conclusion
Colorwork is easier than it seems. Most projects use stockinette in the round. You just need to master yarn holding and managing floats.
Start by reading charts from the bottom-right, one row at a time. Keep your floats neat. This way, complex patterns become simple steps.
Begin with small projects like doodle charts or 24-stitch repeats. Swatch to check color and tension. Use tools like highlighters or a magnetic board to track your progress.
Swatching and blocking show how yarn weight affects your work. Thinner yarn adds detail, while heavier yarn creates bold graphics. For a guide to stranded charts, check out Churchmouse’s sampling of stranded colorwork.
Plan your next steps in colorwork with graded instruction. Use video lessons, local classes, or trusted designers. Start with simple two-color rounds and move to more complex yokes and mittens.
Learn Fair Isle charts by practicing slowly. Carry only two colors at first. Keep your floats short and increase complexity as your tension improves. For tips on reading charts, check out Crochetcraze’s guide.
See each chart as a map and a promise. It shows where colors go, but swatching and blocking reveal how they’ll look on needles. With clear charts, measured swatches, and steady practice, you’ll become confident. You’ll be ready to tackle Fair Isle crowns, cuffed mittens, and bold, multi-color yokes.
FAQ
What is the fastest way to understand a colorwork knitting chart?
Start at the bottom-right and read one row at a time. Treat each square as a single stitch. Follow the chart right-to-left when knitting in the round.
Block out everything but the current bottom row while you learn. Use a highlighter, sticky note, or magnetic board to keep your place.
Why use a chart instead of written instructions for stranded or Fair Isle knitting?
Charts condense complex color instructions into a visual grid. A 24-stitch repeat shown as squares is far clearer than a long sentence of color changes.
Charts reduce counting mistakes and lower cognitive load. This means you knit faster and with fewer errors.
How do chart width and height map to stitches and rounds?
Chart width equals the number of stitches in a repeat; chart height equals the number of rounds. For a 24-square chart, you have a 24-stitch repeat.
Repeat that chart section around the circumference until you finish the round. Then move up to the next chart row.
How should I read chart repeats around a round?
Identify the repeat (often marked with bold lines every 5 stitches). Then work that repeat continuously around the round.
When the round is complete, return to the bottom-right of the next chart row. Repeat right-to-left again.
What do MC, CC1, and CC2 mean on a chart?
MC is Main Color (background), CC1 is Contrast Color 1 (motif), and CC2 is an accent. Chart squares use different fills or colors to represent those yarns.
Always use the same yarn for the same square color for consistency.
Should charts use realistic yarn colors or high-contrast fills?
High-contrast fills or clear shading can make motifs easier to read, even on small doodle charts. Realistic colored charts help you visualize the finished piece.
Choose whichever makes reading easier for you. Stick to consistent fills throughout the pattern.
What if a chart includes unusual symbols or non-standard stitches?
Refer to the chart key. Most stranded charts assume stockinette in the round. Any increases, decreases, or textured stitches must be defined in the key.
If the key is ambiguous, check designer notes, pattern errata, or community discussions.
How do I hold two yarns without tangling or tension issues?
Try options and pick what feels natural. Hold both yarns in one hand, split them between both hands, or switch between continental and English styles.
Practice on swatches and follow graded video drills. This builds consistent tension for your chosen method.
How long should floats be and how do I manage them?
Keep floats roughly the width of the stitches they pass behind. When floats exceed about an inch, trap them by twisting the two yarns.
This anchors the float and avoids long snag-prone strands. Even floats prevent puckering and dense fabric.
What can I do if my floats are too tight mid-project?
Gently stretch the fabric and tug floats to loosen tension. You can ladder back a few stitches to even things out.
Practice on swatches to avoid repeating the problem. Adjust how loosely you carry the non-working yarn.
What are ideal beginner projects for stranded knitting charts?
Choose projects knitted in the round with no more than two colors per round and short floats. Good starters include simple cowls, basic hats, bands, and tube patterns intended to be joined.
Pacific Knit Co.’s doodle charts and 24-stitch repeats are excellent for beginners.
Can you name approachable patterns and designers for beginners?
Try the Dessau Cowl by Carrie Bostick Hoge, Netty Cowl by Ien Sie, Amira pullover by Andrea Rangel for a small yoke, Muckle Mitts by Mary Jane Mucklestone, Vega hat by Alexis Winslow, Selbu Modern hat by Kate Gagnon Osborn, and Funchal Moebius by Kate Davies.
These keep floats short and color changes manageable.
How do I tackle charts with changing stitch counts, like yokes or hat crowns?
Non-rectangular charts will show missing squares where stitches don’t exist. Carefully read the chart key; work row by row and follow the designer’s layout for decreases or increases.
When unsure, consult pattern notes or video tutorials for guidance.
When should I attempt three-color rounds or multi-color yokes?
Wait until you’re comfortable with two-color rounds, trapping, and even floats. Start with bite-sized doodle charts and graded lessons.
Then progress to three-color rounds once your yarn handling and tension are reliable.
What tools help me keep track of charts and reduce mistakes?
Use highlighters, sticky notes, magnetic boards, or chart apps like DoodleHQ. These tools make it easy to mark your current row, isolate repeats, and avoid losing your place.
This is helpful on larger or denser charts.
How important is swatching for colorwork charts?
Critical. Swatching lets you test color dominance, see how floats affect gauge, and adjust yarn choices before committing to a full project. Pacific Knit Co. and other teachers strongly recommend swatching for reliable results.
What if the chart and the written instructions disagree?
The chart is usually authoritative for stitch-by-stitch color because it maps directly to the finished motif. Check the chart key and pattern notes first.
If ambiguity remains, look for errata, designer clarifications, or community consensus. Choose the version that matches the visual motif and stitch count.
My chart looks intimidating — how do I not panic?
Break it into bite-sized tasks: work one bottom row at a time, focus on a small repeat (10 or 24 stitches), and treat each as a simple sequence.
Use doodle charts and graded video lessons to build confidence step by step.
How do I progress from beginner charts to advanced colorwork?
Follow graded instruction—classes, designer tutorials, and YouTube series like Johnny V.’s. Practice yarn handling drills, swatch regularly, and increase chart complexity slowly.
Start with bigger repeats, then multi-color rounds, then integrated increases/decreases.
Are there quick fixes if my color dominance is wrong after finishing a section?
If dominance or contrast is off, consider reworking the section with a different yarn choice. Adjust dominance by swapping which color is carried close to the needle.
For small issues, blocking and careful stretching can help. But swatching first avoids most surprises.